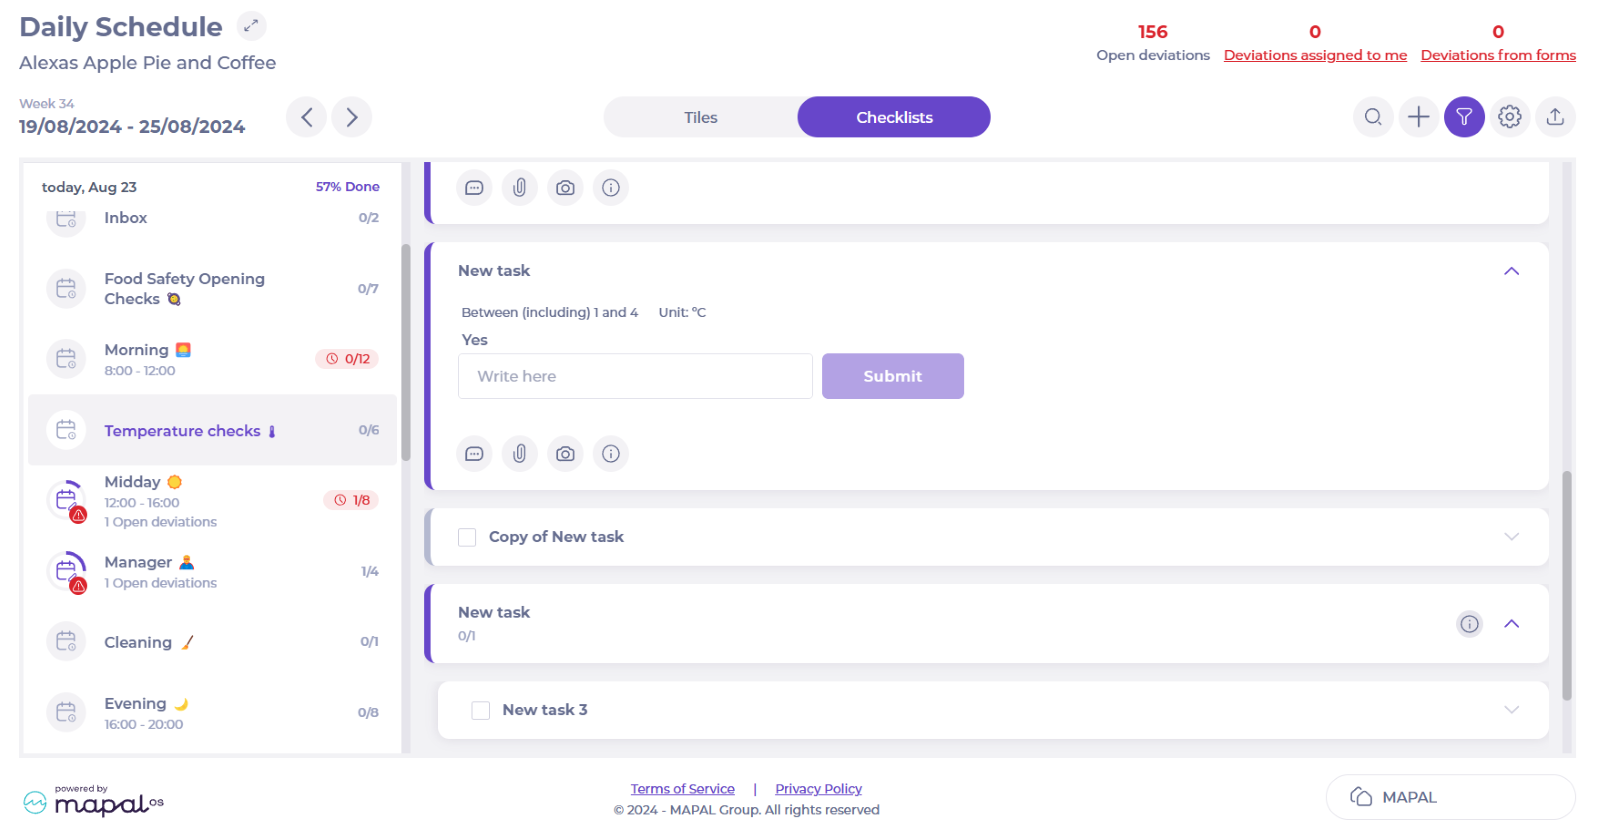
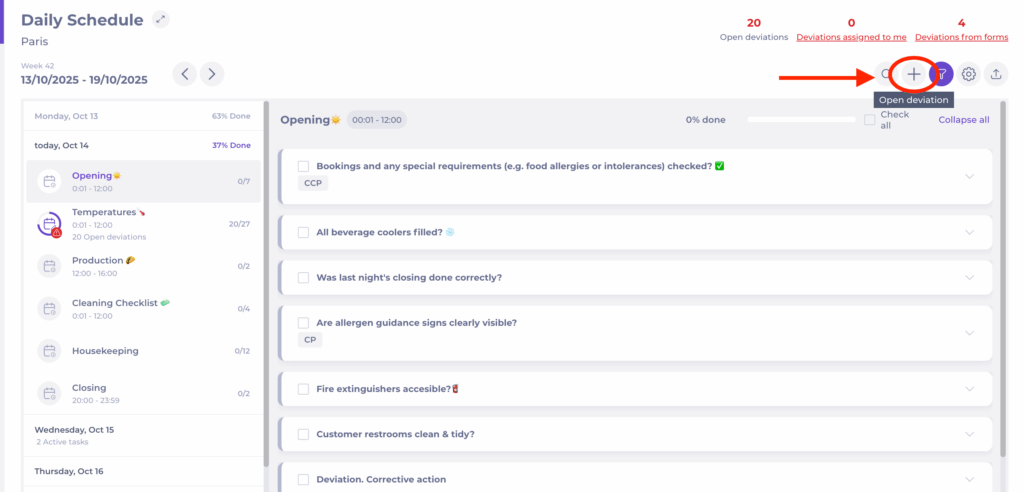
Select the Checklists view at the top of the screen.
Select the +Open deviation button.
On desktop, the button appears at the top of the checklist.
On mobile, the option is available from the checklist action menu (three dots).
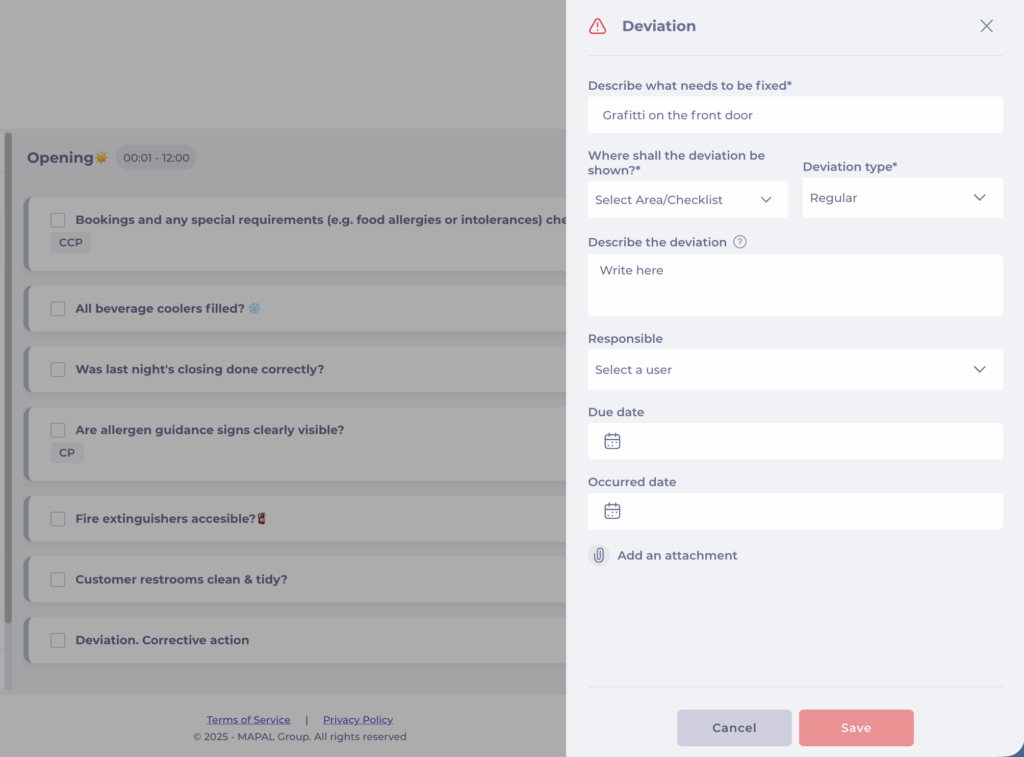
Complete the required fields to describe the deviation:
Describe what needs to be fixed*: give a short, clear name for the issue.
Where shall the deviation be shown?*: Select the Area/Checklist where you want the deviation to appear.
Deviation type*: Describe what type of deviation is this.
Describe the deviation: explain what happened and how it was identified.
Responsible user: assign who will handle the deviation.
Due date: specify when the corrective action should be completed.
Occurred date: specify when the deviation happened.
Add an attachment: upload a file or picture to add more relevant information to the reported deviation.
Select Save to create and publish the deviation.
The deviation will now appear in the selected checklist and can be managed like any other compliance deviation; tracked, resolved, and closed once the corrective action has been completed. To know more about how to respond to deviations, see Respond to deviation reports.
Sort and move tasks at a local level
Start from: The Compliance local overview.
Sort tasks
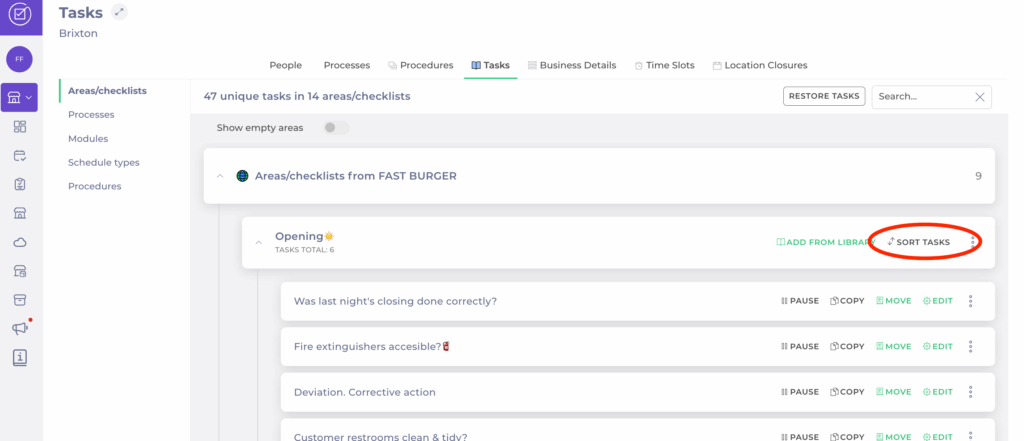
Navigate to My Location > Tasks.
Open the specificarea you wish to edit.
In the checklist, select Sort Tasks.
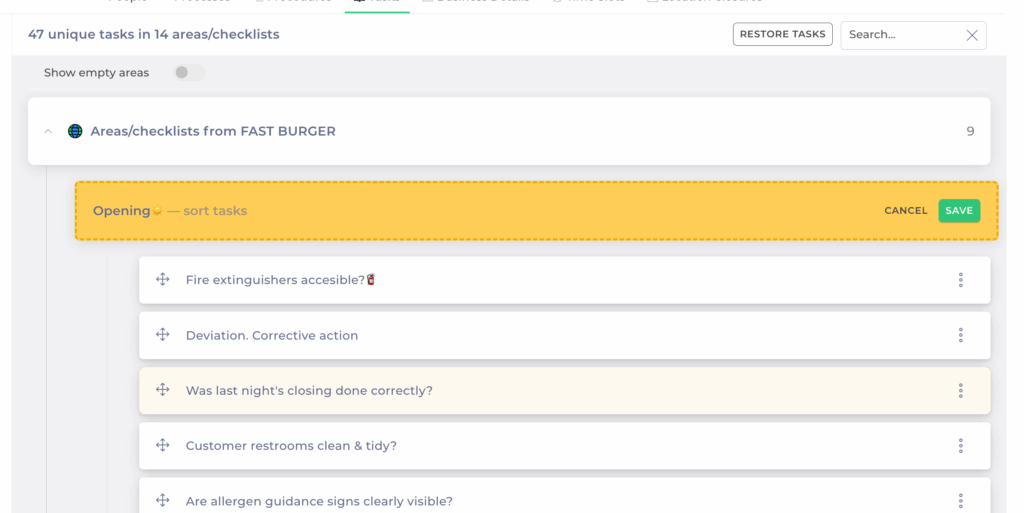
In the task list, drag and drop to change the order of tasks.
Once you have reordered, select Save to register the changes.
Notes: Changes take effect immediately for your site. Central templates remain unchanged.
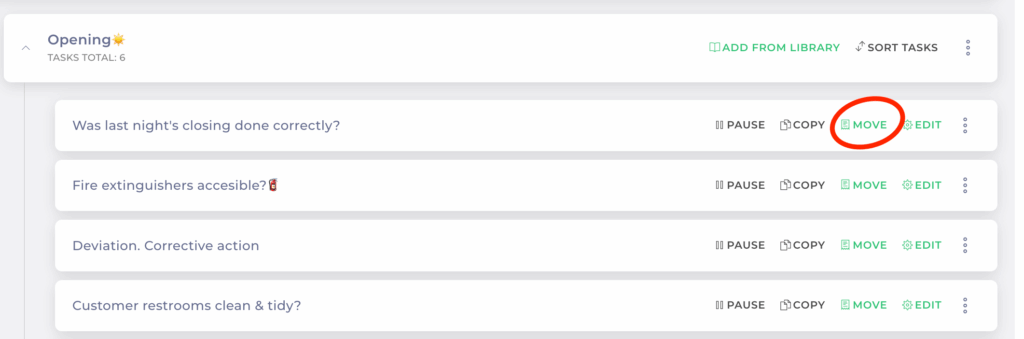
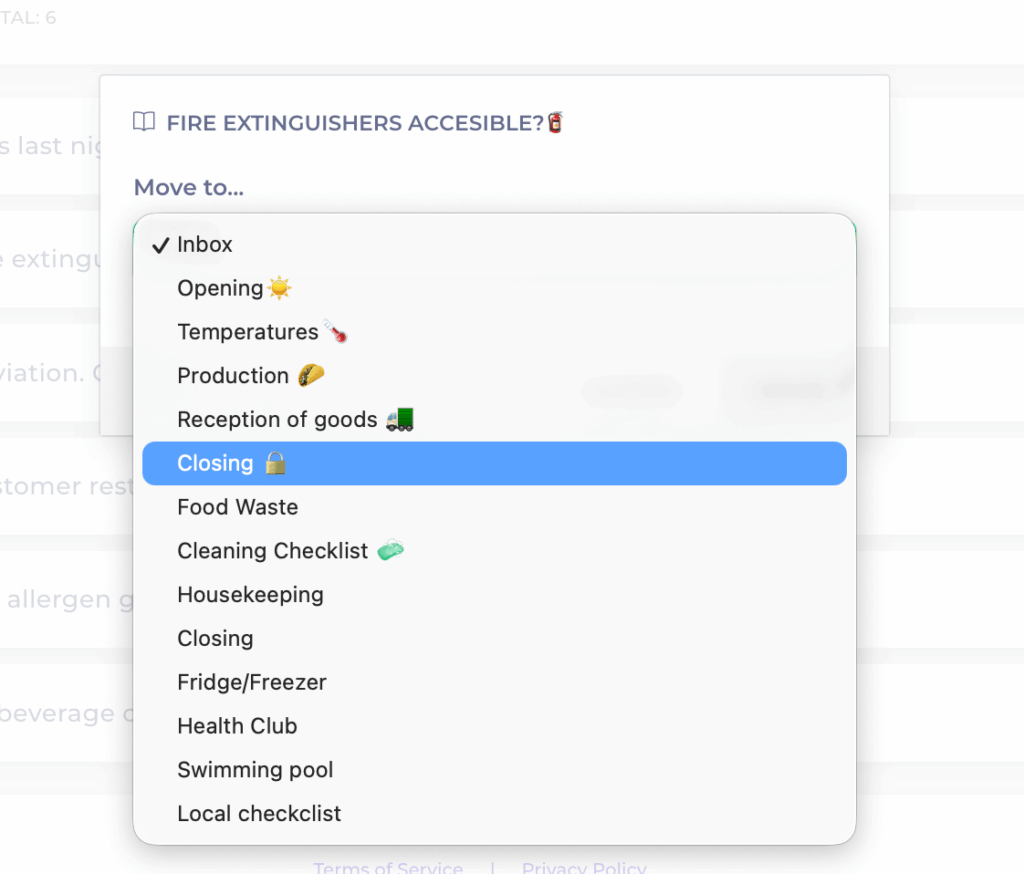
Move tasks between checklists
You can also move tasks between checklists at the local level:
Locate the task you want to move.
Use the Move option.
Choose the destination checklist from the dropdown.
Select Move.
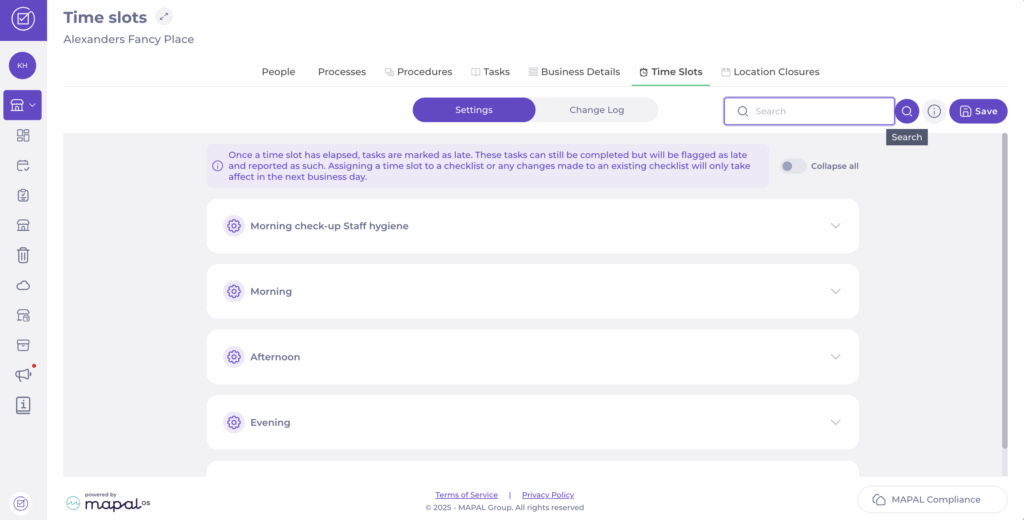
Manage time slots at a local level
Start from: The Compliance local overview.
What are time slots?
Time slots define specific periods during the day (for example, Morning, Afternoon, Evening) and determine when checklist tasks should be completed.
While tasks can still be answered at any time, those completed after their assigned time slot will be marked as late. Only tasks completed within their designated time slot are counted as Answered in time in the central overview tile.
Adjust time slots
Navigate to My Location > Time slots.
Use the Search button to find a specific time slot from the list; for example, Evening.
Once you find the time slot, set the start (From) and end (To) time for it.
Select Save to register the changes.
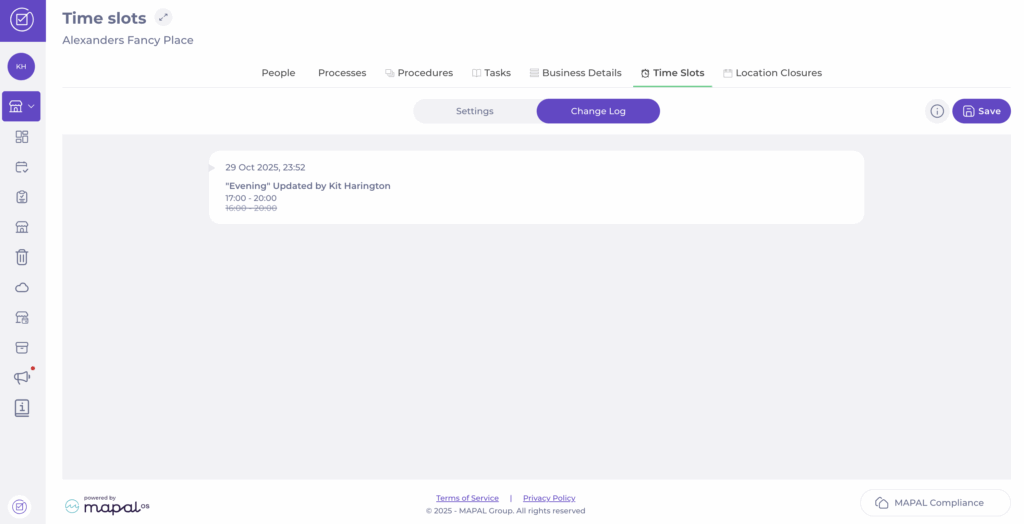
Track changes in time slots
Select the Change Log tab in the Time slots screen.
A list with all changes made to your time slots will appear. Here, you will be able to see:
Date and time the change was made.
Name of the time slot modified.
Name of the user who modified it.
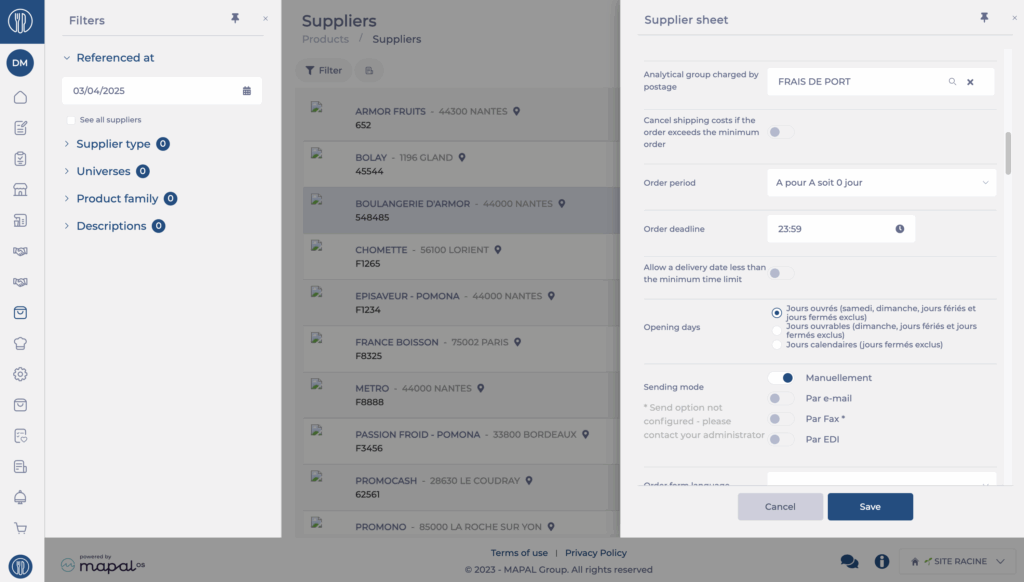
Order deadline and cutoff time
Start from: The Easilys menu.
Entering the deadline and order cutoff time allows Easilys to know until what time an order can be sent to the supplier according to the expected delivery date. However, it is possible to relax this rule by activating the option Allow a delivery date less than the minimum deadline. In this case, the order outside the deadline will be flagged to you but you can still validate it.
Note: Even when activating the option Allow a delivery date less than the minimum deadline, it remains impossible to send an order, even manually, if the delivery date is a past date.
The order deadline takes into account the opening days configuration. Thus, if your supplier works on business days, Saturday, Sunday as well as holidays and closed days will be excluded from the calculation.
Example: If you have an order deadline of 2 days and you try to send your order on Friday for the following Monday, this action will be impossible if the supplier is configured for business days. If it is configured for calendar days, then it will be quite possible to send the order, because you will then be three days before the desired delivery date.
The cutoff time is also important: if you respect the order deadline, but not the order cutoff time, then sending will be impossible.
Example: If you have an order deadline of one day and an order cutoff time at 12pm and you try to send the order on Thursday at 2pm for the next day, this will not be possible. You must send the order before noon.
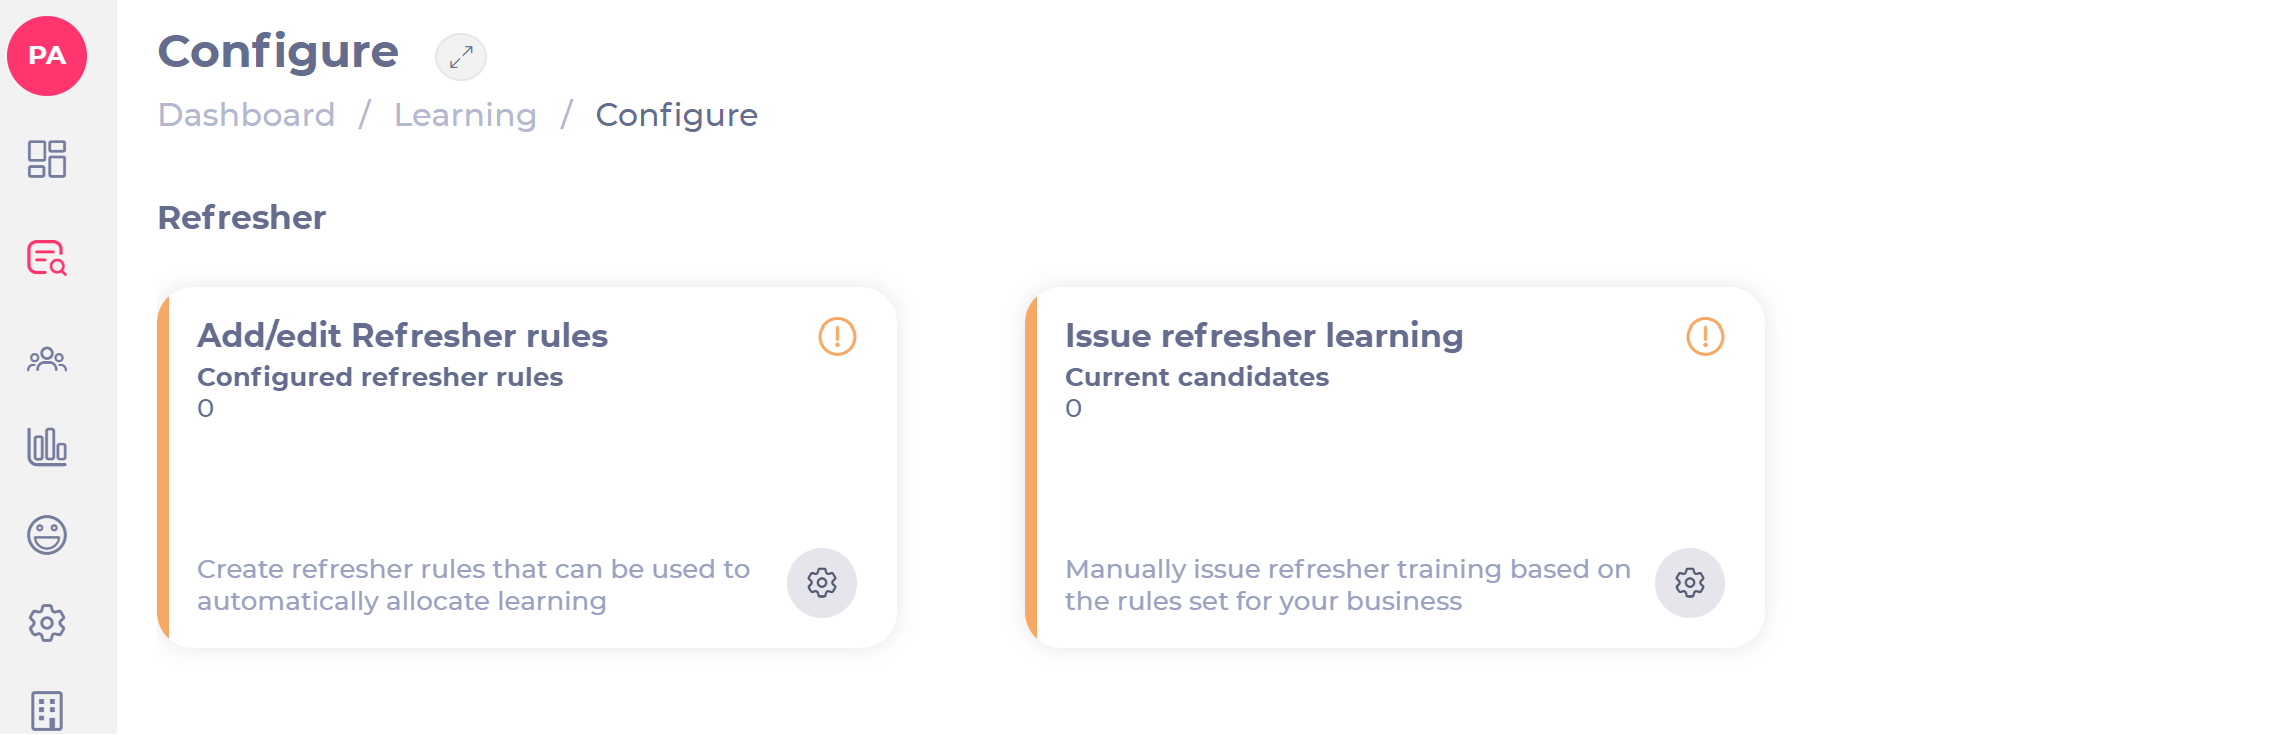
Add and edit refresher rules
Start from: The Flow Learning Dashboard.
How refresher rules work
Refreshers are triggered by completed items listed on a learner’s profile. If an External Training (historical training) is completed and a refresher rule is set, the system automatically assigns the refresher module after the defined number of days.
The refresher module must be included in the learner’s Training Structure for the allocation to take place automatically.
When a Workbook is included in a Training Structure and subject to a refresher rule, the Workbook is also issued automatically according to the refresher schedule.
When an External Training item is included inside a Collection and is subject to a refresher rule, it is also refreshed automatically according to that rule, in the same way as other training items.
To assign refresher rules
Navigate to: Learning & Development > L&D Settings > Add/edit Refresher rules.
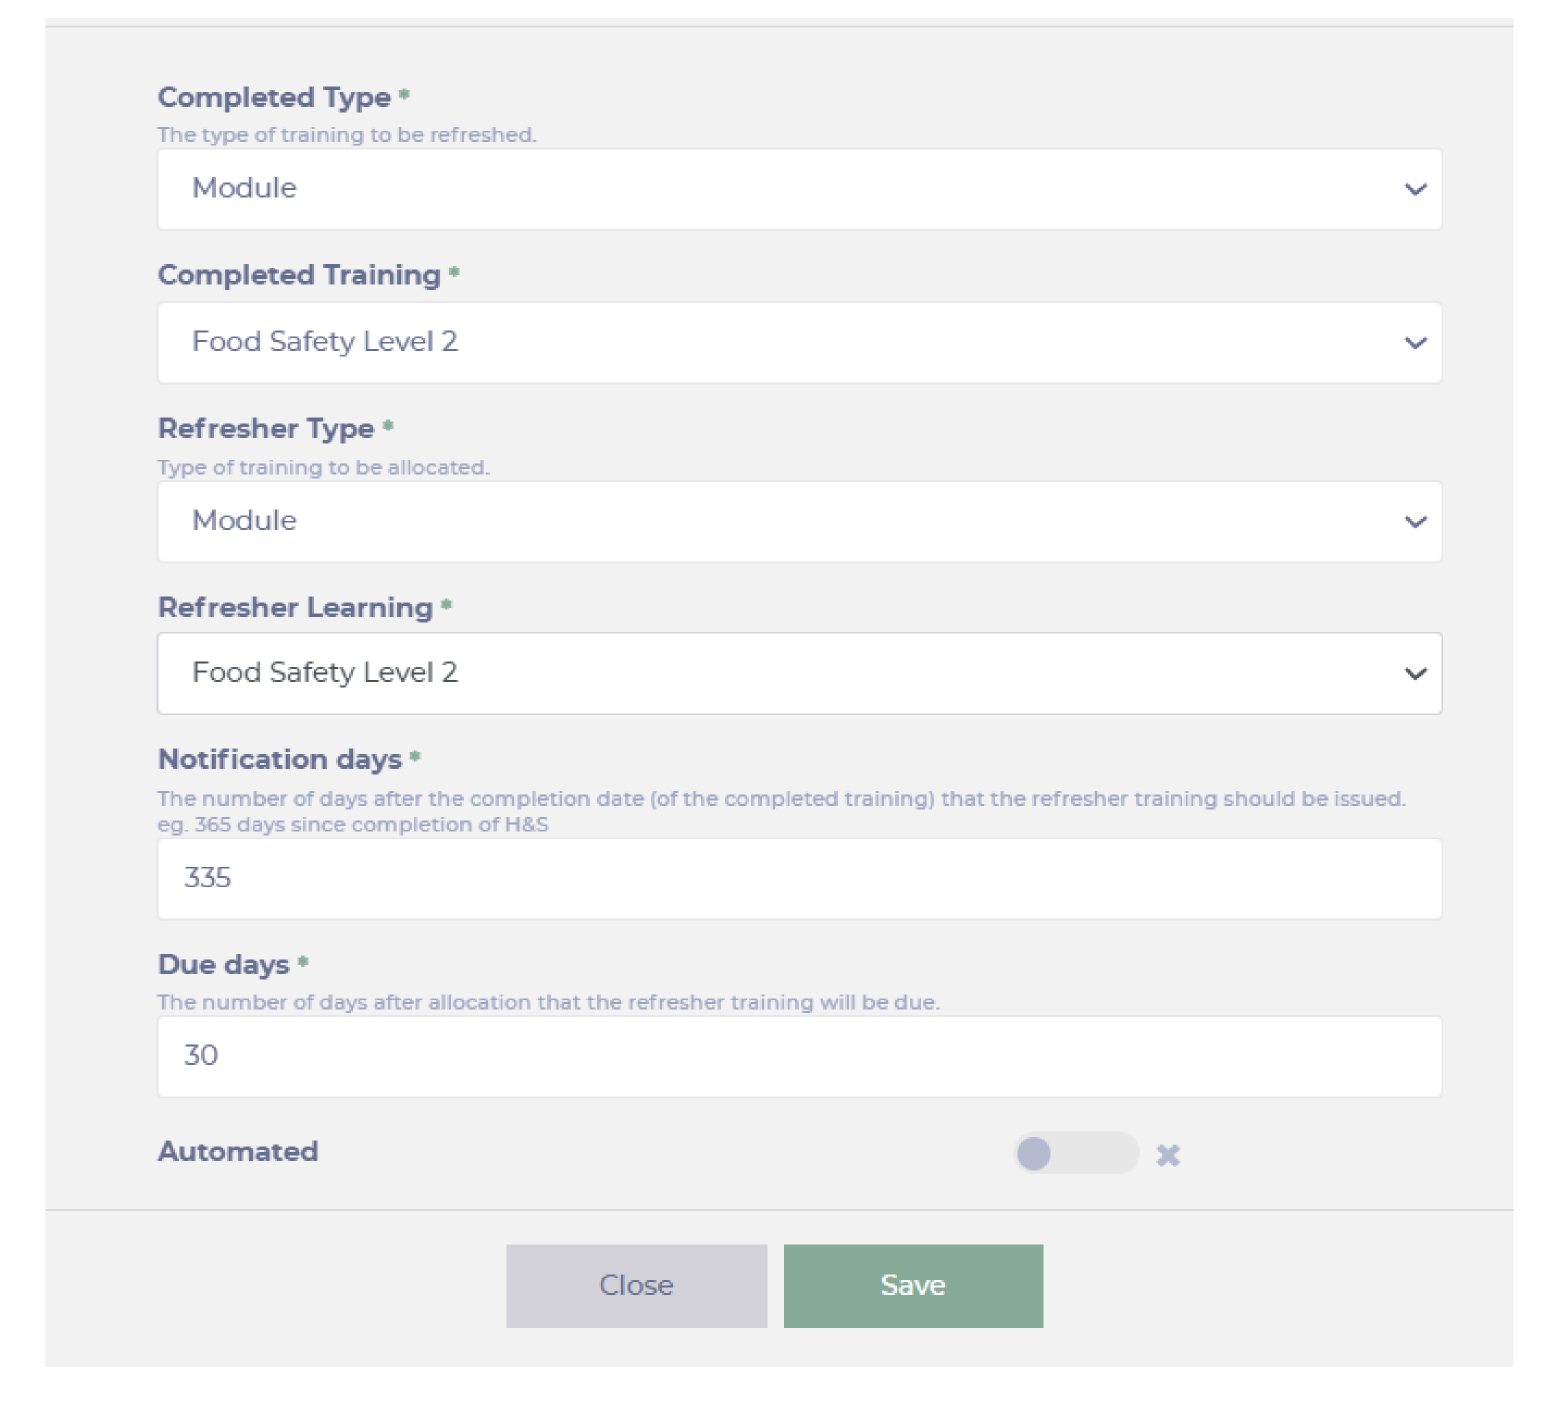
Select the + icon. A new pop-up window will open.
Please fill the following fields:
Choose the training to be refreshed in the Completed Type dropdown menu.
Choose the training that has been completed and needs to be refreshed in Completed Training dropdown menu.
Choose the training to be allocated in the Refresher Type dropdown menu.
In the Notification days section, enter the number of days after the completion date that the refresher training should be issued
In the Due days section, enter the number of days after allocation that the refresher training will be due.
Activate the Automated toggle switch if you want the training to be automatically assigned and issued. If an automated rule is added, the training item (Refresher module) must be included in the training structure for that employee. If not, you will have to manually assign the training.
Example: If a learner has completed an external training module “A” and a refresher rule is set for module “B”, the system will automatically assign module “B” (if it is in the learner’s Training Structure).
Note: Ensure that the refresher module is present in the Training Structure, as it is required for the refresher to be automatically issued. There is no mechanism to override the automatic rules by adding a training record mapping.


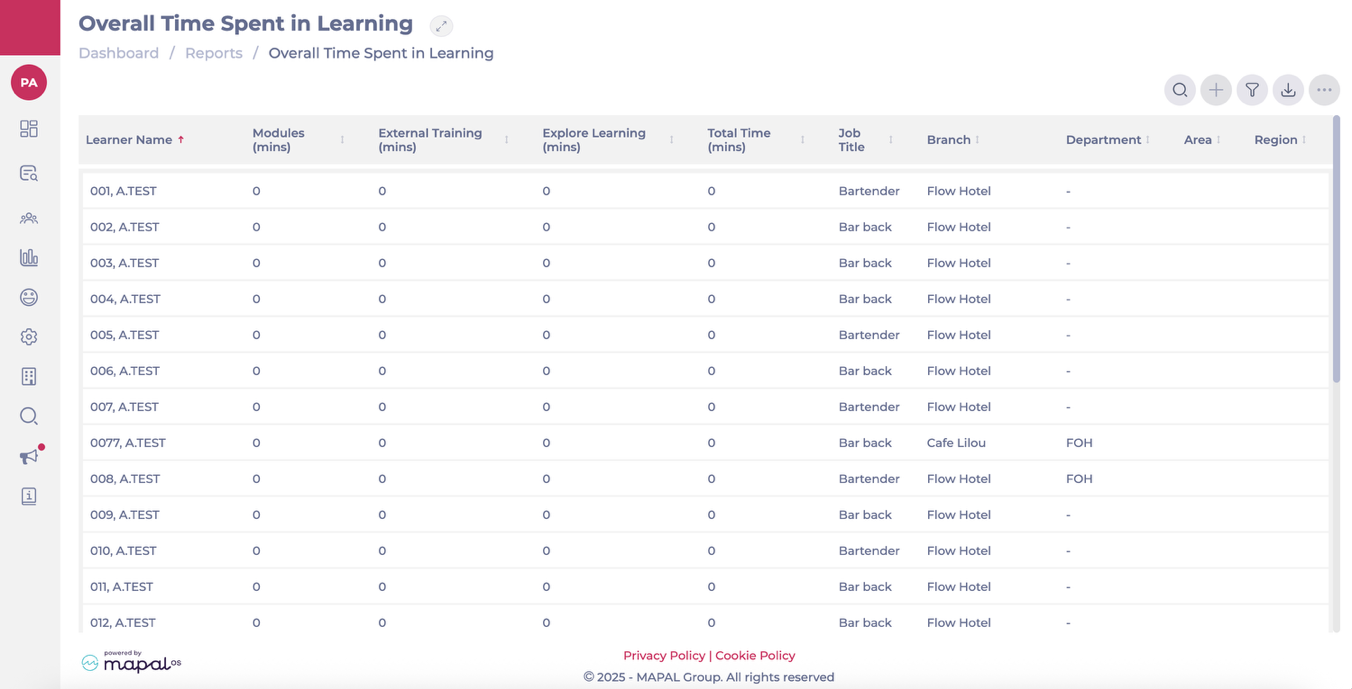


 You will now have an XLSX file with the details of all the filtered locations: