Review user logins to Mapal OS
Start from: The Mapal OS Configuration module.
-
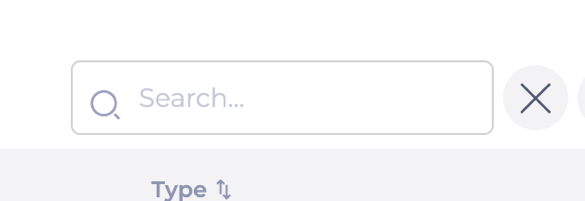
Navigate to User Management > User Logins.

The User Logins screen shows you a grid with five columns: name, email, profile, last logged in, and type.
On this screen, you can also find a series of features:
-
Search: Use the search button to find users by name or email.
-
Filter: You can filter by period (from, to) and by user profile.

-
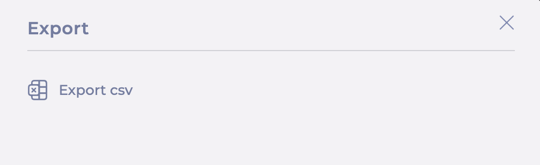
Export to CSV: You can export all the data visible on the grid to a CSV file.
-
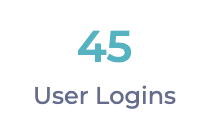
Counter: Placed in the header, it shows the number of user logins.
Managing your integration on Mapal OS
- Sync time between OS and Flow Learning
- Managing users
- User profiles
- Job Titles & Departments
- Troubleshooting with Feed Logs
- Similar records
Sync time between OS and Flow Learning
Managing users
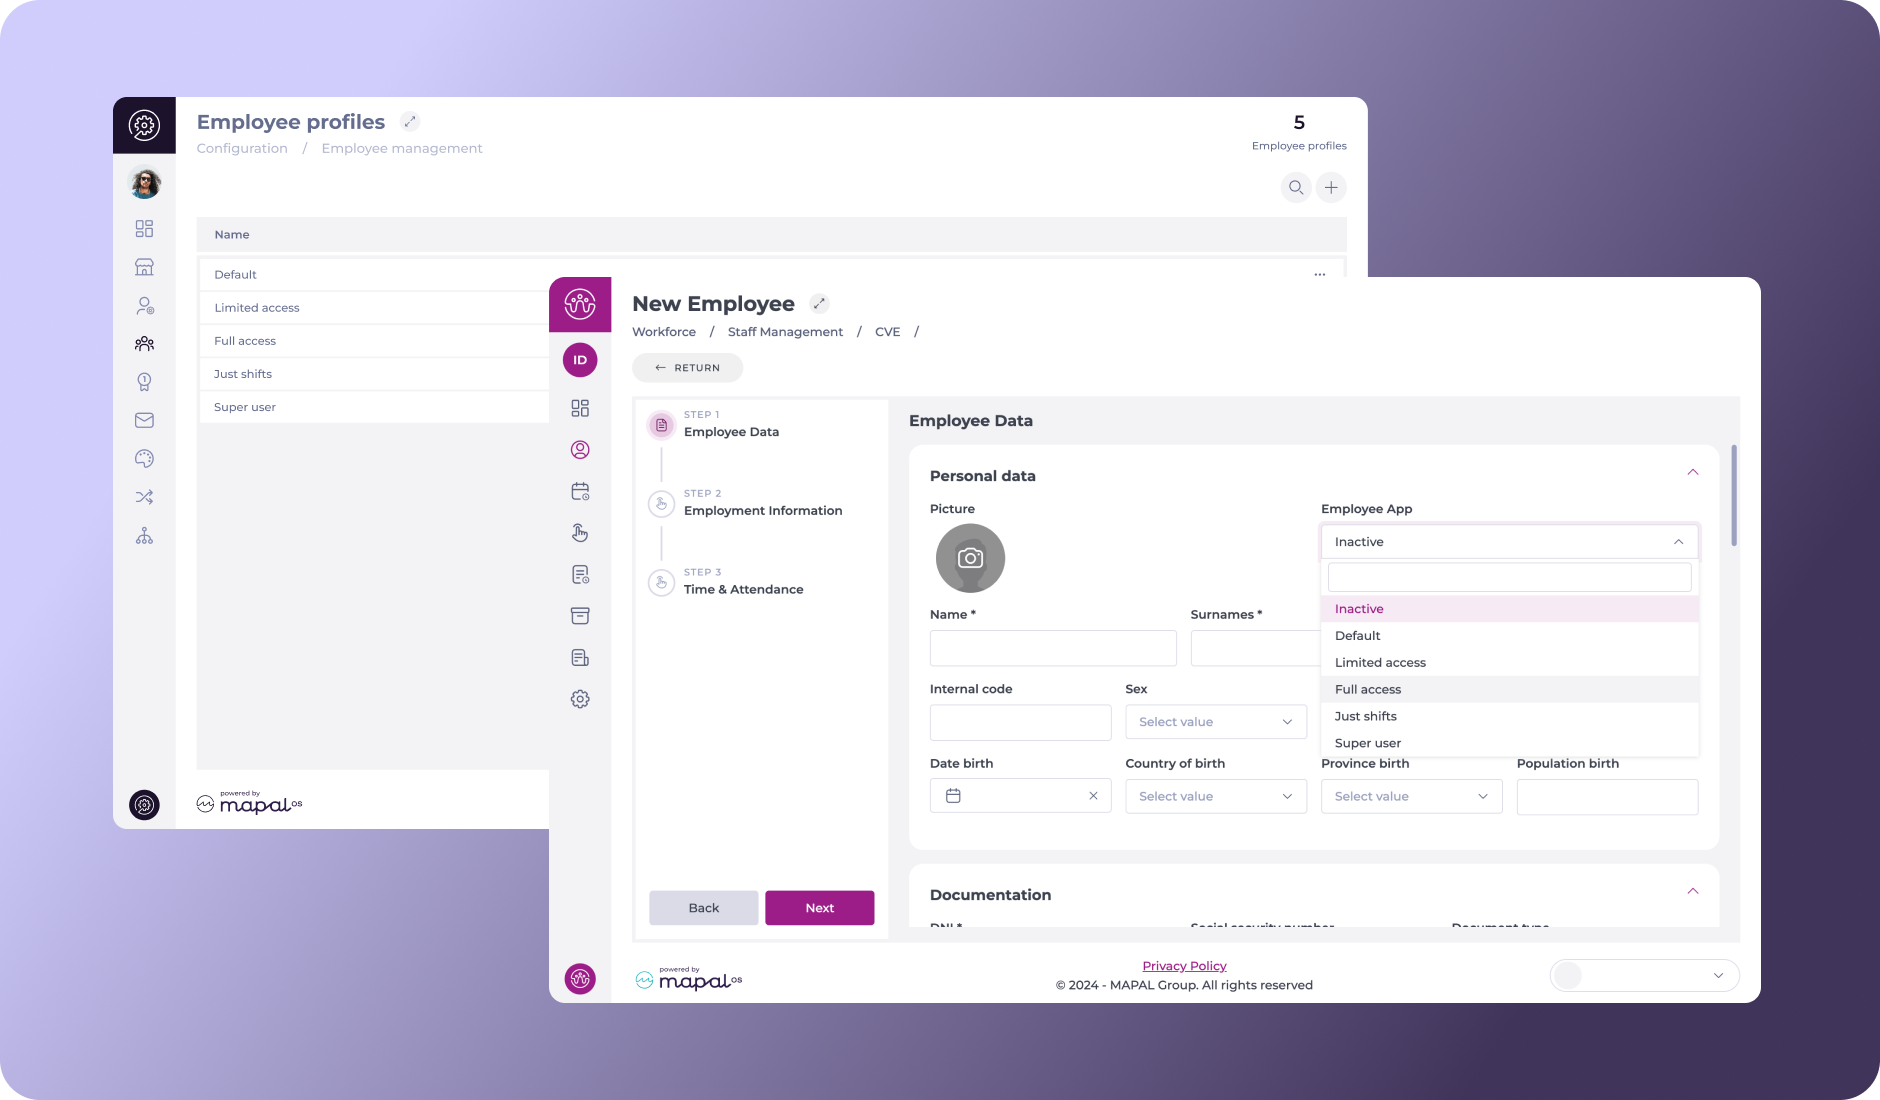
User profiles
User profiles will already be set up for you when you first access the system. These pre-loaded user profiles should be configured to match the variety of permissions your users currently enjoy. Initially, all your users will be given "employee" status, with Mapal One access.
Training manager job titles
The Training Manager job titles feature in Flow allows learners to be automatically promoted to training managers if they are assigned a relevant job title (configured within Company > User Settings).
For OS source customers, this feature remains available in Flow, but users are not automatically updated with the relevant profile in Mapal OS.
Job Titles & Departments
Follow these guides to add new job titles and departments:
Note: Job titles and/or departments must match exactly with what is set up in your HR/Payroll system. This includes capitalisation and spacing to ensure accurate syncing.
Troubleshooting with Feed Logs
- Navigate to User management > Feed Logs.
Note: the job titles and/or departments should match exactly between HR/Payroll system and Mapal - this includes capital letters and spacing.
Similar records
There are a few things to bear in mind when it comes to importing similar records:
- External IDs should be unique for every employee. If two employees are imported with the same external ID, you will find one employee record set up on Mapal - in other words, the first record will be overwritten with the second.
- A new employee record with the same email address as an existing record will import - providing that the original user record has previously been deactivated.
Note: External IDs are controlled by 3rd party systems, and the exact relationship between ID and employee can differ depending on the system.
Next steps
Migration to Mapal OS from Workforce
Start from: The Mapal OS login page.
Migration process
The first step in migrating to Mapal OS, is moving all your operator(s) data in the Mapal OS database. This is a careful process. The amount of time needed depends on the volume and complexity of data to be migrated. During the data migration process, we will need to suspend access to your applications.
Notes: To minimise any disruption, we will agree on a migration date in advance. We sincerely apologize for any inconvenience caused by this process.
New login & dashboard
Once migrated, you will have a single login for all your Mapal OS applications. To access your tools:
- Enter the original login URL (https://app.mapal-os.com/).
- Enter your user details (Email and Password).
- You will need to reset your password to access the system.
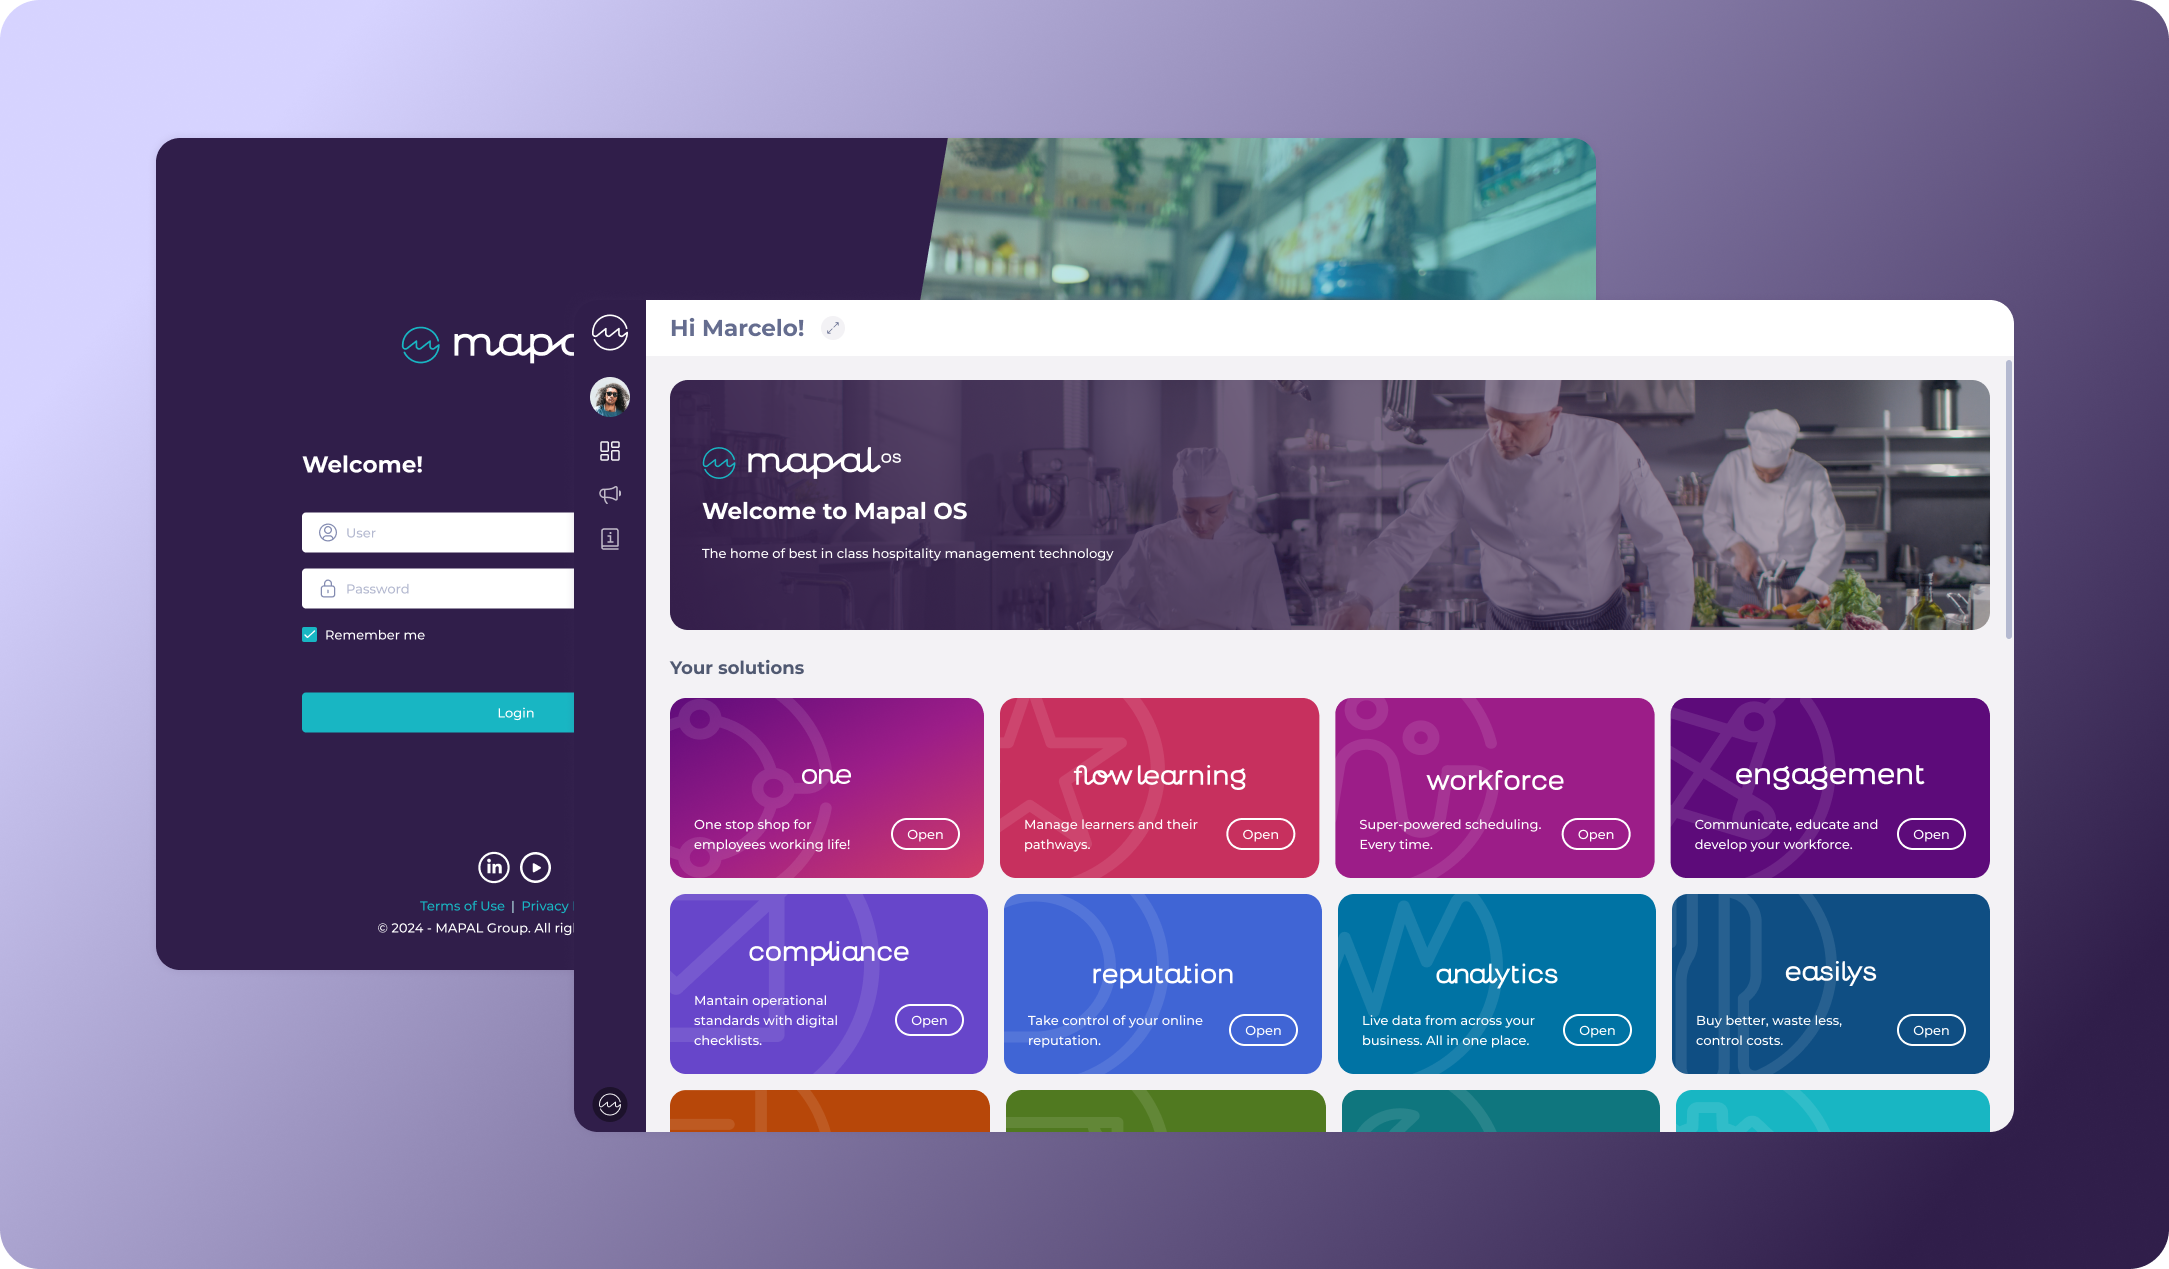
Once logged in, you will have access to the OS dashboard. The Dashboard displays all your applications, along with other useful links such as access to our Knowledge Base, webinars, and more. If you only have one active application, you will be directed straight to it.
Mapal OS Configuration
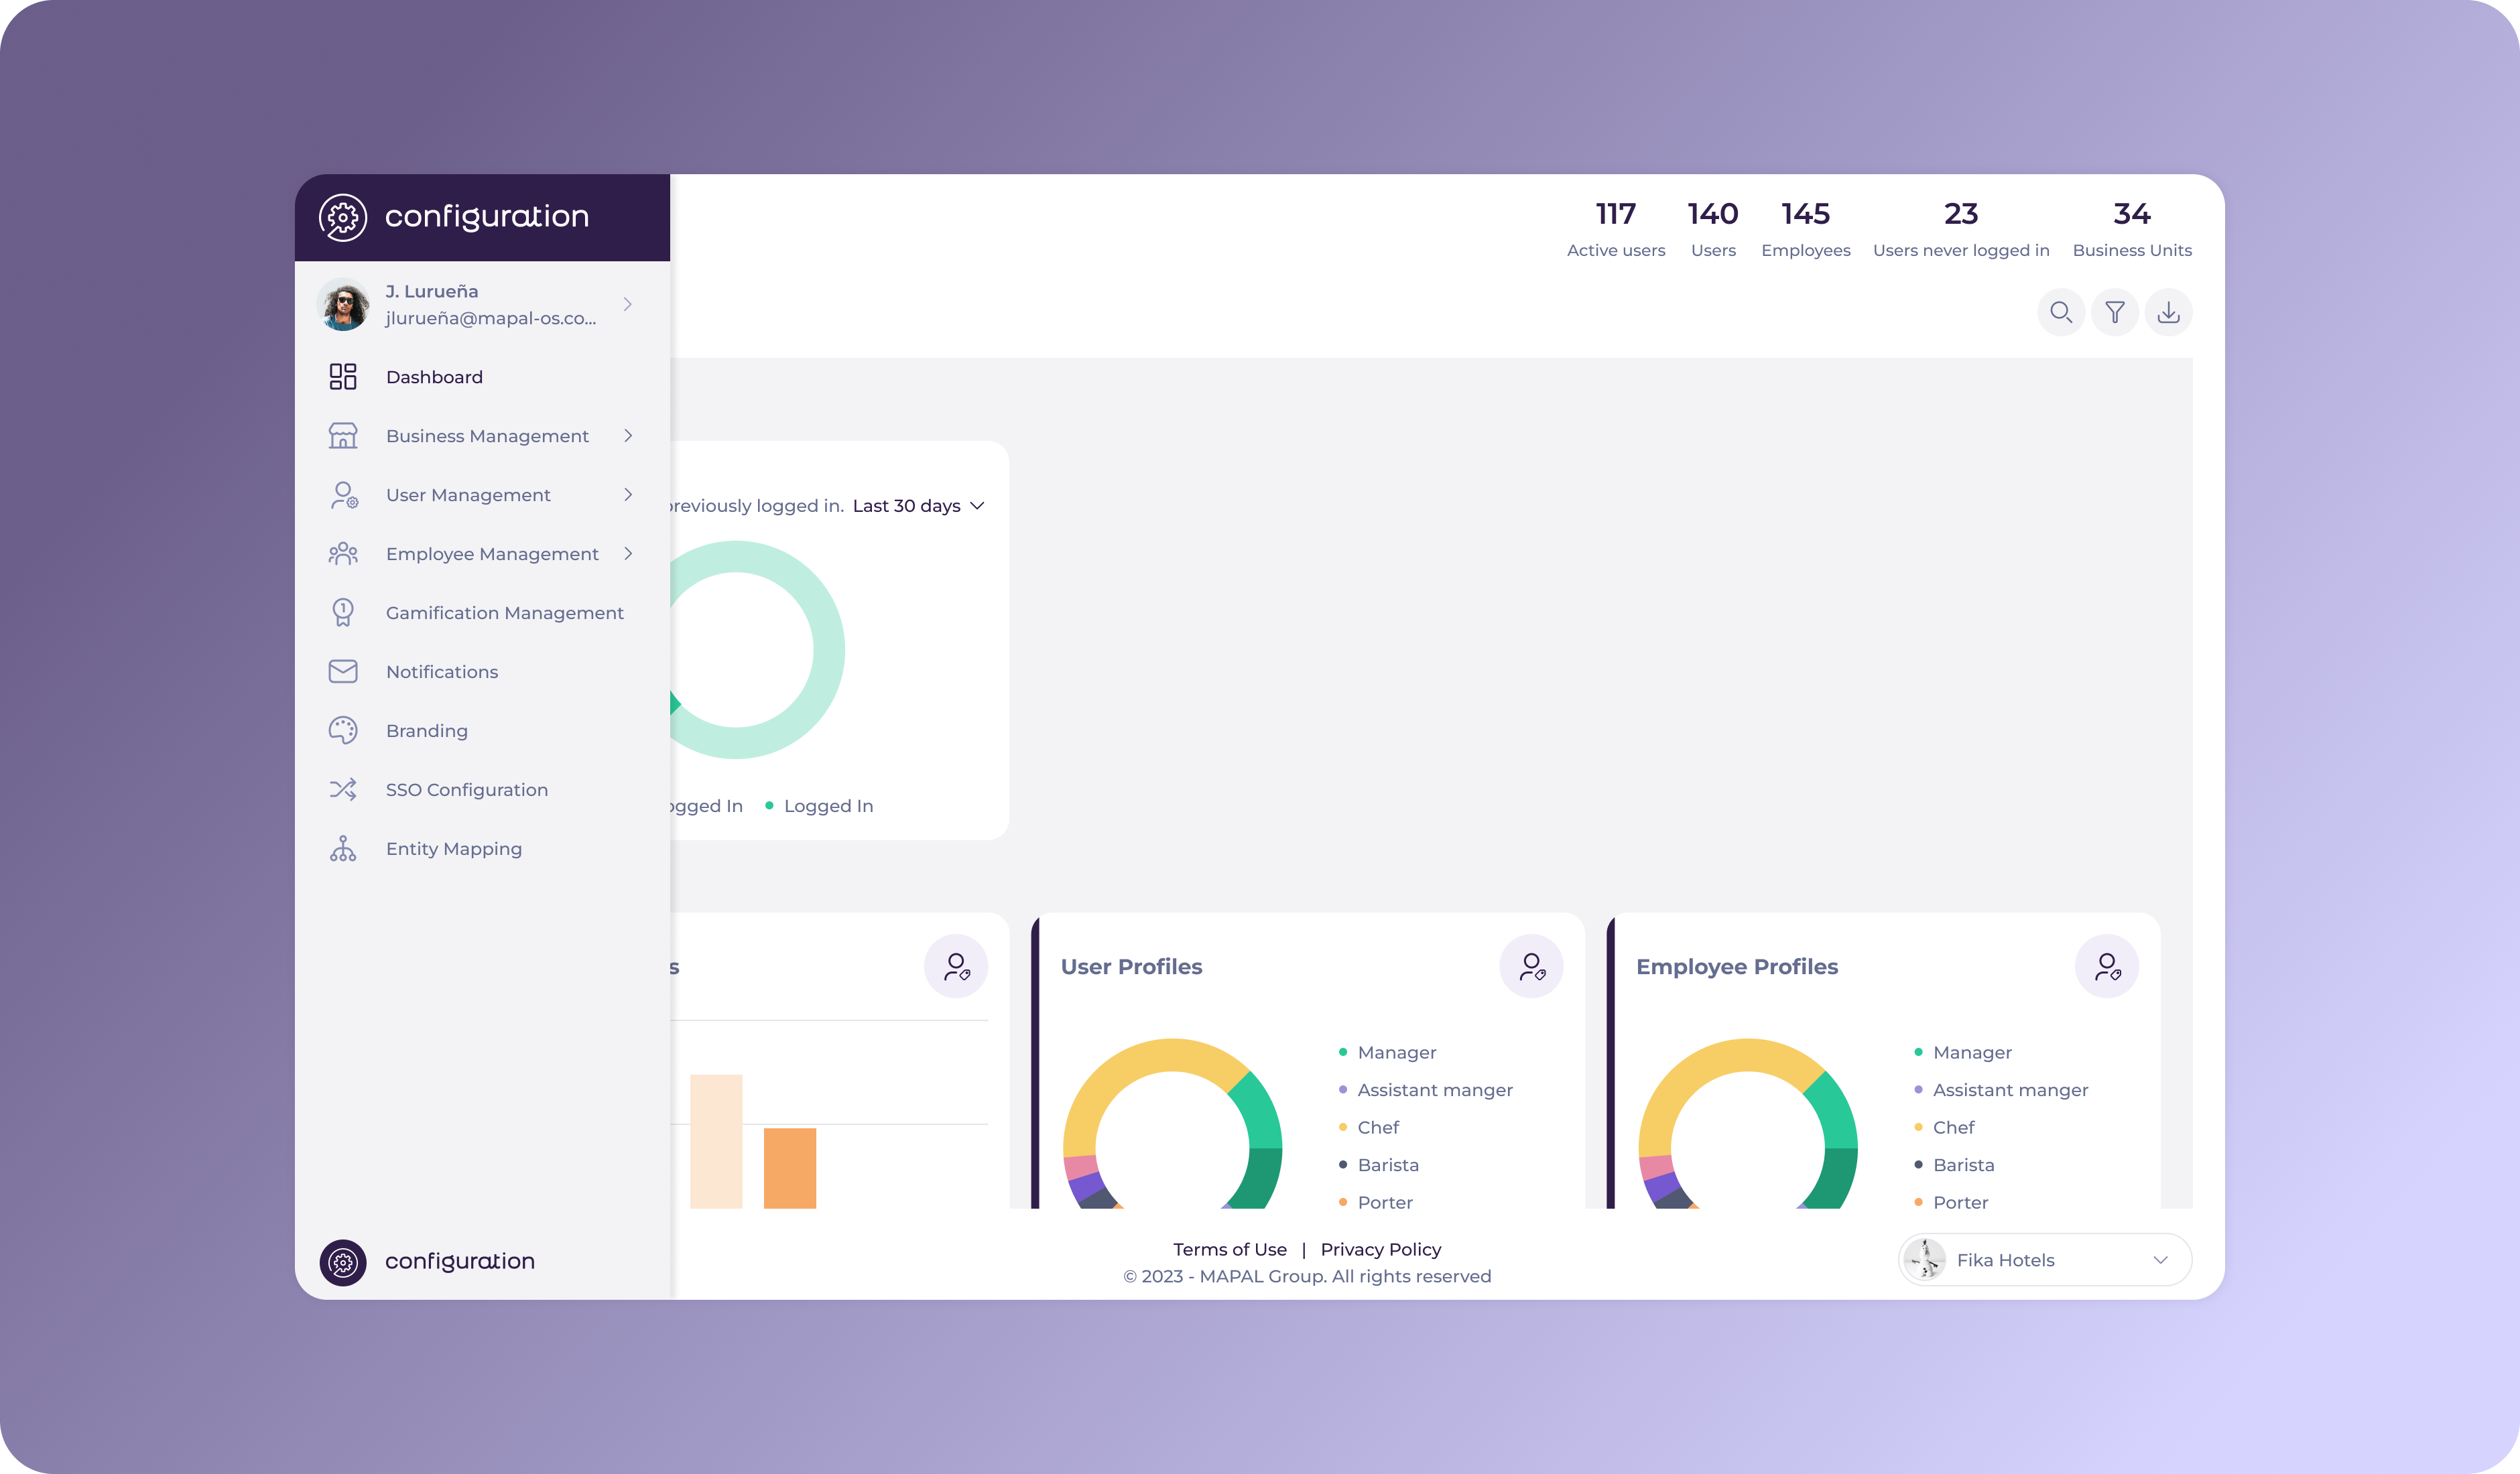
Mapal OS Configuration has many more options available now, which will be applied globally to all your applications. From Configuration, you can:
- Access a dashboard with OS usage data
- Manage your business units
- Users and profiles
- Apply your branding to all contracted applications
- Configure notifications
- Set up SSO (Single Sign-On)
Employee management
Categories are now Job Titles
In Mapal OS, Job Titles replace 'Categories' in Workforce and will be managed in Configuration.
This change aligns a common data reference across all Mapal applications. It's part of simplifying a common database across the platform. To facilitate the transition to this new way of managing it, we will add a link to Configuration on the Categories page in Workforce.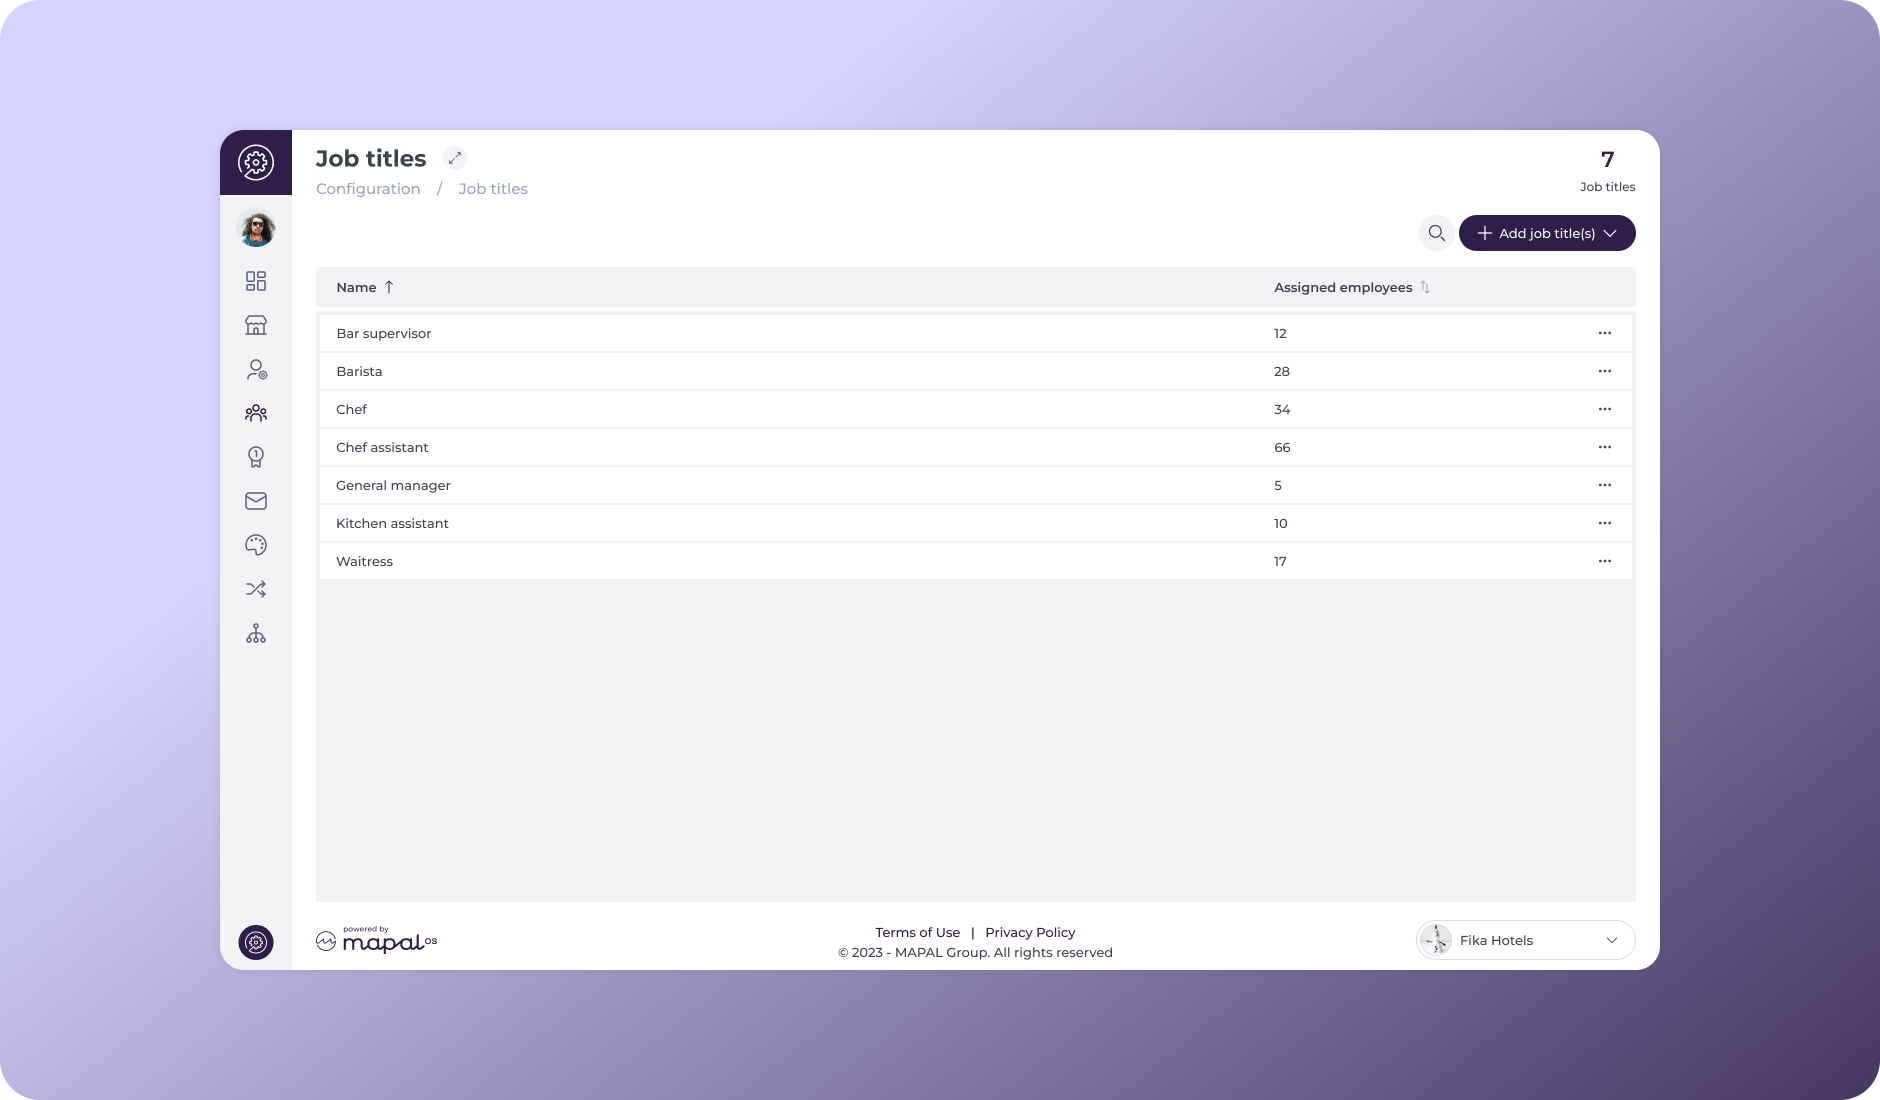
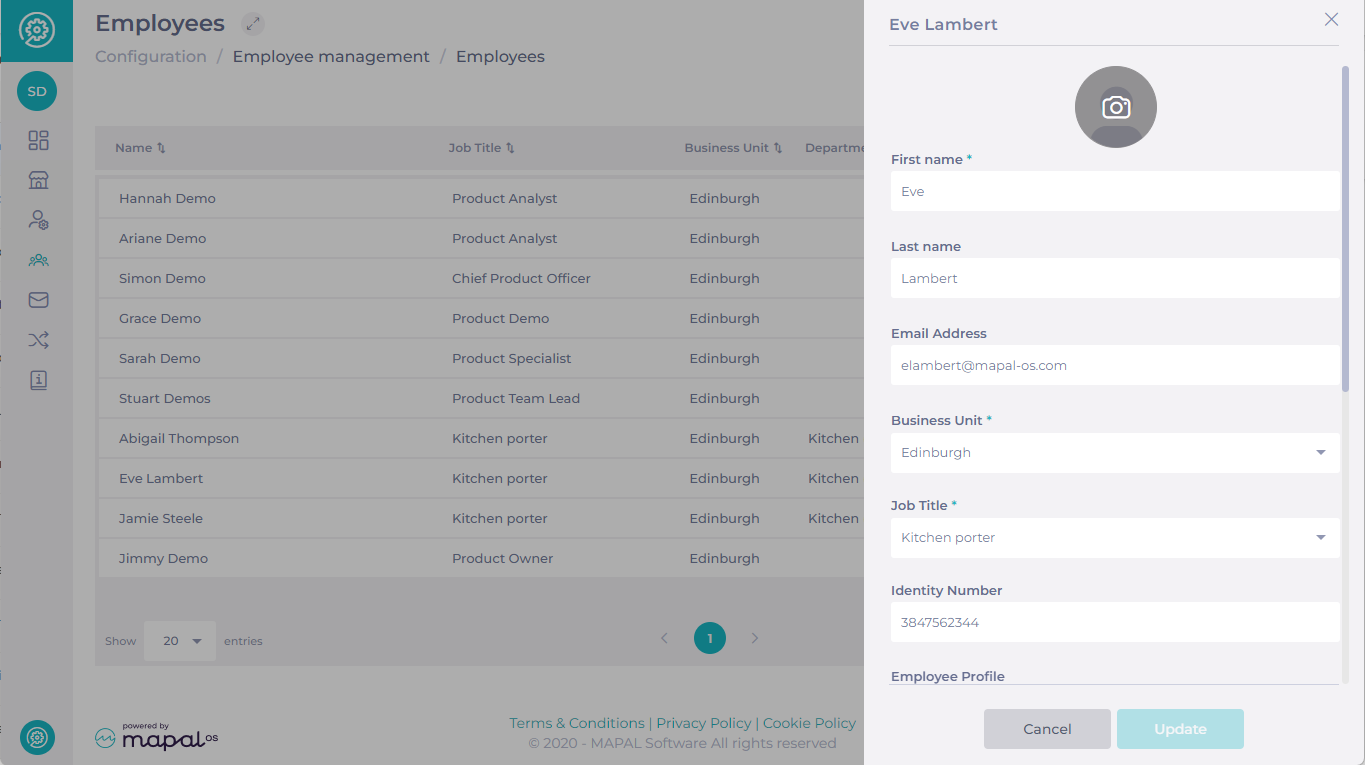
Employee creation and editing
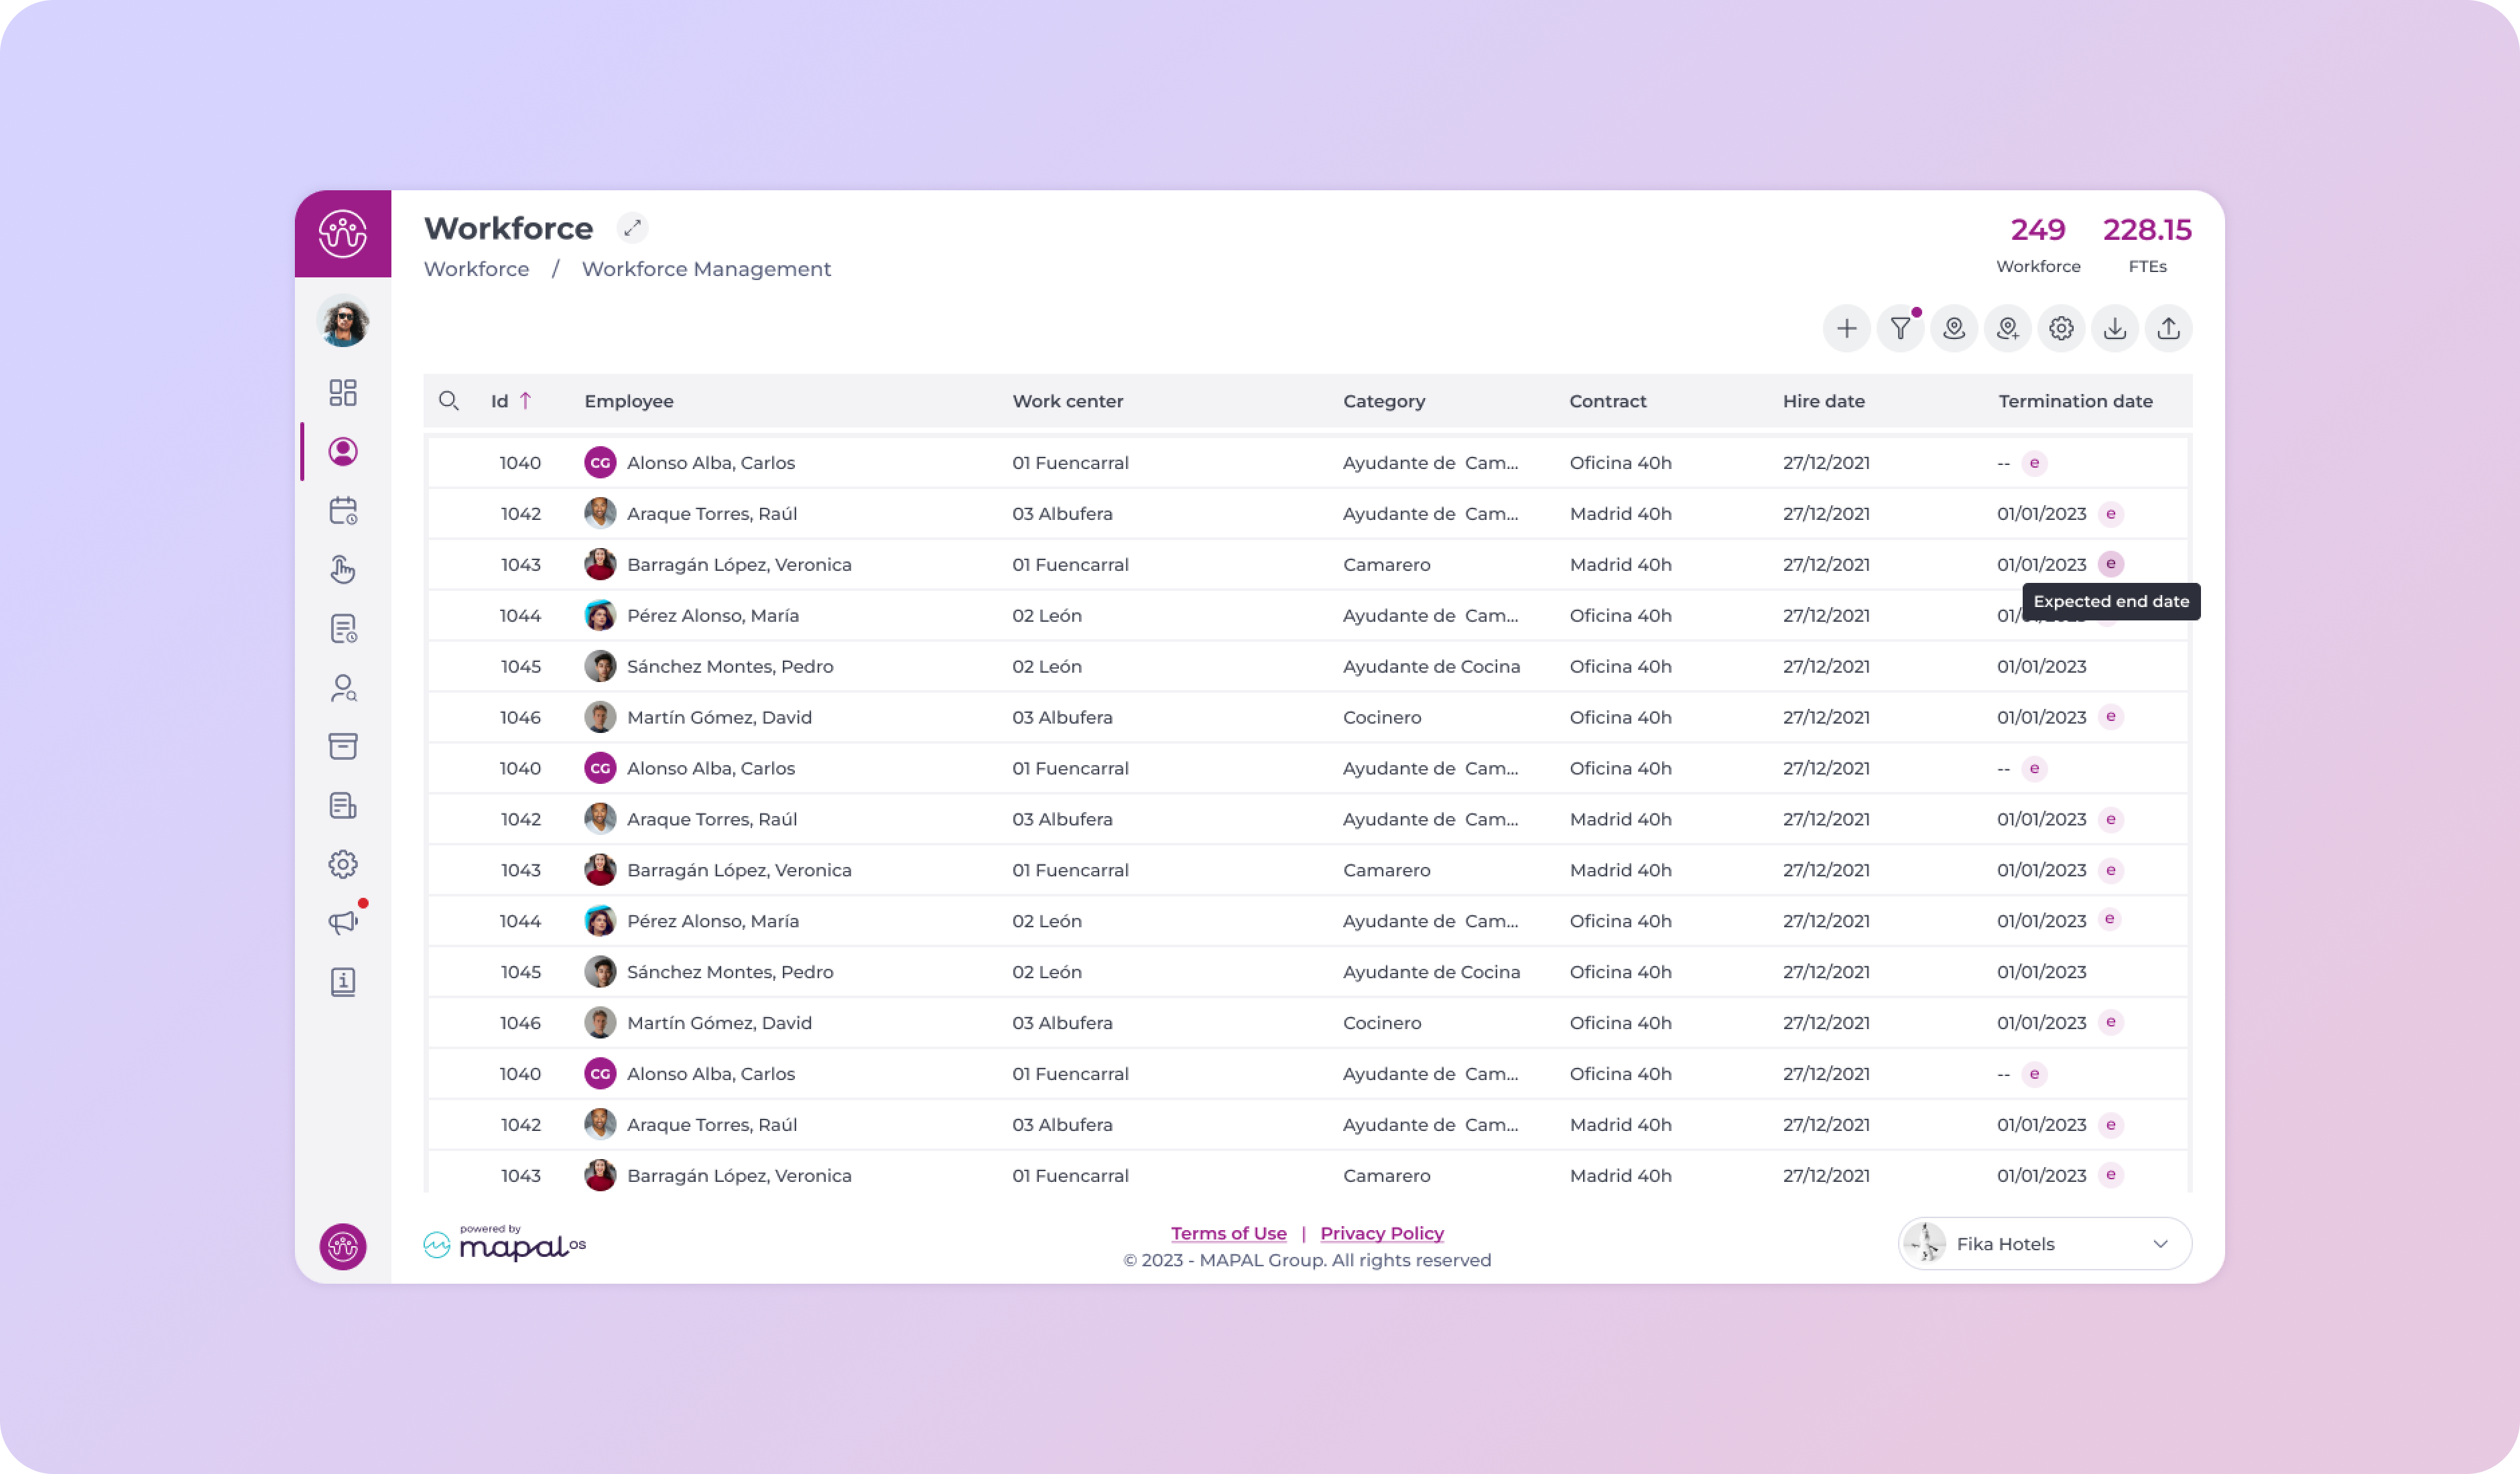
The creation and editing of your employees will continue to be managed in Workforce.
Your employees will also receive a user with access only to Mapal One (the Mapal OS replacement mobile app for GIRStaff) if they have it enabled.
Employee profiles
The creation and editing of employee profiles will now be managed from Configuration, as they affect all Mapal applications available for Mapal One.
Specific Workforce permissions will continue to be managed from the Employee App section of Workforce. We will add a link to Configuration from the Employee App page to facilitate the transition.
Workforce App
After the Mapal OS migration, Workforce users will need to reset their password.
To continue using Workforce app, managers will need to access with the new password, accessing with the same credentials as the one needed to access via web.
Activate an Employee in Mapal OS
Start from: The Configuration App.
Employee added after Mapal OS migration
If the Employee was added after Mapal OS migration (in other words, they have been created on Mapal OS), you can use a similar process to the deactivation steps above.
- Visit Employee management > Employees.
- Select the Employee and scroll to Period of Employment.
- To reactivate the Employee, remove the End date.
- The Employee will now appear as Employed under Status of employment.
Employee added prior to Mapal OS migration
If the Employee was added before Mapal OS migration (in other words, they were originally set up on the system before migration), there are a few additional steps to follow.
- Visit Employee management > Employees.
- Check whether the Employee record exists - it should have been carried over during migration.
- Remove their employment End date using the action detailed above.
- Visit User management > Users.
- Check whether a user exists for the Employee.
- If not, create a user with the same email as the Employee.
- When your team member confirms their details via the welcome email, this will link the accounts.
Note: if you're having trouble finding an Employee record, bear in mind that Employees can be added using different email addresses. If in doubt, search by name or ask your team member.
Manage branding settings within Mapal OS
Notes: Branding settings can only be updated by the Mapal team at present. If you need to update your branding, please contact your Customer Success Manager for assistance.
Start from: The Configuration app.
Set up Branding
-
Select Branding from the main menu.
In the Brand Configuration screen, you can set up your branding in a four-step process:
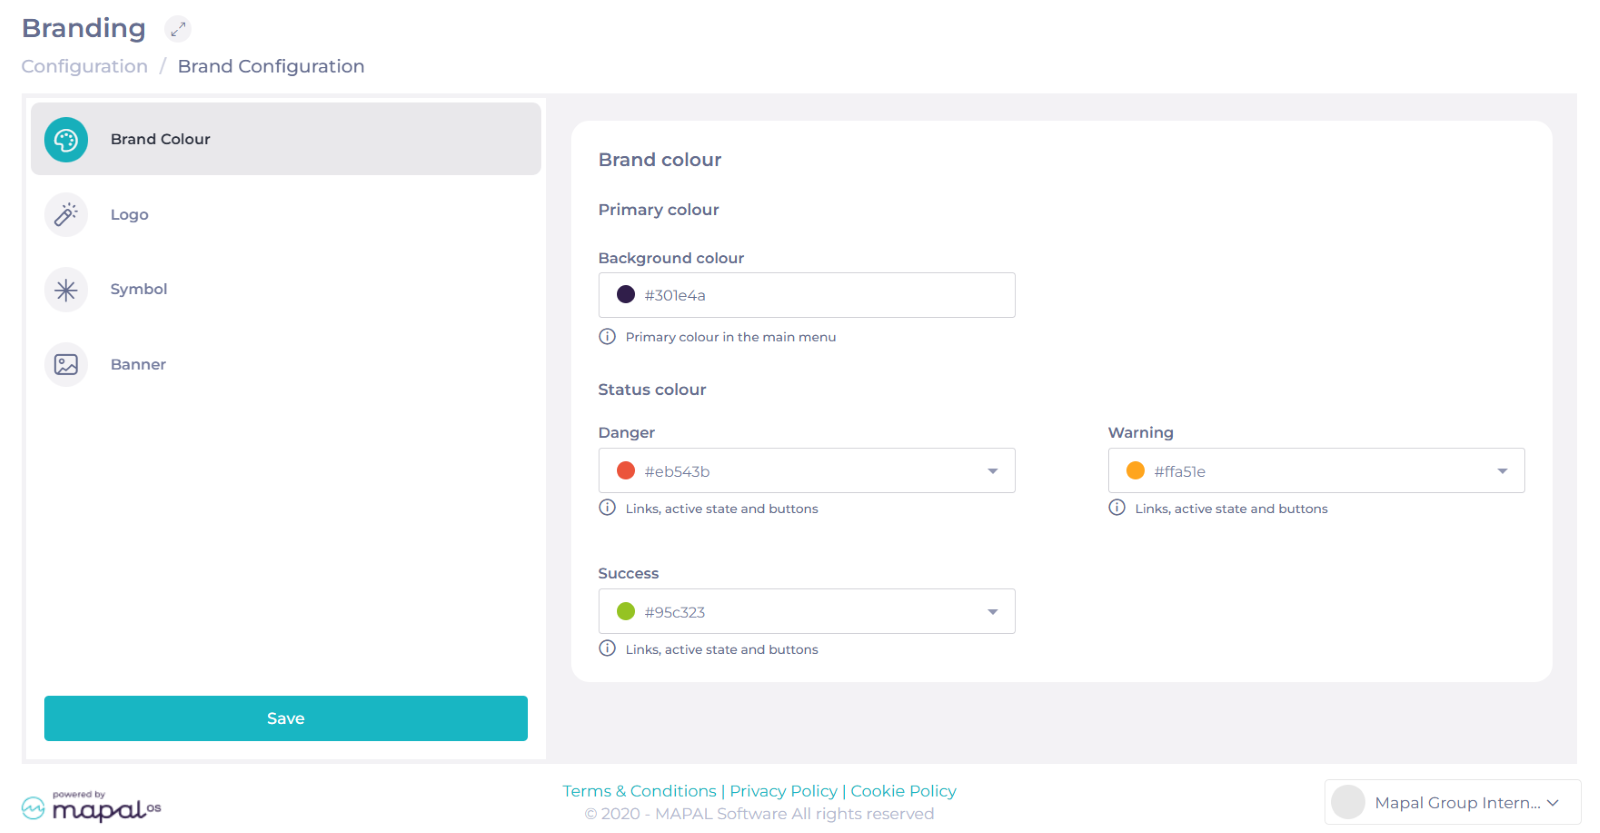
Brand colour
In this section, you can set the colours to be shown on the apps.
- Set a primary colour. This colour will be shown on the main menu.
- Write the colour code in RGB / HEX format or use the colour picker to select the appropriate option.
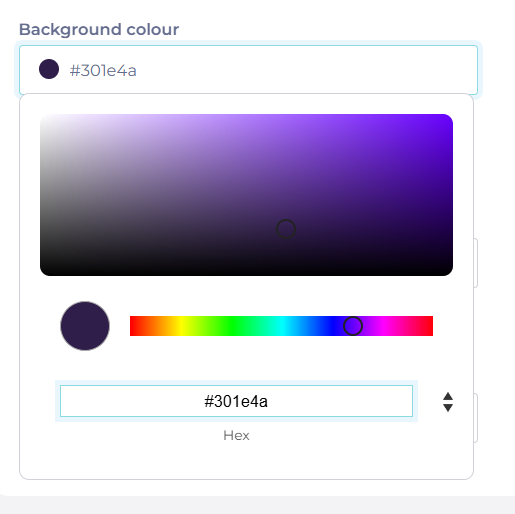
- Select Status colours, such as Danger, Warning, or Success. Keep in mind that, unlike the primary colour, you can only choose status colours from a provided set in the system.
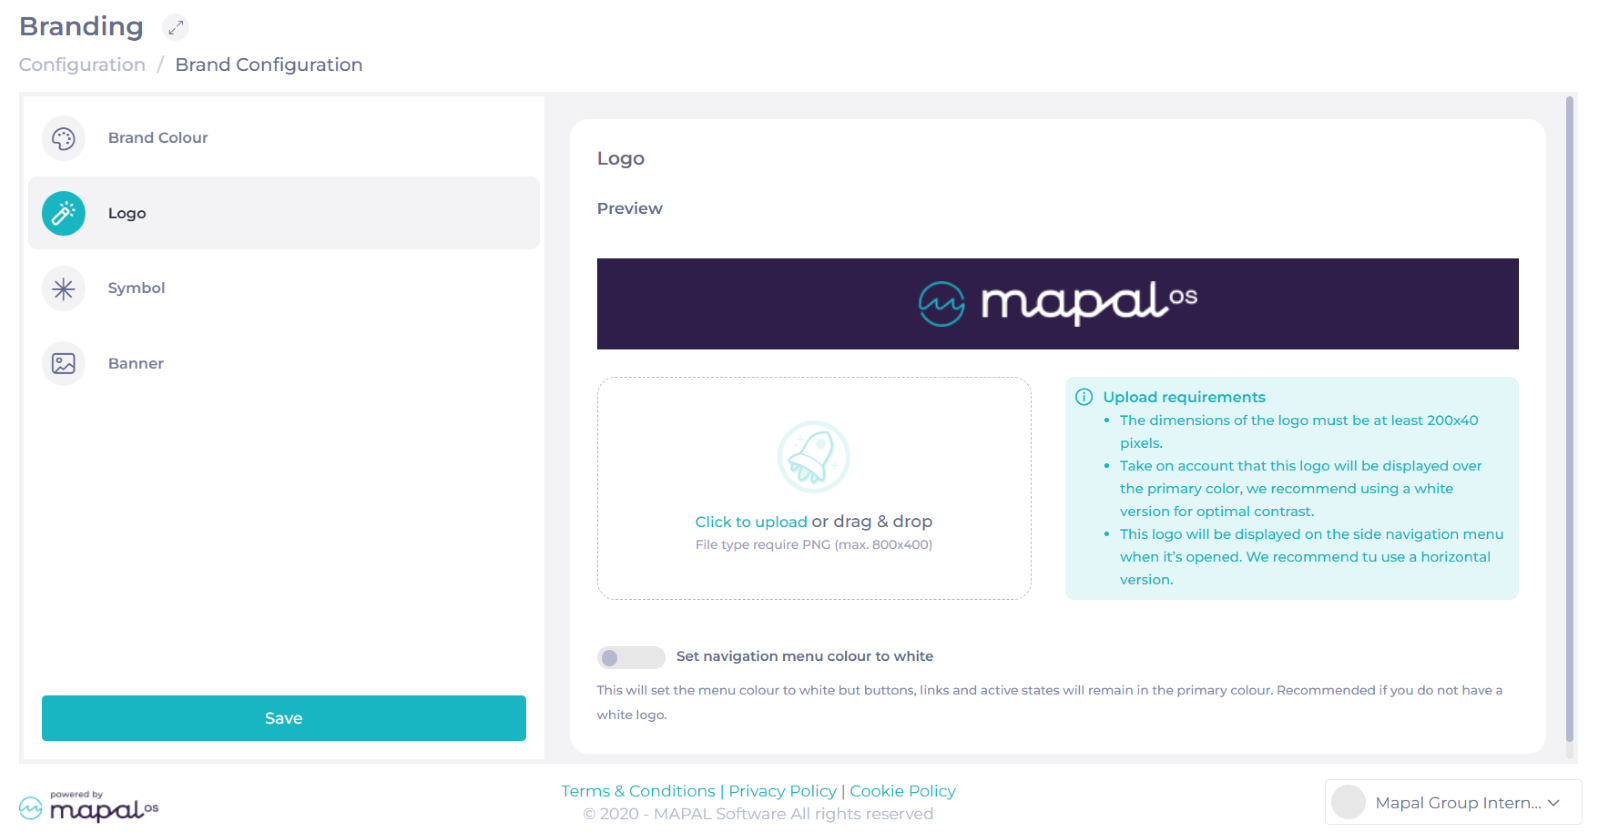
Logo
-
Select Click to upload or drag & drop your company logo. You must select a .PNG file, and dimensions must be at least 200x40 px, max. 800x400 px.
Notes: We recommend using a white horizontal version of your logo, as it will be displayed over the primary colour on the side navigation menu when it’s opened.
If you can’t use a white logo, you can use the button Set the navigation menu colour to white. This will set the menu colour to white but buttons, links, and active states will remain in the primary colour.
-
Once the logo is uploaded, you will be able to see a Preview of how it looks combined with the primary colour.
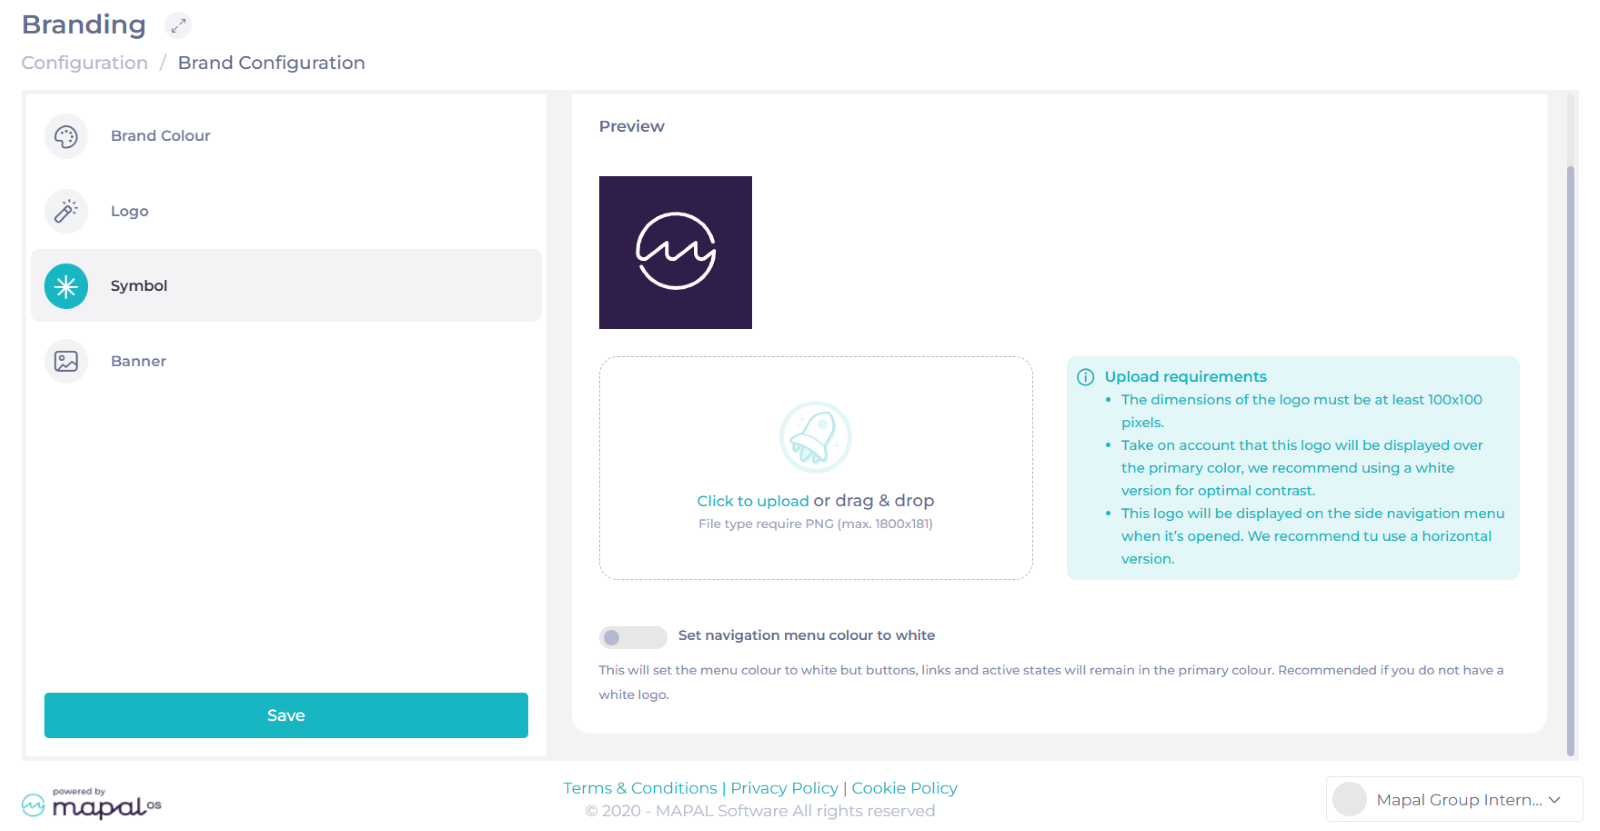
Symbol
-
Select Click to upload or drag & drop your company symbol, which can be an isotype. You must select a .PNG file, and dimensions must be at least 100x100 px, max. 1800x181 px.
Notes: We recommend using a white horizontal version of your symbol, as it will be displayed over the primary colour on the side navigation menu when it’s opened.
If you can’t use a white symbol, you can use the button Set the navigation menu colour to white. This will set the menu colour to white but buttons, links, and active states will remain in the primary colour.
-
Once the symbol is uploaded, you will be able to see a Preview of how it looks combined with the primary colour.
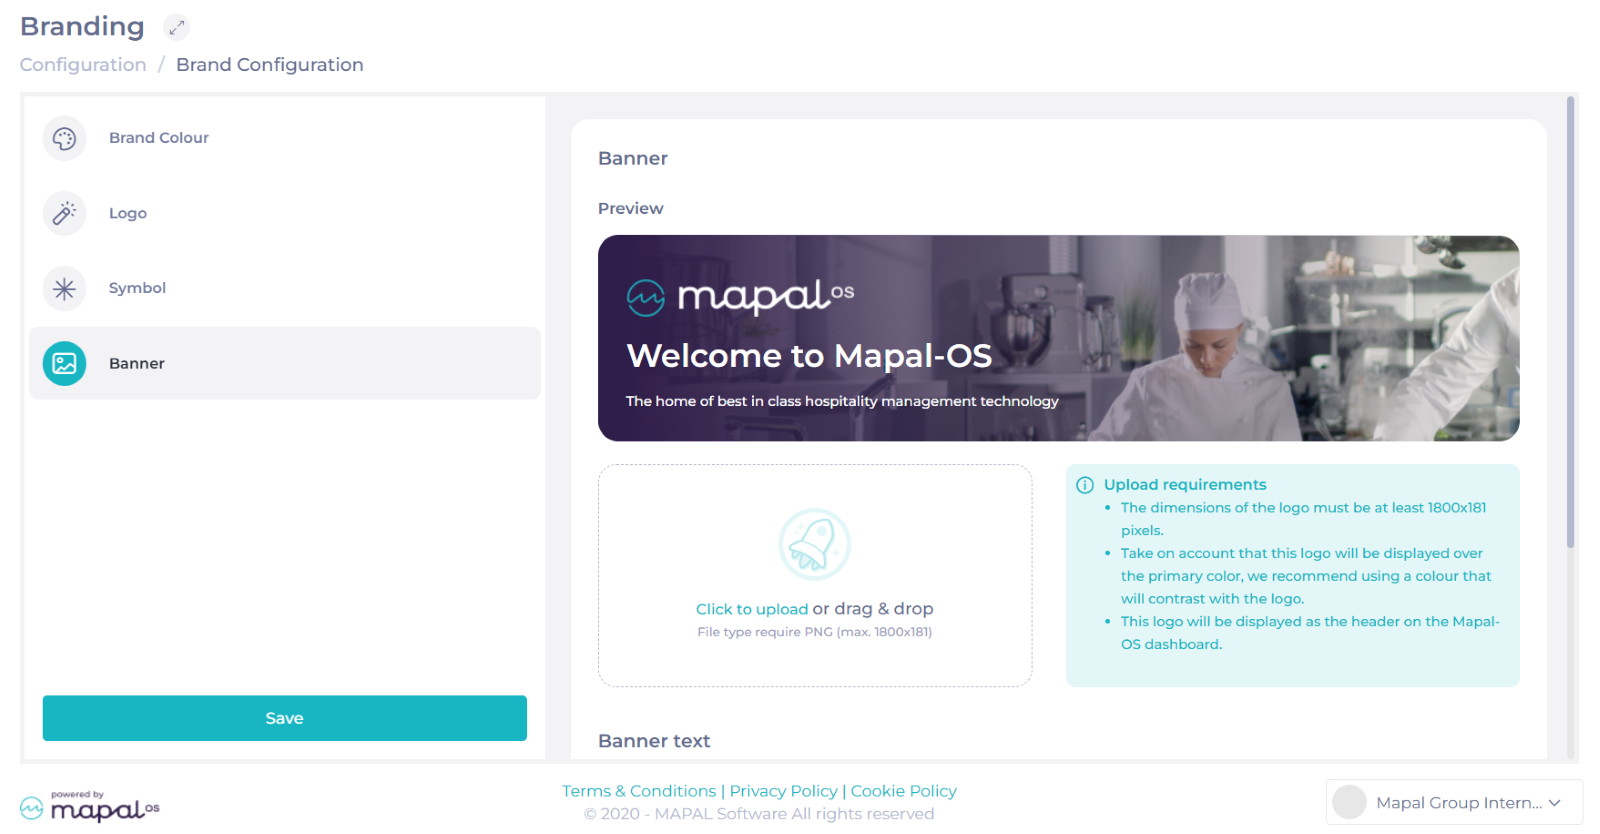
Banner
-
Select Click to upload or drag & drop your banner. You must select a .PNG file, and dimensions must be exactly 1800x181 px.
Notes: This logo will be displayed as the header on the Mapal-OS dashboard. Take into account that the logo will be displayed over the banner and the primary colour, so we recommend using a colour that will contrast with the logo.
-
In Banner text, set the Main text and Sub text. Consider that the main text should welcome the user to your platform, while the sub text should give the user some context to the platform. For example:
Welcome to Mapal-OS
The home of best in class hospitality management technology
-
Once the banner and texts are set up, you will be able to see a Preview of how they look.
After completing these four steps, select Save to store your branding setting.
Application of the branding settings
Custom branding is currently only available for Mapal OS and Mapal One. These are the specific applications for each setting in those platforms:
| Branding setting | Product | Application |
|---|---|---|
| Brand colour | Mapal OS | Log in:
Dashboard:
|
| Mapal One |
|
|
| Brand logo & Symbol | Mapal OS | Log in:
Dashboard:
|
| Mapal One |
|
|
| Status colours | Mapal OS |
Will only apply to links, active states, and buttons. |
| Mapal One |
Will only apply to links, active states, and buttons. |
|
| Main text & Sub text | Mapal OS |
Will appear on the hero banner. |
An overview of Mapal OS Configuration

Key features
- User profile management: Add, edit, and manage user profiles and their permissions within the system.
- Department management: Set up and organise departments to reflect your business structure.
- Job title configuration: Create and manage job titles to ensure accurate role assignment and tracking.
- Bulk actions: Assign roles and permissions in bulk to save time and reduce manual errors.
Benefits
- Streamlined operations: Centralised control of user profiles, permissions, and system settings enhances operational efficiency.
- Customisation: Tailor the system to meet specific business needs, ensuring all settings align with organisational requirements.
- Improved accuracy: Bulk actions and organised management reduce errors and save time.
- Enhanced security: Manage access and permissions effectively to ensure data security and compliance.
Next steps
The Configuration app by Mapal OS is essential for hospitality businesses seeking efficient management and customisation of their system settings. Its comprehensive features ensure a streamlined setup and enhanced operational efficiency.
For more, visit Getting started on Mapal OS, or select from the articles below.
Users and Employees in Mapal OS
A User record exists for everyone on the Mapal OS system.
Employee
An Employee is a non-managerial member of staff who interacts with the employee-focused Mapal apps. Employees have access to features such as learning resources, news items, documents, shift patterns and group chat.
It’s important to note that not all Users have an Employee record, even though Employees will always have a User record, granting them access to the Mapal OS system.
Common Tasks for Users and Employees
Mapal OS has a range of functionality, and the experience on the system can be quite different for the various types of users.
Example tasks for User-only accounts
- Creating learning pathways
- Creating shift patterns
- Making regular compliance checks
- Reviewing customer feedback
- Creating meal plans
- Setting up chat groups for the team
Example tasks for Employee accounts
- Interacting with L&D resources
- Viewing shifts
- Chatting with colleagues
- Providing peer feedback
- Accessing company documents
How Users and Employees access Mapal OS
User-only access to Mapal OS
Management tasks - on User-only accounts - are primarily performed within Mapal OS apps such as Flow Learning, Workforce, Easilys, Compliance, Reputation, Engagement, and Analytics.
Employee access to Mapal OS
Non-managerial tasks – requiring Employee accounts - are carried out in team-focused apps, such as Mapal One, Gir Staff and the SmartHub clocking system app.
Find out more
For detailed instructions on user management, including how to work with User profiles and permissions you can find links to more resources below.
- Manage User Profiles in Mapal OS
- User Profile Permissions: Defined
- Manage Users in Mapal OS
- Add a New User In Mapal OS
- Add a New Employee in Mapal OS
- Manage Job Title in Mapal OS
- Manage Departments in Mapal OS
Add Compliance users on Mapal OS
Start from: The Mapal OS dashboard.
Add a new user in Mapal OS
- Navigate to the OS Dashboard.
- Select Configuration.
- Select User Management > Users from the main menu.
- Click Add User to create a new user.
- Fill out the required details in the form, including:
- First Name
- Last Name
- Email Address
- Role / Profile
- Click Save to add the new user.
Assign Business Units
- Locate the new user in the Users list.
- Select the user to open their profile.
- Go to the Business Units tab.
- Select the relevant Business Units from the list.
- Click Save to confirm the selection.
Configure Compliance-specific properties
- Return to the OS Dashboard.
- Select Compliance
- Once in Compliance, select People > Users from the main menu.
- Locate and select the newly added user.
- Edit the parameters as needed.
Notes: Some user properties will be greyed out, these can only be modified in the Configuration app.
Switching to Mapal OS (from Flow Learning)
In this video, we look at how your migration process is going to work, and what you need to know about the switch.
Continue your Mapal OS journey
Once you're up and running on Mapal OS, take a look at some of the other ways to get started on the platform.
Add users to Mapal OS as a batch
Start from: the Configuration dashboard.
- Navigate to User management > Users.
- Select the down-facing arrow next to Add User(s) and choose Add list of users.
- Download the CSV template list and complete it with the required fields:
- First Name
- Last Name
- Status (Active/Inactive)
- User profile
- External Identifier (typically the email address)
- Job Title
- Start Date (in DD/MM/YYYY format)
- Business Unit ID (The information populated here must be the Business Unit Feed ID, NOT the Business Unit OS ID)
- Department
- Upload the completed CSV file.
Note: If you upload an updated version of the file, changes will be automatically applied to existing records, provided the External Identifier matches the data in the system. If the identifier does not match, a new employee record may be created unintentionally.
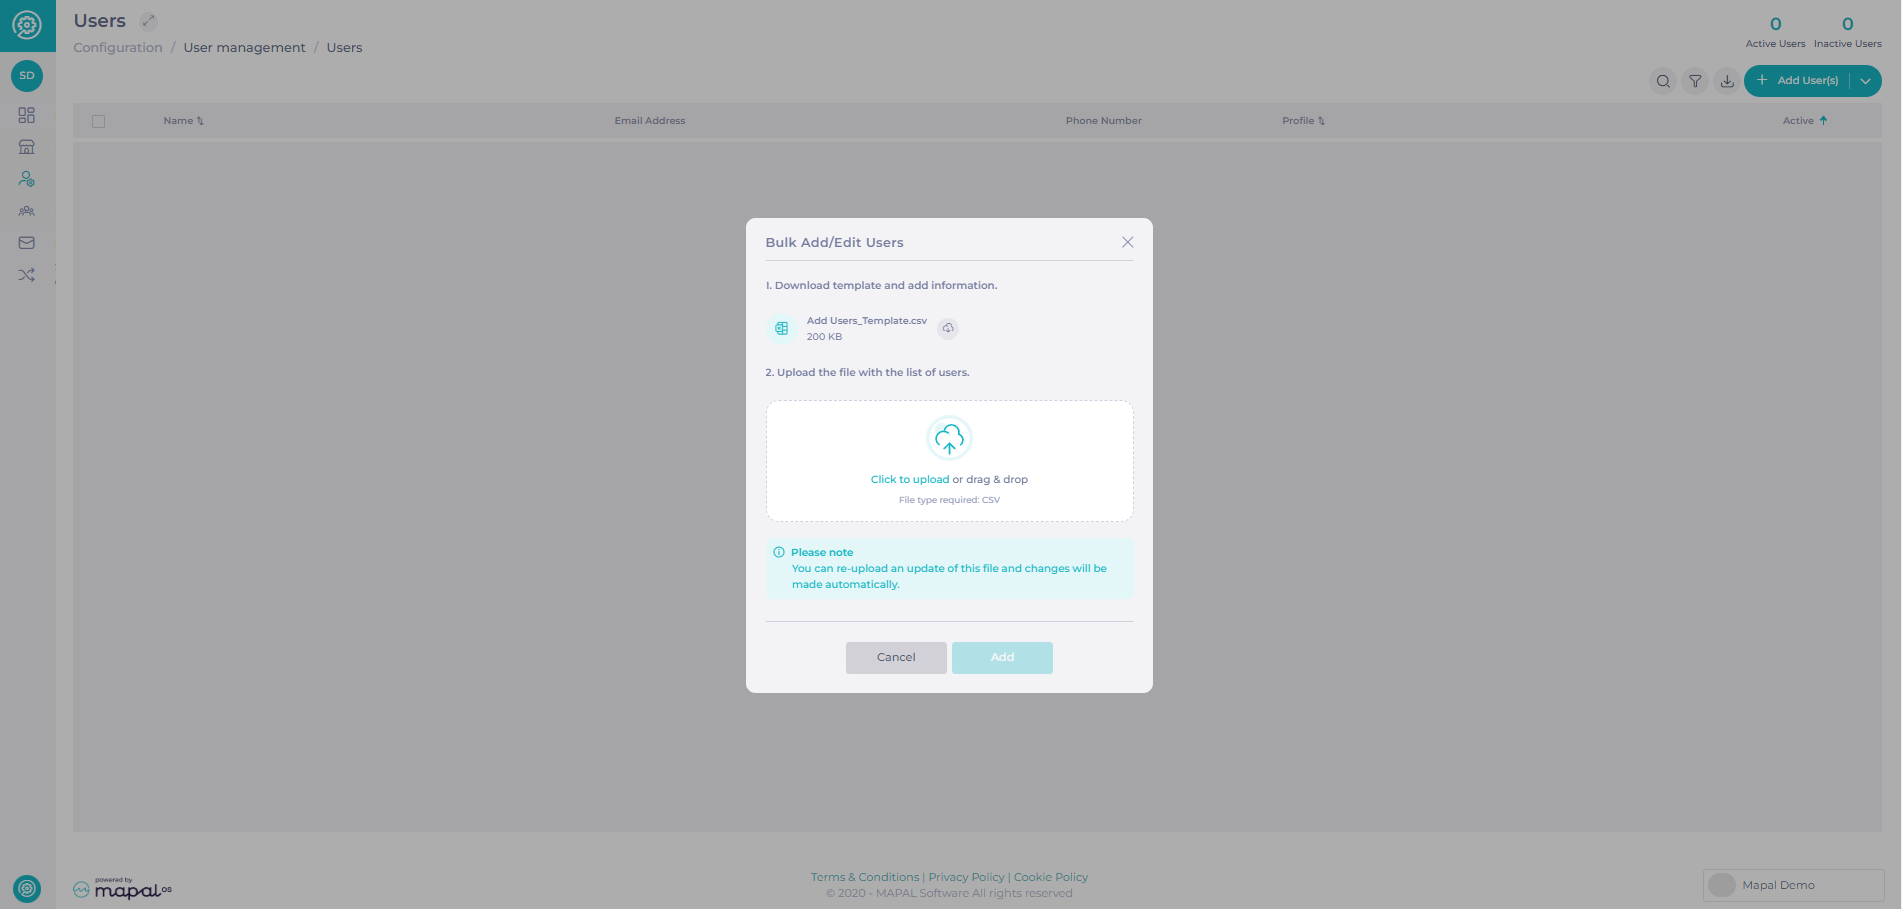
- Select Add to process the upload.
If any errors occur, review the feed logs for detailed information. See Use the feed to check updates for more guidance.