Reactivate a deactivated menu template
Note: actions performed on the Easilys platform are subject to user access permissions. If you are unable to carry out the actions described in the articles, it may be because you do not have the necessary permissions activated on your user profile. Contact the Support team, or your administrator, for help.
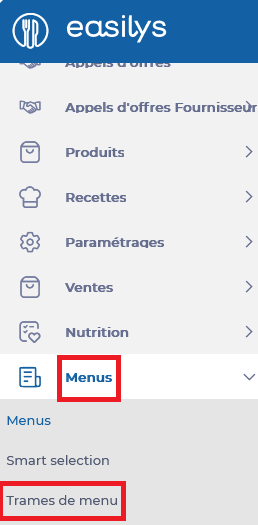
Start from: The Easilys menu.
-
Select the Menus > Menu templates tabs.
-
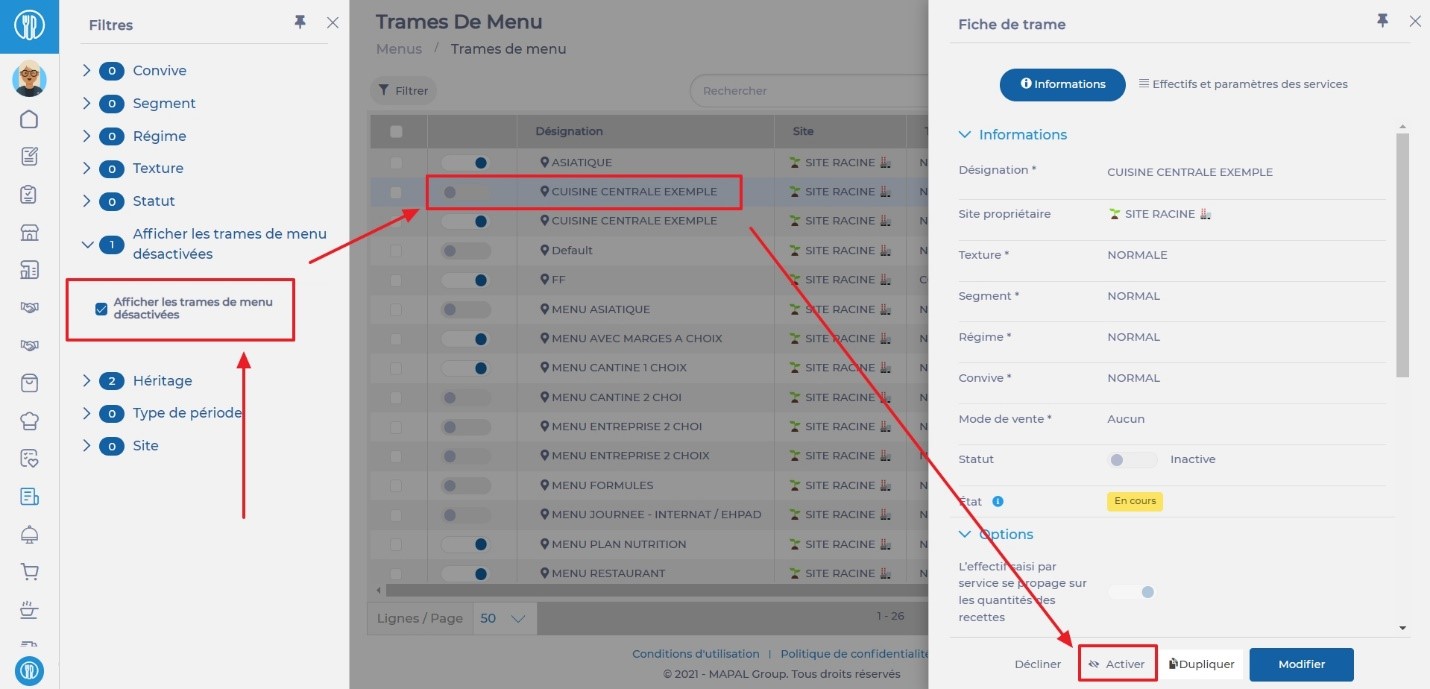
Select the "Display the disabled menu templates" filter.
-
Check the "Display the disabled menu templates" option for this filter.
-
Select the inactive menu template you wish to reactivate.
-
Select Activate in the "Template sheet".
-
Alternatively, you can select the toggle button next to the name of the menu template you wish to reactivate.

Duplicate menus
Note: the actions on the Easilys platform described in the Knowledge Base are subject to user access permissions. If you are unable to carry out the actions described in the articles, it may be because you do not have the necessary permissions activated on your user profile. Contact the Support team, or your administrator, for help.
Start from: The Easilys menu.
You can create your own menus in Easilys to track costs, and benefit from the application's order preparation assistance and production management reports.
To simplify menu set-up, you can use the duplication function. This can be done on the same menu frame, on another menu frame of the site you're working on, or menu frames of other sites if you have child sites.
Duplicate menus on a menu frame available on the same site or on a period of the same frame
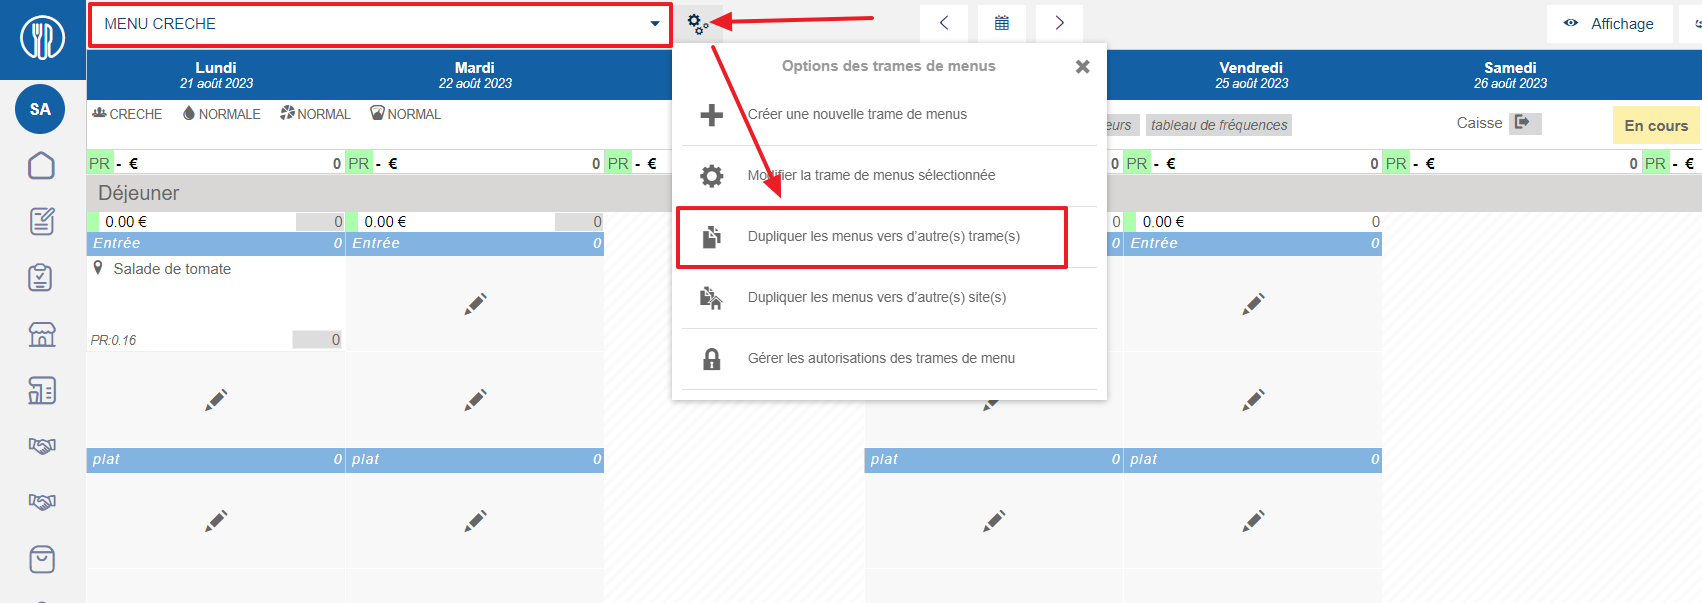
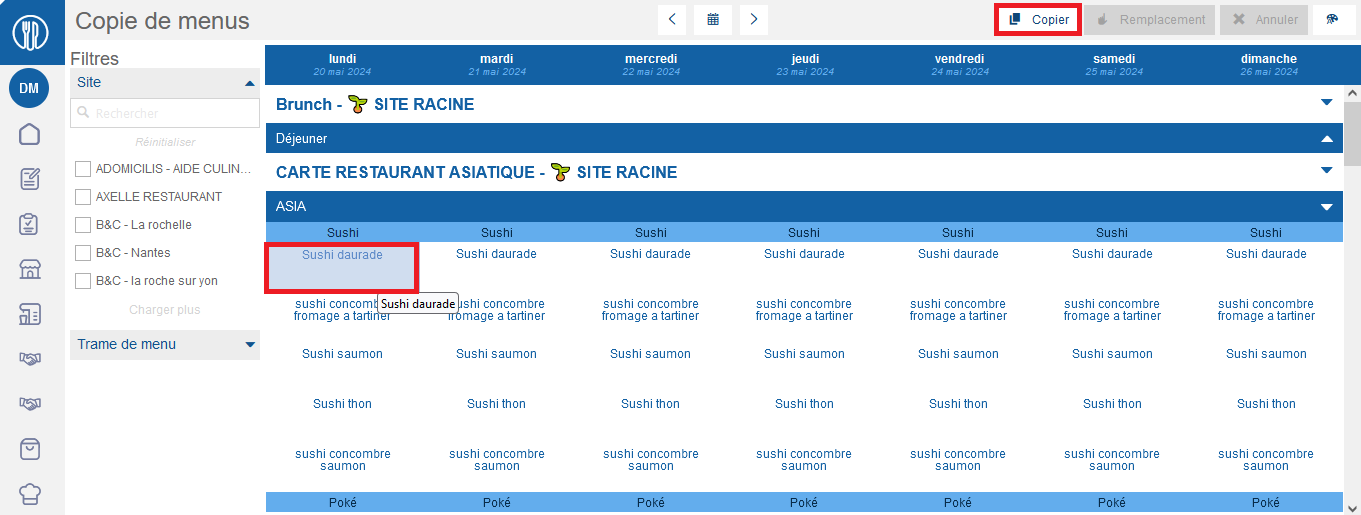
- Select Menus > Menus from the main menu.
- Select the menu frame containing the menus you want to duplicate from the drop-down menu.
- Select the cog icon to open the Menu template options.
- Select Duplicate menus to one or more other categories.
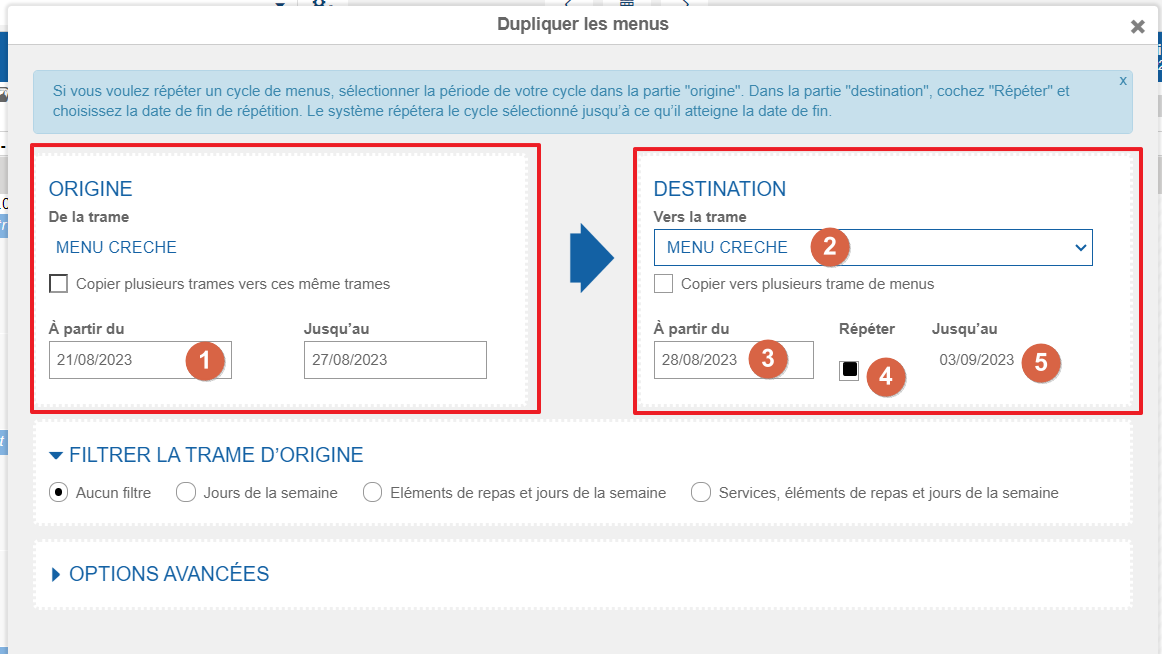
The Duplicate the menus window will appear on screen.
- In the Origin section, indicate the time period to be duplicated. (1)
- In the Destination section, indicate to which frame you wish to duplicate the menus of the time period defined in the Origin section. (2)
Note: this may be the same frame as the original if you wish to duplicate menus over a different period. This is useful for duplicating a menu over a period of time. If you work in commercial catering, we strongly advise you to duplicate the same menu frame to save time if your menu doesn't change from day to day over a long period of time.
- Specify the date from which Easilys should duplicate the menu (in the Destination section). (3)
Optional: if you wish to duplicate the menus of several defined periods until a certain date, check the Repeat box (4) and specify an end date (5).
Optional: apply filters or advanced options to your duplication.
- Select Duplicate in the bottom right-hand corner.
Duplicate menus on a menu frame from another site
- Select Menus > Menus from the main menu.
- Select the menu frame containing the menus you want to duplicate from the drop-down menu.
- Select the cog icon to open the Menu template options.
- Select Duplicate the menus to one or more other sites.

The Duplicate menus to other sites window will appear on screen.
- In the Origin section, indicate the time period to be duplicated.

Optional: check the Automatically create a linked template on the destination sites if it does not exist box, so that the application automatically creates a new menu frame on sites that don't yet have a menu frame whose parent frame is the original menu frame(s) defined in the Origin section.
Optional: check the Copy several templates to these same sites box to select multiple menu frames for duplication.
In the Destination section, indicate to which period you wish to duplicate the menus of the time period defined in the Origin section. (5)
Optional: if you wish to duplicate the menus of the defined period several times until a certain date, check the Repeat box (6) and specify an end date (7).
In the Destination section, indicate to which sites you wish to duplicate the menus of the time period defined in the Origin section. (8)
Optional: check the Copy the templates to all its descendants box so that the application also duplicates the frames on the child and grandchild sites of those selected in the Destination section. Duplication will only take place if a menu frame with the original menu frame as its parent menu frame is present on the child sites.
Optional: apply filters or advanced options to your duplication.
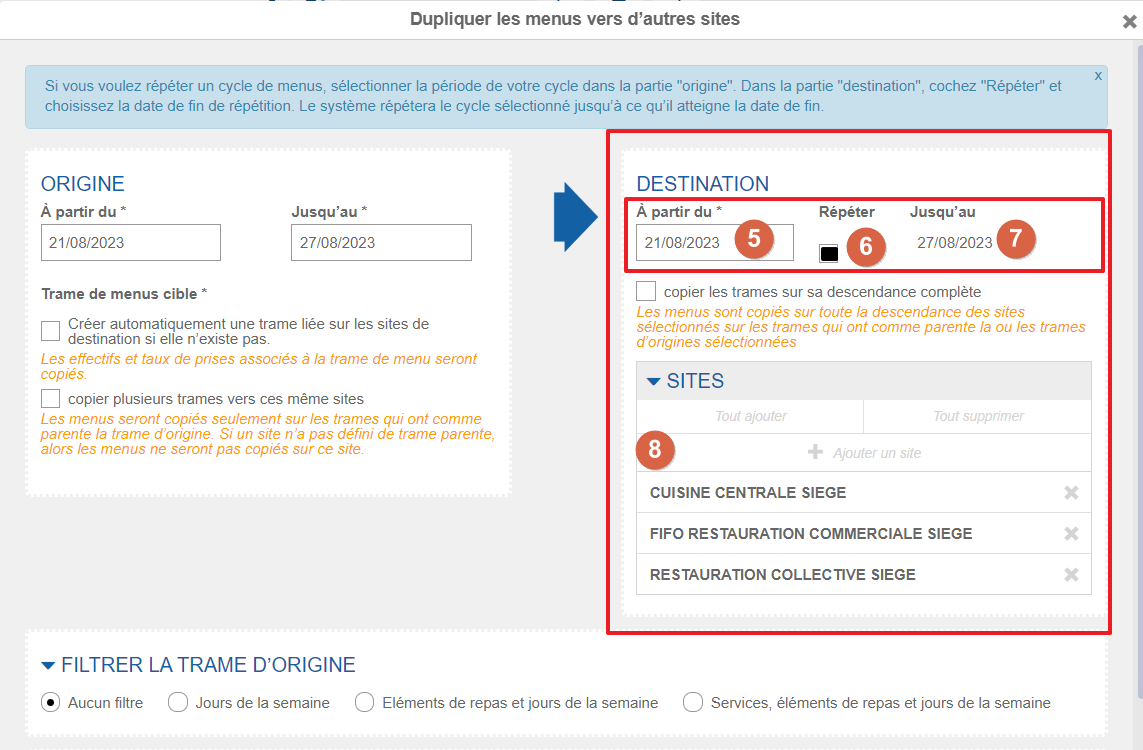
- Select Duplicate.
A green confirmation message will appear.
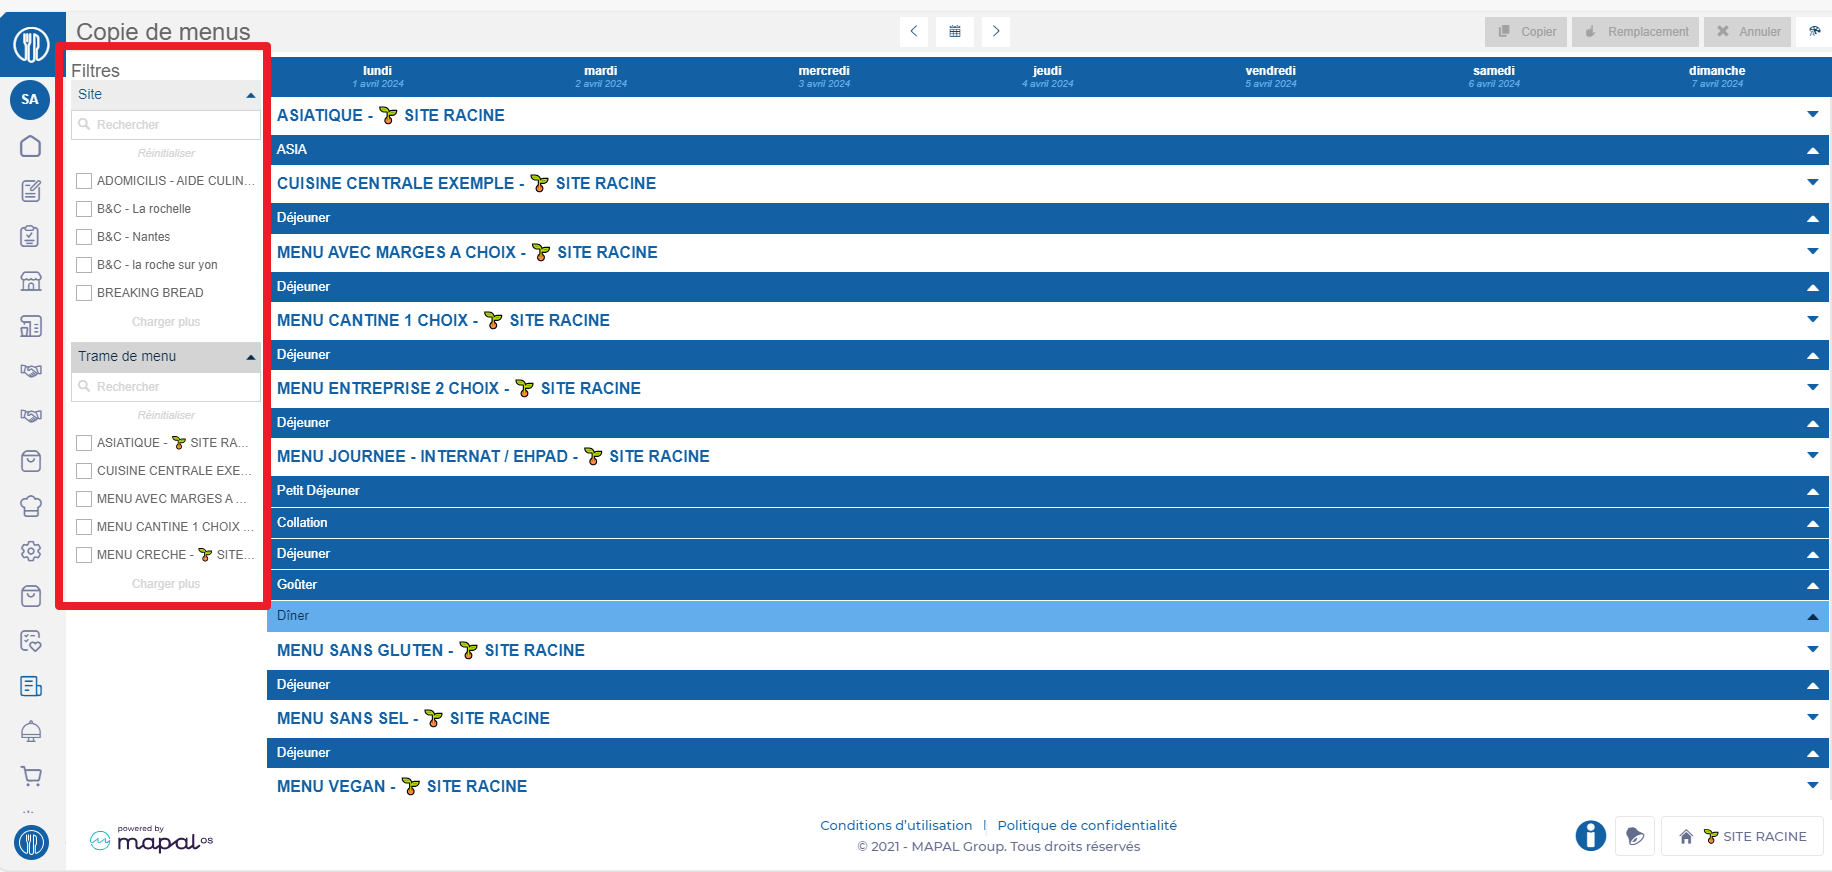
Use the Copy menus screen
Note: actions performed on the Easilys platform are subject to user access permissions. If you are unable to carry out the actions described in the articles, it may be because you do not have the necessary permissions activated on your user profile. Contact the Support team, or your administrator, for help.
Start from: the Easilys menu.
The Copy menus screen has been designed to facilitate menu management for multi-site administrators. With this screen, it's easy to copy part of a menu available on site A to the menu on site B.
- Select Menus > Copy menus.
By default, only the menu frames of the site you're on are visible. Using the filters on the left, you can display all or part of the frames of other sites.
Copy recipes from one service to another and/or to another date
- Select the service name, then select Copy to copy the service from the menu. (You can also use the shortcut CTRL+C to copy).

- Select the service name from another menu onto which you want to paste the previously copied service.
- Select Replace (or use the shortcut CTRL+V) to paste the copied service onto the selected service.
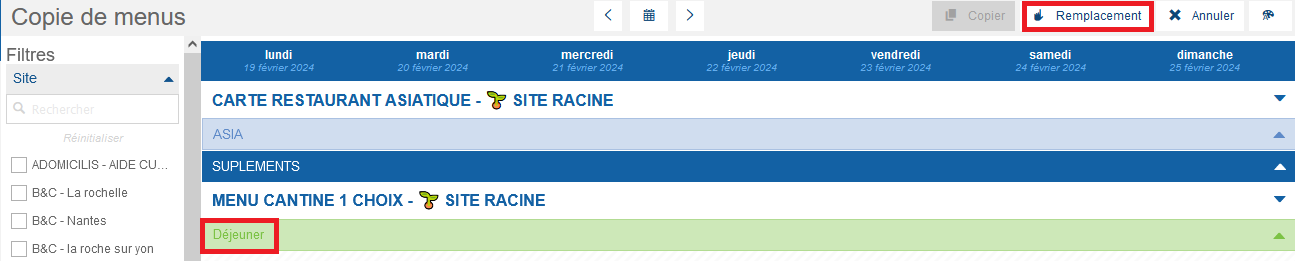
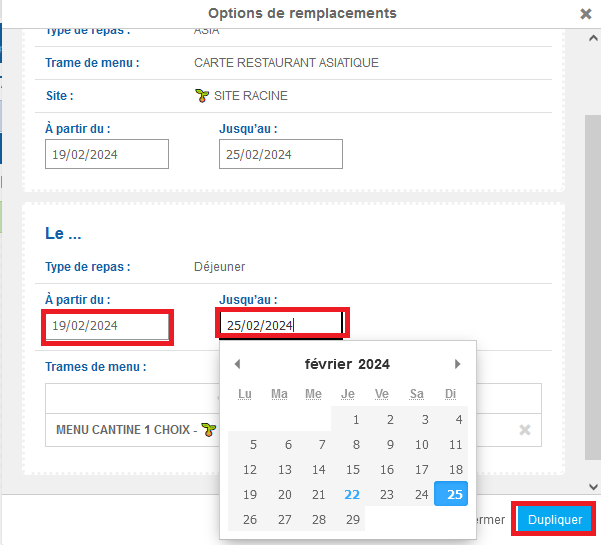
The Replacement options window appears.
- Select the time period and select Duplicate.
You can, for example, copy a service onto itself to duplicate it over a defined period.
Copy a recipe for a meal item
It is possible to copy a recipe present in a menu to another location in the same menu or in another menu, possibly for a different service and/or a different site.
- Select the recipe you wish to copy.
- Select Copy.
- Select the recipe you wish to replace. If the recipe you wish to replace is on another site, make sure that this site is checked in the left-hand filter so that these menus are visible, then select the service in which the recipe you want to replace is located, then select the recipe you want to replace, then the Replace button.
- Select Save now to save your changes.
Create, modify and delete order models
Notes: actions performed on the Easilys platform are subject to user access permissions. If you are unable to carry out the actions described in the articles, it may be because you do not have the necessary permissions activated on your user profile. Contact the Support team, or your administrator, for help.
Start from: the Easilys menu.
An order model enables you to quickly generate an order cart. An order model is created from an order already sent.
This is a very useful time-saving feature when you have recurring orders that are globally always equivalent.
Once you've generated a shopping cart from a model, you can modify it as you would a normal shopping cart if you need to make a few minor adjustments.
Create an order model
- Select Supplier orders>Track orders from the main menu.
- Select an order that has already been sent.
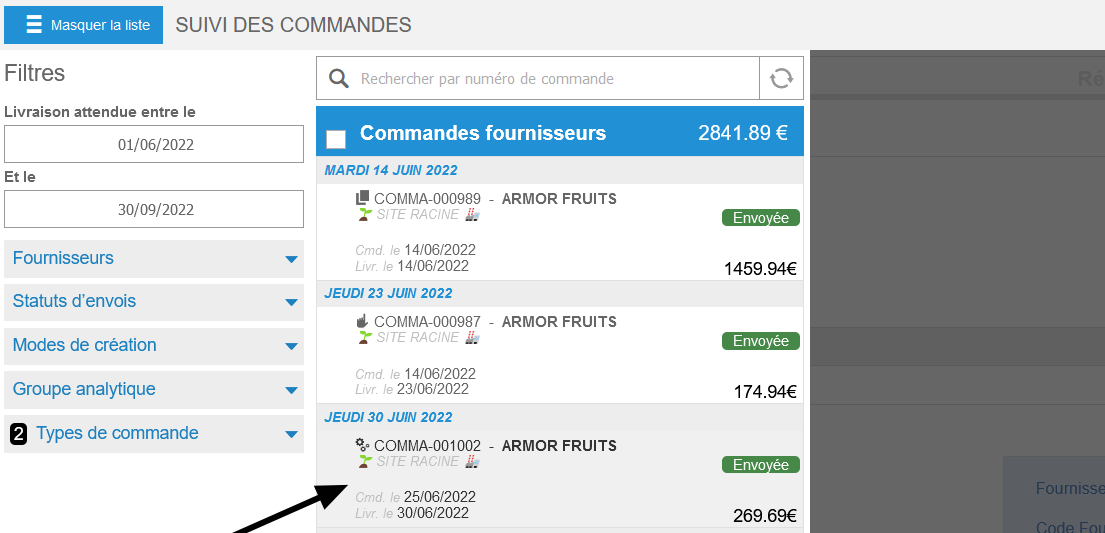
The order details will appear on the screen.
- Select Create a model.
The Create a new model from this order window will appear on screen.
- Enter a name for the model and select Create.

Modifying an order model
- Select Supplier orders > Supplier orders from the main menu.
- Select the Models tab.
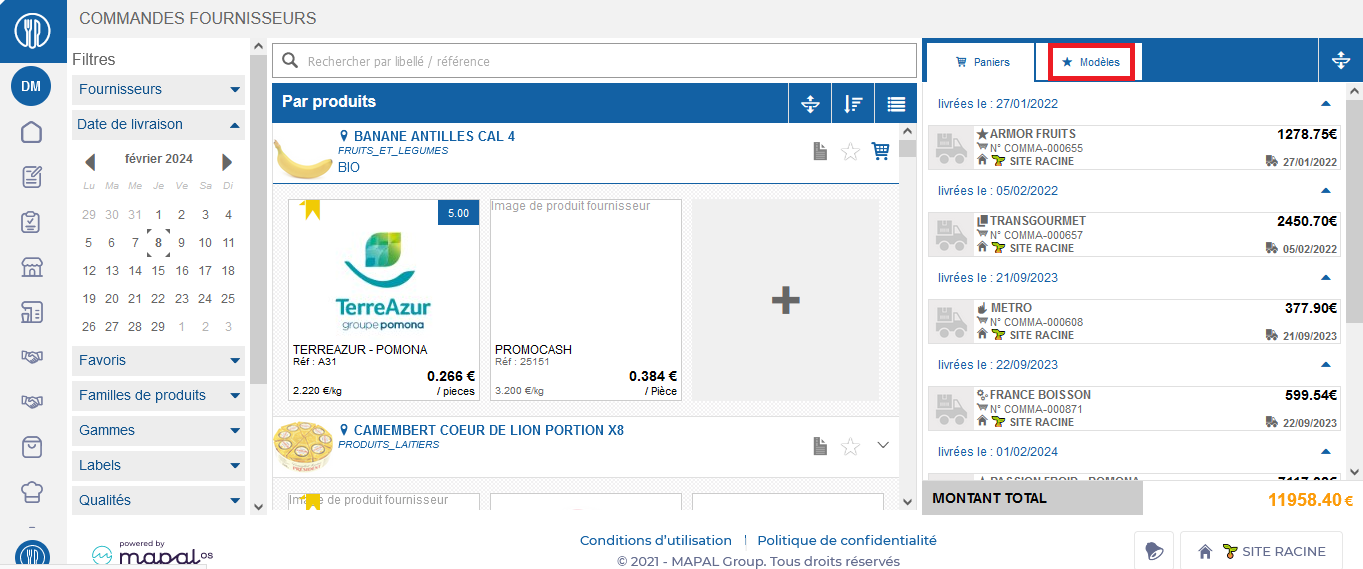
- Select the model you wish to modify.
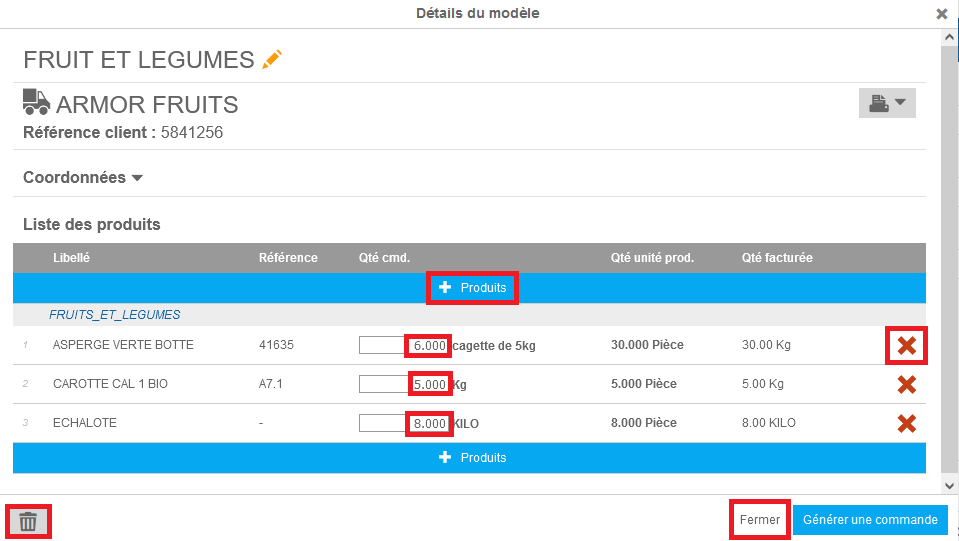
The Model details pop-up will appear on screen.
- Select the red cross to delete a product.
- Select + Products to add a product.
- Modify the quantities as you wish.
- Once you have made your changes, select Close.
- Select the recycling bin icon to delete a model.
Delete an order model
- Select Supplier orders > Supplier orders from the main menu.
- Select the Models tab.
- Select the red cross next to the model name to delete it.
A deletion confirmation window appears.
- Select Remove to confirm deletion of the model.
Using an order model
- Select Supplier orders > Supplier orders from the main menu.
- Select the Models tab.
- Select a model.
The Model details pop-up will appear on screen.
- Select Generate order.
The Choose the generation parameters window will appear on screen.
- Choose an appropriate delivery date.
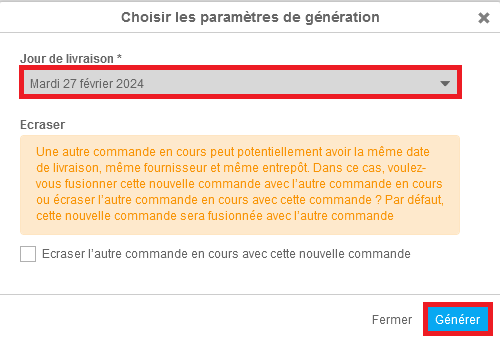
- Check Overwrite the other order in progress with this new order if you want this order to overwrite any other order cart from the same supplier being prepared on the same date.
- Select Generate.
You'll then be redirected to the order cart.
Note: once the shopping cart has been generated from this model, you can modify it as required, either as a manually created shopping cart or one generated with Easilys support, from the Order Preparation screen.
Set up goal templates
How goals can be used
- The manager assigns out a goal template after a yearly appraisal with their staff member.
- The learner updates the document with the areas they want to progress on, as agreed with their manager in the appraisal.
- Objectives and subsequent tasks are created for each 'check in' throughout the agreed time period.
- The manager agrees and signs off on the goal document.
- The learner updates their progress using the check in values set up.
- Once the goal document is complete, the manager or learner can use it to reflect on the progress made and feed it into the next appraisal.
How to set up a goal template
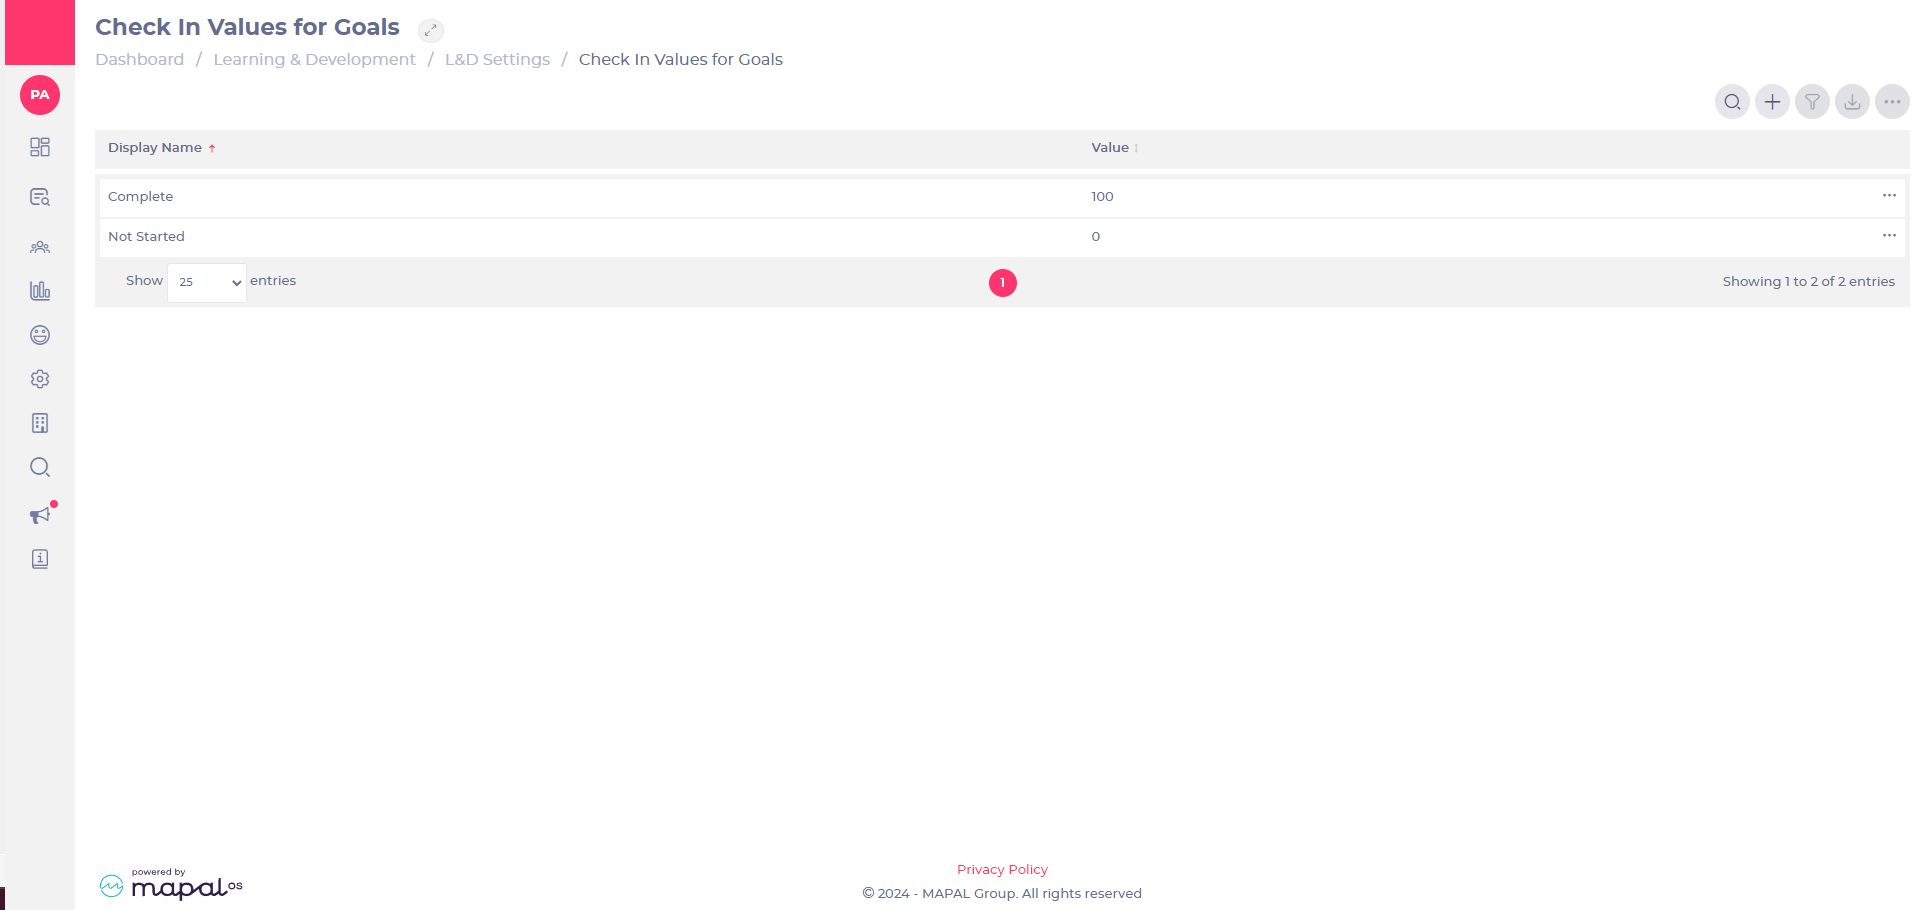
1. Set up Check in values
- Select Learning & Development > L&D Settings from the main menu.
- Scroll down to the Goals section and select View (the cog icon) on the Check In Values for Goals tile.
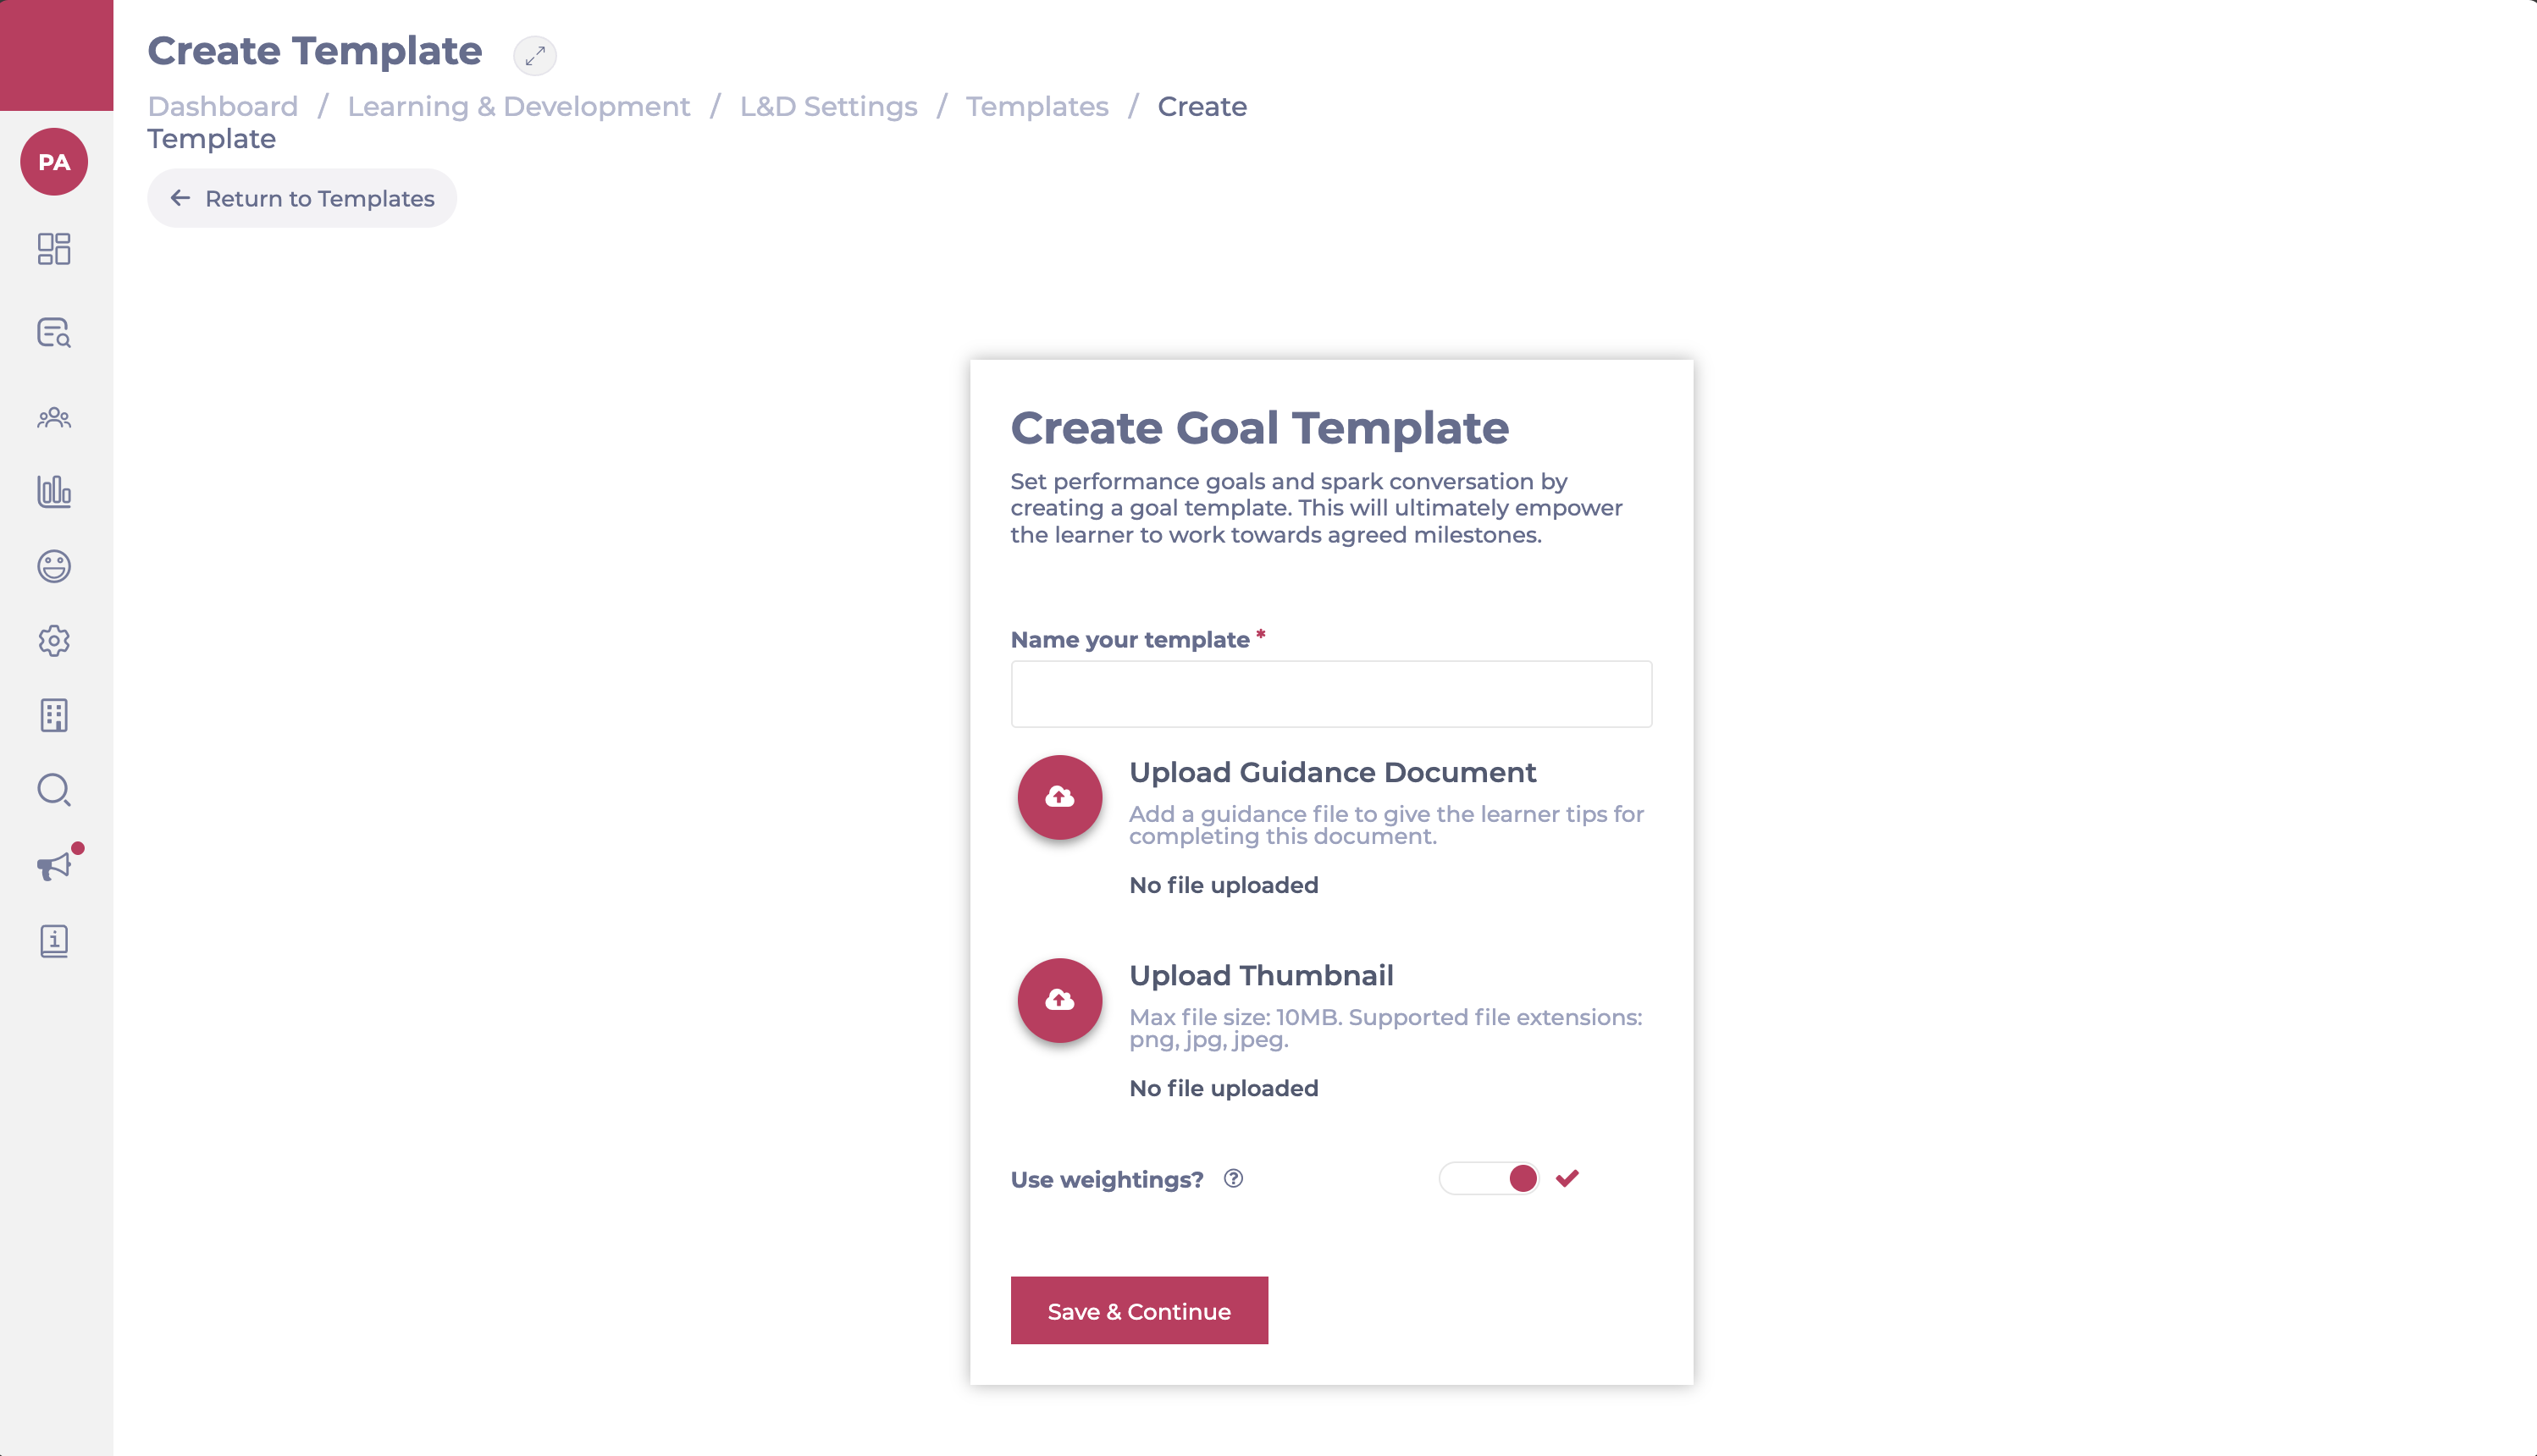
2. Create your goal template
- Select Learning & Development > L&D Settings from the main menu.
- Scroll down to the Goals section and select View (the cog icon) on the Templates for Goals tile.
- Select Add (+).
- Enter a name for your template. You can also upload a guidance document to give the learner tips on how to complete the goal, and a thumbnail image, if you wish.
- Toggle Use weightings? to choose whether or not the goal template includes a weighting system for objectives and tasks.
- Select Save & Continue.
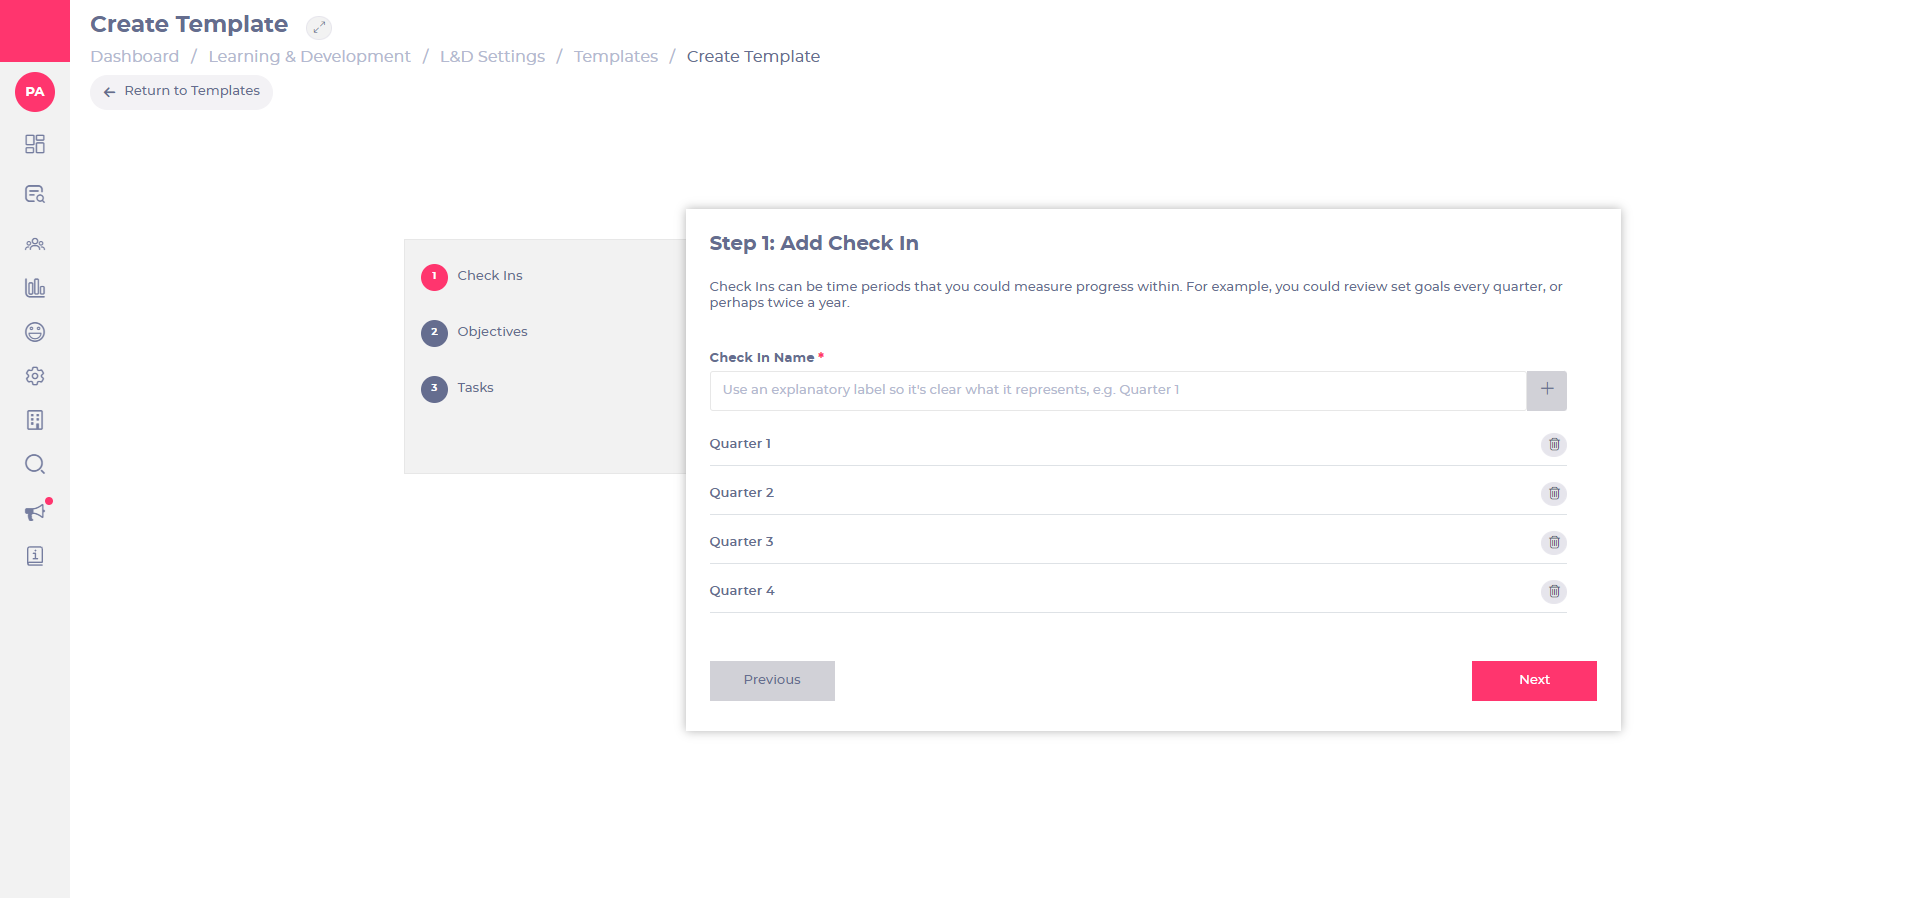
3. Create check-ins
Check-ins are updates on the current progress. You can set these to be weekly, monthly, quarterly, whatever suits best the goal template you’re creating.
- Enter a name for your check-in.
- Select the plus icon (+) to add as many check-ins as needed.
- Select Next when you finish.
4. Build objectives and tasks
Create objectives that will help the learner achieve their overall goal. Objectives are made up of multiple tasks, which are actions that a learner must or should take.
We recommend giving the learner the responsibility to set these, as they’re related to their own development and the goals they want to work towards. You could create basic objectives and tasks named Objective/Task 1 2, 3, etc., and leave these for the learner to complete with an appropriate title and description.
- Enter a template name for the objectives. Noteselect + Add Objective to create as many objectives as needed.
- Enter a template description or leave blank for learners to complete.
- Choose whether to use Weighting or not for tracking progress.
- If Weighting is enabled: Assign a percentage value to each objective/task.
- If Weighting is disabled: Progress will be tracked based on completion without specific weighting.
Note: If using weightings, the total must add up to 100%, or an error will appear.
- Select the Edit, Move or Delete buttons next to each objective or task if you need to make changes.
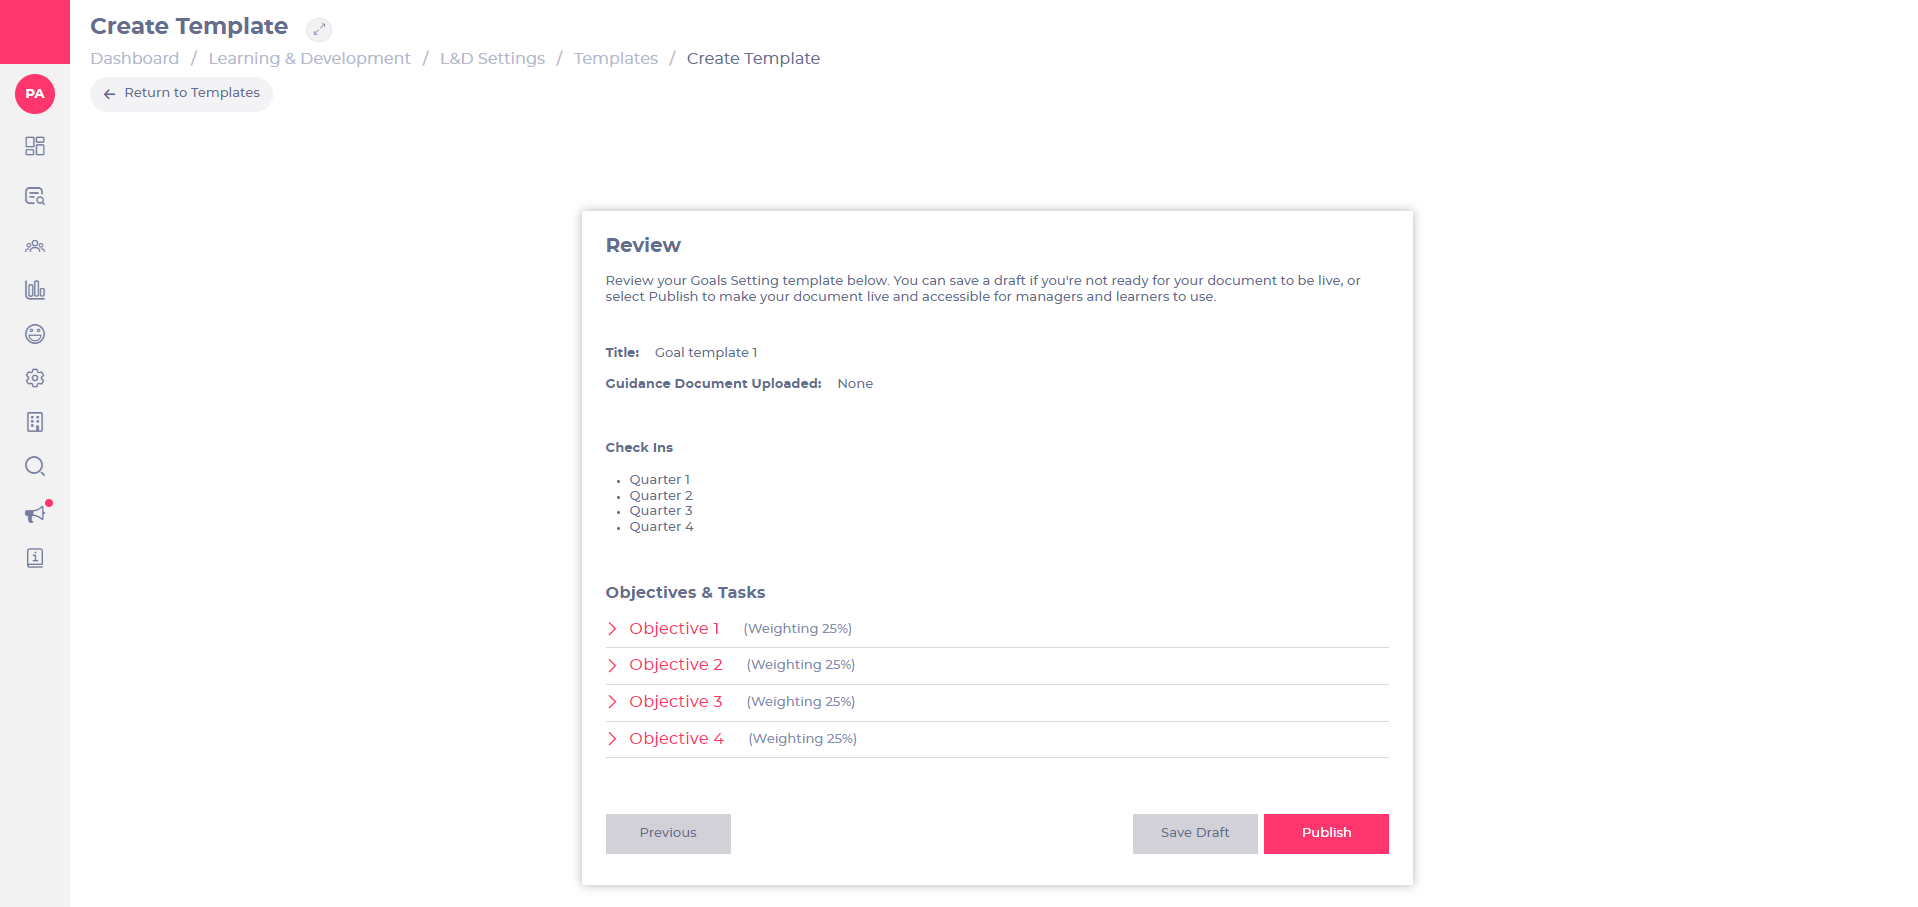
- Select Review to see how your objectives and tasks will look like.
- Select Save Draft to keep a copy if you’re not ready for the document to be live or Publish to make the document live and accessible for managers and learners to see.
Copy a task in a form
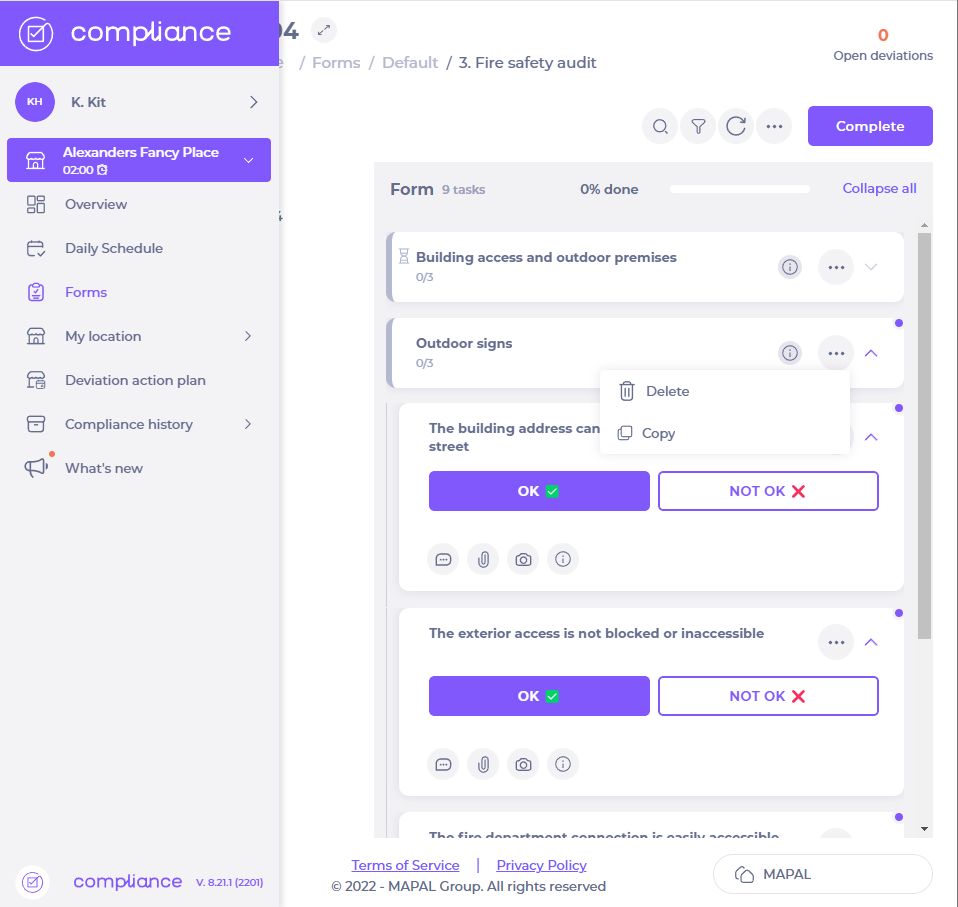
- Select + START NEW.
- Select More (the three dots icon) next to the parent task you wish to copy.
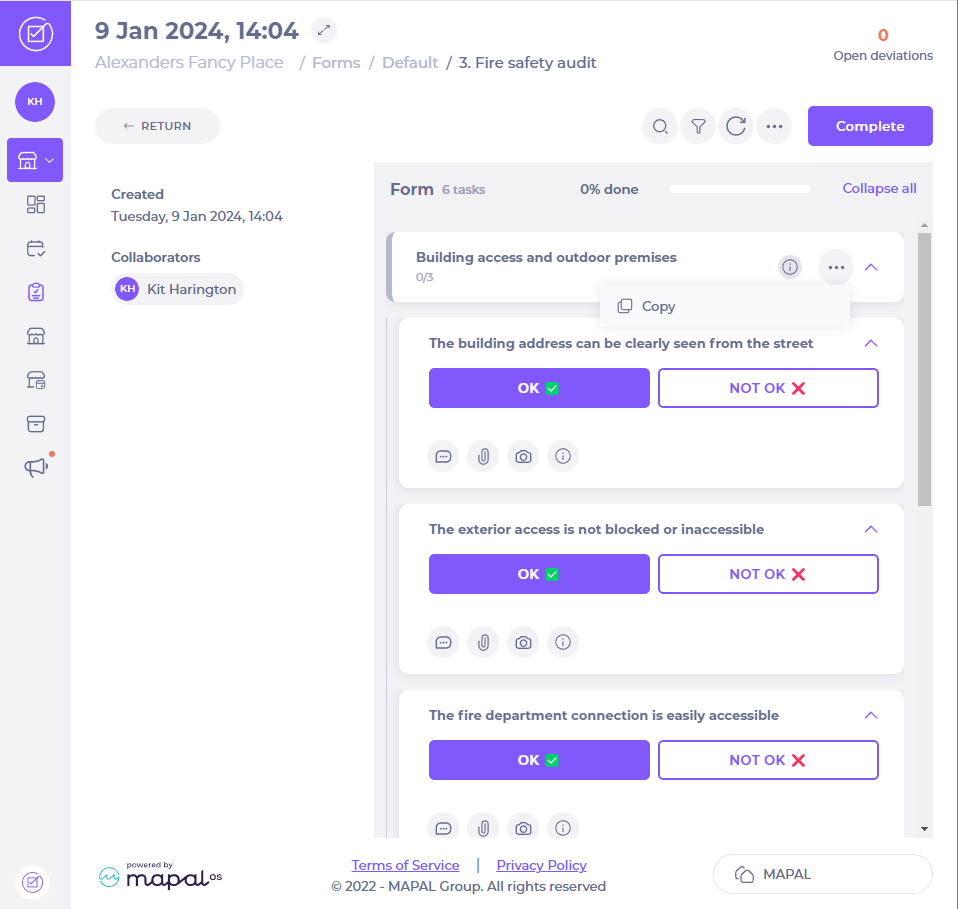
- Select Copy.
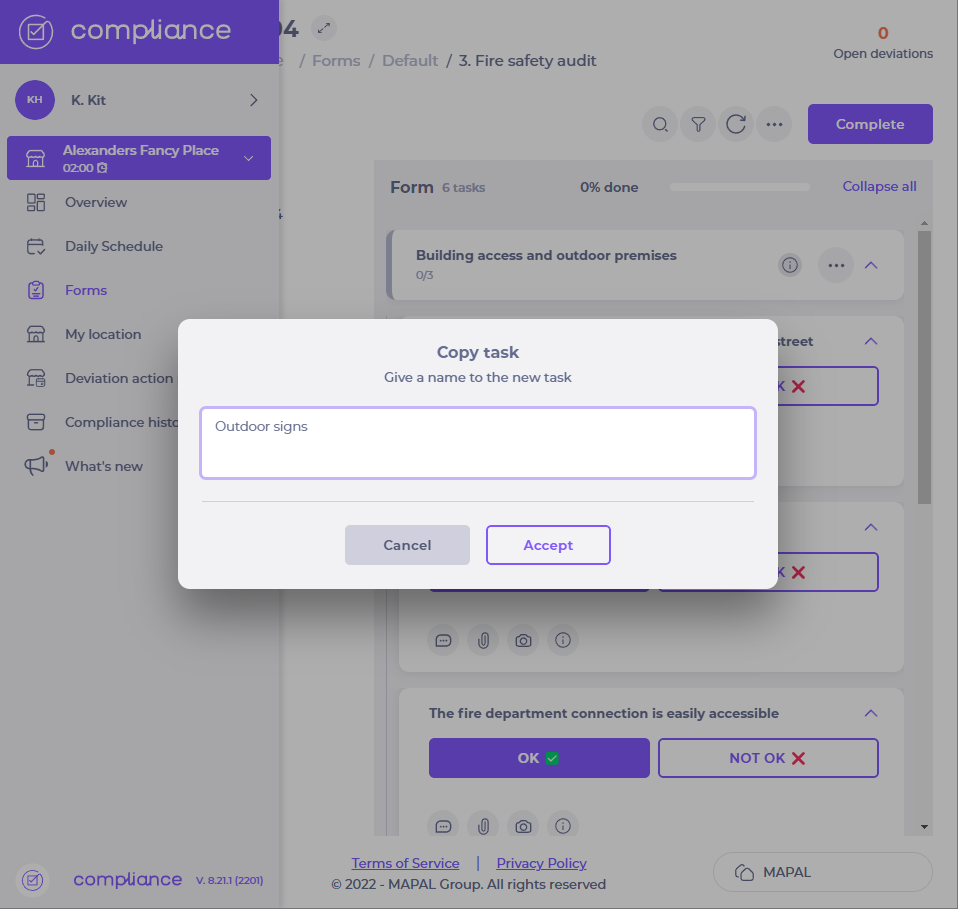
- Enter a name for the new copied task and select Accept.
Copy an existing form
Save, load, and edit shift templates
Start from: The Workforce module.
-
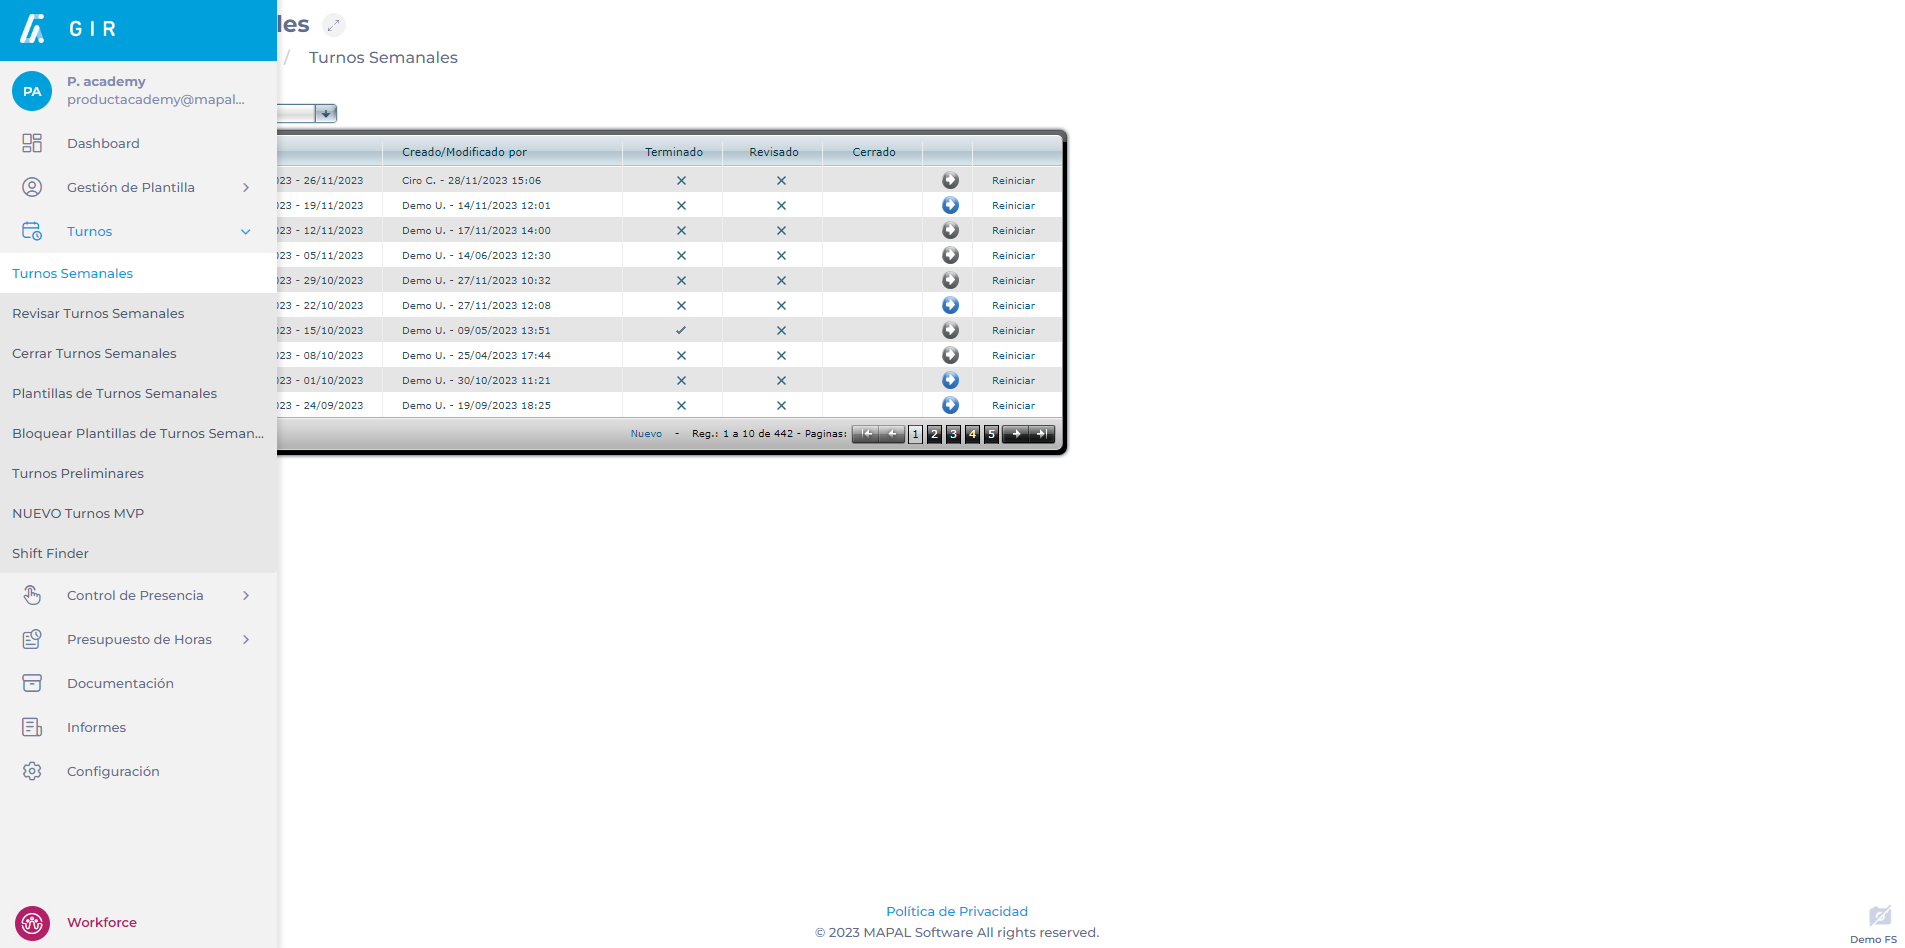
Select Scheduling > Weekly ROTAs from the main menu.
-
Select the Work Center where you will create the shift template.
-
Select New to create a new weekly shift.

Notes: You can configure a weekly shift that has already been created by selecting the Arrow icon. If the icon is blue, it means that there is already data saved in that week.
-
In the Projected Shift screen, select the Templates button. Once the button is clicked, a box will appear in which you can select one of two options: Apply Template or Save Shift as Template.
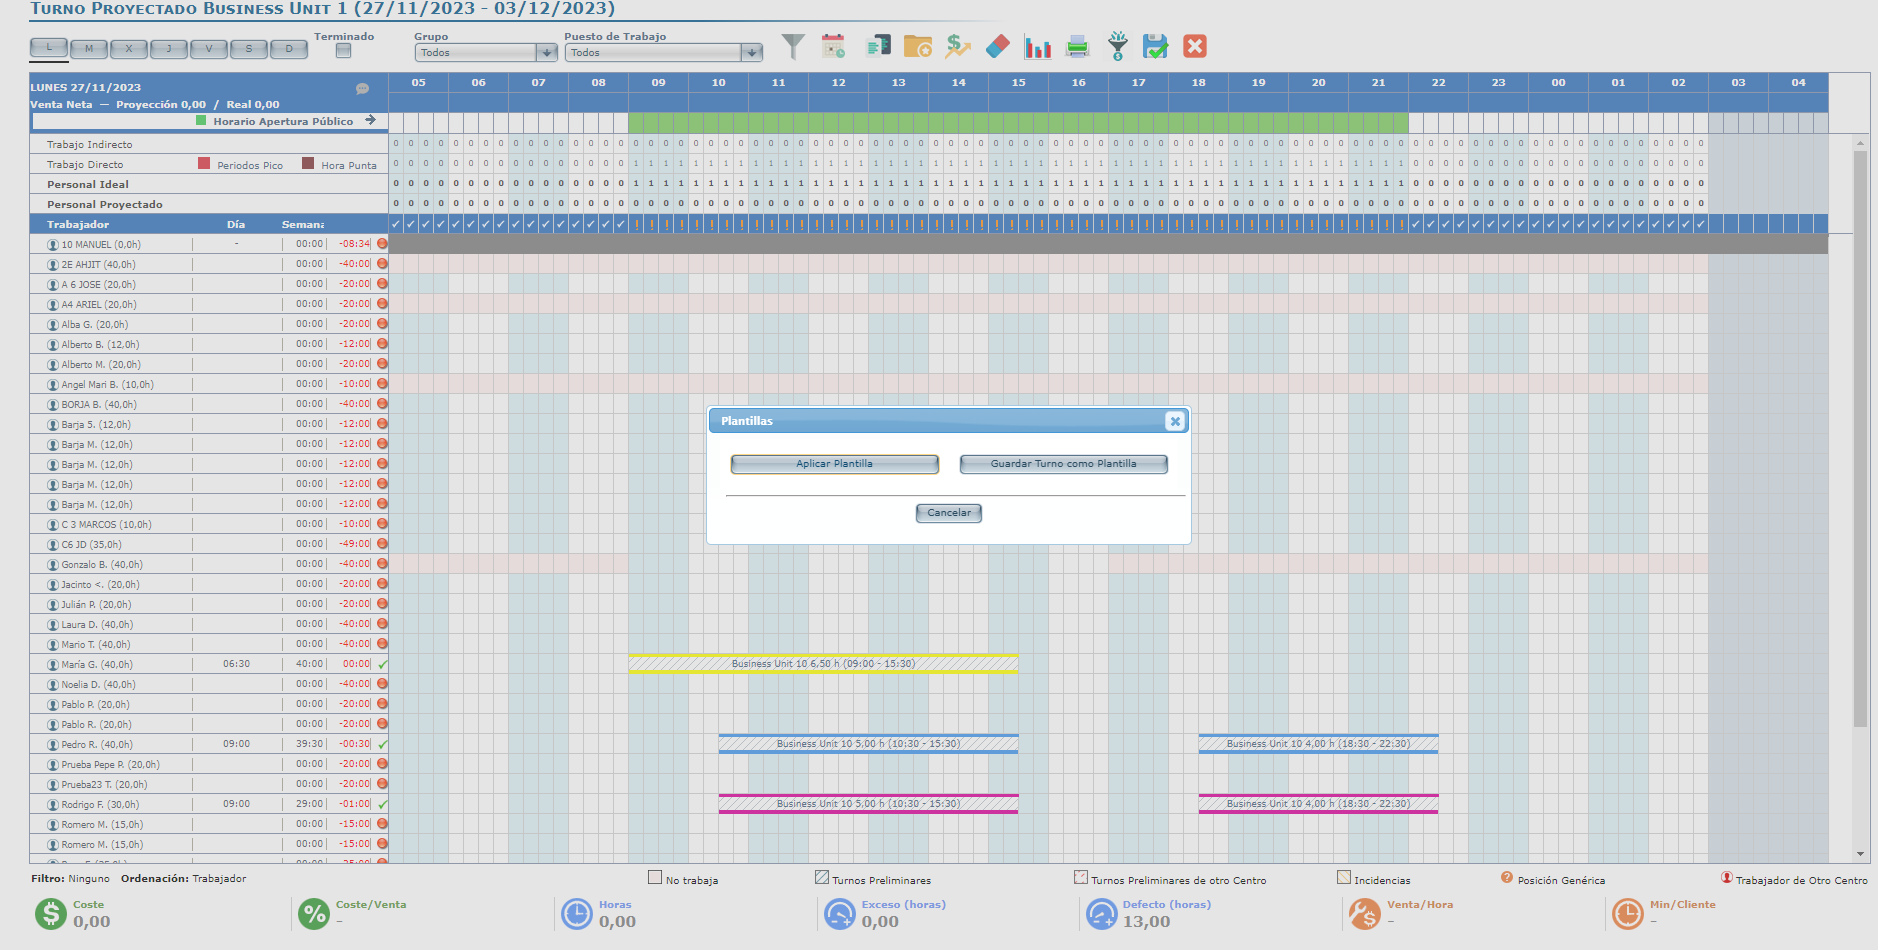
Save Shift as Template
This option will save the current shift as a template for future use. To save a shift as a template:
-
Assign a name to the template.
-
Write comments on the template if necessary.
-
Select the Accept button to save the new template OR Cancel to discard it.

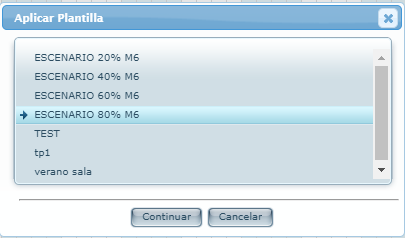
Apply Template
This option allows you to choose from previously saved templates to assign to a new shift. To apply a template:
-
Select the desired template from the drop-down menu.
-
Select the Continue button to load the chosen template.
-
Once the Template is selected, a Quadrant will appear with the projected shifts.
Note: Workers will be generic, so their names will not appear. Real workers must be assigned using one of two available methods, both of which are specified in the next section of this guide.
-
Press the Continue button to apply the quadrant.
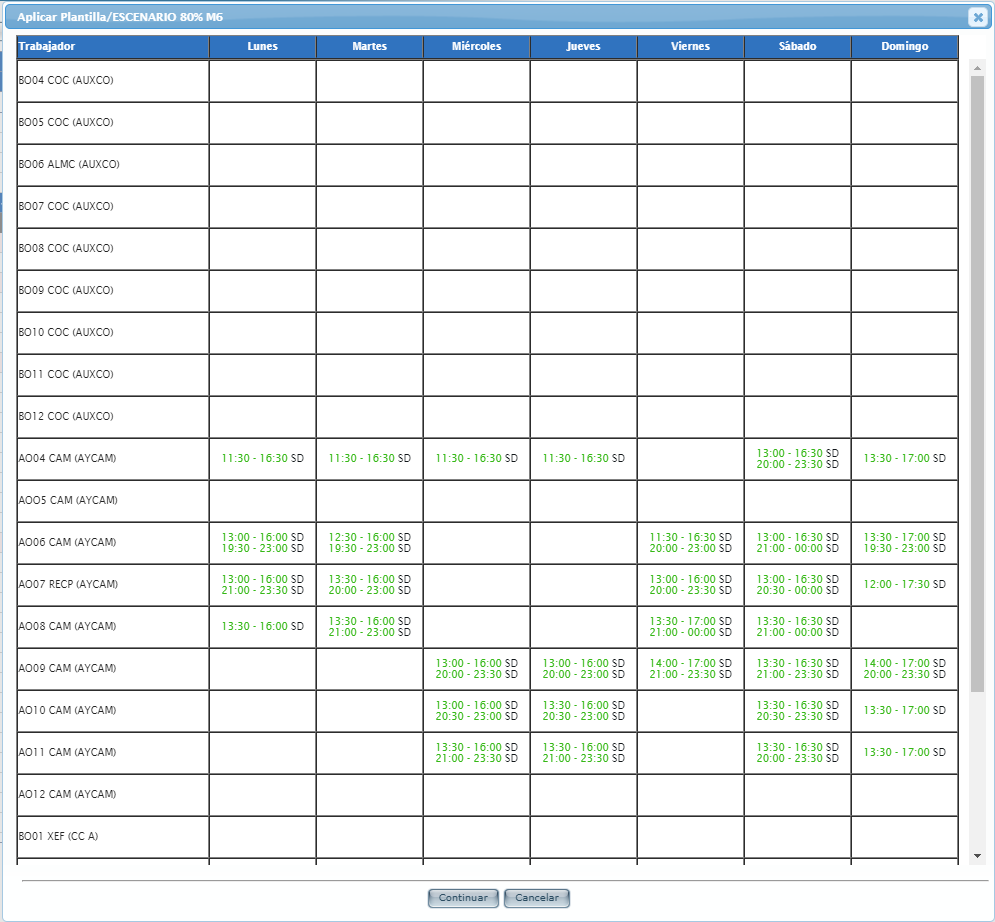
Once the template has been applied, each selected worker will be assigned the weekly shift and the time off they had in the previous week selected.
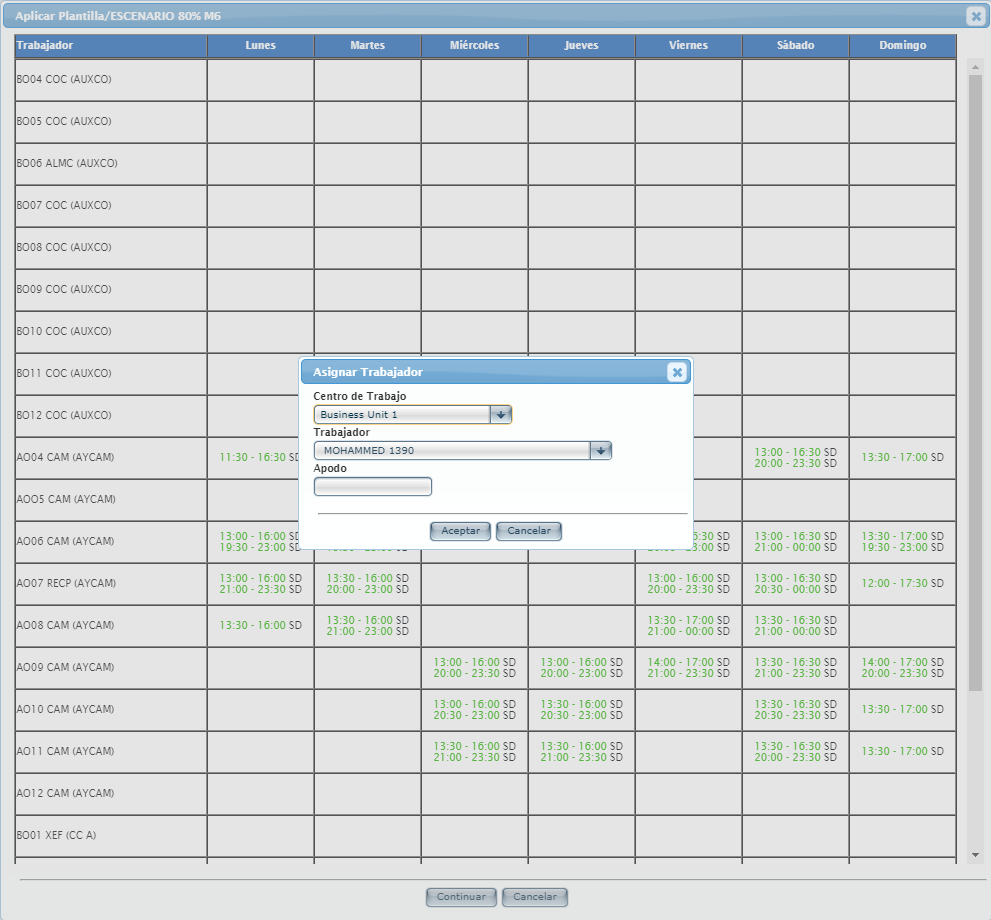
Assign real workers
Before applying the template
-
In the Apply Template pop-up window, select the generic worker field.
-
In the Assign Employee pop-up window, select the Work Center and Employee you wish to assign.
-
Select Accept to save the selected worker OR Cancel to discard the selected worker.
After applying the template
-
In the Projected Shift screen, select the generic worker and click the right mouse button.
-
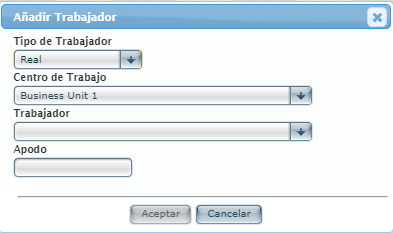
Select Add Employee from the list of options.
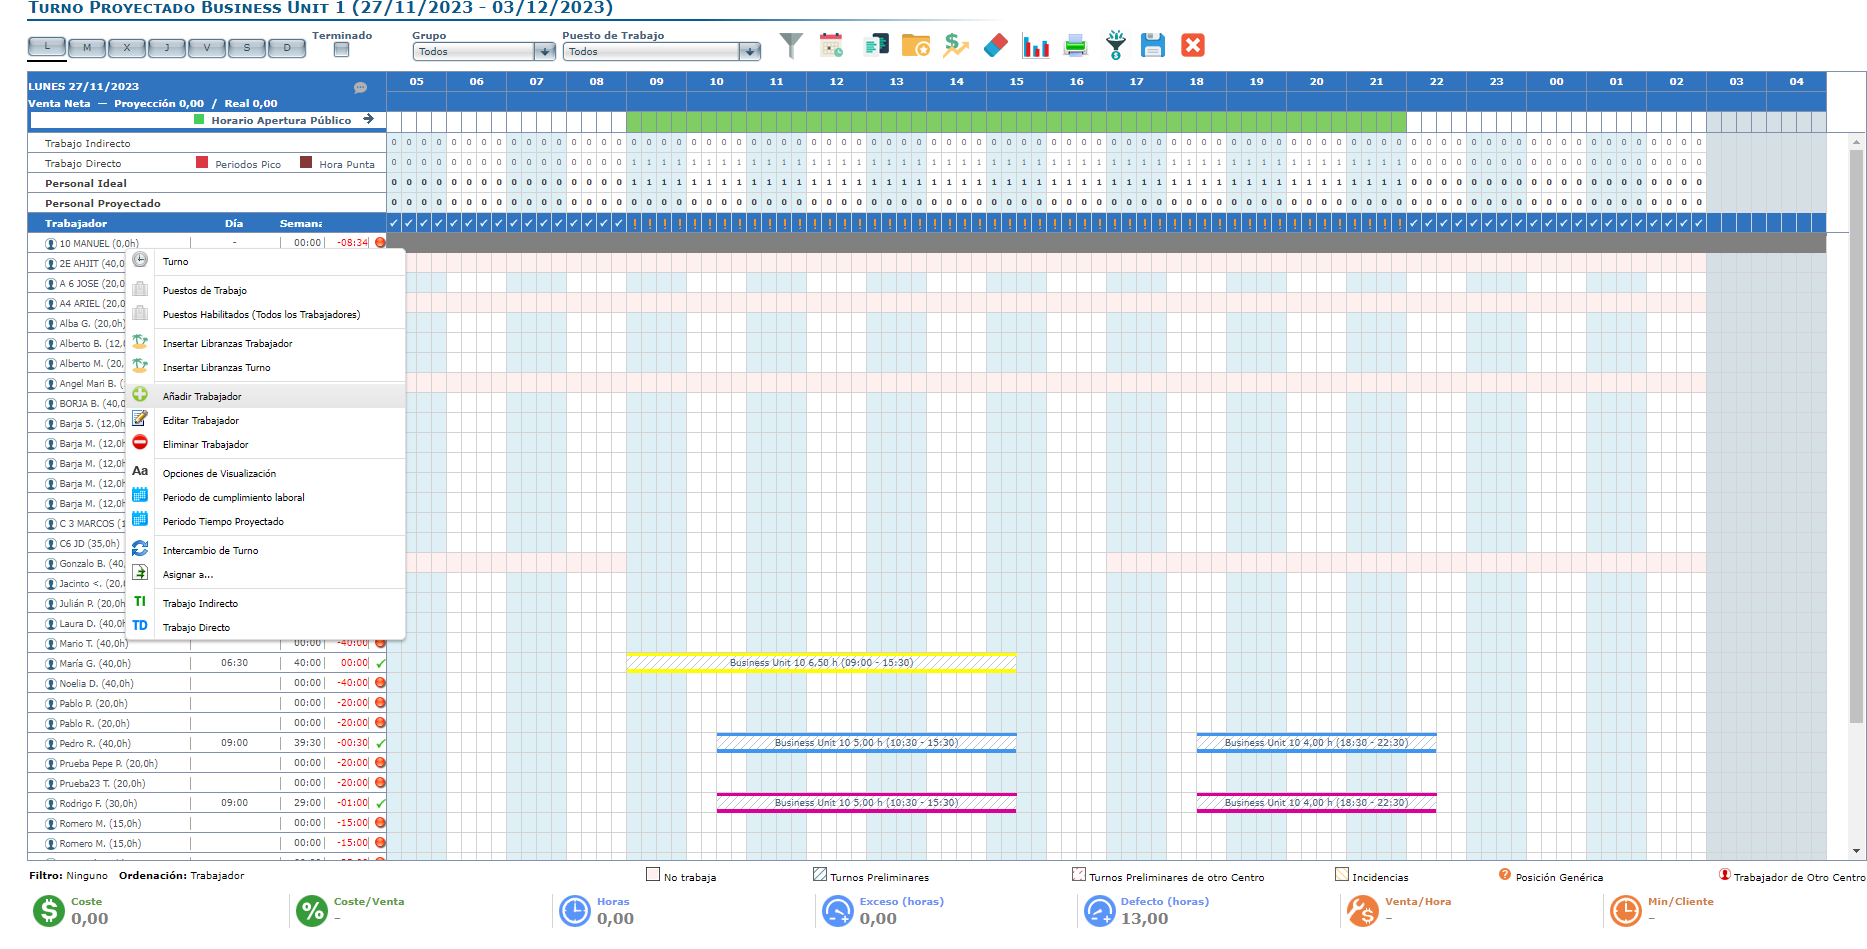
-
In the Add Employee pop-up window, select the Work Center and Employee you wish to assign.
-
Select Accept to save the selected worker OR Cancel to discard the selected worker.
To finish the shift template application process and save the work done, see Mark shift as completed.
Edit shift template
-
Select Scheduling > Weekly ROTA Templates from the main menu.

-
Select the Work Center where the shift template to be edited is created.
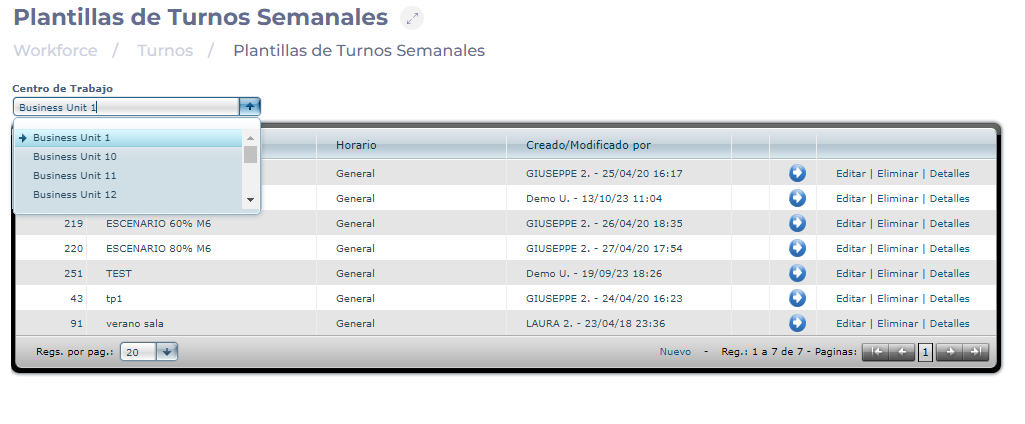
Notes: The Edit button only allows you to make changes to the description and observations assigned to the template.
-
Select the Arrow icon to open the shift template. In this screen, you can edit all the details related to the template configuration, such as the projected working time, labor information, time off, etc.

-
When completing the changes to the template, select the Save button to keep the changes OR Exit without saving to discard the changes.
Create Knowledge Checks (Quizzes)
Start from: The Flow Learning Dashboard.
Knowledge Checks
Knowledge Checks, often implemented as quizzes, enhance the learning experience by making it more interactive and engaging. This tool allows you to create quick assessments that help learners reinforce their understanding of key concepts. By incorporating quizzes, you can move learning into a more active space, improving information retention and ensuring that learners grasp essential topics before progressing. Knowledge Checks can be customised with various question types and are a valuable resource for tracking learner comprehension.
Knowledge checks setup
- Select Learning & Development > L&D Settings > Knowledge Checks from the main menu.
- Select Add (+).
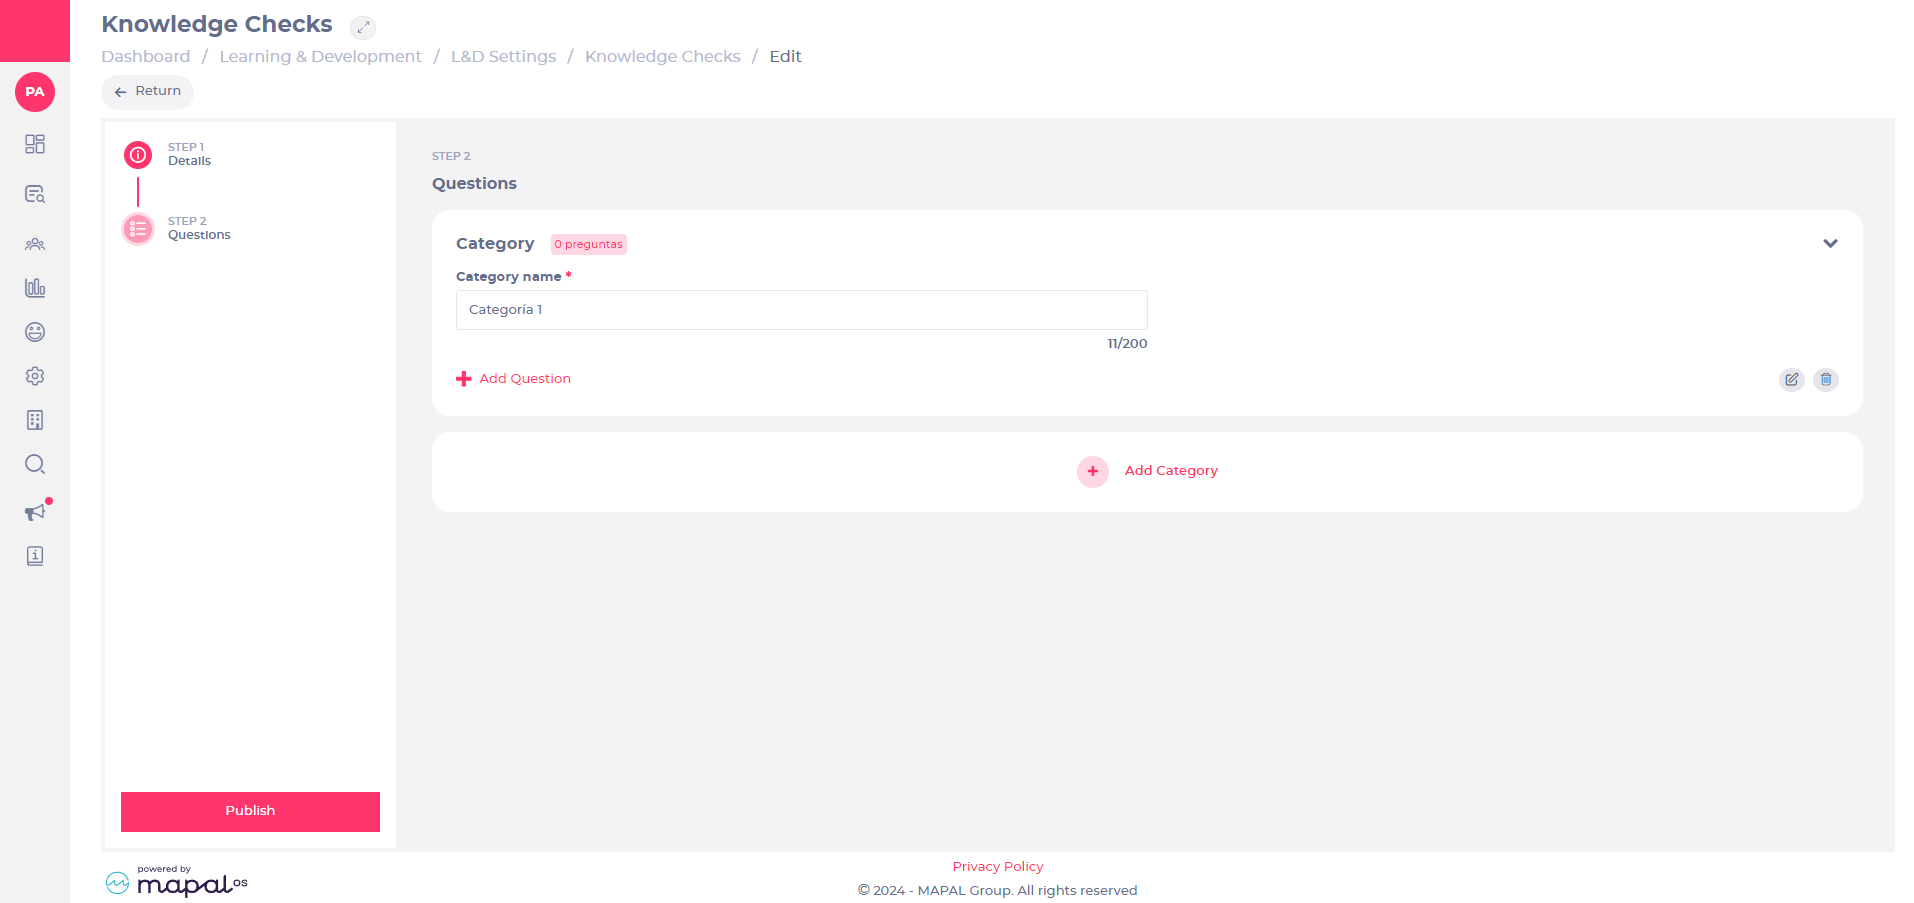
Details section:
- Enter a title, a description, a thumbnail and a passmark.
Questions section:
- Add a number of categories (to group similar question types).
Note: You can add up to 25 questions.
- Within questions, you can select 2 types of questions:
- Single Select
- Multi Select
Note: Select which answer is correct, so that the system can score the user correctly. Scores will be calculated based on the number of questions in the Knowledge Check and the number of correct answers a user has given.
Build training modules using Module Builder
In our ongoing effort to provide the best learning tools, we will be retiring the Module Builder in 2025. Find out more about how we're rolling out these changes.
Start from: The Flow Learning Module Builder Modules List. Select Learning & Development > Module Builder from the main menu to access.
Note: Module Builder is only available for customers who have it as part of their plan.
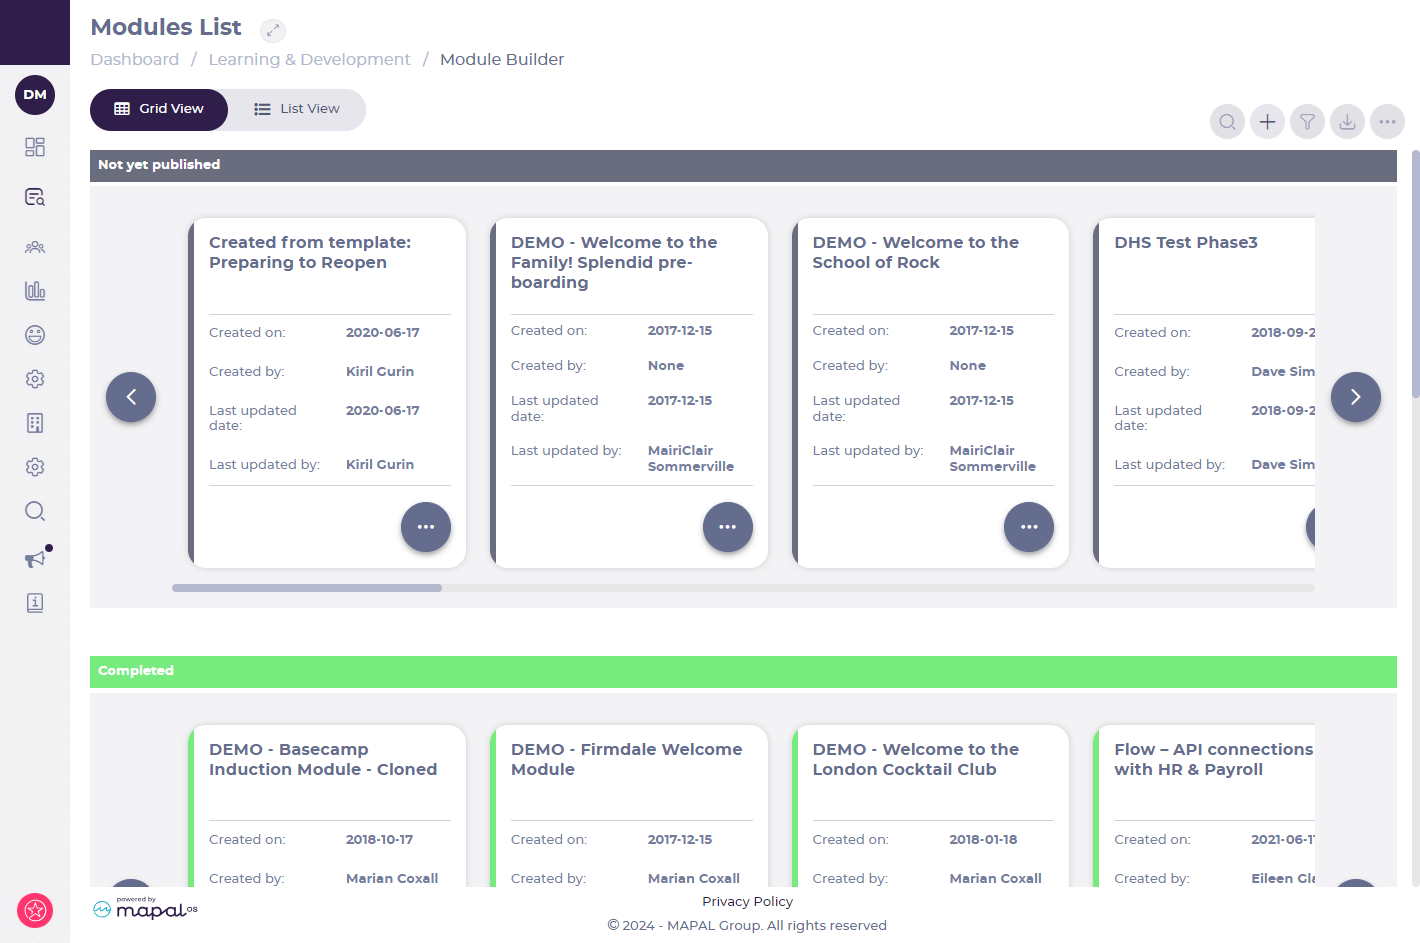
Creating a new module
- Select Add
> Add New Module.
- Choose between a blank module or a pre-existing template.
- If opting for a blank module, provide a name, description, and select a color scheme. If your company has a branded theme, select this from the Colour Scheme dropdown list.
- Select the Slide templates checkbox to create a reusable module that can be used to copy slides from, when creating other modules. Slide template modules can't be published.
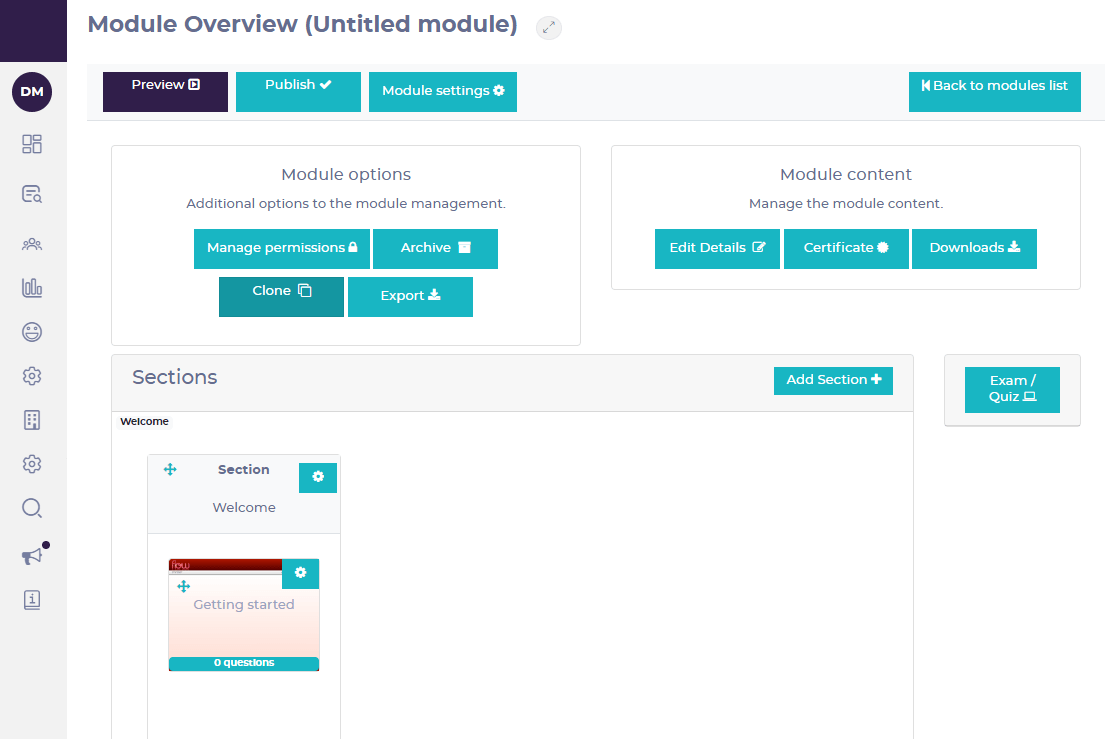
Adding sections
- Select Next > Create.

- Add sections by selecting Add new section and assigning names.
- Each section can include a section quiz.
Creating slides
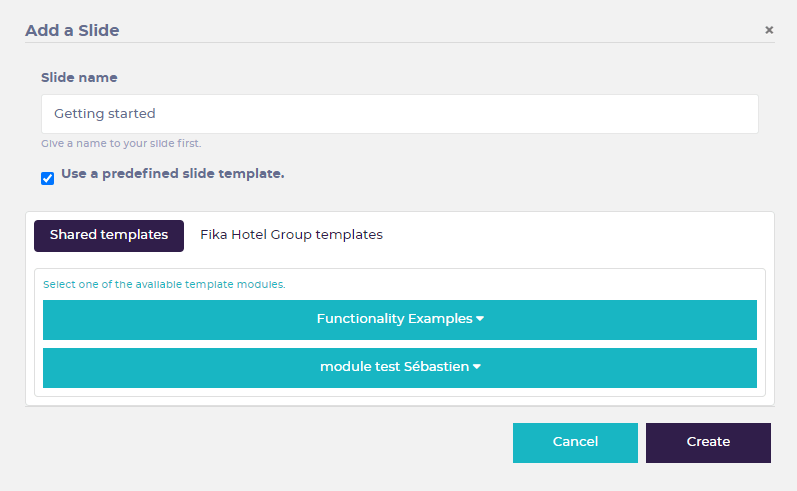
- Select Add the first slide to create a new slide.
- Name the slide using the slide name field
- The checkbox Use a predefined template opens the slide template options below.
- Choose between Shared templates (templates that are available to everyone) and [Your company] templates (templates that only your team can use).
Editing slides
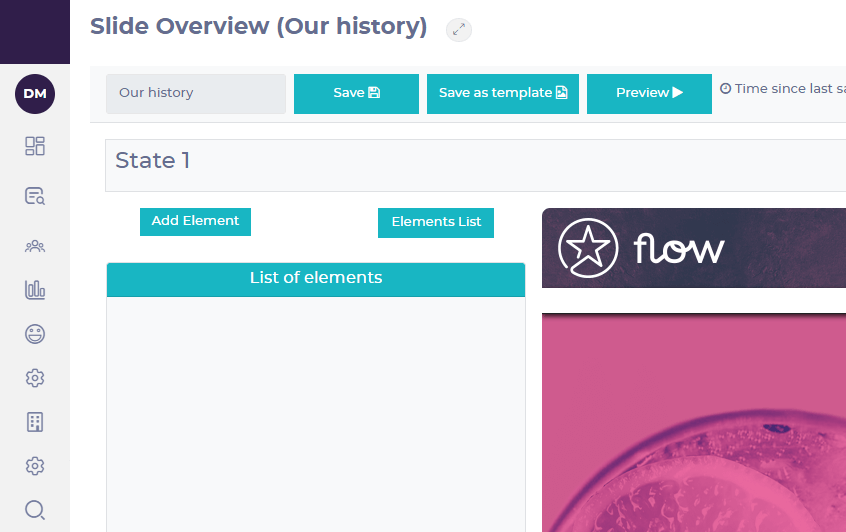
Created slides are displayed in the Module Overview page.
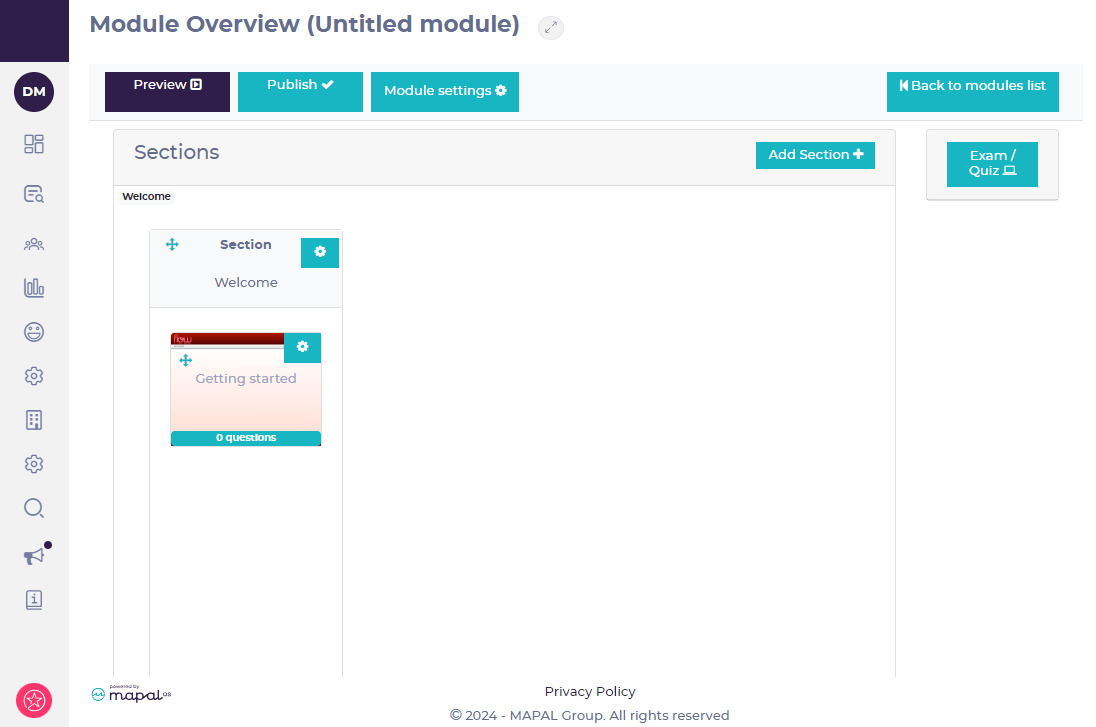
- Select a slide to make changes to its content.
Text content
- Select Add element > Text to add text to the slide.
Text boxes are usually set at 450x400px. They can be resized by dragging the corners.
- Aim for around 100-150 words per slide to ensure readability.
- Adapt existing training material for eLearning purposes.
- Consider using PDFs or videos for more extensive content.
Inserting videos
- Select Add Element > Video for local videos. These must be in MP4 format.
- Select Add Element > Embedded for online videos. You will need the embed code for the video, rather than the standard link.
Note: For local videos, resize using a third party tool to meet format requirements. Make sure you use the recommended dimensions (1024x600px resolution) and compress to within 100MB. Your video may not upload, or may display incorrectly, if you don't use these recommendations. Please make sure you have permission to use the videos that you are uploading to avoid licensing issues. This includes public YouTube videos.
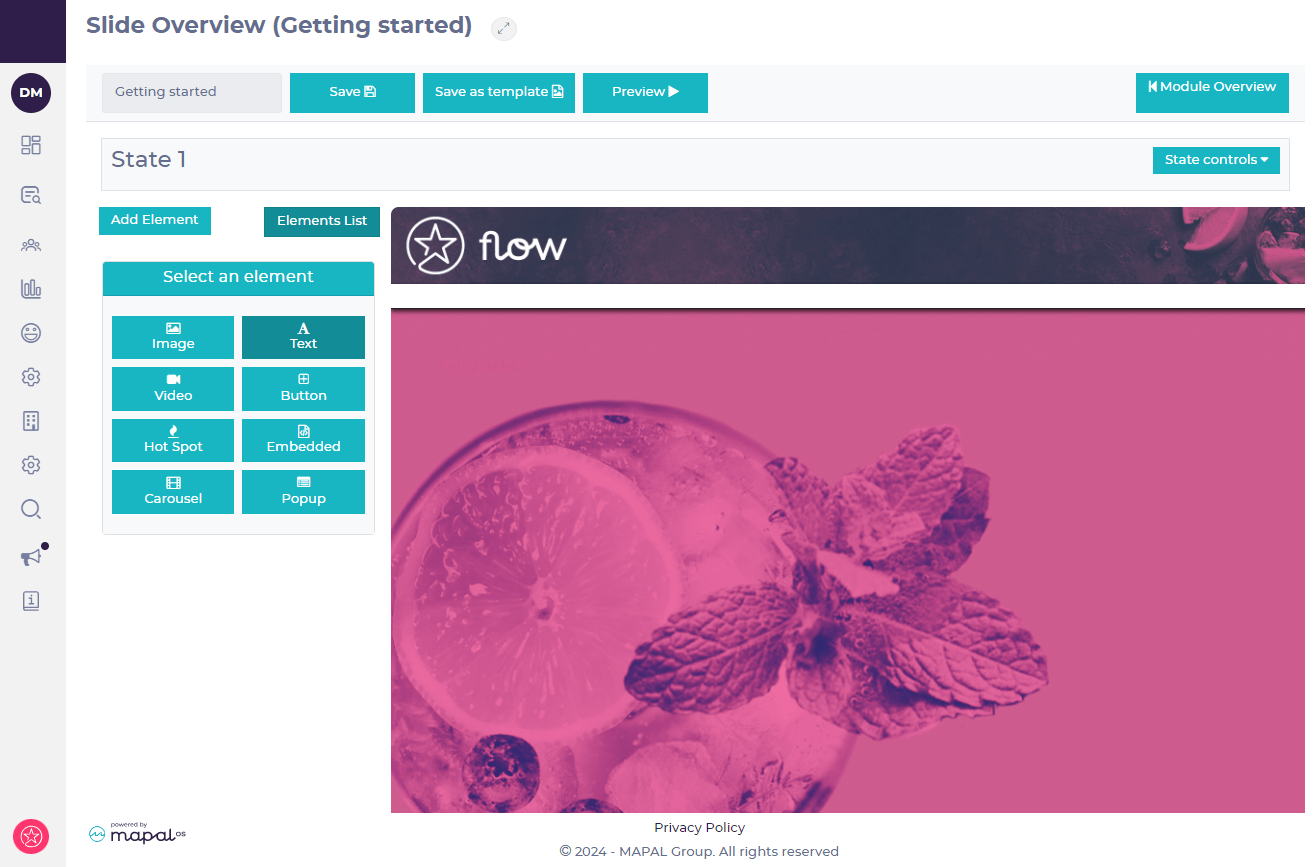
Inserting images
- Select Add element > Image.
- Resize images to recommended dimensions before you upload. Background images should be 1024x600px.
- PNG files are preferred for good file sizes with no visible compression, and transparent areas. JPEG images are most efficient for photography but don't support transparency.
- Resize and compress images for optimal loading speed.
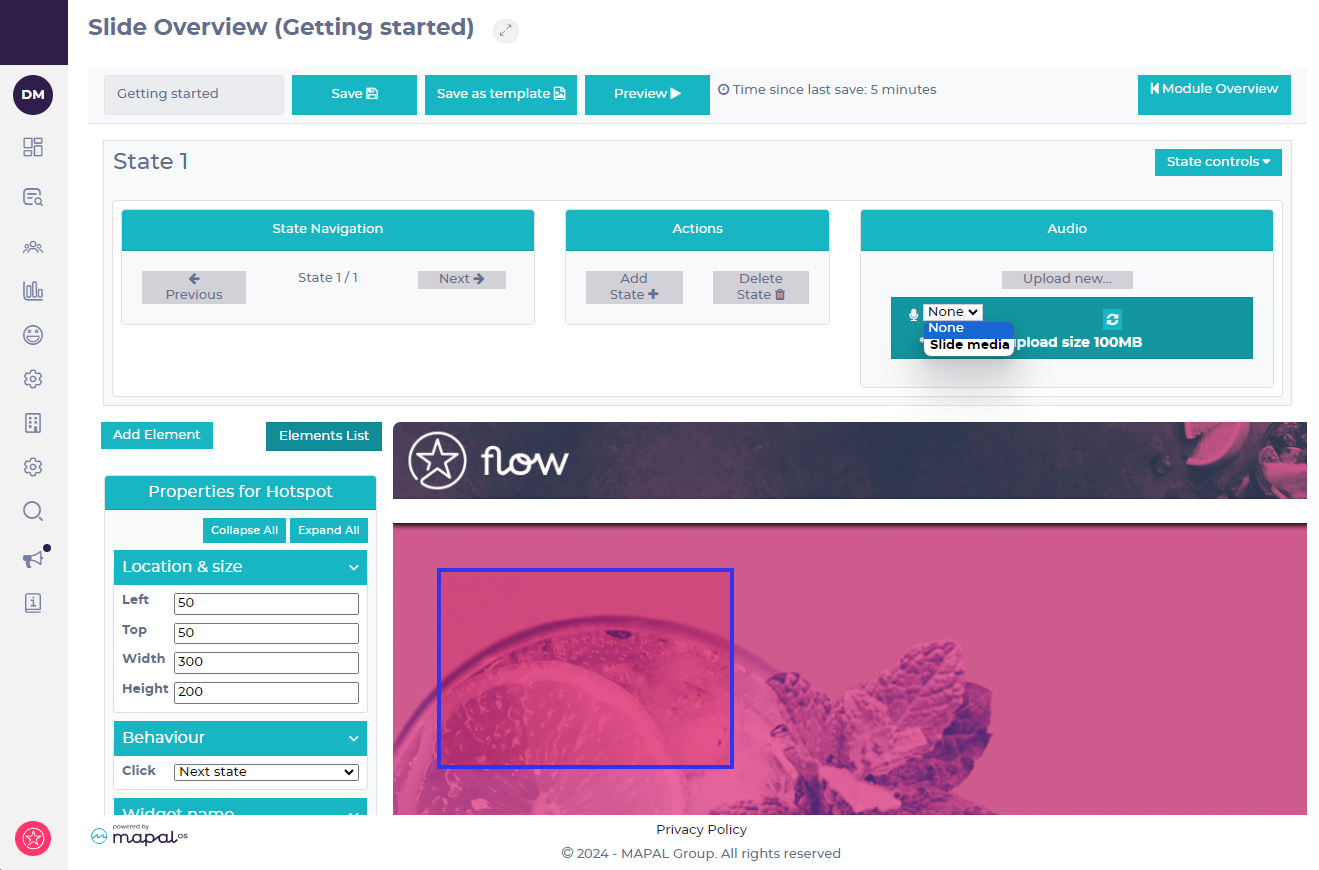
States and navigation
States are a great way to group together content when you want to keep your trainees in the module. For example, if you have timeline for history, you might want to keep all the information contained on one slide.
Understanding states
- States group content within slides for navigation purposes.

- Link states via buttons or hotspots in the Behavior tab. These elements can be set to move the slide to a different state.
- Avoid exceeding 15 states within one slide to maintain loading speed.
- You can also add a sound or voice file in each state using the Audio tab to upload MP4 files.
Adding Exams/Quizzes
- Select Exam/Quiz to add a quiz.
- Select Add Questions to populate the exam with questions. There are 3 types of questions available to add:
- Single Choice questions have only one correct answer that the learner must select from a maximum of 6 possible answers.
- Multiple Choice questions multiple correct answers, with a maximum of 8 potential answers. All of the correct answers must be selected, with no incorrect answers, for a correct result.
- Drag & Drop questions require each option to be dragged to the correct answer, with 4 pairs of question/answers.
- The standard pass percentage is 80% but this can be set to whatever you need.
- Aim for engaging quizzes with up to 10 questions. It's possible to add more questions, but this can reduce learner engagement and is not recommended.
Cloning
Slides or whole modules can be cloned for use elsewhere. This is useful to reuse content when creating multiple modules with a consistent structure.
Module cloning
Clone modules from the Module Overview page.
- Duplicate an existing module by selecting Module Settings and then Clone.
- Select the target company for the cloned module to create a copy in that company.
Note: It can take a few minutes for the cloned module to appear in the target company's Module Builder. Once it has been cloned, the module will be named the same as the original module with a 'Cloned' suffix, ready to rename.
Cloning slides
- Clone a slide by selecting the cog icon on the slide.
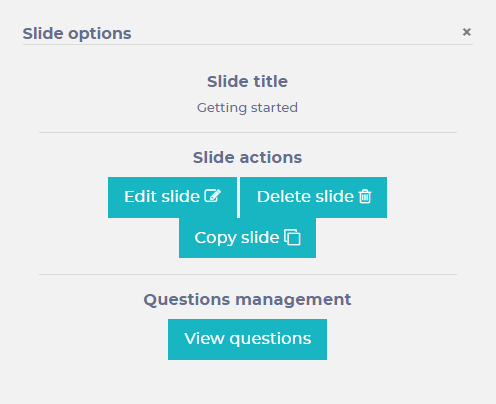
- Choose Copy slide and provide a new name.
- Edit the duplicated slide as needed.
Creating slide templates
You can create your own Module Builder templates, that will allow you to reuse layouts and save time.
- From the Slide overview, select Save as template
- Choose from [Your company] templates and select the template module and section within that module from the dropdowns.
- Enter a name for your template in the Slide name field.
- Your slide template should now appear as an option when creating new slides.
Tips for effective e-Learning content:
- Define clear learning outcomes to keep the content relevant to the goal that the training needs to achieve.
- Incorporate introductions and summaries to reinforce learning outcomes.
- Use the exam / quiz button (from the module overview) to create your own questions and validate the learning.
- Consider the learner's perspective to improve engagement. Try not to make the learning more laborious than it needs to be.
- Visualize elements on slides as layers, with each layer sitting above the previous one.
These guidelines are designed to streamline your module creation process and enhance the quality of your training content.