Sentiment analyses the written review rather than the score. For example, a customer may make a mistake and post a review that may have a score of 1 and a review that says the restaurant is excellent, in this case, the score is low, but the sentiment is high.
The following graph analyses the percentage of positive reviews versus total reviews.
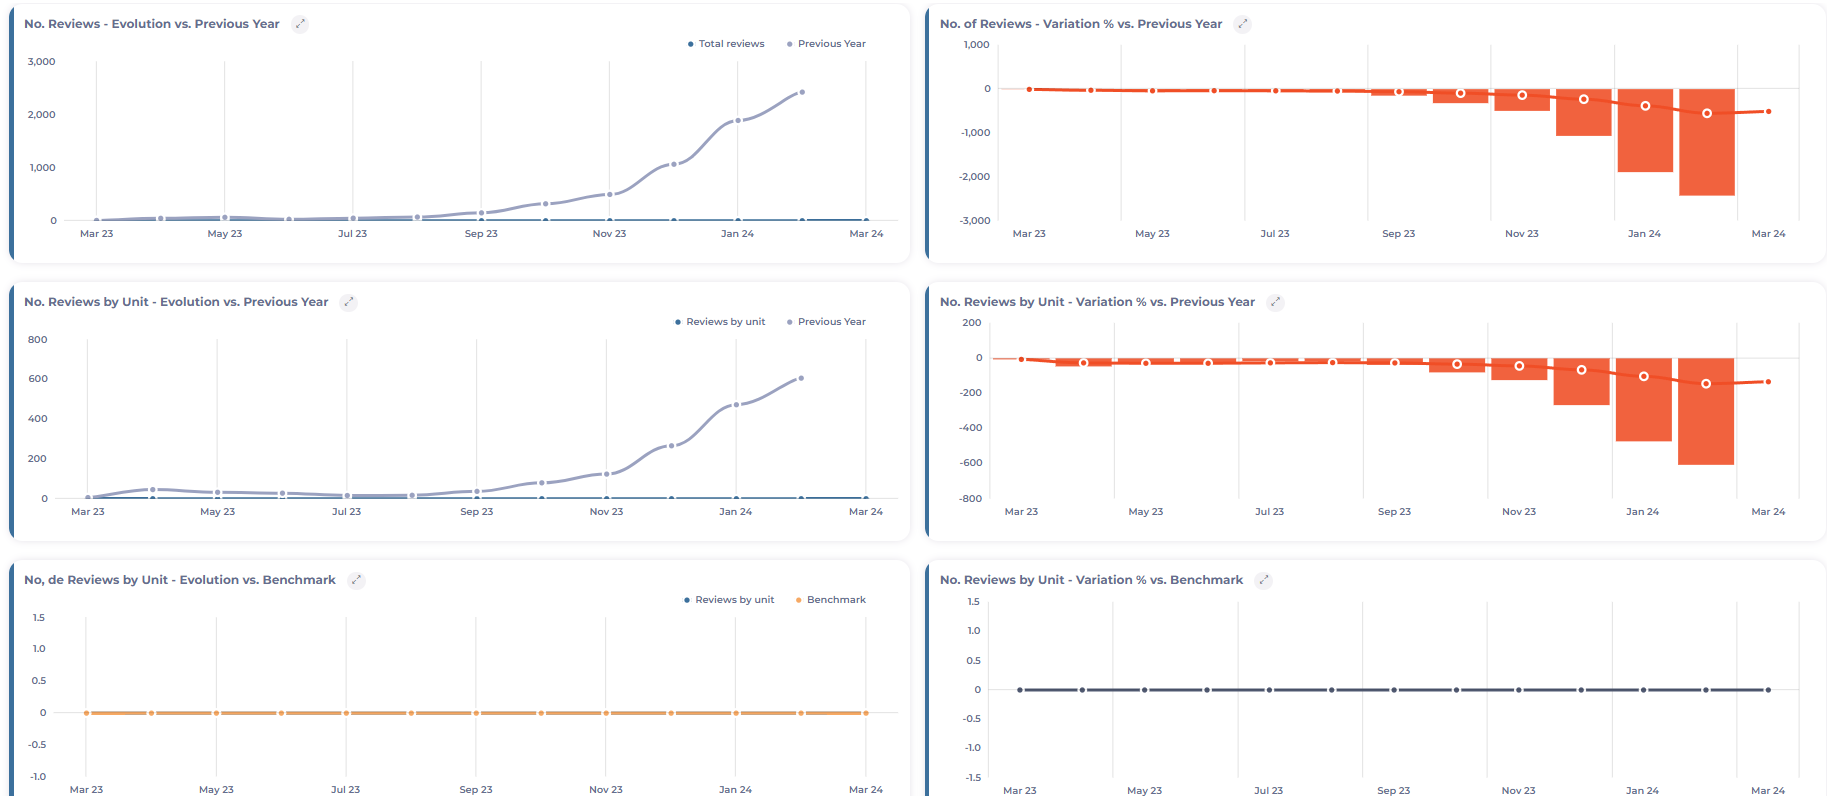
The following section shows the evolution of the reviews according to their nature, the percentage evolution, and the variation compared to the benchmark.
The following graph shows a general view of the overall sentiment, detailing the total amount of positive reviews versus negative ones.
The last graph analyses which words are used most frequently in both positive (green) and negative (red) reviews. Visibility
The visibility tool shows the total number of reviews, the absolute and percentage variation over the previous year, and the previous period.
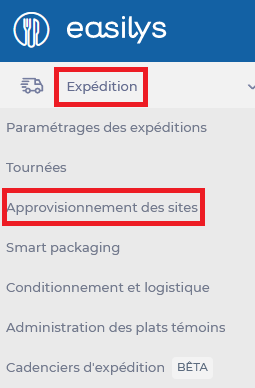
Select Visibility from the main menu.
The following graph shows the evolution of the opinions according to their nature, the evolution percentage, and the variation concerning the benchmark.
Understand photo analysis
Start from: The Reputation module.
Select Photos from the main menu.
You’ll find two tabs in the Photos menu: Dashboard and Photos.
In Photos, you’ll find the photos that have been uploaded.
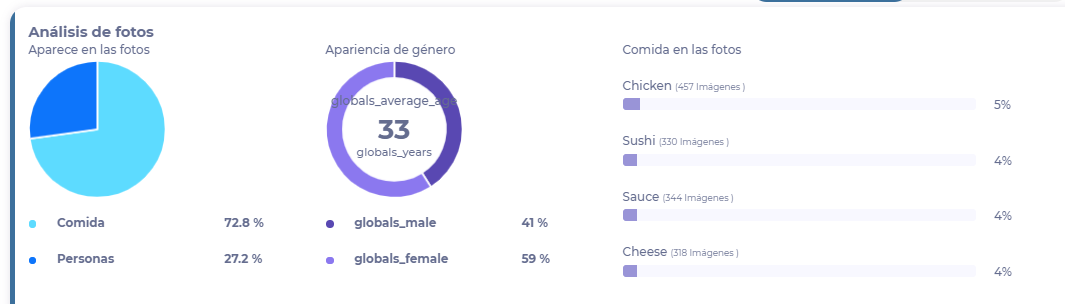
The Dashboard shows graphs that analyze the photos in which food or people appear.
The following graph shows the number of men and women that appear in the photos and average age.
You’ll also find a breakdown of the types of food that appear most in the photos.
Set up the Reputation survey app (On Site)
Start from: The Reputation module.
Set up permissions
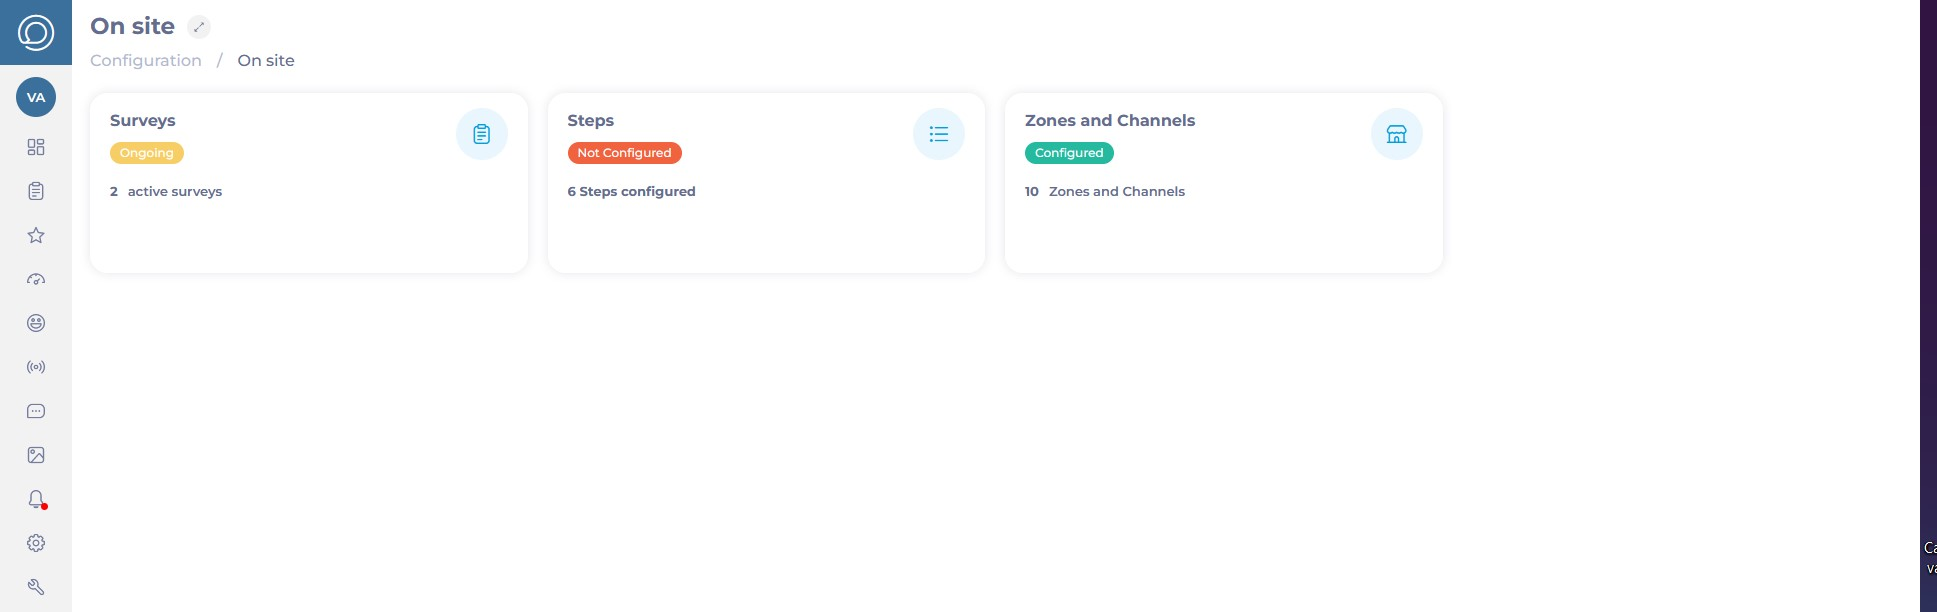
Once the On Site bundle is activated for an operator, the Permissions have to be set up to allow users to access the functionalities.
To do this:
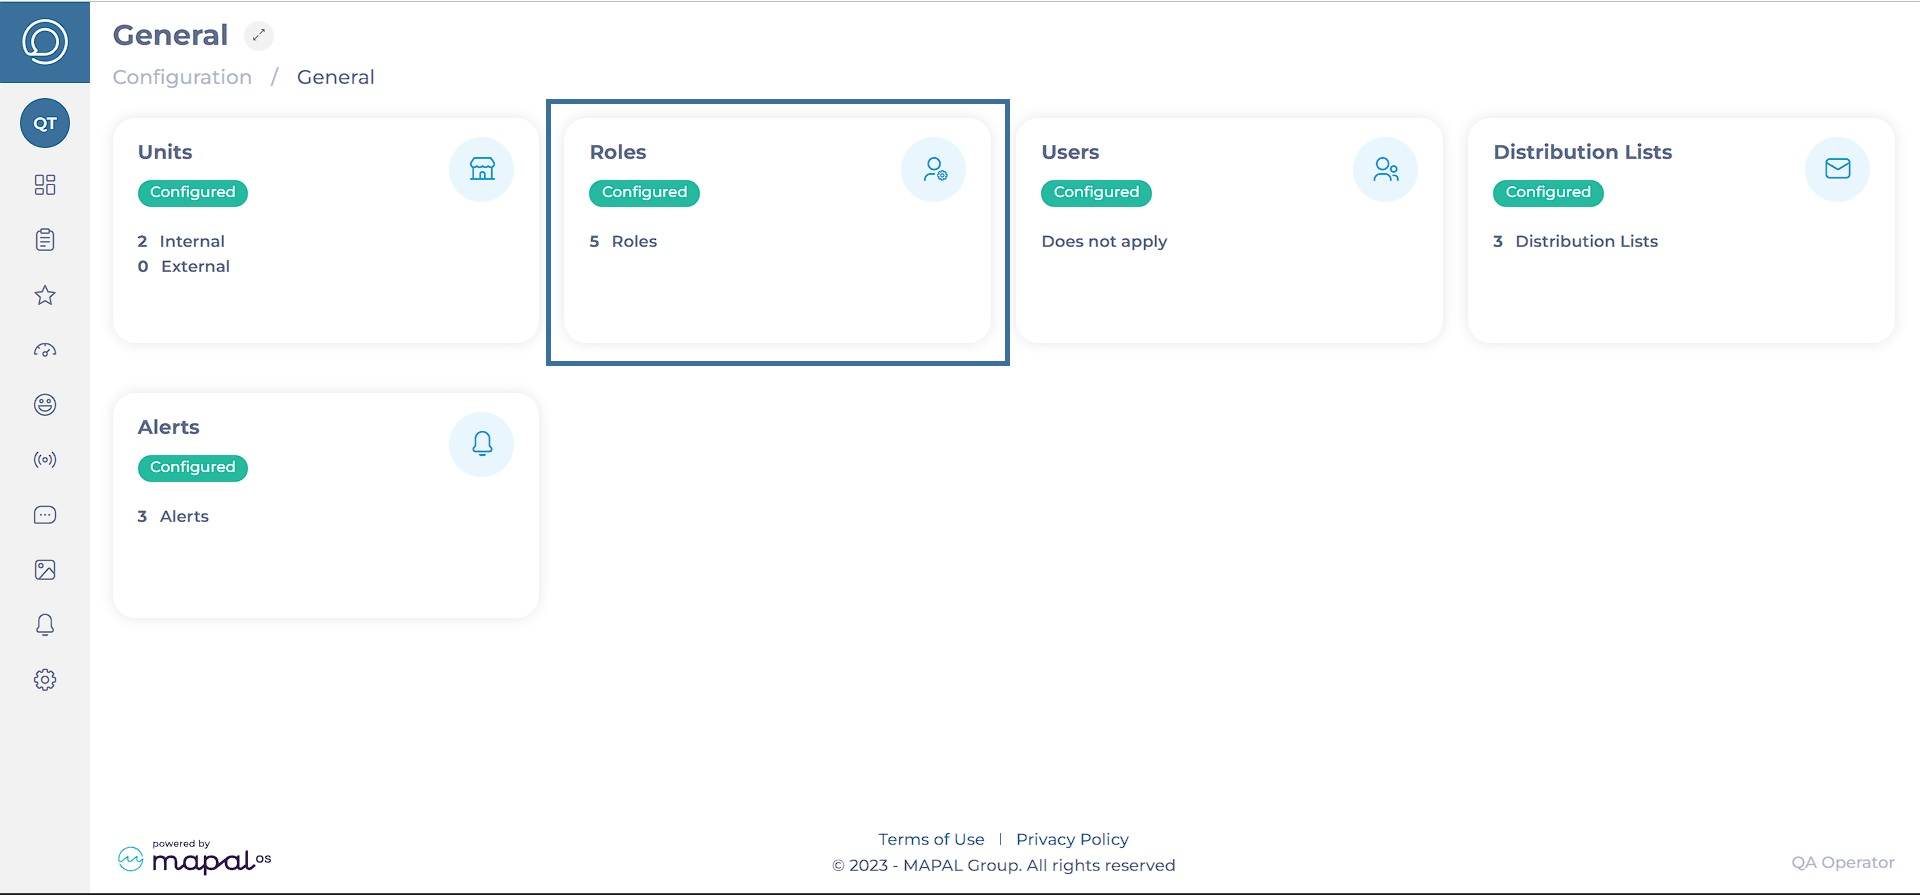
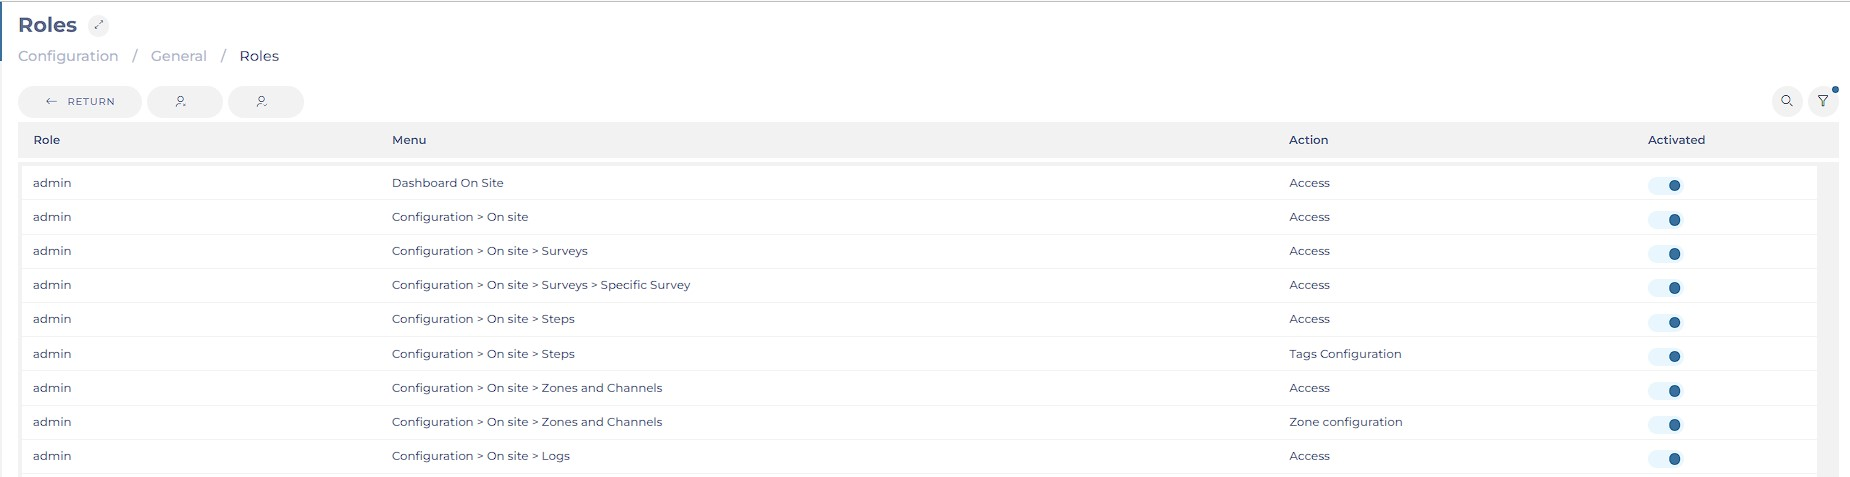
Navigate to Configuration > General > Roles.
On the Roles page, use the switch in the Activated column to enable or disable all the desired permissions regarding On Site.
After giving permissions in the operator, the On Site option will be shown under Configuration in the main menu. There, you will be able to set up new surveys, new steps for the surveys, and new zones and channels for distributing the survey.
Set up steps
To create a structured and efficient survey process in Reputation, you need to manage individual survey steps first. Each step represents a unit within a survey, such as a question, message, image, or interactive element, and can be reused across multiple surveys.
Reputation allows you to create and customize guest surveys, ensuring they are always relevant and aligned with business needs. You can select specific steps to tailor your survey, set up advanced logic for conditional branching, and add visually appealing designs.
Reputation allows you to distribute surveys effectively to gather guest feedback. You can assign surveys to specific zones within a business unit, such as the kitchen, bar, or bathroom. Managers can also choose the distribution channels for these surveys, including QR codes, emails, or PDFs.
Do you need to replace one recipe with another for a specific period in your menus? Rather than making manual changes over several days, use the recipe substitution system!
You can define the period during which a recipe should be replaced by another and Easilys will make the changes for you. This saves time, especially when you do not know exactly where the recipe appears during the period.
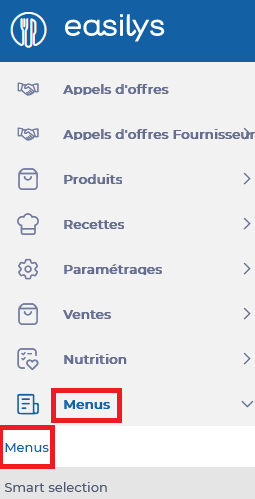
Select the Menus > Menus tabs.
Select the menu template on which you want to perform a recipe substitution.
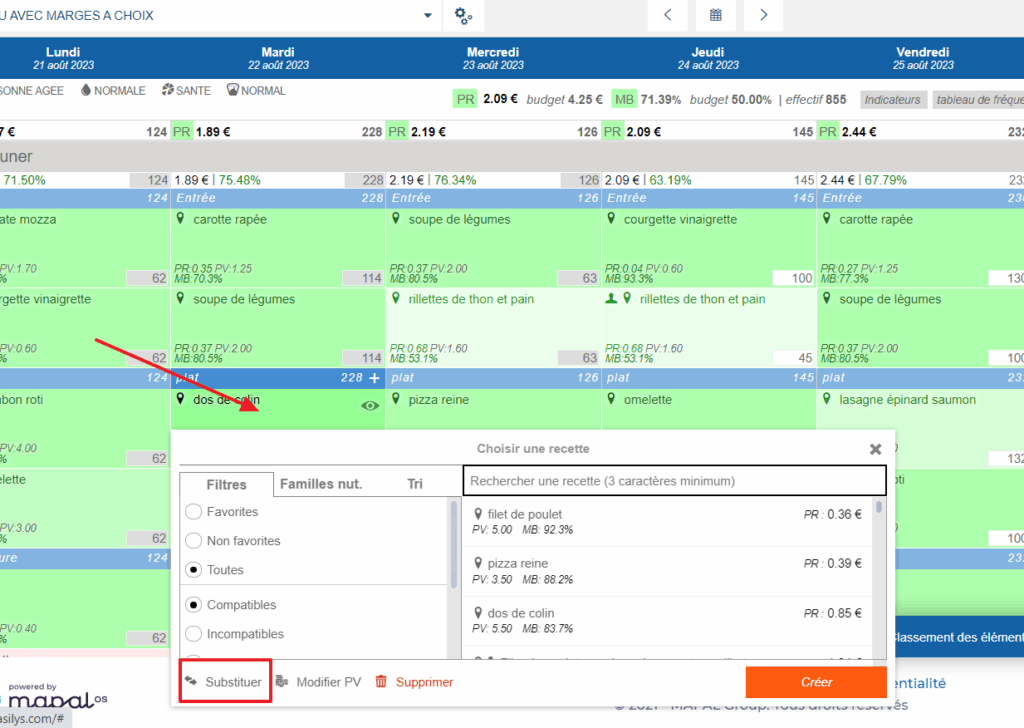
Select a menu box containing the recipe to be substituted for a specific period of time.
The small recipe selection window will then appear on the screen.
On the left side of this window, scroll down to see the different options available to you under the filters.
Select Substitute.
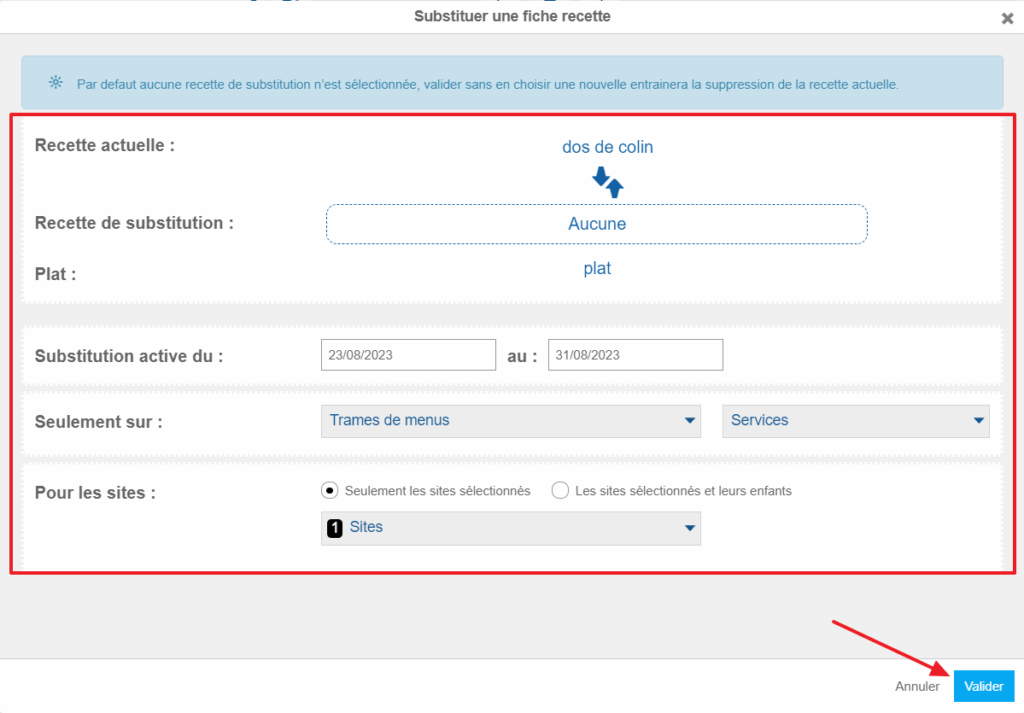
The “Substitute a recipe sheet” window will then appear on the screen.
In the “Current recipe” section, make sure you find the name of the recipe you want to substitute with another.
In the “Substitution recipe” section, select the box to set the recipe of your choice.
Then indicate the period during which the substitution should be effective. You can also indicate to Easilys if the substitution should be made on different menu templates or different sites if you work in multi-site.
Select Validate.
A green message at the top right of the screen will indicate the number of recipes that have been substituted during the period.
Managing order delivery
Start from: The Easilys menu.
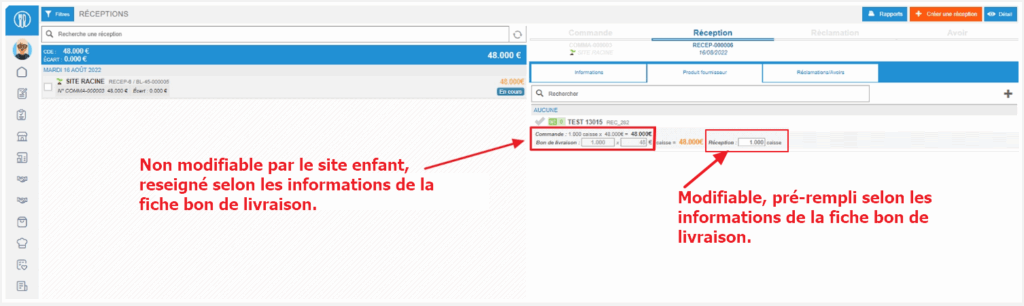
From child sites, users can place orders in the same way as they order from other suppliers. To manage the delivery of their order, you must go to the "Delivery notes" screen on the parent site.
Select the Shipping > Site supply tabs.
The table listing the orders from your child sites is displayed.
Select the order you want to process.
The delivery note form appears on the right of the screen and lists the details of the order.
Select Edit if you want to make changes to the quantity, price, replace a product with another (by selecting the “replace” icon in front of the product name) or add other products as needed.
It is possible to deliver the requested products in several shipments. To do this:
Change the quantities to indicate those delivered in the first shipment.
Activate the "Redelivery" toggle on the lines of the products that will be delivered in a second shipment.
Send the note.
A new note containing only the products that have not yet been sent is then created: you can send it when needed.
The unit visible in the “Delivered qty” column corresponds to the billing unit of the finished product.
Note: It may be necessary to edit the delivery note if the total stock of ordered products is not sufficient. To be able to set the delivery to Sent status, you will need to replenish the stock or change the delivered quantity on the delivery note form.
Select Send at the bottom right of the delivery note form to indicate to Easilys that the delivery has been sent.
The delivery note form changes to Sent status and the stock removal of sent products is performed automatically on the parent site.
Easilys automatically generates a pre-filled receipt note on the child site receiving the delivery. The user will not be able to change the delivered quantity or price, but can change the received quantity if needed and generate claims or credit requests as for normal receipts.
Once the child site validates the receipt note, your delivery note form changes to Received status.
You can track the status of your deliveries from the “Site supply” screen, at any time and for any past or future period.
Create a shift proposal
Start from: The Workforce dashboard.
Navigate to Scheduling > Shift finder.
In the Shift finder screen, select New +.
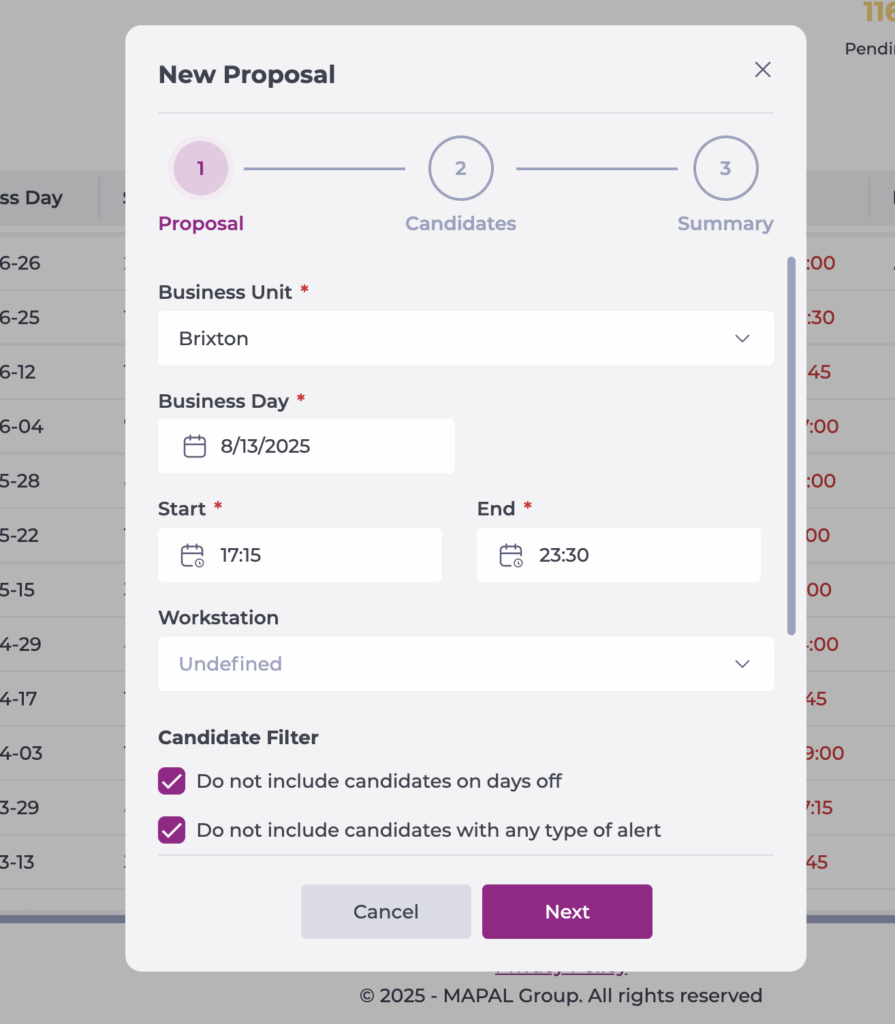
The “New proposal” form will appear, divided into three steps: Proposal, Candidates, and Summary.
1. Proposal
Fill in the following fields:
Business unit: The venue where the shift is needed.
Business day : The day of the shift. The available times are based on the venue’s configured business day start time.
Start and end time: The hours the shift will cover.
Workstation: The workstation for the shift. Select Undefined if any qualified employee can take it.
Candidate filter (If permitted): choose whether to exclude certain employees:
Do not include candidates on days off: Excludes employees with a full or partial day off on that date.
Do not include candidates with any type of alert: Excludes employees with contractual or agreement alerts, including those the proposal would put into alert.
Do not include candidates with obligatory alerts: Excludes employees with mandatory alerts or where the proposal would cause non-compliance.
Expiry: Set a cut-off time before the shift starts for accepting the proposal. After expiry, employees cannot accept the shift.
Comments: Optional message for employees.
Once you finish filling out the fields, select Next.
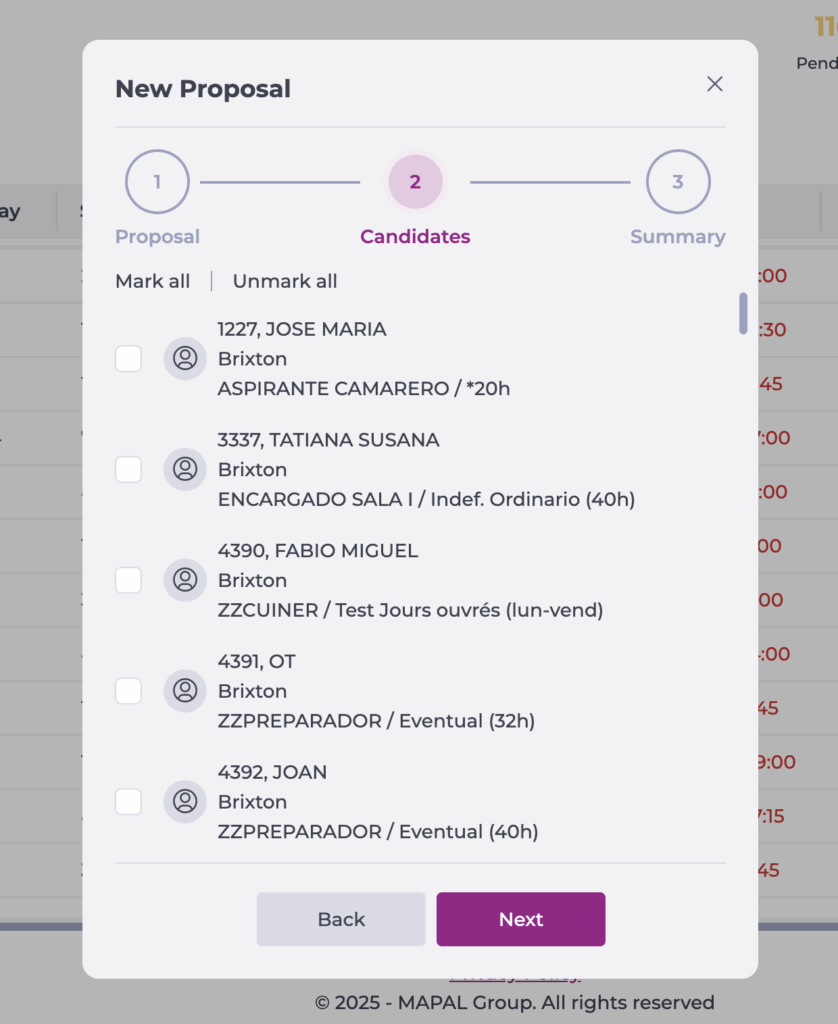
2. Candidates
The list will show employees who:
Are hired employees.
Have no conflicting projected shifts in any business unit.
Have no full-day absence on the proposal date.
Have no overlapping partial absence.
Can clock in at the business unit.
Are authorised to work in the selected workstation (unless “Undefined” is chosen).
Select employees using:
Mark all: to include all displayed candidates.
Individual checkboxes: to select specific employees.
3. Summary
Check all proposal details.
Select Publish to submit.
Notes: If you have authorisation permissions, the proposal is sent immediately via push notification to all selected employees in Gir Staff. If you do not have authorisation permissions, a push notification is sent to managers authorised to approve proposals for that business unit.
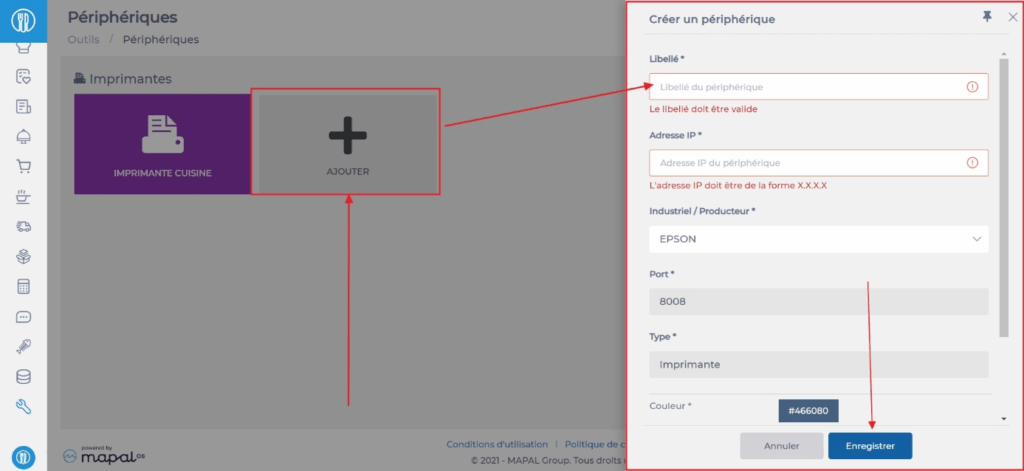
Print sanitary labels
Start from: The Easilys menu.
CONNECT EASILYS TO A PRINTER
Select the Tools > Devices tabs.
Select Add.
The “Create a device” panel appears on the right side of the screen.
Complete the required information. Fields marked with a * are mandatory.
Select Save.
CREATE A PRINT JOB
Select the Recipes > Print Labels tabs.
Select + Create.
The “Create a print job” panel appears on the right side of the screen.
Complete the required information. Fields marked with a * are mandatory.
Select Create.
Select the created job.
The job details appear on the right side of the screen.
Go to the “Print” tab.
Configure the print settings.
Select Print and wait until the printing is complete.
Smart Analysis in Reputation
Start from: a supported page in the Reputation product.
Notes: Smart Analysis is a tool, not a final decision-maker. Always verify key results using the data visible in your system. AI may occasionally provide incomplete or incorrect responses. If in doubt, cross-check with learner records or reports.
Smart Analysis in Reputation
Smart Analysis is an AI-powered tool that helps you explore Reputation data through simple, conversational questions. It highlights trends, patterns, and problem areas instantly, so you can understand performance at a glance—without exporting reports or analysing spreadsheets manually.
Where it is available
Smart Analysis is currently supported on the following Reputation screens:
Net Promoter Score
Sentiment
Visibility
Score
More pages may be supported in future.
How to access Smart Analysis
The Smart Analysis icon appears next to the filters on supported pages. Select the icon to launch the assistant.
Use Smart Analysis to get real-time answers about the data shown on screen. You can:
Identify long-term patterns in sentiment.
Monitor how customer feedback evolves over time.
Highlight sudden shifts that may need immediate attention.
Support review management by summarising NPS comments across locations, helping you identify recurring themes or issues.
Reveal how your brand presence is performing across different review platforms, and where improvements might be needed.
Compare branches or periods to help you understand which areas are performing consistently well and which ones may require support.
Spot opportunities, validate concerns, or prepare for management meetings—all without leaving the page.
Things to keep in mind
Use plain and natural language.
Smart Analysis only works with the data that is currently displayed.
Adjust your filters or date range before launching the assistant to get broader results.
If a prompt returns limited results, check your current view.
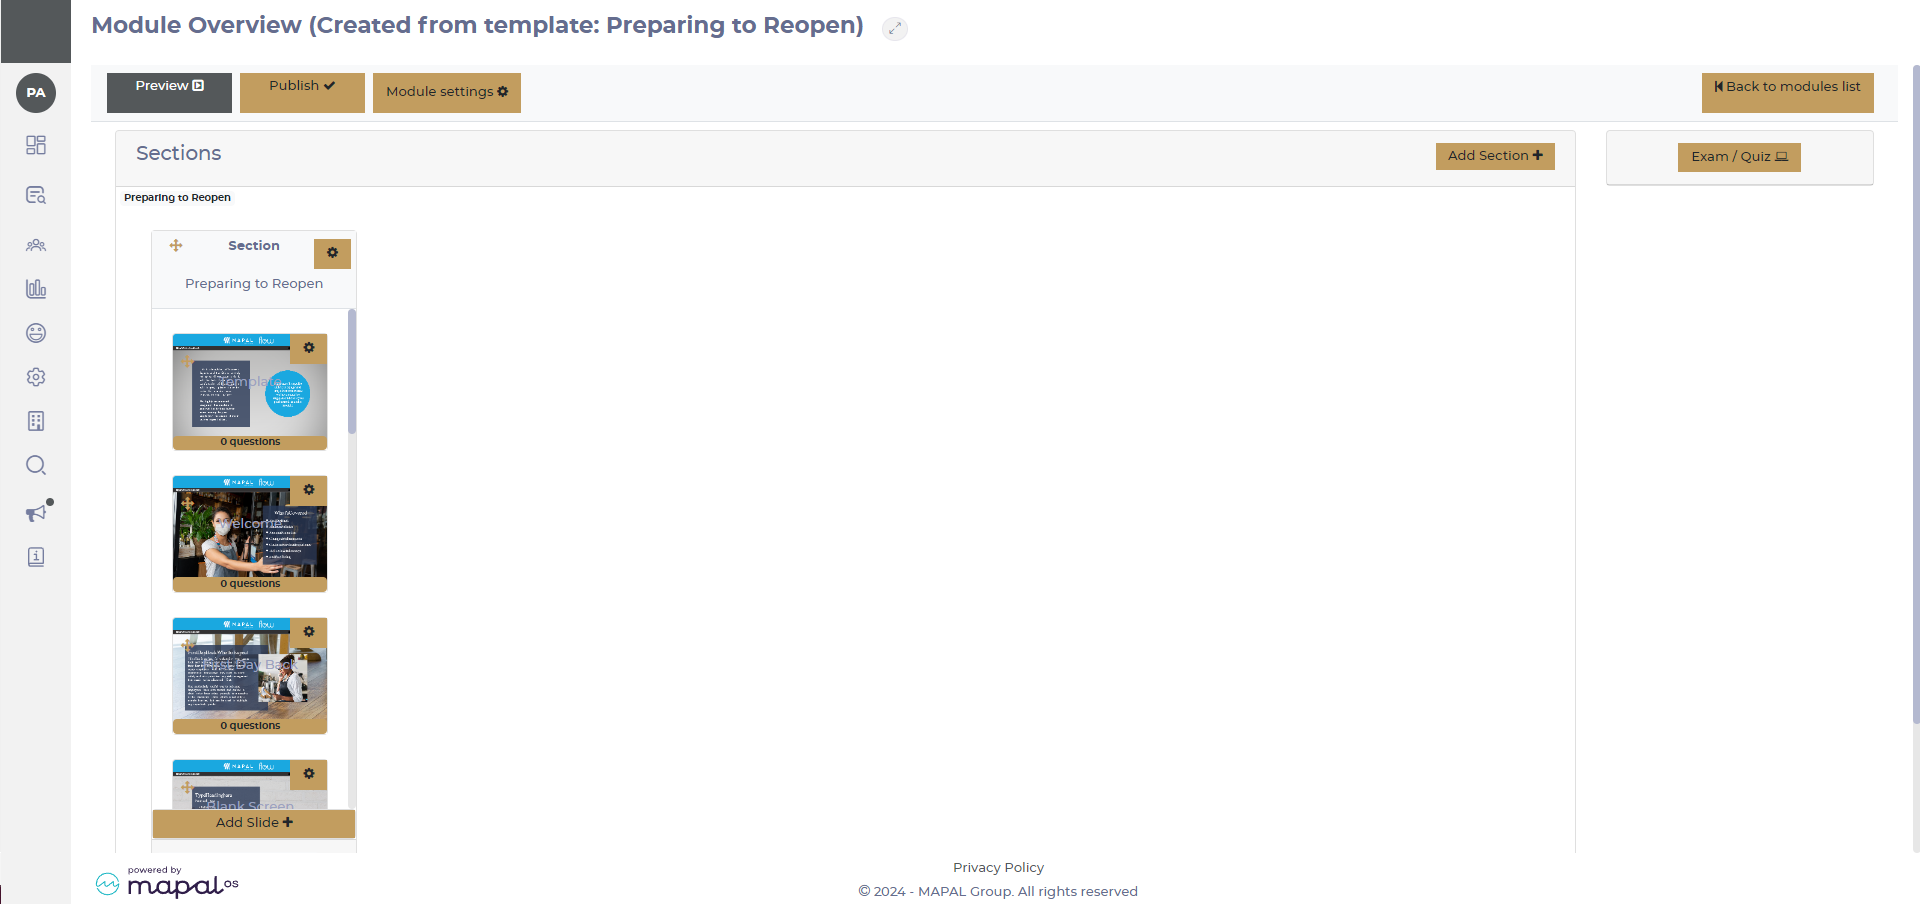
Create quizzes and exams with Module Builder
Start from Learning & Development > Module builder.
End-of-section or end-of-module?
It is important to be aware of the difference between end-of-section (EoS) and end-of-module (EoM) questions within Module builder.
End-of-section (EoS) questions are asked at the end of a section, and are better as a quick "knowledge check".
End-of-module (EoM) questions are asked at the end of a module, and they are a good place for a longer - more comprehensive - quiz.
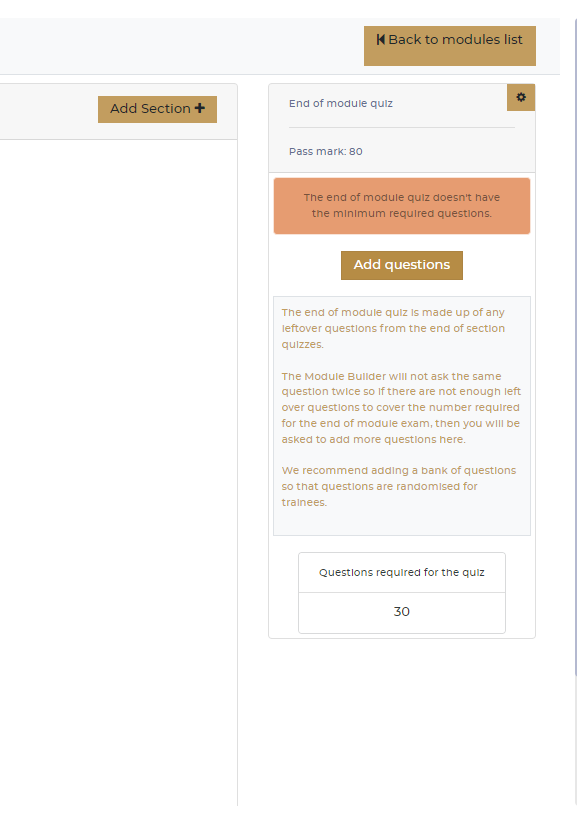
Both types of questions are taken from an overall bank of questions that are attached to slides. EoM questions are always taken from unused EoS questions. Therefore, the minimum number of EoM questions must always be higher than the minimum number of EoS questions, to ensure there are enough unique questions left in the bank.
If you set the minimum number of EoM questions to be lower than the combined minimum of EoS questions, you will get the error message "The end of module quiz doesn't have the minimum required questions.".
Always ensure there are enough questions in the shared question bank to cover the end-of-section plus end-of-module tests.
Note:If your module is short (ten slides or fewer), it is usually best to focus on one end-of-module quiz (rather than several end-of-section quizzes), for a better user experience.
Configure an end-of-section quiz
On any section within the module overview, select the cog icon to view the Section options window.
Under section actions, choose Edit section.
From End of section quiz, you can select the number of questions from a dropdown menu.
Create an end-of-module quiz
From the Modules list page, select the module where you wish to add an exam or quiz.
Select Exam/Quiz.
An "End of module quiz" pop-up will appear.
Enter a number in the Number of questions field.
Note you can have a bank of up to 60 questions, with the maximum number of questions in the exam being 30. However, we don't recommend more than 10 questions to maintain trainee engagement.
Enter the Pass percentage you wish to give your quiz.
Note our Flow standard pass percentage is 80%. However, this is ultimately up to you, depending on what you feel is best for the content of your module.
Add questions via the "end of module quiz" window
Select the Add questions button.
From the Manage your questions pop-up that appears, select the +Add question button.
Add questions via Slide options
On any slide within the module overview, select the cog icon to view the Slide options window.
Under Questions management, select View questions.
Select the +Add question button.
Question types
There are 3 kinds of questions you can choose from:
Single Choice this type of question means that there is only one correct answer that the trainee has to select. It has a maximum of 6 possible answers.
Multiple Choice this type of question means that there are multiple answers to the question asked, and has a maximum of 8 potential answers, which includes incorrect answers.
Drag & Drop this type of question is similar to match-the-pairs questions. It has 4 pairs of question/answers (e.g., Step 1 = ABC, Step 2 = DEF and so on).
All answers have a character limit of 100 characters.
Note make sure that the answer to the question you are asking is within your module content. If a learner receives a question that does not relate to the content you've built, it can lead to confusion and reduce their engagement.
src="src="src="src="src="src="
Manage menu plans for menu pre-design
Start from: The Easilys menu.
Menu plans
Menu plans defined in the Menu pre-design screen allow you to list all the recipes needed to meet the requirements of a group of customers for meals and days within a given period, and to generate customer-specific menus. They serve the following purposes:
Ensure all customers receive menus that comply with their contracts and specific needs.
Provide an overall view.
Create all menus for all child sites with one click from a single menu plan.
Important: Before creating your menu plans, you must configure rules using the Smart Specification screen to indicate if certain products, recipes, allergens, or ingredients must be excluded from menus for certain clients.
Create a menu plan
Go to Menus > Menu Pre-Design.
Click the + Create button (or the + at the top right if plans already exist).
In the "Create New Menu Plan" window, fill in the following fields:
Name*: Enter a name for the menu plan.
Period*: Define the period covered by this plan.
Days of the Week*: Days will be auto-filled based on selected menu templates.
Menu templates*: Choose the menu templates to include in the plan. The dropdown shows all menu templates available on the current site. For each template, you’ll see the sites it applies to.
Click Validate to finish creating the plan. It will now appear in the list of menu plans.
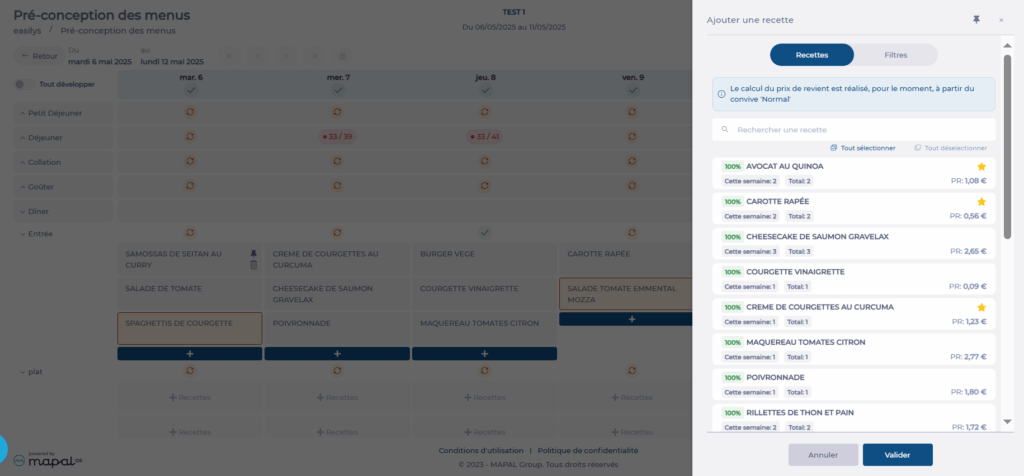
Add recipes to a menu plan
Select the actions menu (three dots) next to the plan and click Manage Recipes.
The first week of the plan will display with all relevant services and meal components based on the selected templates. You can now start assigning recipes to each area for all weeks in the plan.
The idea is to place the main recipe first—the one you want most clients to receive. Follow this with alternative recipes for clients who cannot receive the main one due to their smart particularity rules.
Use the calendar or arrows to navigate to the correct week.
Click + Recipes for the desired date, service, and meal component to open the add panel.
Use the search or filters to find recipes.
Consider indicators (cost, favourite, frequency, coverage rate...) to make your choice.
Select the recipes you want to assign, in order.
Click Validate.
Note:
Drag and drop recipes to change their order.
Bin icon: Remove a recipe from the plan.
Pin icon: Use it to enforce a single recipe in a meal component (e.g., for festive meals or themed events). Pinned recipes override alternatives when the plan is applied.
Verify the menu plan
With the simulation function, you can check if the recipes in the plan will generate valid menus for each client site.
Click Simulator to highlight any issues.
Green checks: Recipes cover all client needs.
Red bubbles: Recipes will not generate valid menus for some clients (e.g., all recipes on that day contain carrots, and one client cannot have carrots).
Numbers (e.g., 0/2) show how many menu templates are covered out of the total.
To investigate issues:
Hover over red bubbles to see affected templates.
Click the bubble to open the problem panel.
In the Contextual Issues panel:
The Expand All/Collapse All button allows you to quickly show or hide all details across the plan for easier navigation.
See which sites have at least one issue.
For each site, view:
Affected menu templates
Recipes concerned
The rule that is not being met
Click the eye icon to view or edit the rule.
To fix issues:
Replace a conflicting recipe by clicking its name and selecting another.
Add an extra recipe that complies with client requirements by clicking + in the relevant meal component.
Re-run the simulation to confirm issues are resolved.
Note: Recipes added after a simulation are highlighted with a yellow background. This distinction remains visible as long as a new simulation is not run or the page is not exited.
Apply the menu plan to menus
Once the plan is complete, you must apply it to update the corresponding templates across all relevant sites.
Click Impact Menus.
Review any alerts or confirmation messages in the pop-up.
Choose Publish or Cancel to make further edits.
You can track the progress of the impact via the Impact Menus button, which shows the number of menu templates impacted out of the total to be affected. You can leave the screen without waiting for the impact to finish—it will continue to run in the background. You can even launch the impact of another menu plan if needed. This second impact will be queued and will automatically begin once the current impact is complete.
Note: If you change the menu plan after applying it, you must apply it again to update the templates on the child sites. This will overwrite previous versions.