The Smart specifications function in Easilys allows you to enter rules that indicate which products, product families, recipes, allergens or specific ingredients must be excluded in order to meet customer expectations. These exclusions can be defined for a given period (holidays, day of the week) for certain services and/or for certain meals. You can also target the menus (diet, textures, segments, guests) they apply to.
This feature ensures that your menus meet contractual requirements. It is a crucial step before creating menu plans. To find out more about menu plans, see Manage menu plans for menu pre-design.
Some examples of cases handled by Smart specification rules
A client site that requires melon never to be served as a starter.
Recipes containing fish or shellfish allergens must never be used in menus intended for the “no fish” diet.
Grapefruit must not be included on the menu for nursery school children.
Create a Smart specification rule
Navigate to Menus > Smart specifications.
Select + Rule to create a new rule.
Complete the following fields:
Rule name*: Enter a clear, descriptive name for the rule.
Status: Set whether the rule is active or inactive.
Sites: If needed, select one or more sites where this rule applies.
Under Exclusion criteria, choose which elements to exclude. You can select:
Specific products.
Product families.
Ingredients.
Recipes, recipe categories or recipe tags.
Allergens.
Under Time period, define how the rule applies over time, if necessary. You can specify:
Specific dates.
Public holidays.
Days of the week.
Under Menus, specify the menu characteristics affected by this rule, such as:
Diets (for example, gluten-free, vegetarian).
Texture preferences (for example, soft foods).
Segments (for example, corporate, standard, schools).
Guests (for example, children, elderly people).
Select Save. The rule is now added to your list of Smart specifications and will be applied when planning menus that match these conditions.
Manage Smart specification rules
Edit a rule
In the Smart specifications list, open the action menu (three dots) for the relevant rule.
Select Edit.
Adjust the settings as required (name, status, sites, criteria, time period or menus).
Select Save to update the rule.
Delete a rule
In the Smart specifications list, open the action menu (three dots) for the relevant rule.
Select Delete.
Confirm the action in the pop-up window by selecting Delete again.
Complete the projected and/or actual forecasting of a menu
Note: each action performed in the application is subject to access permissions. If you cannot carry out the recommended actions in the articles you are viewing, this may mean that the necessary rights have not been activated for your user profile. Contact the Support team, or your administrator, to find out more.
Start from: The Easilys menu.
SET DEFAULT FORECASTED HEADCOUNTS ON A MENU TEMPLATE
It is possible to indicate forecasted headcounts when creating a menu template. This way, the application always pre-fills these forecasted headcounts by default.
MANUALLY INDICATE FORECASTED AND/OR ACTUAL HEADCOUNTS
It is possible to modify forecasted and actual headcounts manually directly from the menus by selecting the headcount box at the bottom right of each recipe added in the menu.
Note: the actual headcount is automatically filled in by Easilys whenever a forecasted headcount exists and the date has passed. To ensure this actual headcount is correct, you can modify it.
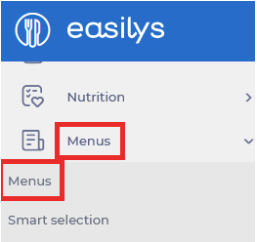
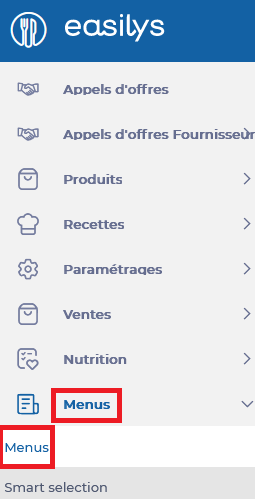
Select the tabs Menus > Menus.
Select the menu template containing the menus for which you want to manually add forecasted headcounts.
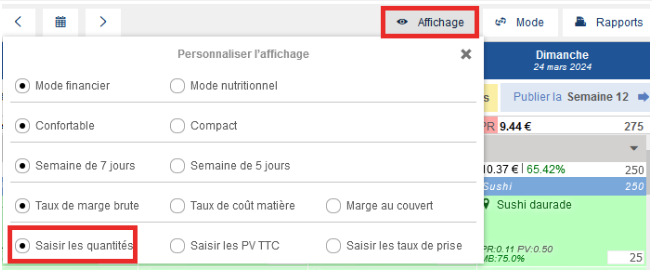
Note: there are several menu display types. You may not be in the view that allows you to enter headcounts. In that case, select Display and choose the option Enter quantities.
In a menu box containing a recipe, select the small box visible at the bottom right.
Enter the headcount in the box.
If you enter the headcount on a future date, Easilys considers it a forecasted headcount.
If you enter the headcount for today or a past date, Easilys considers it an actual headcount.
Once entered, press Enter on your keyboard to validate or select a new box in the menu.
A message will prompt you to save your changes.
Select Save now.
Note: you can make several changes before selecting Save now. Just make sure you do so before leaving the menus page, or you will lose your modifications.
COMPLETE FORECASTED AND/OR ACTUAL HEADCOUNTS USING THE MENU QUATITIES SCREEN
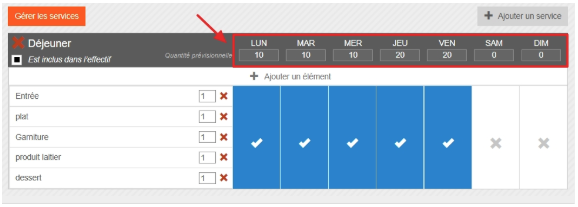
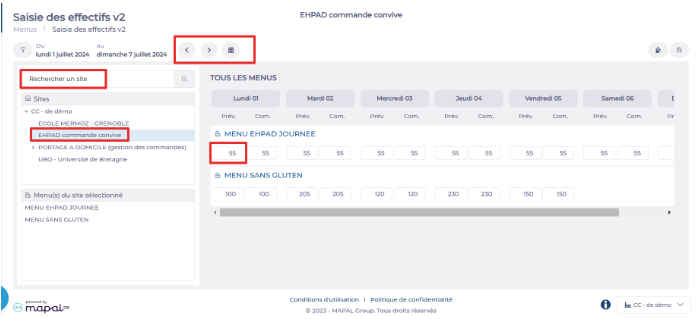
Select the tabs Menus > Menu quantities.
Select a service to expand the detail by dish included in it.
Enter the forecasted headcounts in the P box and the actual headcounts in the R box under each dish.
The P box corresponds to forecasted headcounts.
The R box corresponds to actual headcounts.
As soon as the actual is entered, this is the information Easilys will use in the various monitoring reports.
Note: for a past date, the total is greyed out and the R box is highlighted. This is where you must enter the actual headcounts.
Once entered, press Enter on your keyboard to validate or select a new box in the menu.
A message will prompt you to save your changes.
Select Save now.
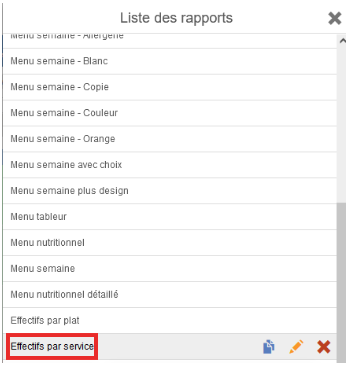
You can also download the Count per meal type report from the Menus screen. This will give you a spreadsheet showing weekly headcounts per dish and service.
Select the tabs Menus > Menus.
Select Reports.
Select Count per meal type.
Download the report in spreadsheet format (ods, xls, xlsx).
Modify this file and re-import it from the Menu quantities screen (Menus > Menu quantities) by selecting Import headcounts.
COMPLETE FORECASTED AND/OR ACTUAL HEADCOUNTS USING THE MENU QUANTITIES V2 SCREEN
This entry screen is particularly useful if you need to enter headcounts for several child sites. For example, if you manage a central kitchen, it allows you to enter and view headcounts for your delivery points:
Select the tabs Menus > Menu quantities V2.
Display the desired week using the scroll arrows or the calendar.
Select the site for which you want to enter headcounts. You can use the search field or the site tree.
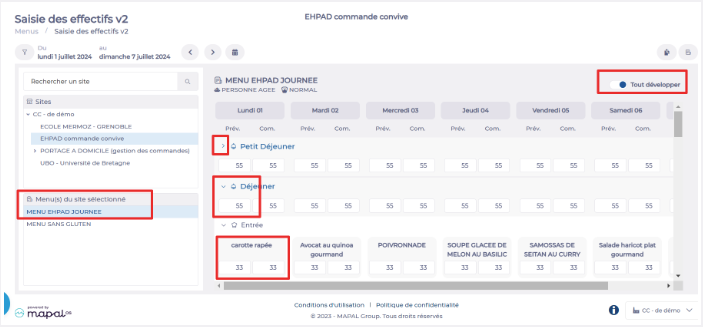
You will then see an entry line for each menu template of this site. The headcounts you enter here will be applied identically to all services of the day.
If you want to enter different headcounts depending on the services:
Select the menu template from the list on the left.
For each service, view the details of the recipes offered in the menu.
Note: You can hide or display the recipe details either service by service (arrow next to the service) or globally (the Expand all option).
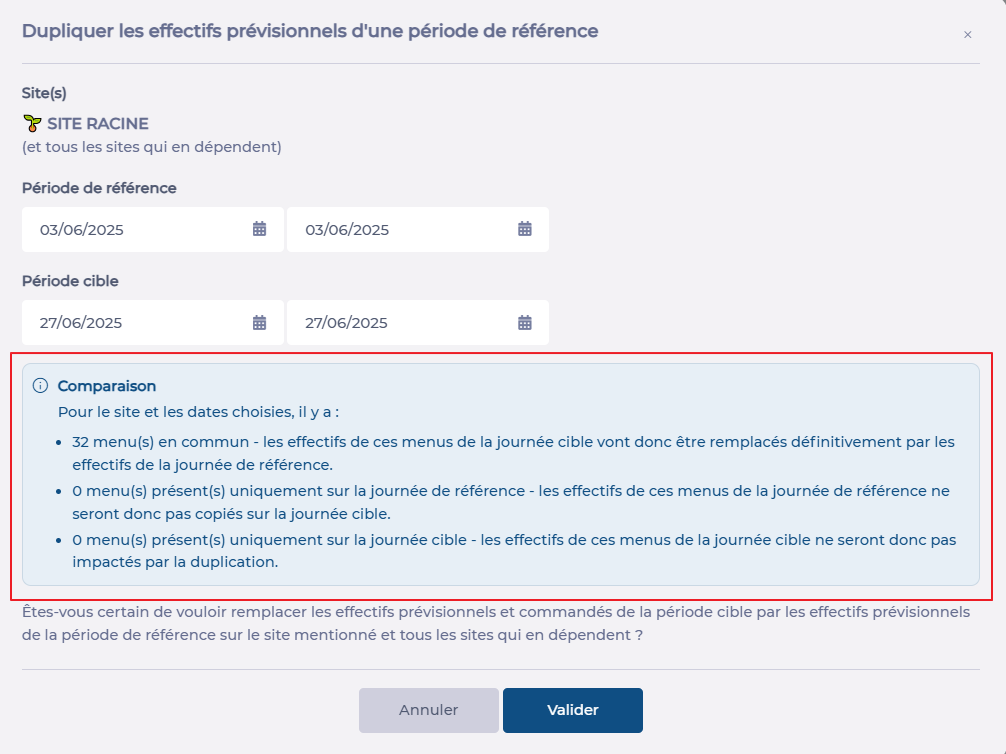
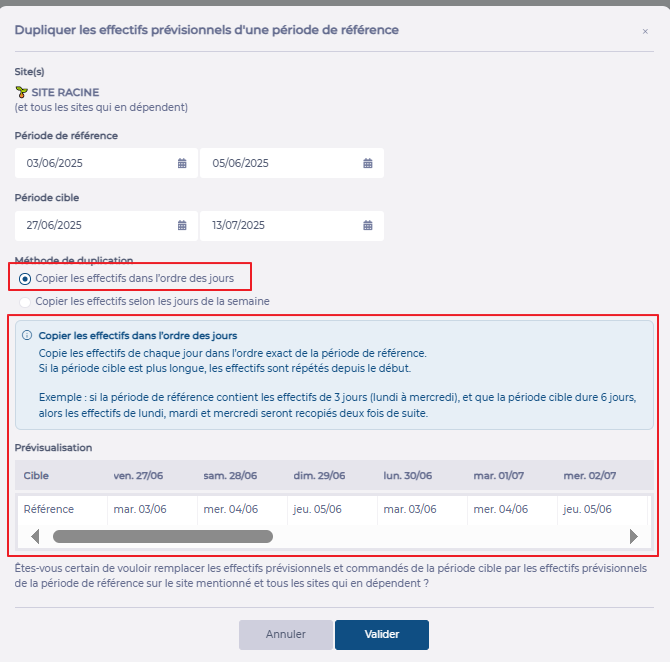
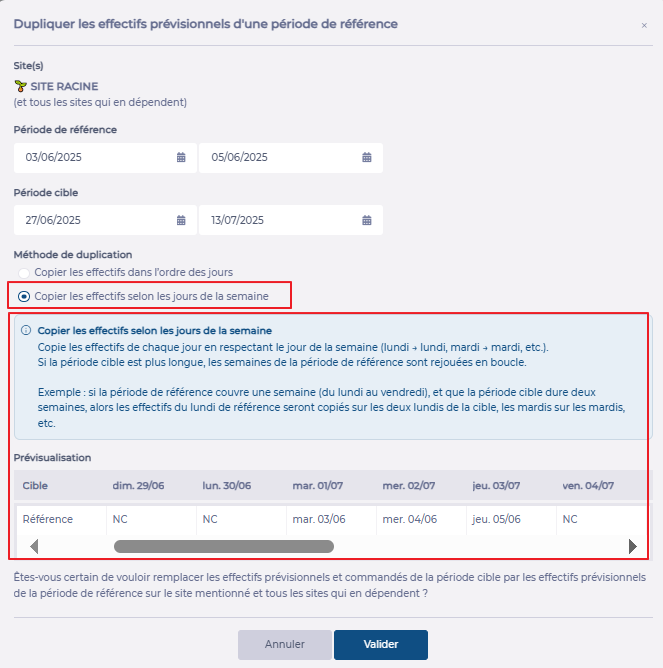
If you want to fill in the forecasted headcounts of a future period with the headcounts from another period (past or future), you can also use the Duplication function:
Select the Duplicate a reference period function at the top right.
Enter the origin period and the target period.
Select the desired copy option.
Click Validate.
Note: Depending on the selected period, the available options and the information message will update. Take the time to carefully read this message as well as the summary table that appears when copying a period of more than one day to fully understand the impact of your action.
Message when duplicating a single day:
Message when duplicating a period with the option to respect the order of days:
Message when duplicating a period with the option to respect the days of the week:
Add progression to a recipe
If your environment is configured for multiple languages, the multilingual icon
appears for some fields. For more information on how to use it, see the article
Use Easilys in multilingual mode
.
Start from: The Easilys menu.
Select Recipes> Recipes management.
In the Progression section:
Select the orange pencil icon.
A pop-up window Update recipe preparation appears:
Fill in the necessary elements.
Select Update.
Add a non-compliant meal to a meal plan
Start from: The Easilys menu.
Select the Menus > Menus tabs.
Select a menu then a recipe.
If the Ability to add dishes that do not comply with the meal plan permission is enabled on the user's profile, then they have access to the "Comply with meal plan" or "All" filter in the recipe selection window to be placed in the menu. When the filter is set to "All" and not "Comply with meal plan", recipes that do not comply with the meal plan have a crossed-out heart icon (the symbol of the MEAL PLAN screen crossed out).
Note: If you do not have the necessary permission, contact your administrator or our Support team to check if it is possible to enable the permission on your profile.
Administer the list of meal items and services
If your environment is configured for multiple languages, the multilingual icon
appears for some fields. For more information on how to use it, see the article
Use Easilys in multilingual mode
.
Start from: The Easilys menu.
Administration of the list of meal items and services is done via the "Manage services" function, which is accessible from Menus > Menus as well as from Nutrition > Meal plan.
Access the "Manage services" function, 1st method: from Menus > Menus.
Select the Menus > Menus tabs.
Select the cogwheels leading to the "Menu frame options".
Note: if you do not have any menu frames on your root site, Easilys will then prompt you to create one. Accept this creation to access the administration of services and meal items. (You will not be required to finalize the creation of the menu frame if you do not wish to.)
Select Edit the selected menu frame.
The Update a menu frame window appears on the screen.
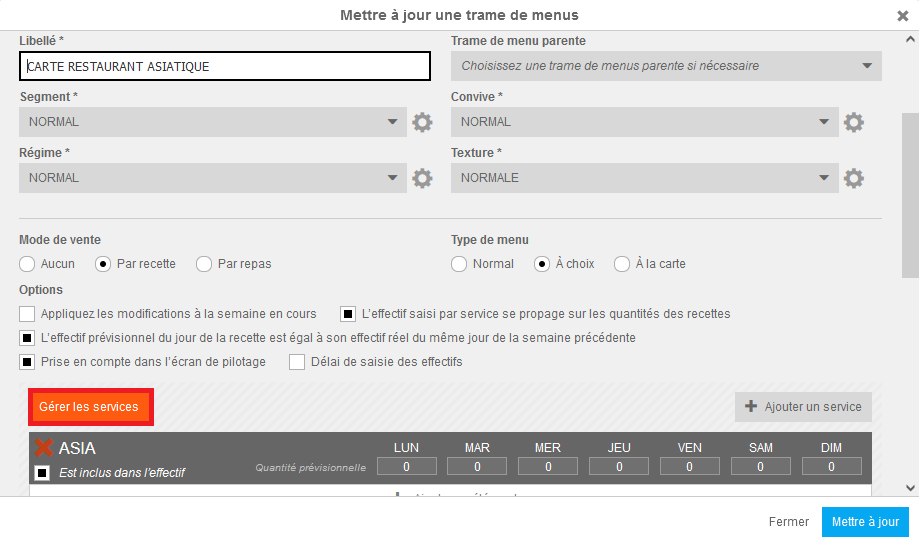
Select Manage services.
Note: this button is only visible if you are on the root site and have administration rights for these items.
Access the "Manage services" function, 2nd method: from Nutrition > Meal plan.
Select the Nutrition > Meal plans tabs.
Select Create a meal plan.
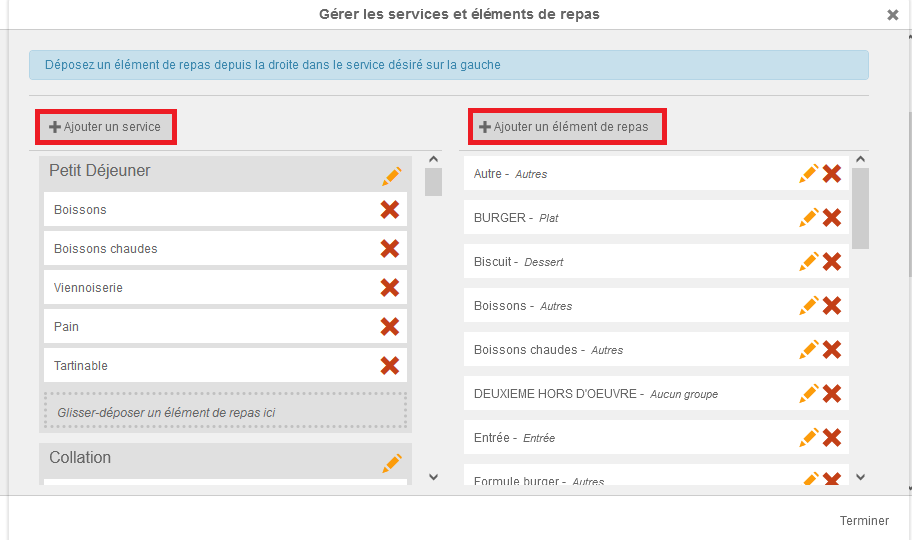
Use the "Manage services" function
The Manage services and meal items window appears on the screen. Service management is on the left side of the window, meal item management is on the right side.
Select "Add a service" or "Add a meal item" to create a new one. You can create a meal item by adding it to a meal item group.
Note: it is not possible to delete a service, you can only rename it.
Drag and drop meal items into a service to configure the service and determine which meal items can be offered for use when the user chooses to add the service to their menu frame.
Note: be careful not to delete a meal item by mistake when you only want to remove it from a service composition!
Select the orange pencil to edit the name or meal item group of a meal item.
Select the red cross to permanently delete a meal item.
Note: if it was part of a service composition, you will need to update the menu frames to remove it. Deleting a meal item does not remove its use in the menu frames.
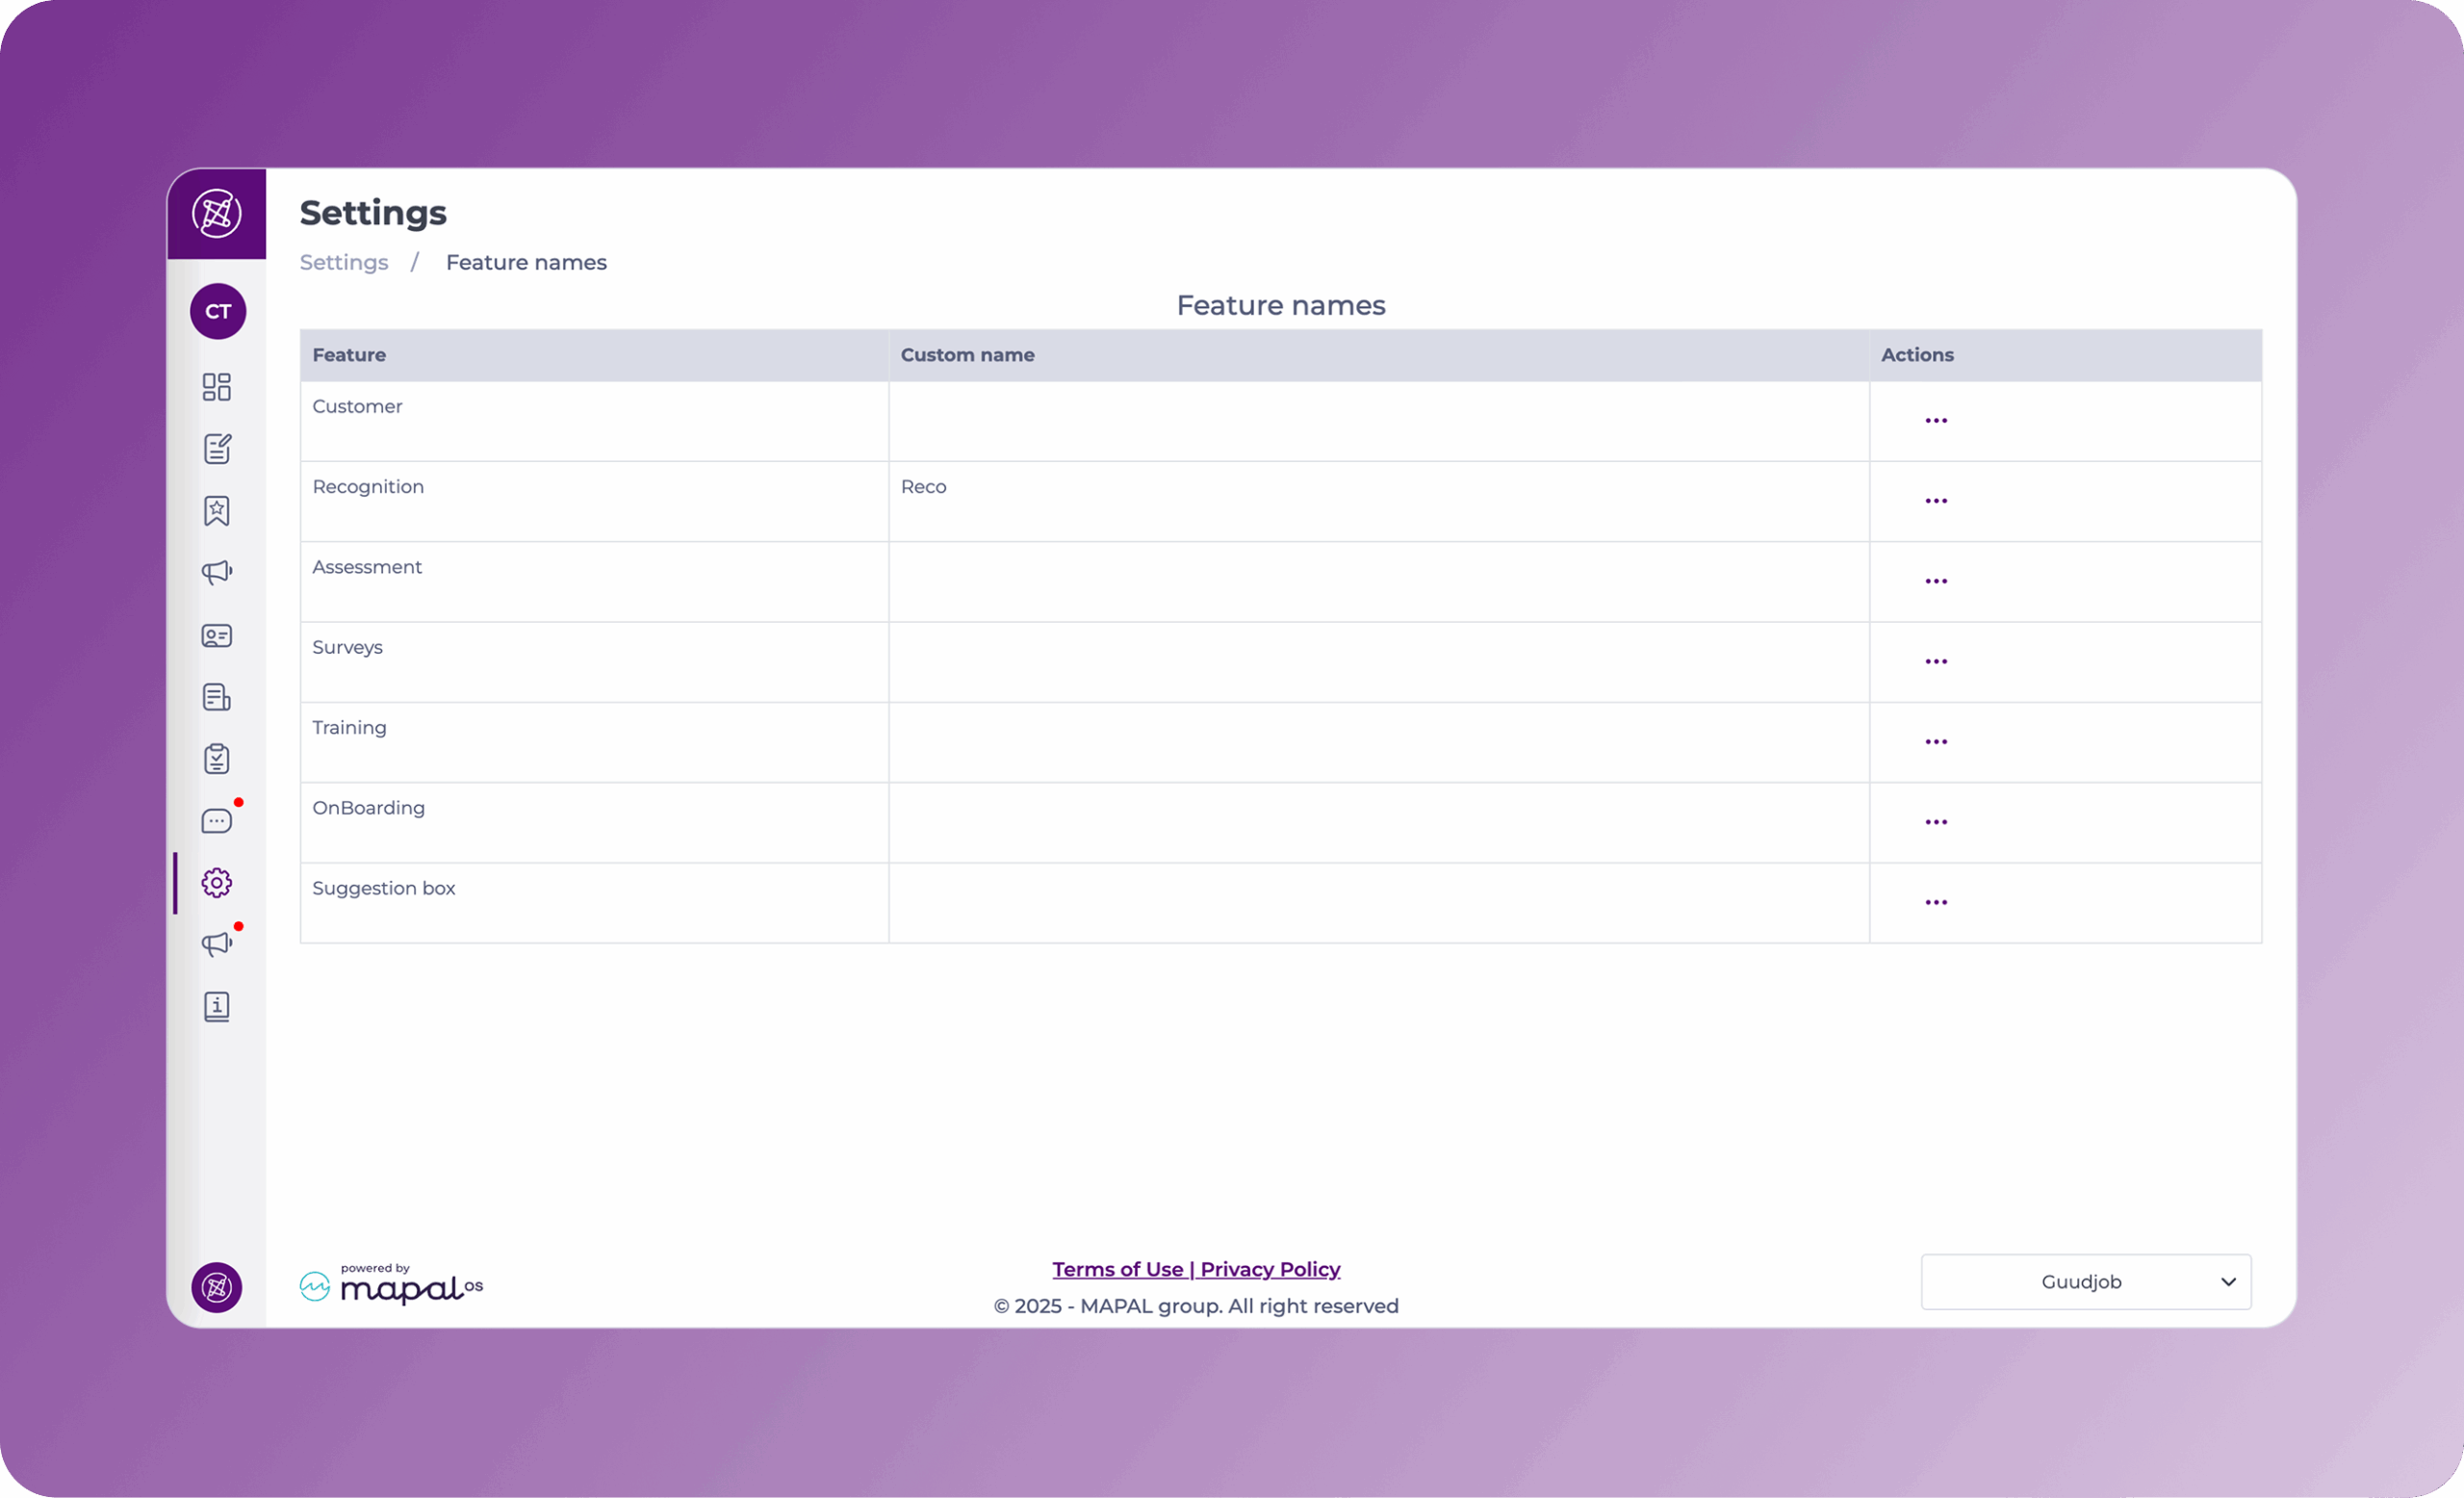
Customise menu names in Engagement
Start from: The Engagement dashboard.
Navigate to Settings > Feature names.
The Feature names grid shows you three columns:
The names of all the functionalities available.
Custom names assigned by you.
Actions. Note that the only action available is Edit.
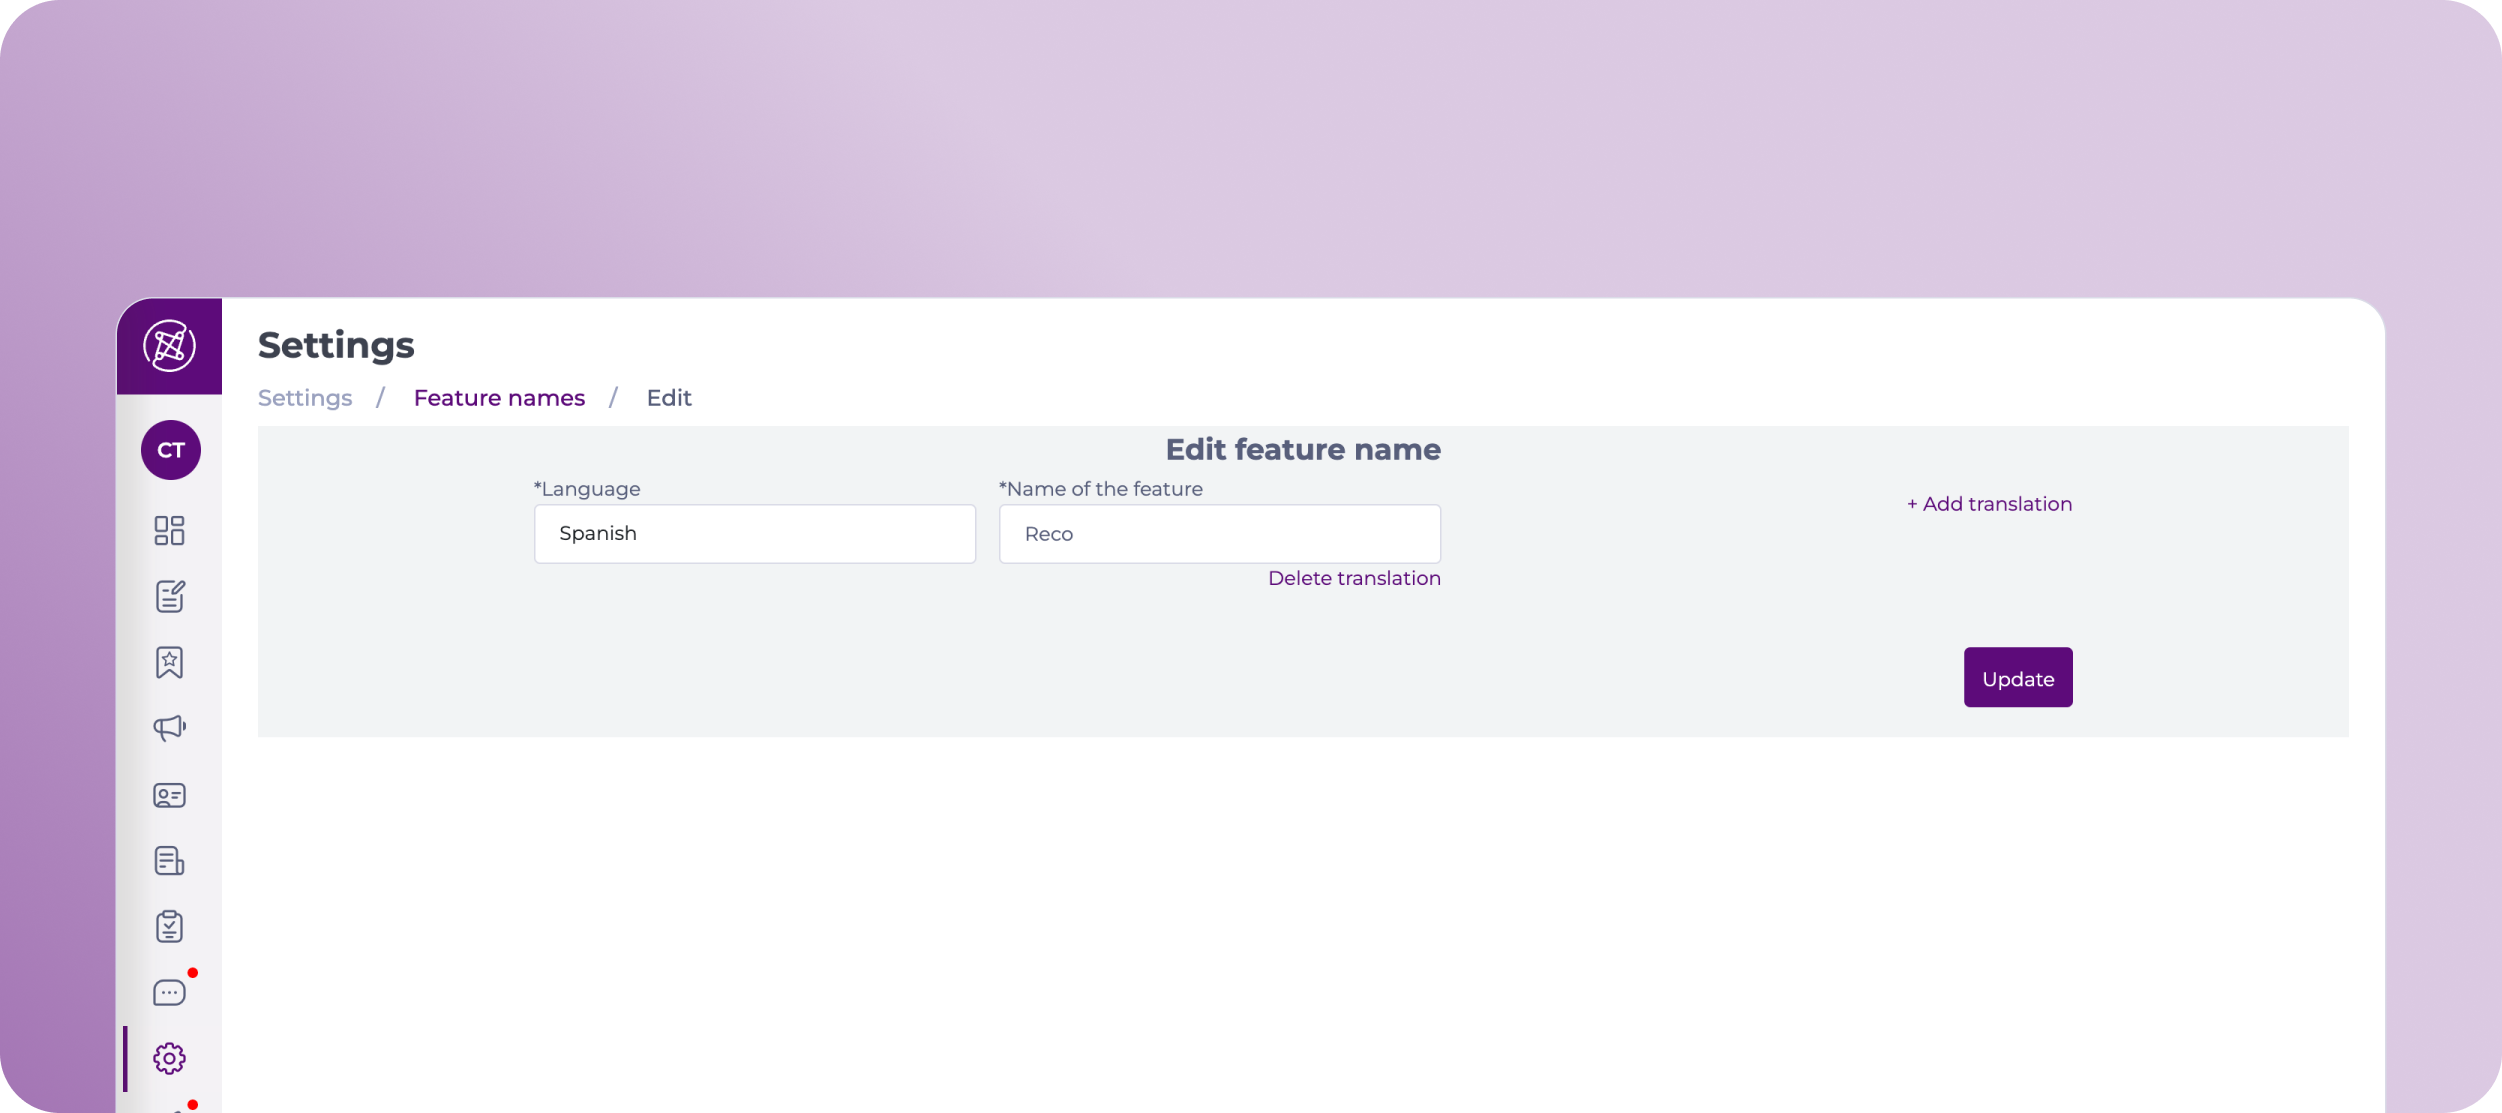
Select the Action button (three dots) at the far right of the feature’s row and press Edit.
In the Edit feature name screen, you can modify:
Main language
Feature name
Add translations of the feature name
Notes: You can add as many names as languages, 5 (Spanish, English, French, Italian, and Flemish).
Once you complete the edition, select Update to save the changes.
The new custom feature name will now appear in the second column of the grid.
Manage jurisdictions in Flow Learning
Start from: the Flow Learning dashboard.
Create Jurisdiction
Select Company > Company structure from the main menu.
Select the Jurisdictions card.
Select the Add (+) button to add a new Jurisdiction.
Assign a Name to your new Jurisdiction.
Select Save.
After creating your Jurisdictions, make sure you assign the correct Jurisdiction to each Branch in Company structure. If branches are not linked to a Jurisdiction, any jurisdiction-based restrictions configured in training structures will not work. To do this:
Navigate back to Company > Company structure.
Select Branches.
Select the specific Branch you want to assing the Jurisdiction to.
Scroll down to Jurisdiction and select your new Jurisdiction from the dropdown list.
Select Save.
Edit Jurisdiction
Select an existing Jurisdiction from the list.
Note: You can use the Search and Filter buttons to look for a Jurisdiction or filter the list.
Modify the name as needed and select Save to finish.
Delete items in Flow Learning by batch
Select Delete.
Confirm your deletion by selecting Save.
Note: this is irreversible and items will be deleted permanently.
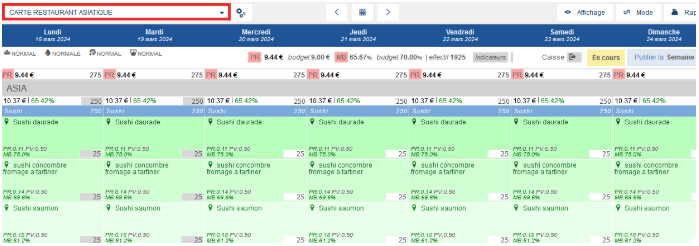
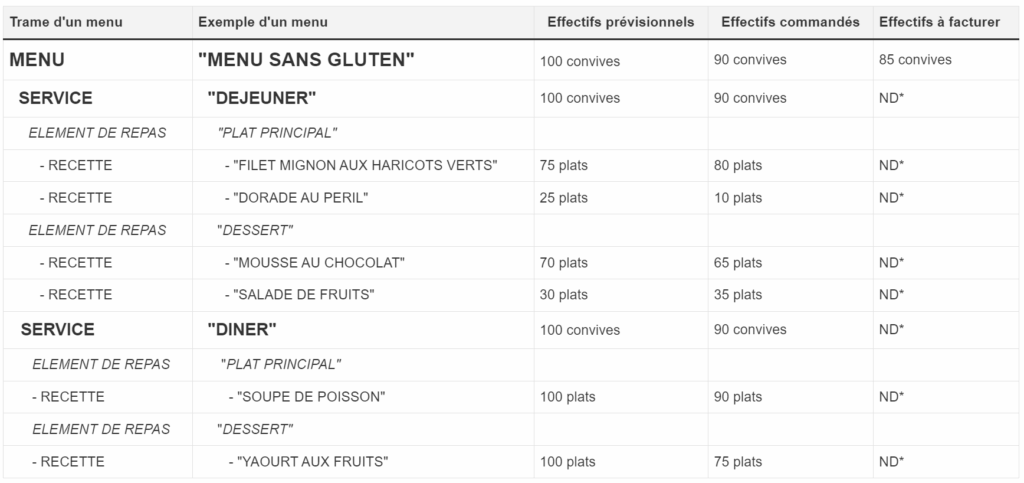
Record information with Menu quantities
Menu quantities entry allows you to record, on a daily basis, the number of guests for each menu with details at the service level (breakfast, lunch, dinner, etc.), meal components (starters, main course, dessert, etc.), and recipes.
Based on the quantities, it is possible to anticipate production and later observe the difference between forecasted and ordered quantities.
General information
For a given day:
Each menu includes one or more services.
Each service includes one or more meal components.
Each meal component includes one or more recipes.
Example of a day:
*ND: Not available in the current version of the application.
Note: A menu is generated from a menu template.
For each menu, you can track daily:
Forecasted quantities (estimated number of guests/dishes).
Ordered quantities (actual number of guests/dishes ordered).
Quantities to be invoiced (number of guests).
General rules for forecasted quantities:
The forecasted quantity can only be modified for a future date (d+1).
Modifying the forecasted quantity automatically updates the ordered quantity, provided the ordered quantity has not already been entered by the user.
General rules for ordered quantities:
The ordered quantity for a past, present, or future date can be freely modified.
The ordered quantity has a status that indicates whether the user has manually entered a specific amount. The cell color visually identifies that the ordered quantities have been entered by the user.
The ordered quantity allows a return to the previous amount (using a back button that appears in the cell when hovering the mouse). If the previous amount equals the initial amount, the value is considered as not entered by the user. This allows the user to cancel an entry error.
Note: This return to the previous amount is only possible during the current session (if the user closes the application and returns to the screen, the return is no longer possible).
It is also possible to reset the ordered quantity to the forecasted quantity by clearing the ordered quantity and leaving the cell.
General rules for quantities to be invoiced:
As long as the user has not entered a quantity to be invoiced, the invoice column is equal to the ordered quantity.
The quantity to be invoiced for a past, present, or future date can be freely modified.
The quantity to be invoiced has a status that indicates whether the user has manually entered the amount. The highlighted cell color visually identifies that the quantities to be invoiced have been entered by the user.
The quantity to be invoiced allows a return to the previous amount (using a back button that appears in the cell when hovering the mouse). If the previous amount equals the initial amount, the value is considered as not entered by the user. This allows the user to cancel an entry error.
Note: This return to the previous amount is only possible during the current session (if the user closes the application and returns to the screen, the return is no longer possible).
It is also possible to reset the quantity to be invoiced to the ordered quantity by clearing the ordered quantity and leaving the cell.
If the user enters a quantity of 0, this value is significant.
If in a template, a service has the Included in quantities option disabled, then the quantity to be invoiced cannot be entered and is marked as NF (Not billable).
General parameters impacting the menu quantities entry screen
At the site settings level:
The Do not display this site in the site tree parameter allows you to hide a site from the site tree to simplify it. By default, this parameter is not enabled.
The Do not display menus on this site parameter allows you to hide any menus from the site. By default, this parameter is not enabled.
Functional scope
Site search function
The site search allows you to search for any site in the entire site tree authorized for the connected user.
Note: If the Do not display this site in the site tree parameter is enabled for certain sites, then these sites do not appear in the tree.
Select a site and/or a menu
Selecting a site displays the possible list of its associated menus with the quantities for the selected period.
Note: If the Do not display menus on this site parameter is enabled for certain sites, then the possible menus for these sites do not appear.
Selecting a specific menu displays the quantities for the service(s) associated with this menu, with details by meal component and by recipe.
Initialization/Modification of quantities at the menu level
Forecasted/ordered quantities at the menu level are initialized/calculated automatically:
Either by the service quantity, if there is only one service (e.g.: Service1 = 100 then Template = 100).
Or by the service quantities, if all quantities are identical (e.g.: Service 1 = 100, Service 2 = 100, then Template = 100).
In other cases, the quantity is initialized to 0 (e.g.: Service1 = 100, Service2 = 200 then Template = NC "Not Calculable").
If the menu consists of different services with the same quantity, it is possible to modify the menu quantity, which automatically updates the service quantities (e.g.: Service 1 = 200, Service 2 = 200, changing the menu quantity to 300 updates each service to 300).
If the menu consists of different services with different quantities, then the menu has a NC (Not calculable and not modifiable) quantity.
Quantities to be invoiced are automatically initialized with the ordered quantities. The user can freely modify the quantities to be invoiced.
Initialization/Modification of quantities at the service level
Forecasted quantities for services are automatically initialized:
Either from the quantity settings on the menu template.
Or directly from the menu, if it has been generated.
If the services have the same value, it is possible to modify the menu quantity, which automatically updates the service quantities (e.g.: Service 1 = 200, Service 2 = 200, changing the menu quantity to 300 updates each service to 300).
Quantities to be invoiced are not currently managed at the service level.
Initialization/Modification of quantities at the meal component level
No quantity is displayed/calculated for a meal component.
Initialization/Modification of quantities at the recipe level
Forecasted quantities for a recipe are automatically initialized:
Either from the quantity settings on the menu template.
Or directly from the menu, if it has been generated.
Modifying the forecasted quantity for a service:
Impacts the forecasted quantity for the recipes of that service by applying the same ratio to the previous quantity.
If the previous quantity was 0, the ratio is not calculated.
Uptake rates that can be entered in the menu template settings are not taken into account.
If necessary, the calculated quantity is rounded to the nearest whole number.
Quantities to be invoiced are not currently managed at the recipe level.
Duplicate a reference day
To facilitate entry, it is possible to duplicate (copy/paste) a reference day to a target day.
The general principle of duplication is as follows:
The ordered quantities of the reference day for the current site and child sites are duplicated to the target day, for all templates common to forecasted, ordered, and invoiced quantities.
Before applying duplication, a summary of its impact is provided to facilitate understanding and control. It indicates between the two dates:
The number of common templates.
The number of templates unique to the reference day that will not be copied to the target day.
The number of templates unique to the target day that will not be affected by the duplication.
Business rules:
Duplication is performed from the current site with its child sites and applies to the same current site and its children.
The reference day can be set in the past, present, or future.
The target day must be a future date (d+1) and later than the reference day.
It is the ordered quantities of the reference day that are duplicated to the forecasted, ordered, and invoiced quantities of the target day.
Quantities copied to the target day are considered as not entered by the user.
On the target day, it is impossible to recover quantities that have been replaced by duplication, even if they were previously entered by the user.
Duplication is limited to one day at a time.
Child sites/templates/services/meal components not present on both dates (reference day and target day) are ignored.
Details on duplicating quantities at the recipe level:
The probability of having the same recipes between the reference day and the target day is very low. The distribution of quantities for the recipes of the target day is therefore based on the ratio of the quantity for the recipes of the reference day, maintaining the order of the dishes set in the template.
Three scenarios:
If there is the same number of recipes between the reference day and the target day, the distribution of quantities is strictly identical.
If there are more recipes on the target day than on the reference day, the additional recipes on the target day have forecasted and ordered quantities set to 0.
If there are fewer recipes on the target day than on the reference day, a ratio is calculated for a relevant distribution of quantities.
In all cases, the quantities for the target day are identical to those of the reference day.
Quantities to be invoiced at the recipe level are not currently managed in the application.
Filters
Types of quantities:
This filter allows you to customize the display by limiting it to certain types of quantities to facilitate entry and consultation.
Reports
Status of ordered quantities entries by site/tour:
This report lists the sites for which the entry of ordered quantities has been completed or not, taking into account the management of tours. Display options allow the report to be adapted to the desired context.
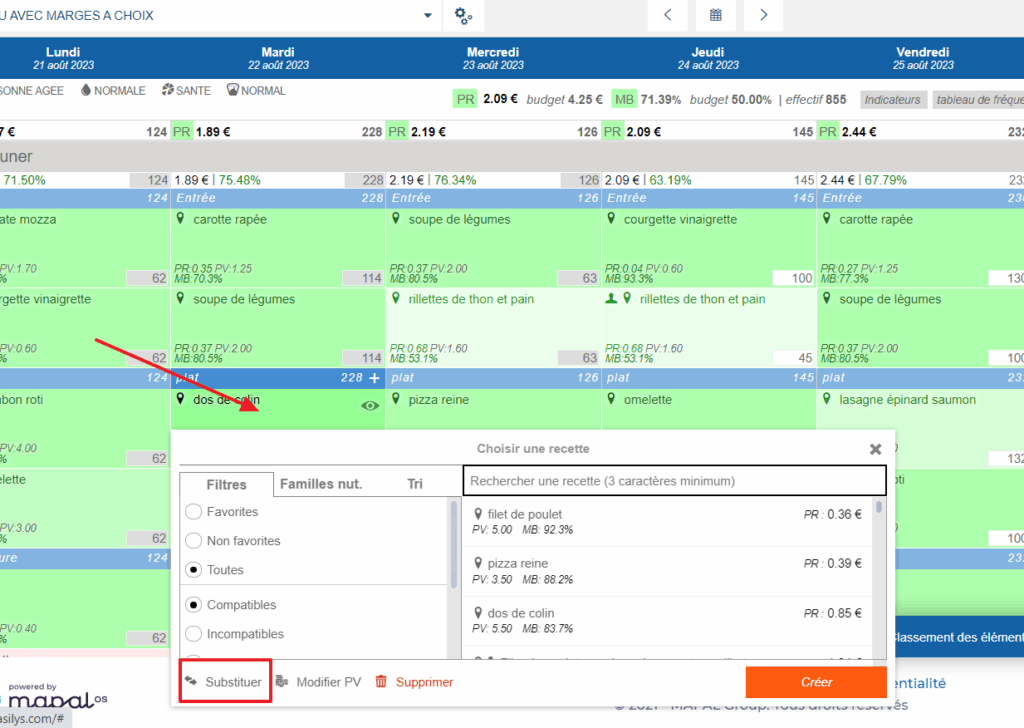
Substitute recipes in your menus
Start from: The Easilys menu.
Do you need to replace one recipe with another for a specific period in your menus? Rather than making manual changes over several days, use the recipe substitution system!
You can define the period during which a recipe should be replaced by another and Easilys will make the changes for you. This saves time, especially when you do not know exactly where the recipe appears during the period.
Select the Menus > Menus tabs.
Select the menu template on which you want to perform a recipe substitution.
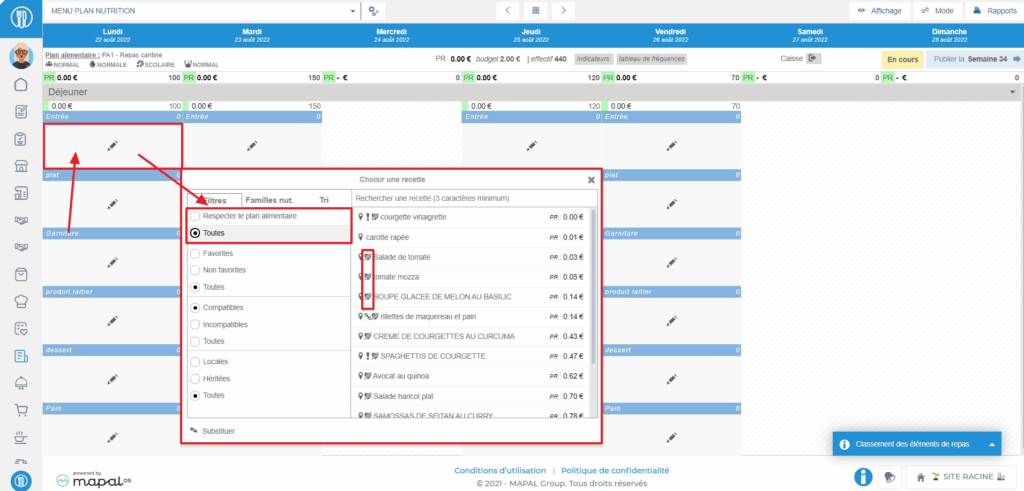
Select a menu box containing the recipe to be substituted for a specific period of time.
The small recipe selection window will then appear on the screen.
On the left side of this window, scroll down to see the different options available to you under the filters.
Select Substitute.
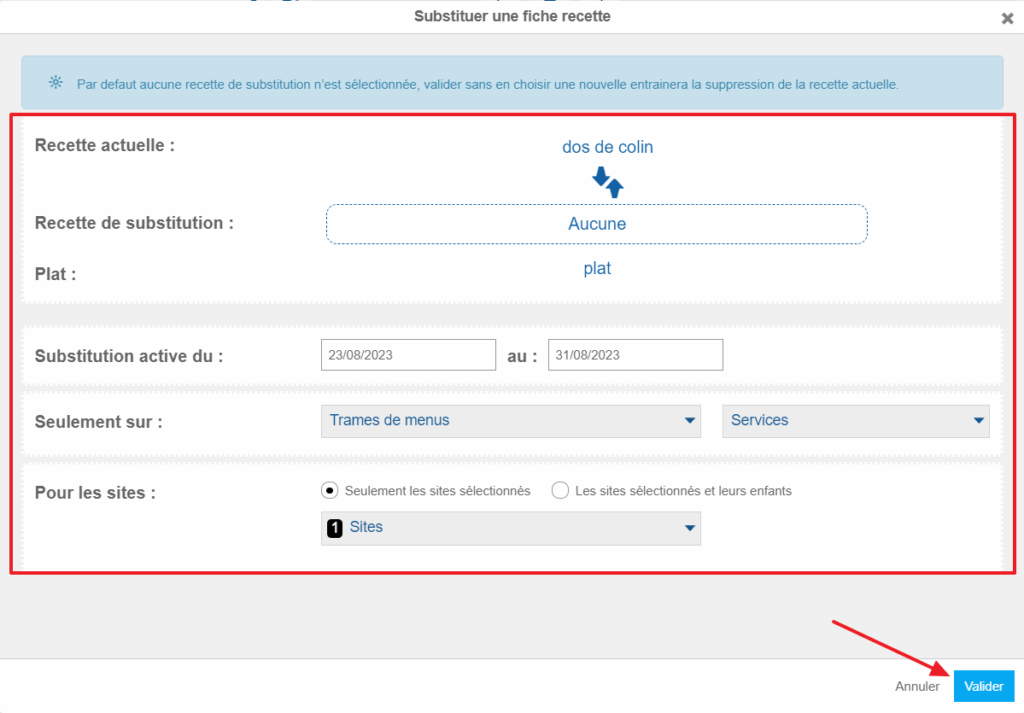
The “Substitute a recipe sheet” window will then appear on the screen.
In the “Current recipe” section, make sure you find the name of the recipe you want to substitute with another.
In the “Substitution recipe” section, select the box to set the recipe of your choice.
Then indicate the period during which the substitution should be effective. You can also indicate to Easilys if the substitution should be made on different menu templates or different sites if you work in multi-site.
Select Validate.
A green message at the top right of the screen will indicate the number of recipes that have been substituted during the period.