Bulk change a list of supplier orders to ‘manually sent’ status
Note: Each action that can be performed on the application is subject to user permissions. If you cannot perform the actions recommended in the articles you consult, it may mean that the necessary rights are not activated for your user profile. Contact the Support team, or your administrator, for more information.
Start from: the Easilys menu.
Navigate to Supplier orders > Track orders.
The list of purchase orders is displayed.
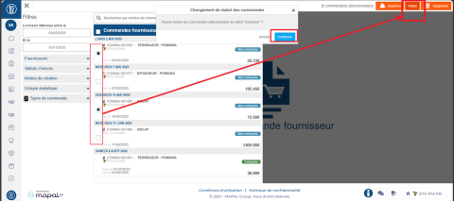
Tick the orders that you want to change to the status "Sent".
Click on Confirm
Note:
Changing the orders to the status "sent" is the equivalent of the manual sending of each of these orders. With this type of sending, the supplier will not be informed directly by Easilys of these orders, it is you who informs the supplier by other means, for example by telephone.
This action is impossible for suppliers whose order sending requires external validation. If you are concerned, a message will be displayed when you attempt to change the status.
The referencing period
Start from: The Easilys menu
When using this option, the supplier will also no longer be active in the rest of the application. It will therefore no longer be possible to place orders with the supplier even if their price lists are still active.
Modify the referencing period
It is entirely possible to modify the referencing period even once the end date has passed in order to be able to order from the supplier again. To do this:
Select the tabs Products > Suppliers.
Check the "View all suppliers" filter.
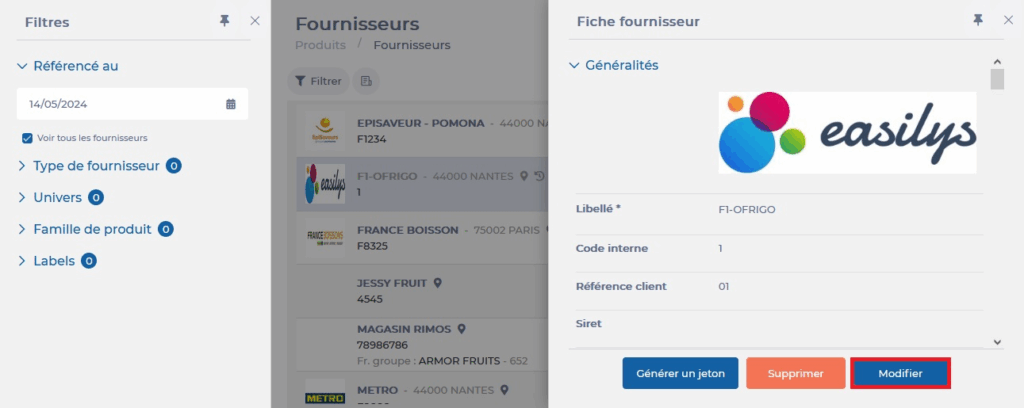
Select the grayed-out supplier record.
Select Modify.
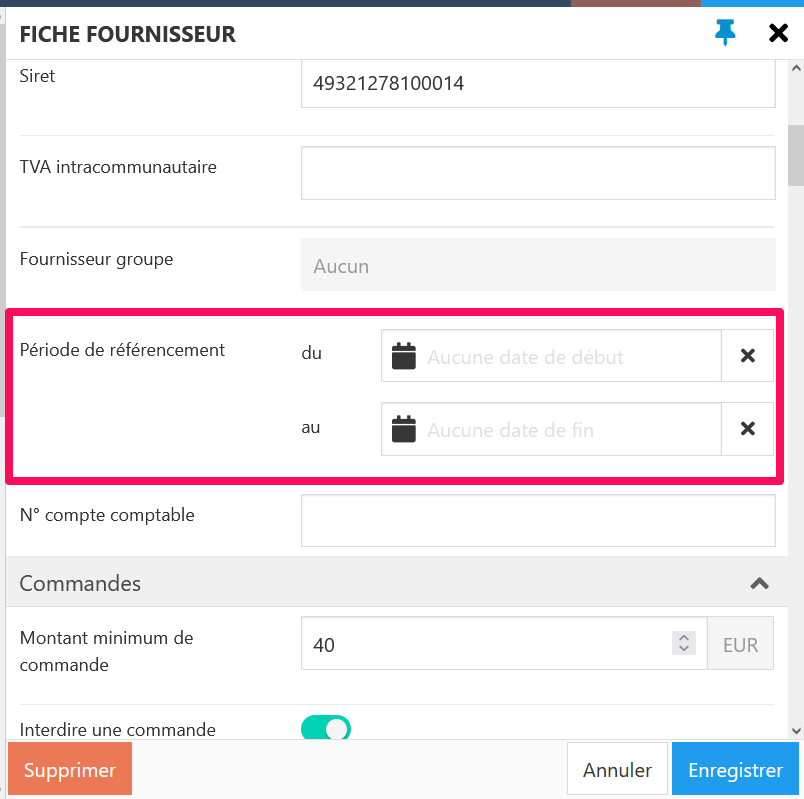
In the "Referencing period" section, modify the dates then select Save.
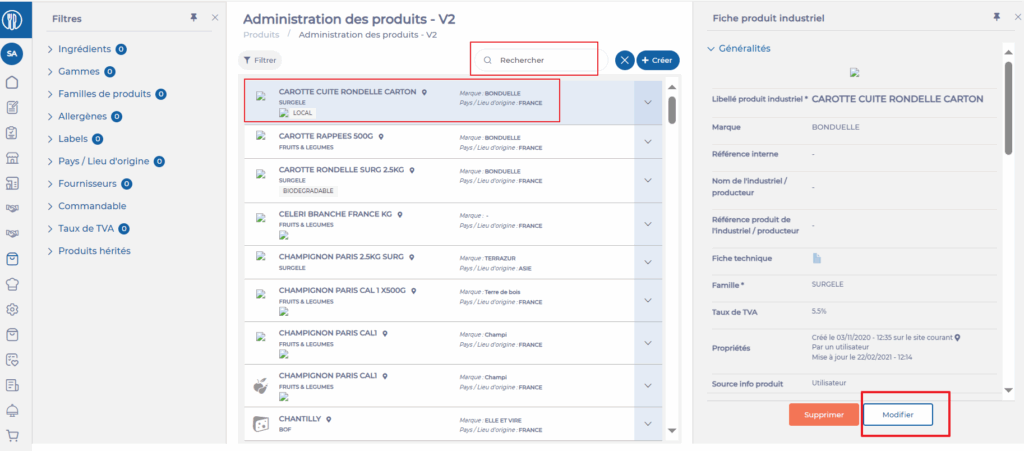
Add product labels
If your environment is configured for multiple languages, the multilingual icon
appears for some fields. For more information on how to use it, see the article
Use Easilys in multilingual mode
.
Start from: The Easilys menu.
Labels can be managed from the price lists screen OR from the Products administration - V2 screen.
Method 1: From Price lists:
Select Products> Price lists.
Select the price list in which the product you want to add or modify the label(s) is located.
The price list details are displayed on the screen.
Search for the relevant product in the list.
Select the product name.
A Supplier product details pop-up window appears. It consists of three columns.
In the Industrial product section, select the pencil icon.
An Update industrial product pop-up window appears.
Add or remove label(s).
Select Update.
Method 2: From Products administration - V2
Select Products in the main menu > Products administration - V2.
Search for and select the desired product.
Select Edit.
Add or remove the desired labels.
Select Save.
Note: Modifying the labels associated with a product has a retroactive effect on the analysis of your purchases: thus, all orders for this product will feed into the percentage total of your purchases of this or that label that you have saved on the product and will no longer feed into the total of labels that you have removed.
Ensure that the modification of a price list product impacts the stock
To ensure that changes made to a product in the price list, such as unit changes, affect the stock, follow these steps:
Access the Settings and navigate to the Inventory section.
Ensure that the product is correctly linked to the stock management system.
Verify that the Unit settings are consistent across both the price list and the stock system.
Save the changes and monitor the stock levels to confirm the update has been applied.
For further assistance, contact your system administrator or refer to the user manual.
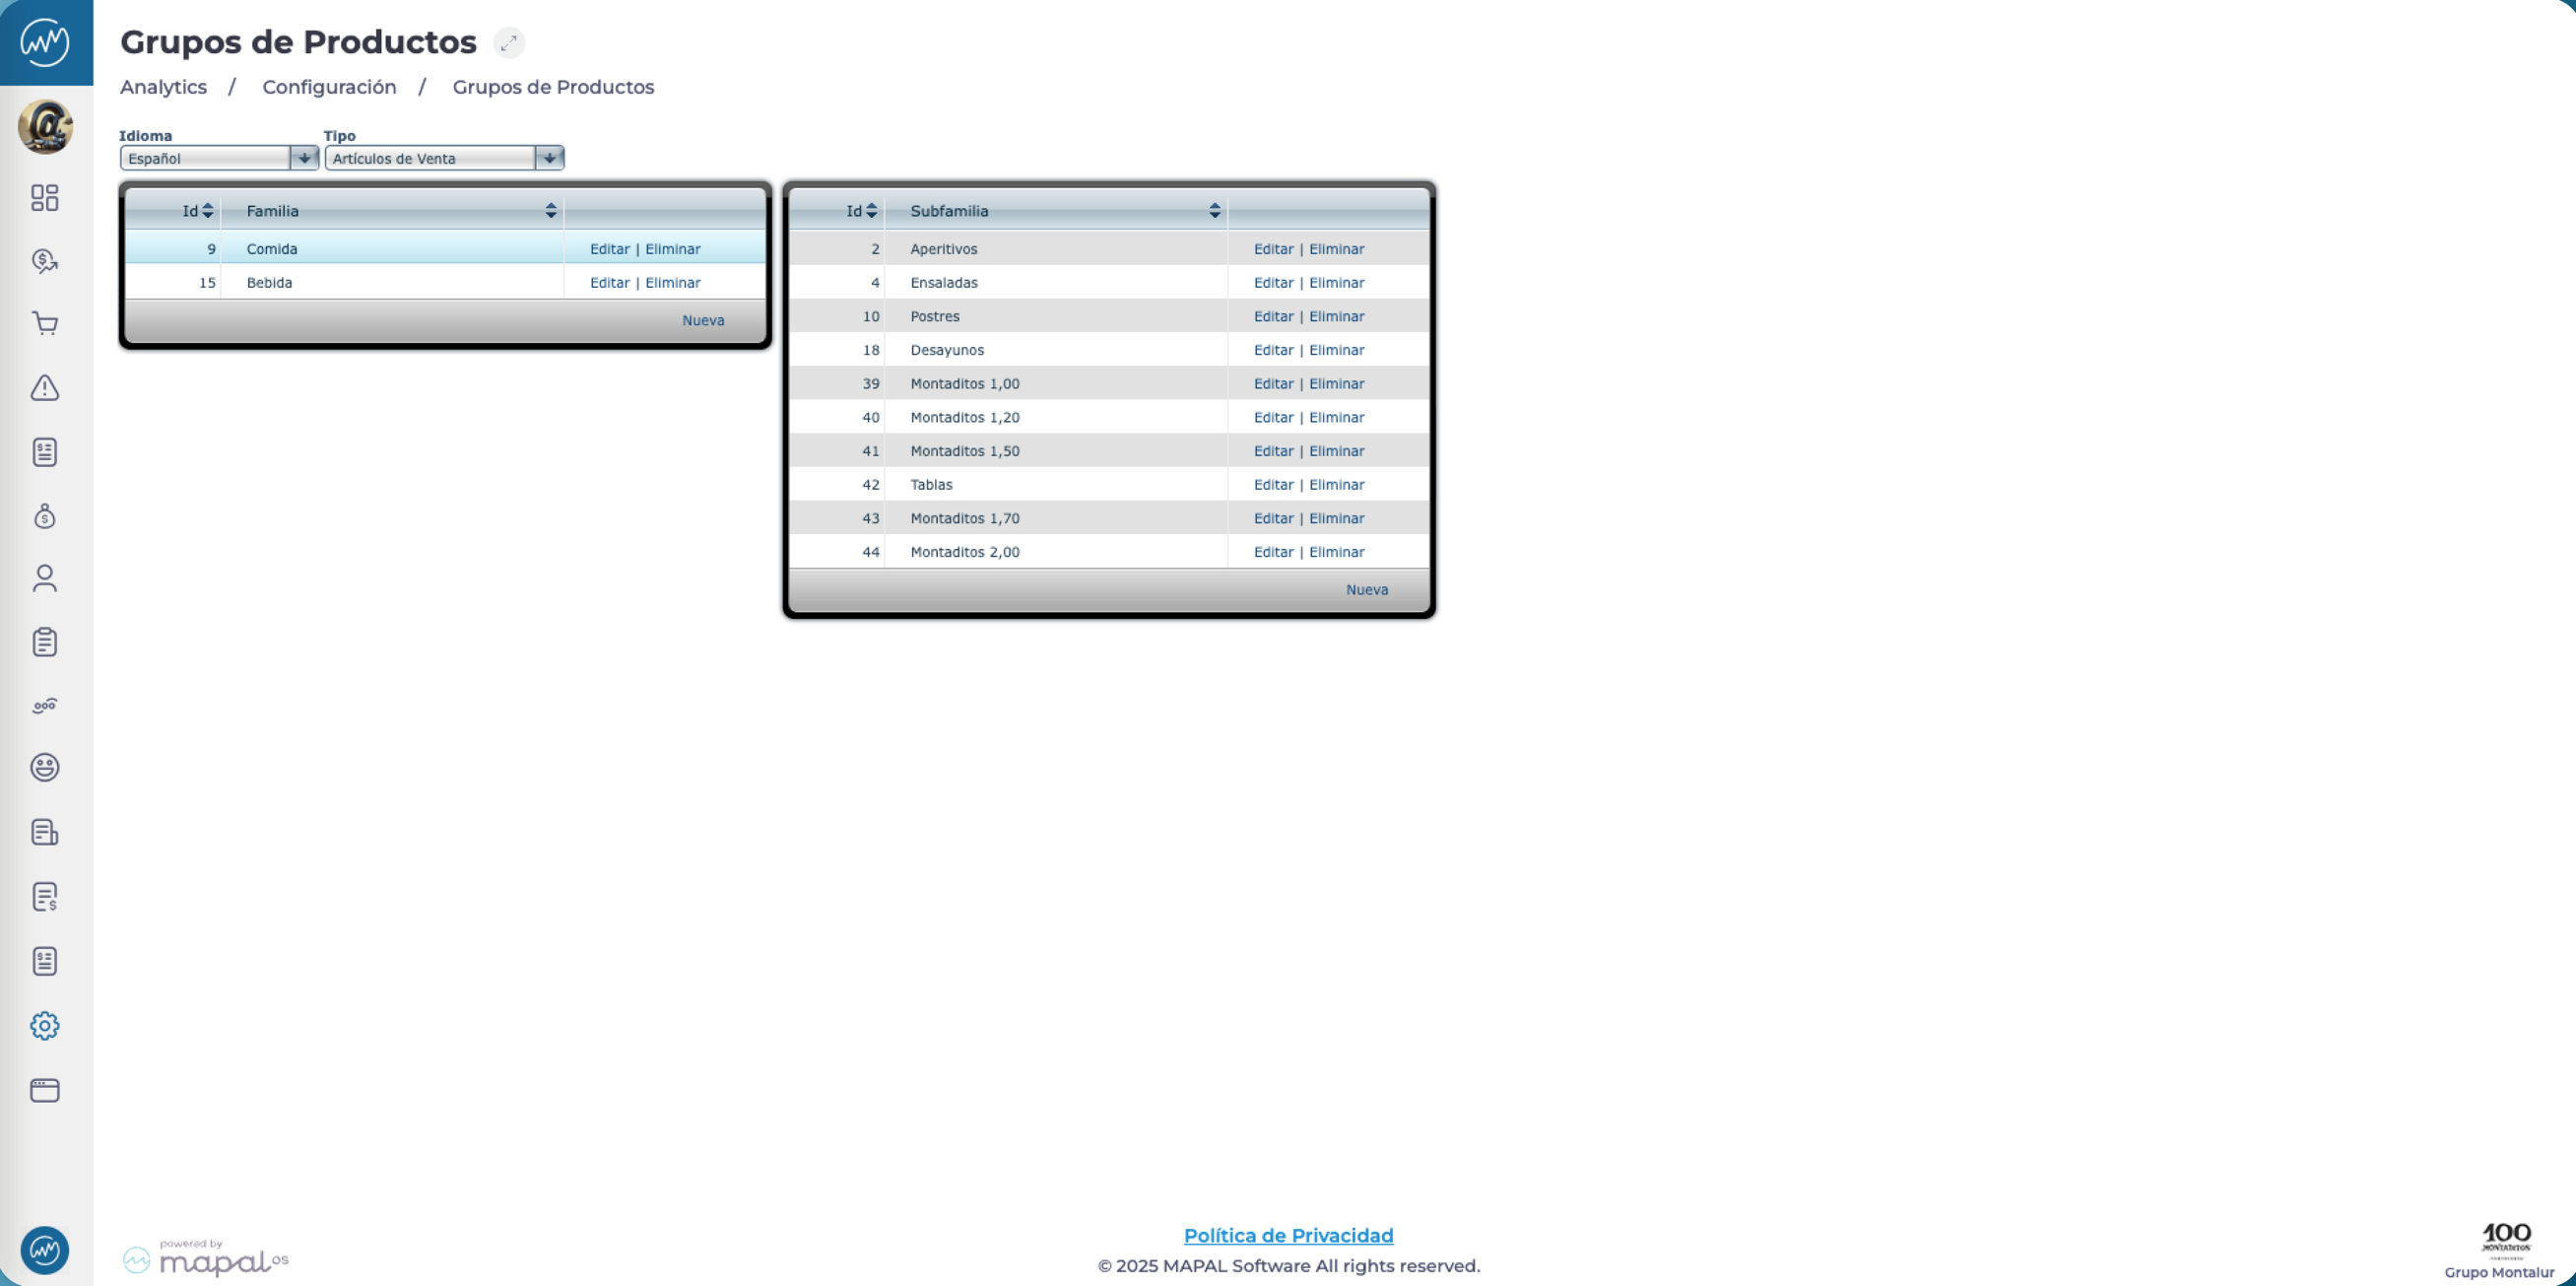
Organise your items into Product Groups
Start from: The Analytics dashboard
Navigate to Configuration > Product Groups.
In the Product Groups screen, select a preferred language and a specific product type (e.g. Raw Materials, or Sale Items)
Manage families
Product families are the top-level categories that contain one or more subfamilies. Each family has a unique identifier.
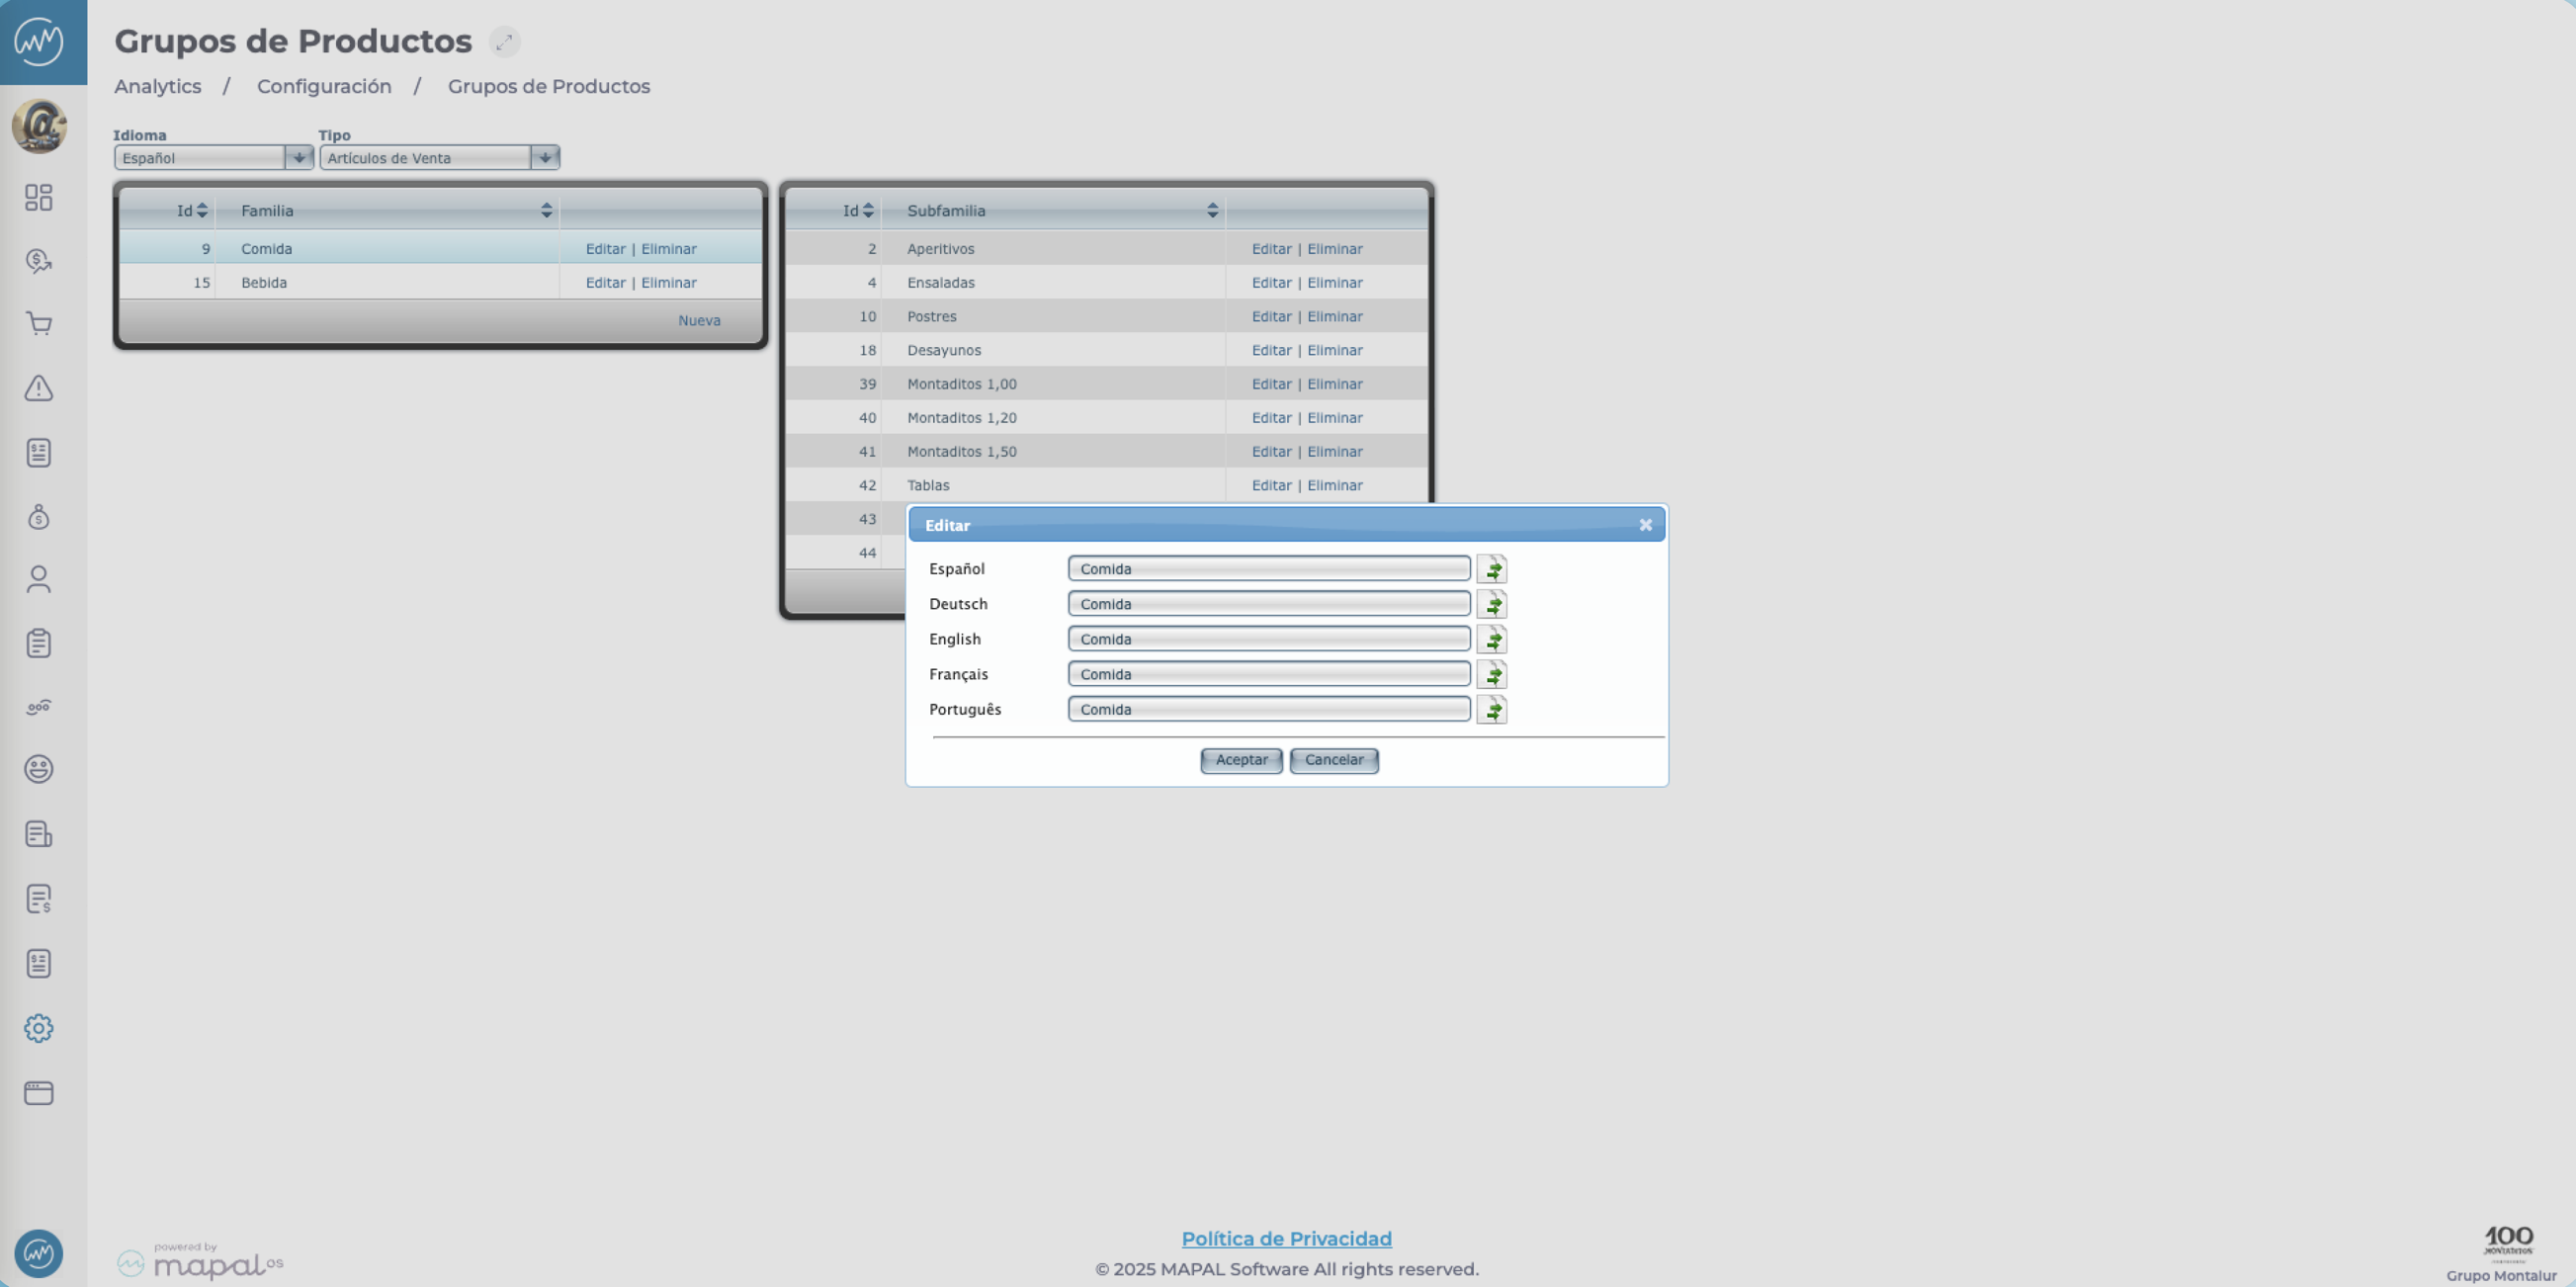
Create a Family
Select New under the Family table.
Assign a Name to the Family. You can also add the translations of the name here.
Select Accept. Your new Family will now appear in the table.
Edit a family
Select Edit in the Family’s row.
Change the name or translations as required.
Select Accept. The updated family will now appear on the list.
Delete a family
Select Delete in the Family’s row.
In the confirmation window, select Accept. The family will now disappear from the list.
Note: You can’t delete families that contain subfamilies.
Manage subfamilies
Subfamilies are subcategories within a family and cannot be shared across multiple families.
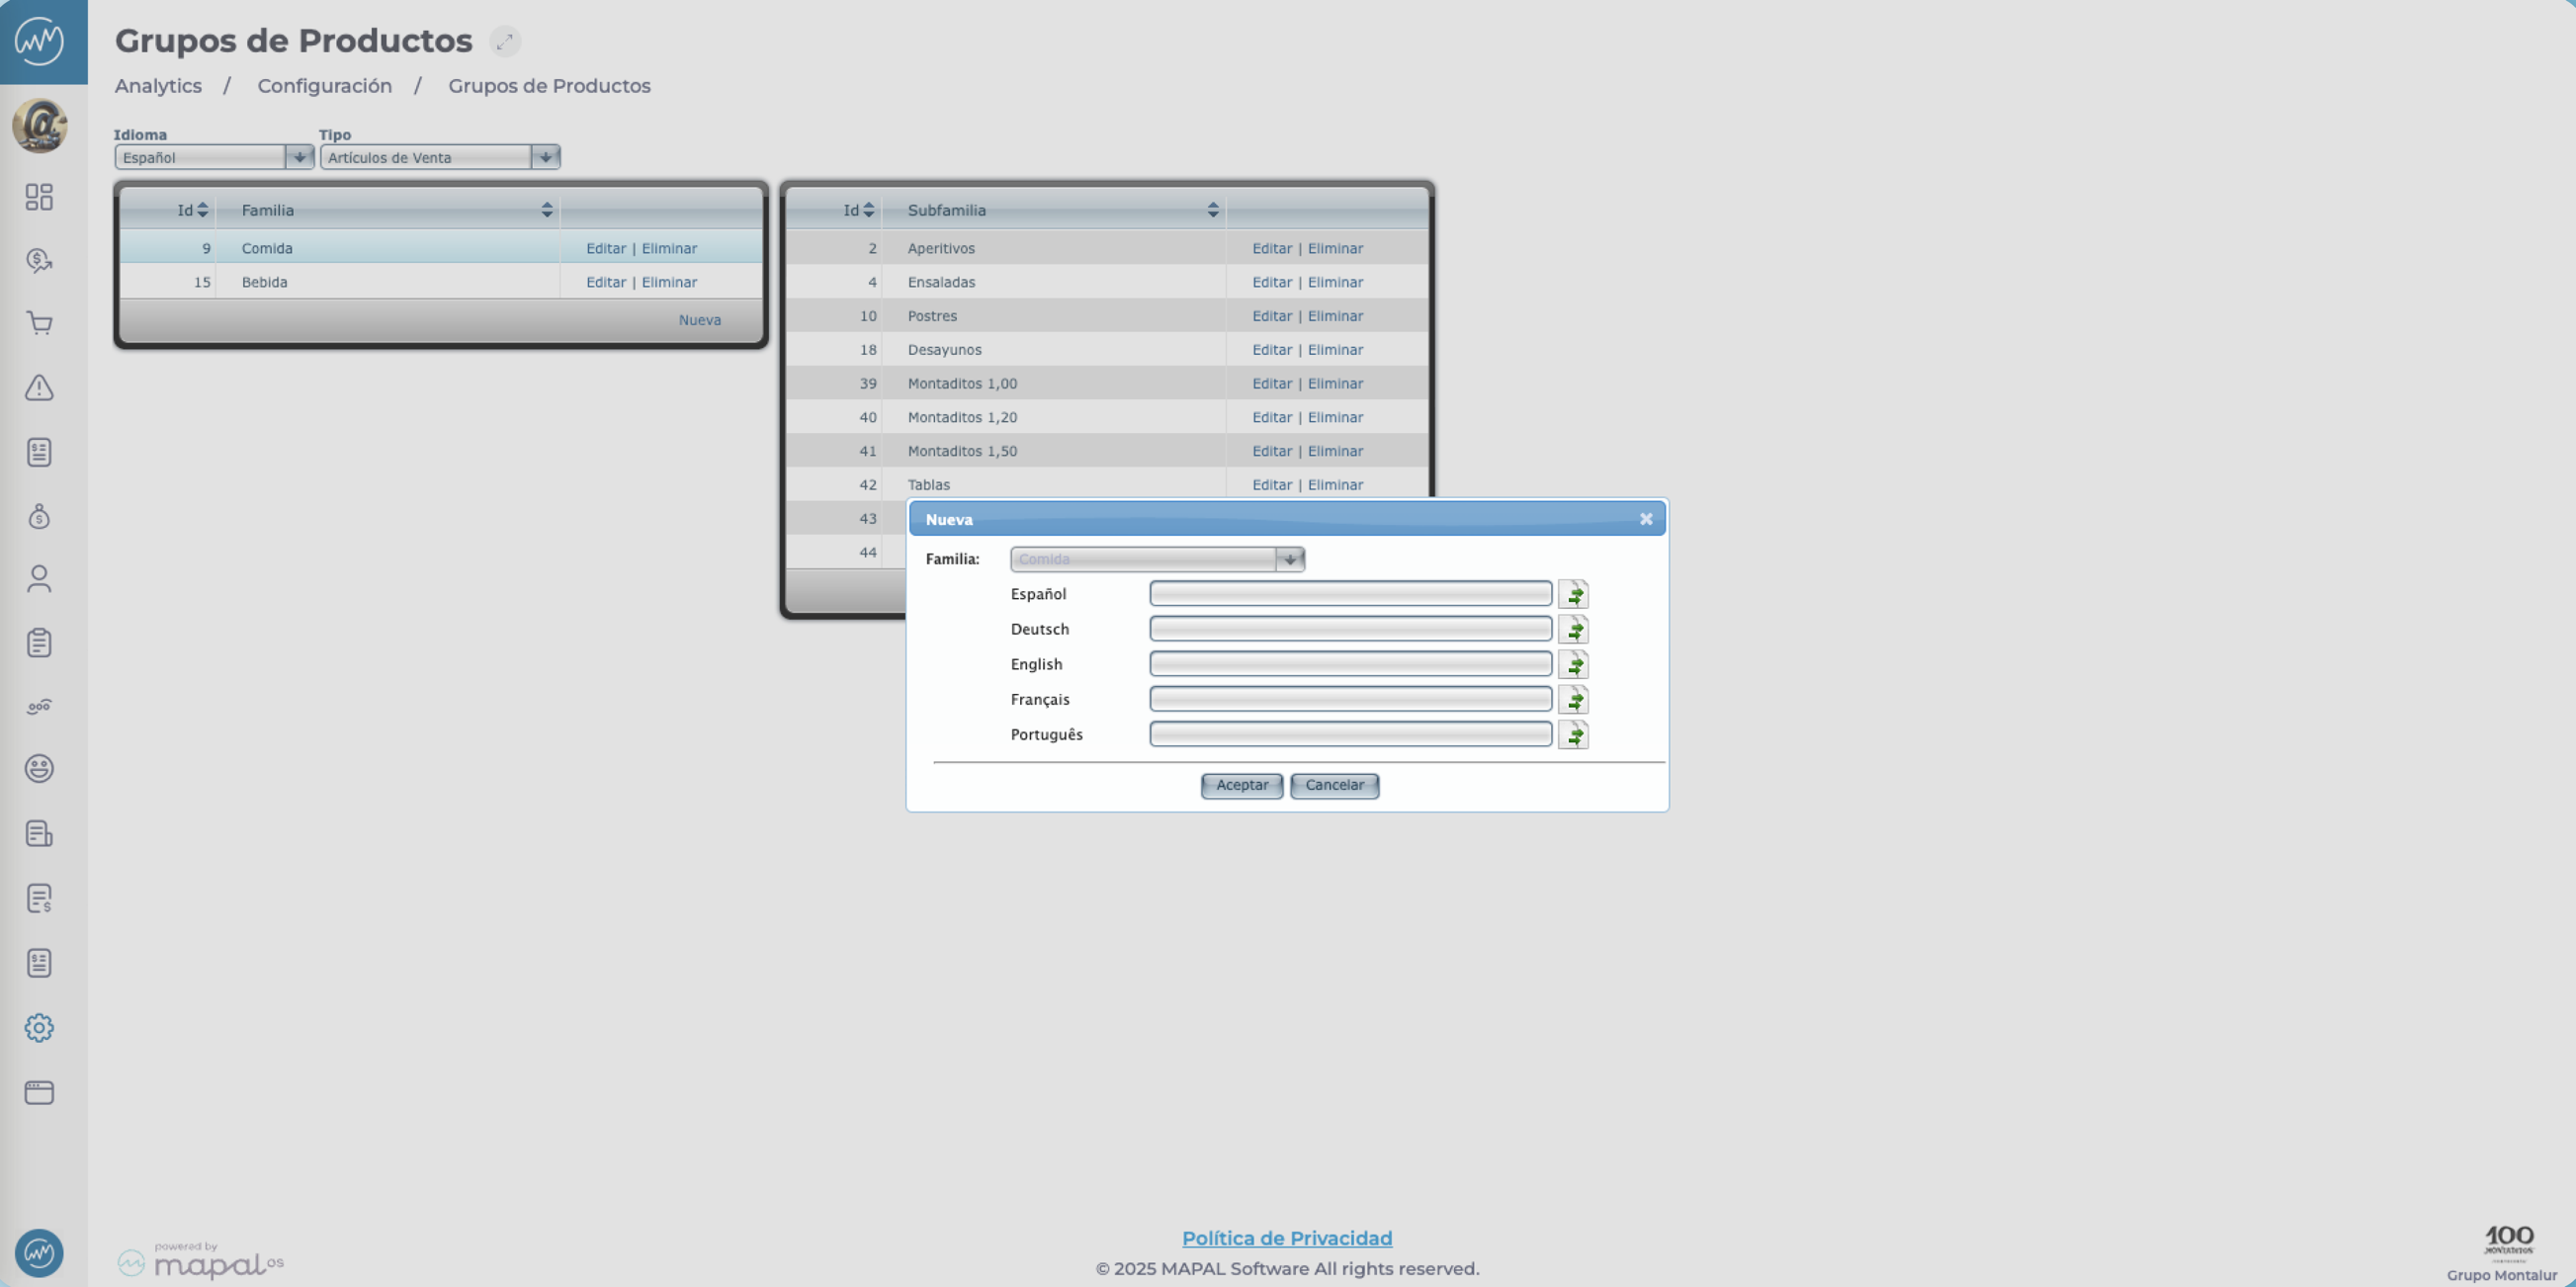
Create a Subfamily
Select New under the Subfamily table.
Assign a Name to the Subfamily. You can also add the translations of the name here.
From the Family dropdown, select the family to which this subfamily belongs.
Select Accept. Your new Subfamily will now appear in the table.
Edit a Subfamily
Select Edit in the Subfamily’s row.
Change the name or translations as required.
Select a new Family from the dropdown list if needed.
Select Accept. The updated subfamily will now appear on the list.
Delete a Subfamily
Select Delete in the subamily’s row.
In the confirmation window, select Accept. The subfamily will now disappear from the list.
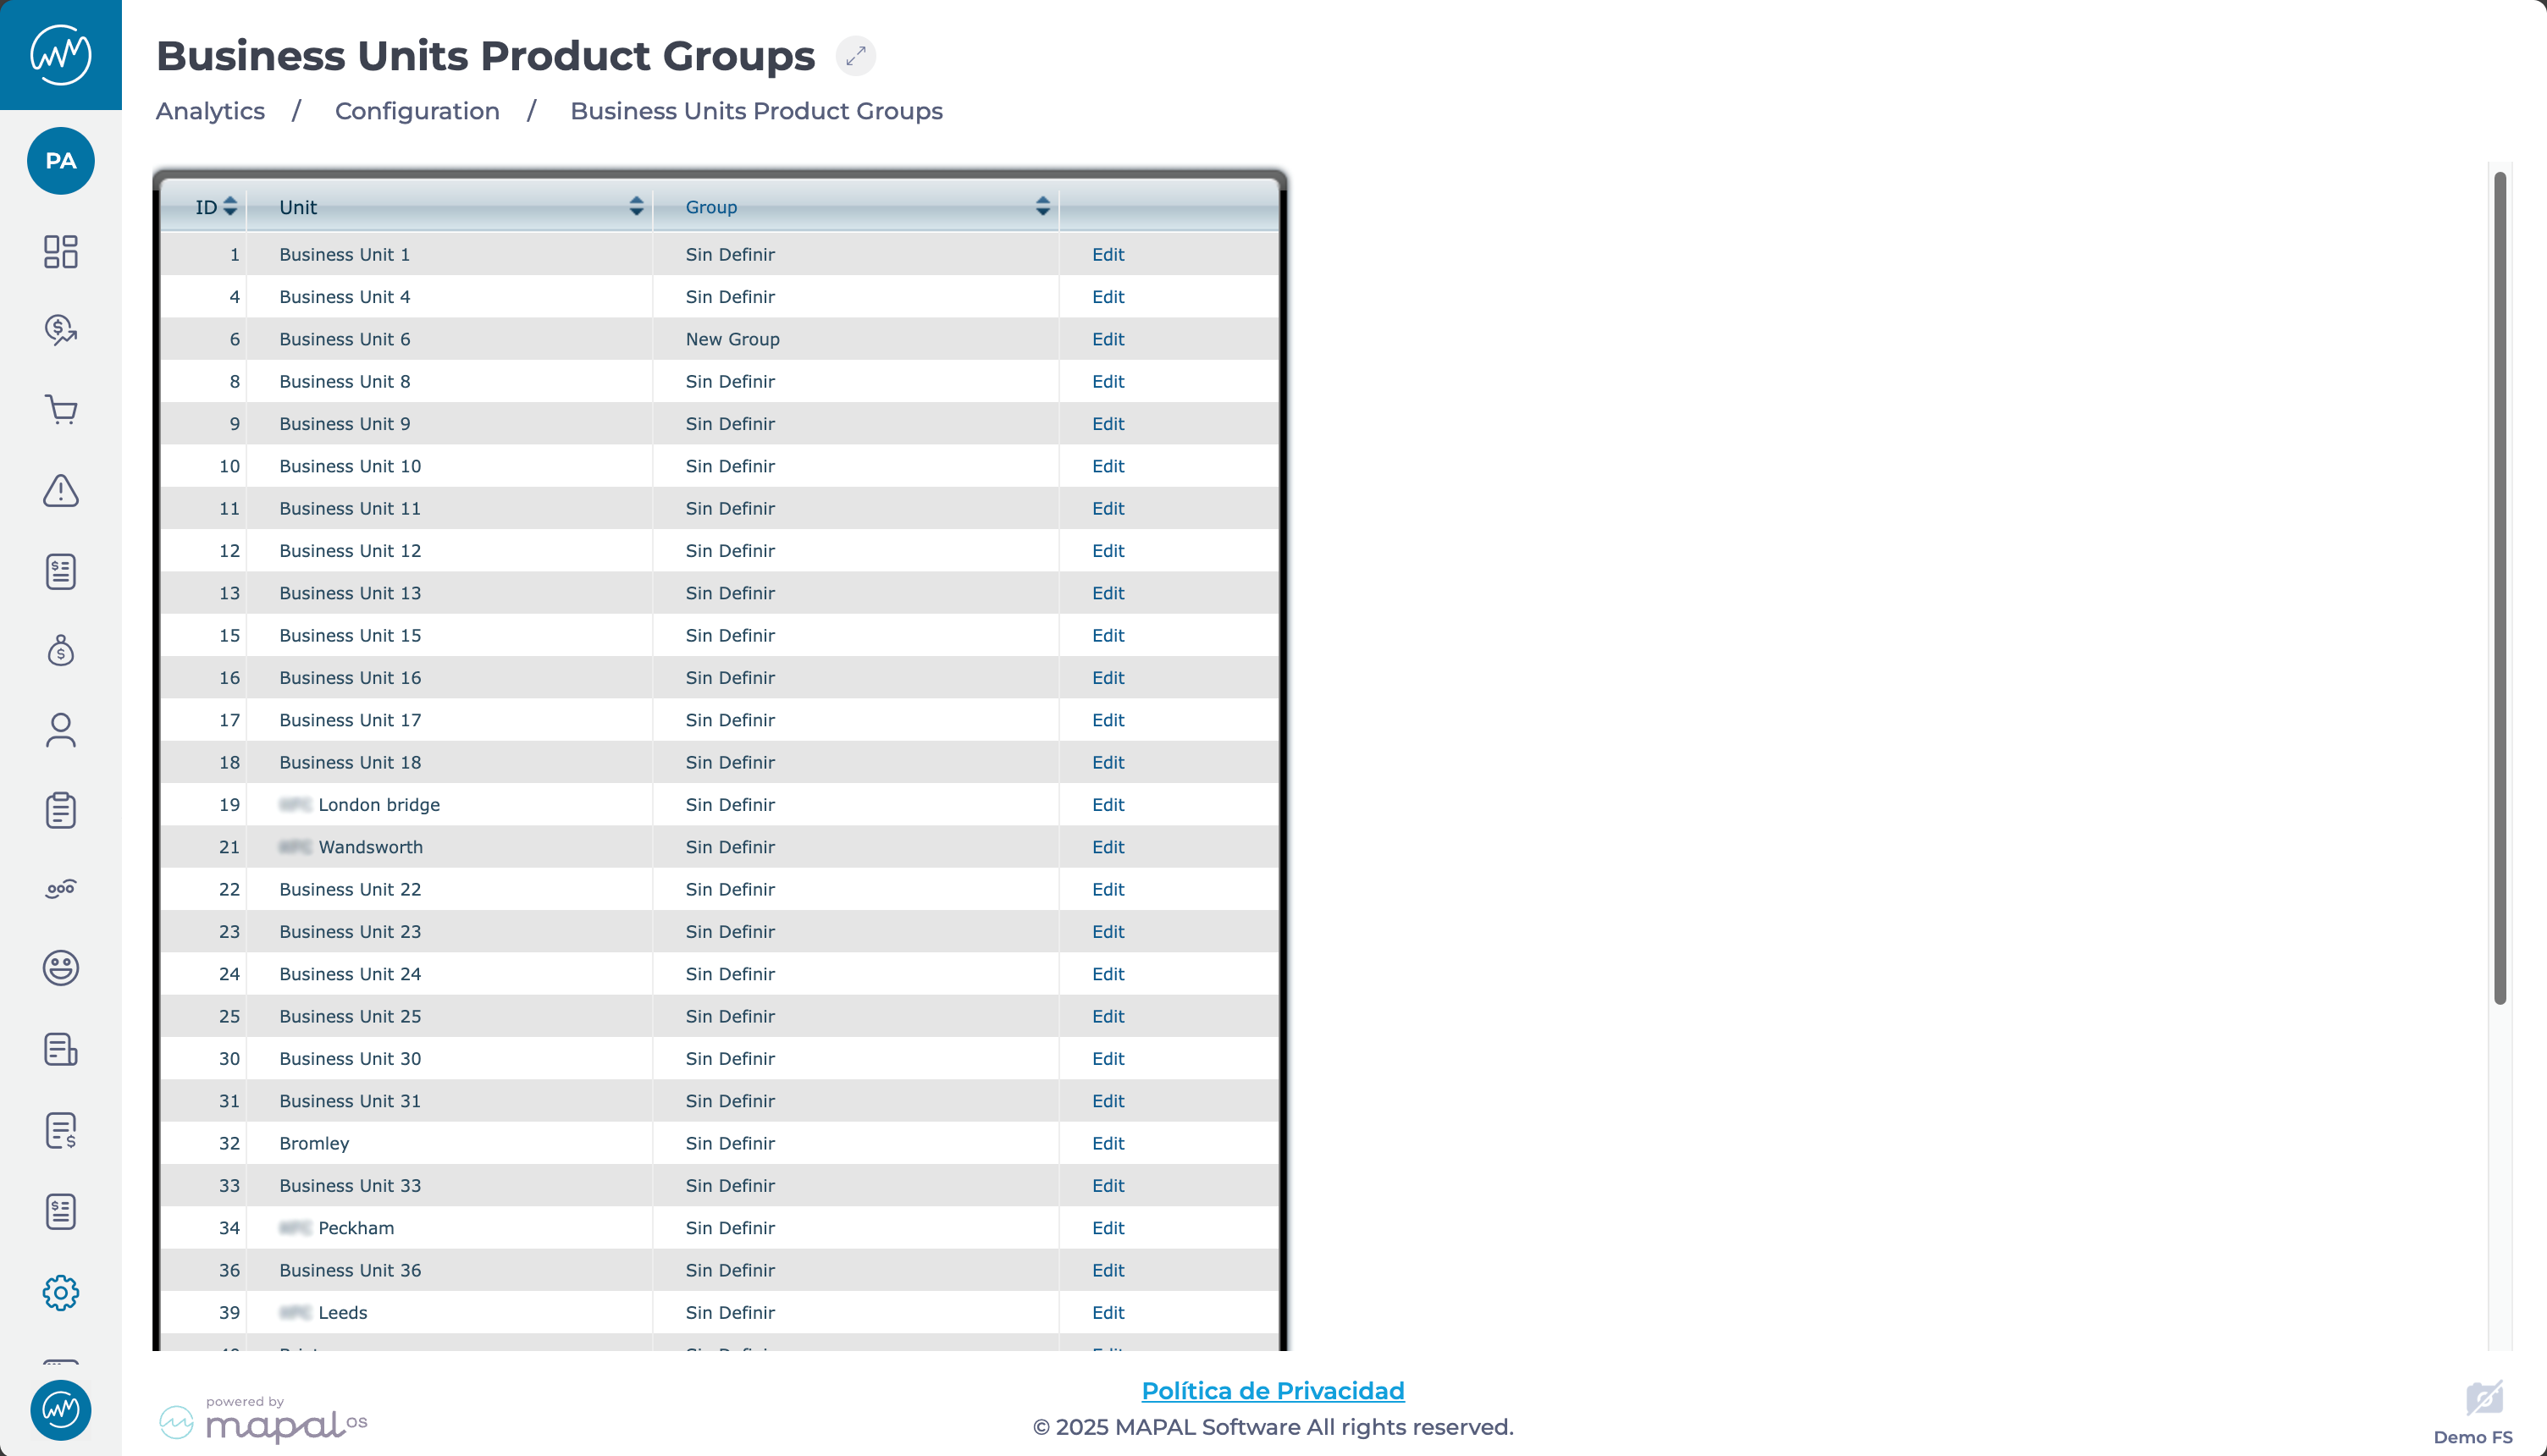
Assign product groups to business units
Start from: The Analytics dashboard
Navigate to Configuration > Business Units Product Groups.
You’ll see a grid displaying all product group assignments across business units. The grid includes the following columns:
Id: Unique identifier for the relationship between a business unit and a product group.
Business Unit: Name of the business unit.
Group: Name of the assigned product group.
Edit: Use this action to update the assignment.
Edit product group assignments
Select the Edit button in the row of the business unit you want to update.
Choose a new product group from the popup menu.
Select Save to confirm your changes.
Note: Product group assignments can be changed at any time to reflect operational changes or reorganisations.
General technical recommendations
Start from: The Easilys menu.
Minimum browser version required
Notes: Ideally, your browser version should not be older than 18 months.
From 01/01/2024, the browser versions required are:
Chrome 104+
Firefox 103+
Microsoft Edge 103+
Safari 16+
Opera 88+
Notes: We advise you to avoid trying Internet Explorer. Some Easilys features may not work. In addition, as of February 1, 2020, we no longer guarantee compatibility with Internet Explorer.
Preferred operating system
Windows 10+
Ubuntu 14.04+
OSX 12+
Android 11+ with Chrome
iOS 15+
Locate supplier files that no longer appear in the list
Start from: The Easilys menu.
1. A filter or search is active
When you activate filters or perform a search, the displayed results correspond to your criteria. It is therefore possible that the supplier file you are looking for does not match the current filters or search.
To simply check this hypothesis, reset the filters and search or press the F5 key on your keyboard (this refreshes your web page and therefore resets the filters and search to zero.)
If the supplier file is still not found, consult the hypotheses below.
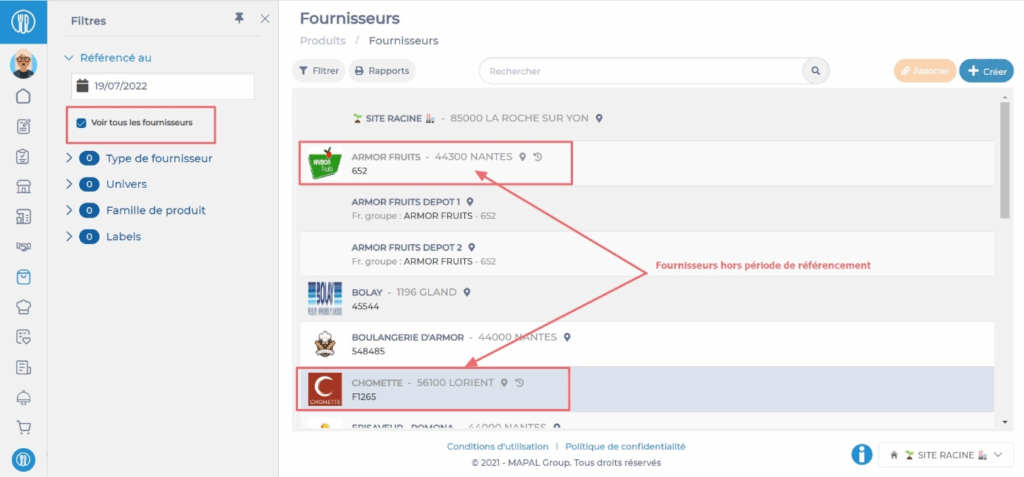
2. The supplier file's referencing period has expired
A supplier file has a referencing period. By default, this has no end date, but if an end date had been configured, it could have expired.
You can check this quickly by checking the "View all suppliers" filter. This option displays supplier files that are outside the referencing period in gray.
If you find your supplier file, select it and modify the referencing end date. Then wait until the next daily update to be able to place orders with the supplier again. (Make sure that the price lists are active and if not, activate them before this same update.)
If the supplier file is still not found, consult the hypotheses below.
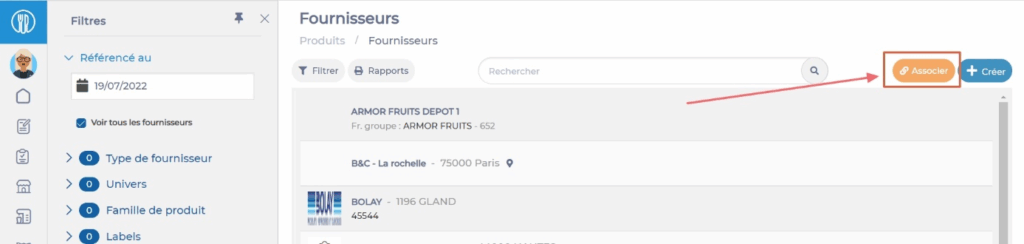
3. The supplier file has been detached
If the supplier file you are looking for is a supplier file made available by a parent site, meaning that you do not handle the management of this supplier's price list (this is generally the case for national or international markets that are administered from headquarters), then the supplier file may have been detached by mistake.
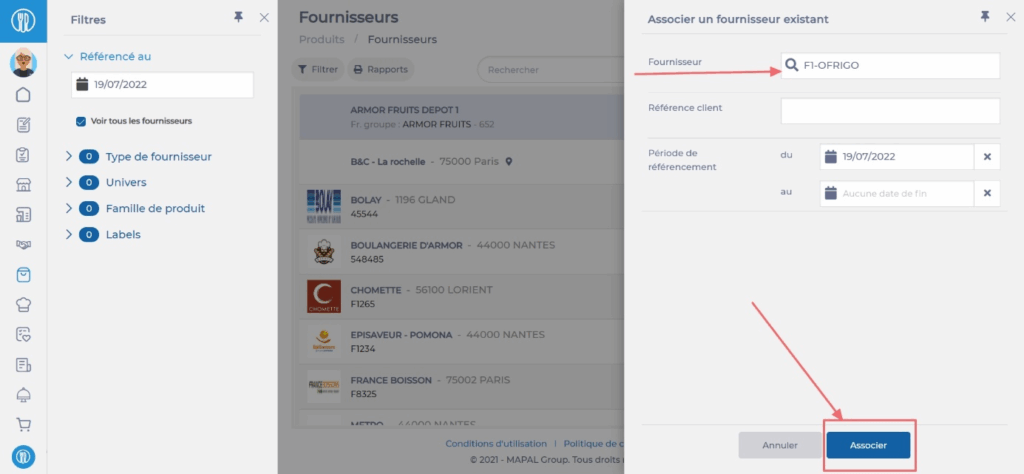
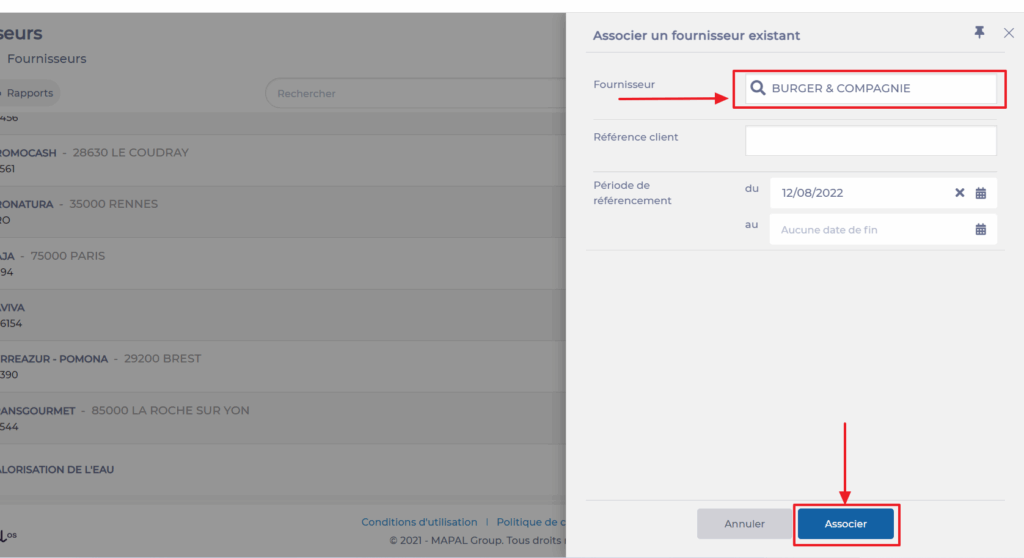
Select Associate at the top right of the SUPPLIERS screen.
Search for the supplier.If it appears in the list, select it to associate it again with your site/establishment. If you do not have the necessary permissions to perform these actions, contact your administrator.
If the supplier file does not appear in the list, consult the last hypothesis below.
4. The supplier file has been deleted
If none of the above hypotheses was correct, then your supplier file has probably been deleted. Deletion is unfortunately permanent. You will therefore need to recreate a supplier file and modify existing price lists to attach them to this new supplier file.
Cancel a pre-order with a supplier to avoid receiving goods that you no longer need. It is entirely possible to cancel your pre-order as long as the order deadline has not been reached.
Starting from: The Easilys menu.
Select the Supplier orders > Supplier orders tabs.
Select the order basket linked to your pre-order.
Select the crossed-out cart icon at the bottom of the order details.
A message then asks you to confirm your choice to cancel the pre-order.
Select Yes.
If you submitted your pre-orders by email or fax, the supplier will receive a notification of your pre-order cancellation.
Warning: if you had sent your pre-orders using the "Manually" or "By EDI" (standardized or non-standardized) sending mode, you will need to inform the supplier of the pre-order cancellation by your own means.
As a reminder, the "Manually" sending mode was initially designed to allow recording orders placed by phone. Therefore, always prioritize sending pre-orders using the "By email" sending mode.
Warning: sending by standardized EDI (AGENA 3000 type) does not yet allow managing pre-orders.
Associate the "PARENT SITE NAME" supplier on child sites
Using the Site supply screen, you can associate the "PARENT SITE NAME" supplier to child sites, so that they can order products from the parent site (in the orders screen).
Starting from: The Easilys menu.
Go to each child site to associate the supplier record bearing the name of the parent site.
To do this, select Root Site at the bottom of the screen to display the list of your sites and select each of your child sites.
Then select the Products > Suppliers tabs.
Select Associate.
The "Associate a supplier" window appears.
Enter the requested information and select Associate.
As a reminder, by associating a supplier record from a parent site on a child site, you allow the child site to order the products available in the price lists administered on the parent site. It is therefore essential to have not only associated the supplier record, but also created the price list(s) for this supplier.


 Note: Product group assignments can be changed at any time to reflect operational changes or reorganisations.