Manage the delivery and consumption delay in a smart delivery rule

Start from: The Easilys menu.

Example: A recipe for rillettes and bread is planned on the menu.

Set the delay between delivery and consumption

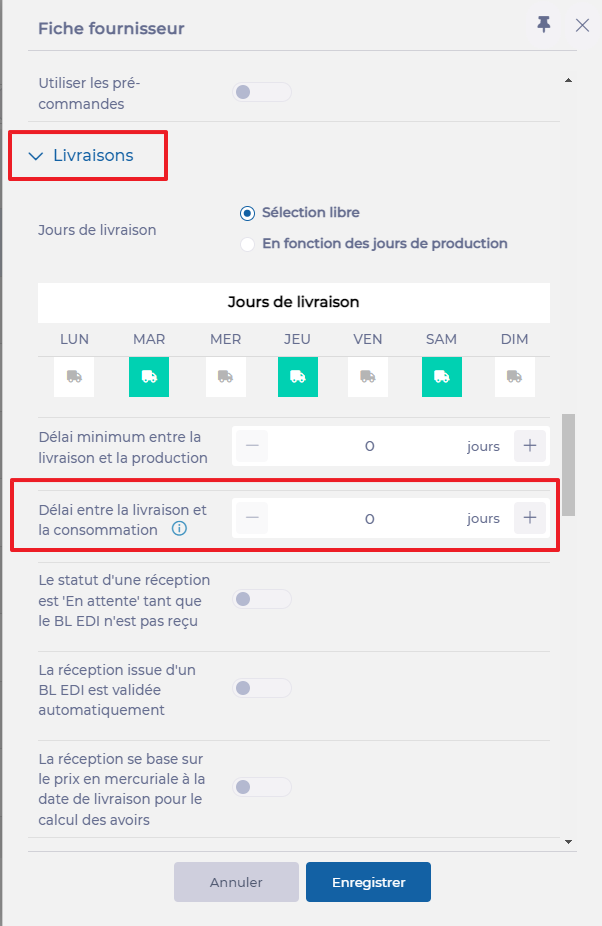
The supplier record appears on the right of the screen:

In the Delay between delivery and consumption line:

This delay will apply only to products from this supplier that are impacted by a Smart Delivery rule.

Smart Analysis in Engagement

Start from: a supported page in the Engagement product.

Notes: Smart Analysis is a tool, not a final decision-maker. Always verify key results using the data visible in your system. AI may occasionally provide incomplete or incorrect responses. If in doubt, cross-check with learner records or reports.

Smart Analysis in Engagement

Smart Analysis is an AI-powered tool built into the Engagement module and powered by the Mapal Assistant. It helps you quickly interpret the data on screen by summarising results, highlighting trends, and identifying common themes—without needing to export reports or manually analyse responses. This saves time and supports better decisions in your internal communications strategy.

Where it is available

Smart Analysis is currently available on the following Engagement screens:

Note: Additional Engagement screens may be supported in future updates.

How to access Smart Analysis

The Smart Analysis icon appears next to the filters on supported screens.
Select the icon to open the assistant.

For full instructions, see Access the Mapal AI Assistant.

What users can do with it

Smart Analysis in Engagement can help you make better use of your internal communications data by revealing patterns, summarising activity, and comparing results over time — all from the current screen view.

You can use it to:

Things to keep in mind

Manage job titles in Engagement

Start from: The Engagement dashboard.

  • Navigate to Settings > Job Titles.

In the Job Titles screen, you will be able see, delete or edit all existing job titles as well as adding new ones.

The job titles page has a table with 3 columns: Job title, translation, and actions.

Add a new job title

  • Select Add professions.
  • A popup window will appear for you to Assign a name to the job title. Write the name in the main company language and the translation for the second language.

Notes: These fields are mandatory.

  • Once completed, select Save.

The new job title will then be added to the table.

Edit & Delete Job Titles

Edit

  • Locate an existing Job Title from the list.
  • Select the Action button (three dots) at the far right of the job title’s row.
  • Select Edit. In the popup window, change the name of the Job Title and the translation for the second language.
  • Select Save.  

Delete

  • Locate an existing Job Title from the list.
  • Select the Action button (three dots) at the far right of the job title’s row.
  • Select Delete. A confirmation window will appear at the top of the page.
  • Select Accept to complete the deletion.   

Customise menu names in Engagement

Start from: The Engagement dashboard.

  • Navigate to Settings > Feature names.
  • The Feature names grid shows you three columns:
    • The names of all the functionalities available.
    • Custom names assigned by you.
    • Actions. Note that the only action available is Edit.

  • Select the Action button (three dots) at the far right of the feature’s row and press Edit.
  • In the Edit feature name screen, you can modify:
    • Main language
    • Feature name
    • Add translations of the feature name

Notes: You can add as many names as languages, 5 (Spanish, English, French, Italian, and Flemish).

  • Once you complete the edition, select Update to save the changes.

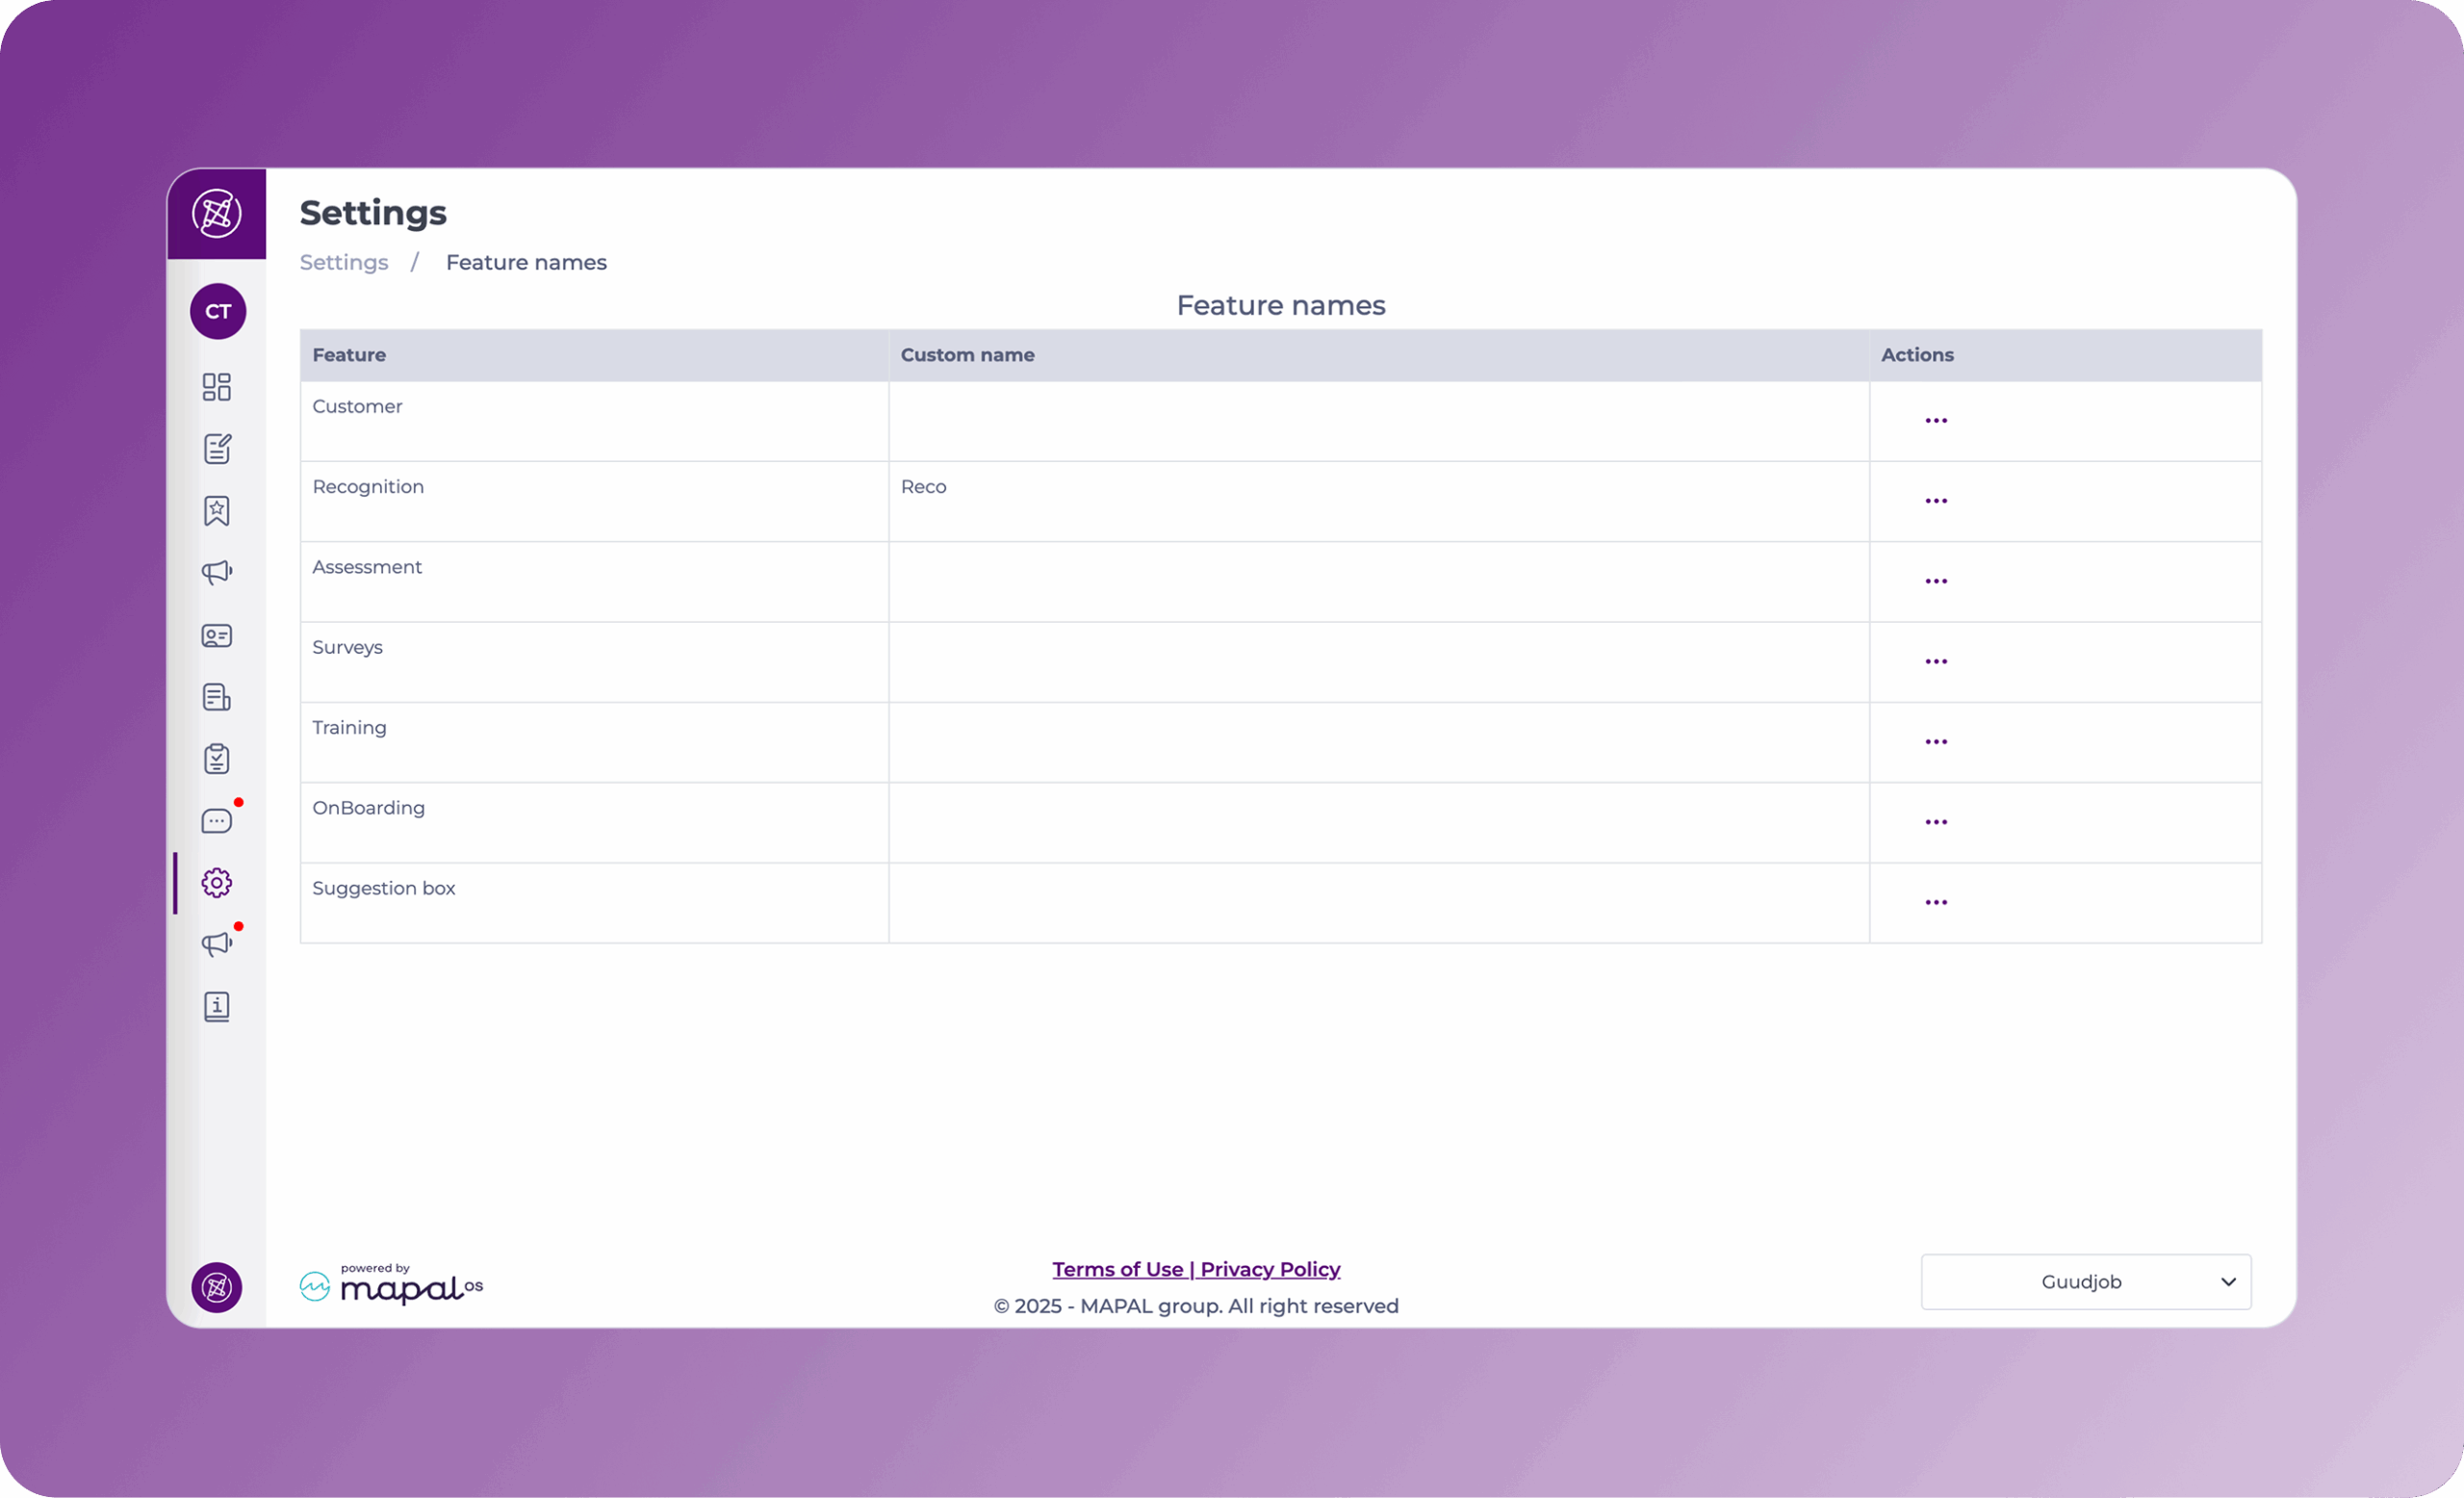
The new custom feature name will now appear in the second column of the grid.

Check your points on the Mapal One leaderboard

Start from: The Mapal One dashboard.  

Leaderboards aggregate points earned by employees through various activities and achievements. This system rewards consistent effort and dedication, providing a comprehensive view of an employee's engagement and accomplishments over time. 

To see the Leaderboards: 

  • Select Leaderboards from the main menu.  

  • Select the Points tab. 

  • The leaderboard displays a ranking of employees based on their total accumulated points.

  • Each team member's score is shown alongside their position in the ranking.

  • This feature enhances visibility into employee achievements and helps track ongoing engagement.

  • A new dropdown menu allows users to switch between viewing:

    • Current Month Points: Displays points earned during the ongoing month.

    • All-Time Points: Shows the total points accumulated over time.

Get started with Mapal One

Start fromthe Mapal One dashboard.

On the general dashboard, you’ll see an overview of your required and recommended training, external links, appraisals, external training, etc. You can also access these specific sections by selecting them from the main menu.

Schedule

This is your learning calendar, where you can view training deadlines, allowing you to efficiently manage your time to ensure you complete everything as due. You’ll see a dot marking the dates in which you have training deadlines. Use the filter icon to view your learning by date or type.

Learning

This section shows all learning content assigned to you.

Required by you

  • Select Learning > Required by you in the main menu.

In this section you can see all the mandatory training that your managers have assigned you. These must be completed within a time period, which your manager will have set. 

  • Use the progress bar above to see your progress as you work through the content.
  • Use the Filter options to find specific pieces of training based on course, due date, type or completion status.

Recommended for you

  • Select Learning > Recommended for you in the main menu.

In this section you can see all the training content assigned to you that is part of your learner journey and must be completed, but that don’t have a strict deadline. 

  • Use the Filter options to find specific pieces of training based on course, due date, type or completion status.

Career

This section shows all training content that is part of your career development. These include appraisals, workbooks and career mapping, where you can view your company’s career paths and the training you would need to complete to work your way up to the role you aspire to.

Feed

This section shows any news items your managers have issued to you. 

External links

This section displays any external links to relevant learning pieces that your manager may have issued to you.

Library

In this section you can view any noticeboard items issued to you and download your certificates from the learning items you have completed.

Monitor Point of Sale (POS) transactions

Start from: the Analytics dashboard.

  • Navigate to Interfaces > POS Log.

  • The POS Log interface presents transaction data in a structured grid format. Key columns include:

    • ID: Unique identification number assigned to the transaction.

    • Business Day: The operational day the data refers to.

    • Comm Date (UTC+1), Comm Date (Unit), Comm Date (Group): Timestamps that help trace communication timing and patterns across unit and group levels.

    • Report: Links to the report generated by the system.

    • Status: Indicates whether the transaction succeeded, failed, or is pending.

  • Users can find a specific transaction using the filters at the top to narrow down the search by Units and Status.


See a transaction's report

  • Locate the specific transaction on the grid.

  • Select the Report button on the transaction’s row.

  • A pop-up window with the transaction details will be displayed.


src="src="src="src="src="src="

Understand appraisal sign off settings

Some companies choose to rename 'appraisals' to something that works better for their company. If Appraisals is part of your package and you are having trouble locating it on your system, please get in touch with your Mapal Customer Success Manager.

Start from: A new appraisal form.

Sign off settings

Sign off settings are in Step 1 of the Edit Appraisal page.

Sign off configuration control who needs to sign off an appraisal, and decide whether draft or completed responses remain hidden before sign-off.

Learner

Reviewer

Choosing the right settings

Note: Even if sign-off is not mandatory, the reviewer must always mark the appraisal as complete.

Set up day planners

Note: each action performed on the application is subject to a fee. If you are unable to carry out the recommended actions in the articles you are viewing, this may mean that the necessary rights have not been enabled for your user profile. Contact the Support team, or your Admin, to find out more.

Start from: The Easilys menu.

For each day of the week (the parent site decides which days are wee days/working days), allows you to specify when guests should order at the latest. These are consumption days.

Likewise, it is possible to define, for each day of the week, from when the guest order deviations will be recorded.
To date, this concept has had no impact on Easilys.

SETTING THE SCHEDULE

  • Select Site parameters. (Day planners created on this site will be inherited by child sites).

Une image contenant texte, capture d’écran, Police, Marque<br><br>Description générée automatiquement


  • Go to the “Day planners” tab.

Une image contenant texte, capture d’écran<br><br>Description générée automatiquement


  • Select +Add a day planner if the day of the week for which you wish to set deadlines does not yet match the list.

 
The “Add a day planner” window appears on the screen.

  • Fill in the required information, then select Create.
  • If required, you can modify by selecting the pencil icon and the cross icon to delete.

Ecran Paramétrage du site, rubrique Cadenciers


Once the general day planners are created on the root site, it is possible to adapt them by child site, if necessary. By default, general day planners apply to all child sites.

ADAPT GENERAL DAY PLANNERS TO CHILD SITES AS NEEDED

  • Go to the settings of the child site for which you need to adapt the timetables.
  • Go to the “Day planners”tab.
  • Select Duplicate these day planner days.

Une image contenant texte, capture d’écran, nombre, logiciel<br><br>Description générée automatiquement

 
The “Duplicate these day planner days” window appears on the screen. A warning message indicates that “When these day planners are duplicated, they will belong to “Site name” and will be independent.”.

  • Confirm your decision by selecting Duplicate.

The child site becomes the owner of the day planners, and can modify, delete or create new ones as required.
The general day planners of the root site will no longer apply to this child site, and changes made on the child site will not affect the general day planners.

src="src="src="src="

Check your team's points in the Mapal One leaderboard

Start from: The Mapal One Dashboard.

Leaderboards aggregate points earned by teams through various activities and achievements. This system fosters collaboration and motivation by recognizing collective efforts, providing a comprehensive view of each team's engagement and accomplishments over time.

To see the Teams Leaderboards: