Optimize Smart Grammage rules using recipe categories
If your environment is configured for multiple languages, the multilingual icon appears for some fields. For more information on how to use it, see the article Use Easilys in multilingual mode .
Start from: The Easilys menu.
Using recipe categories and subcategories
A recipe category, as its name suggests, allows you to categorize recipes, to group them together in the same group. The recipe subcategory further refines this categorization.
The benefit of this categorization is, first of all, to be able to filter your recipe list.
Example: If you are looking for a dessert recipe sheet, use the Recipe Category filter by checking only the Dessert category. You will then have, on the screen, only the recipe sheets attached to this category.
Finally, recipe categories and subcategories can be a criterion for applying a rule of Smart Selection, Smart Grammage, Smart Packaging, Smart Catalogue, or smart particularity.
Application priority of yield rate according to the definition mode
Start from: The Easilys menu.
There are different methods to define the yield rate. It is not mandatory to choose only one method. If you use several methods simultaneously, here is the order of application priority from the lowest to the highest.
1. The raw/cooked loss coefficient (lowest priority)
Filling in the raw/cooked loss coefficient on the information sheet of an industrial product is the most generic method for defining the yield rate. As soon as this raw/cooked loss coefficient conflicts with another yield rate defined by another method, it does not apply.
2. Smart Yield rules and yield rate imports (intermediate priority)
"Smart Yield rules" VS "Yield rate imports"
Both yield rates are cumulative if they both apply to the same product.
Yield rate from a Smart Yield rule x Yield rate from an import = Yield rate applied to the recipe
"Yield rate defined on the recipe owner site" VS "That applying to products of recipes inherited on a child site from a Smart Yield rule"
Both yield rates are cumulative only on the concerned child site.
Yield rate of the recipe owner site x Yield rate of the child site = Yield rate applied on the child site
"Yield rate defined on the recipe owner site" VS "That applying to products of recipes inherited on a child site from an import"
Both yield rates are cumulative only on the concerned child site.
Yield rate of the recipe owner site x Yield rate of the child site = Yield rate applied on the child site
3. Manual definition of the yield rate in a recipe (highest priority)
Unlike the raw/cooked loss coefficient, if you manually define a yield rate directly on the recipe sheet, this value will take priority over all other yield rate definition methods.
If you wish to cancel this manual entry, select the rotating arrow icon.
Note: Manual definition of the yield rate is only possible if the site is set to manage quantities in "Net" or "Gross" and the simulator is activated. For more information, see the article Manage yield rates of food resources.
"Yield rate manually defined on the recipe product owner site" VS "That manually defined on the child site of the inherited recipe product"
The value defined on the recipe inherited from the child site will always take priority over the value defined on the recipe owner site.
Managing tap water in recipes
Start from: The Easilys menu.
Follow these three steps:
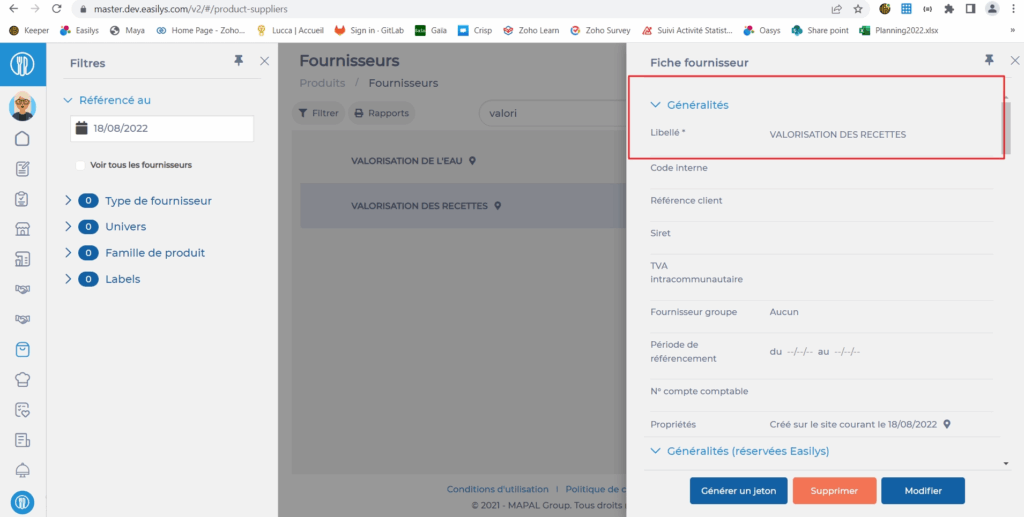
1. Create a supplier record
Select Products > Suppliers.
Create a supplier record RECIPE VALUATION.
No need to detail the record, just enter the label.
Note: These elements are generally created on the root site. All child sites can then benefit from them by inheritance.
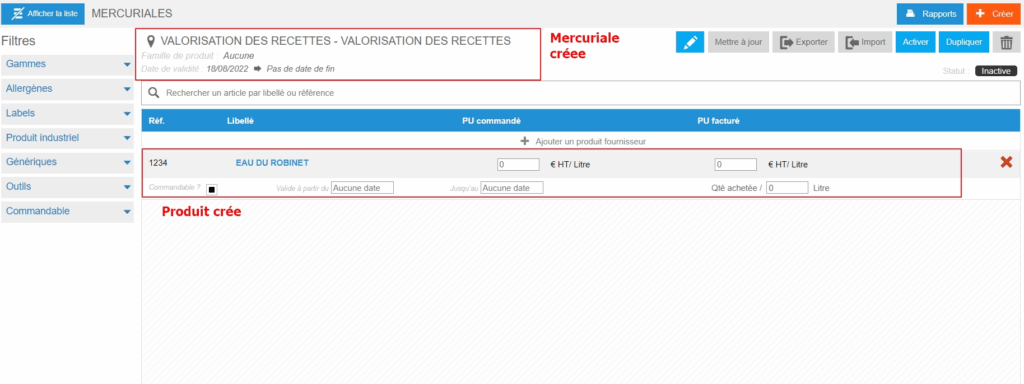
Note: If you are working on a child site, be sure to check that this is not already available before you start creating. Simply go to the Purchasable items screen and search for TAP WATER.
Manage traceability steps
Note: Actions on the Easilys platform depend on your user access permissions. If you are unable to perform the actions below, this may be due to restrictions on your user profile. Please contact the Support team or your administrator for assistance.
Start from: The Easilys menu.
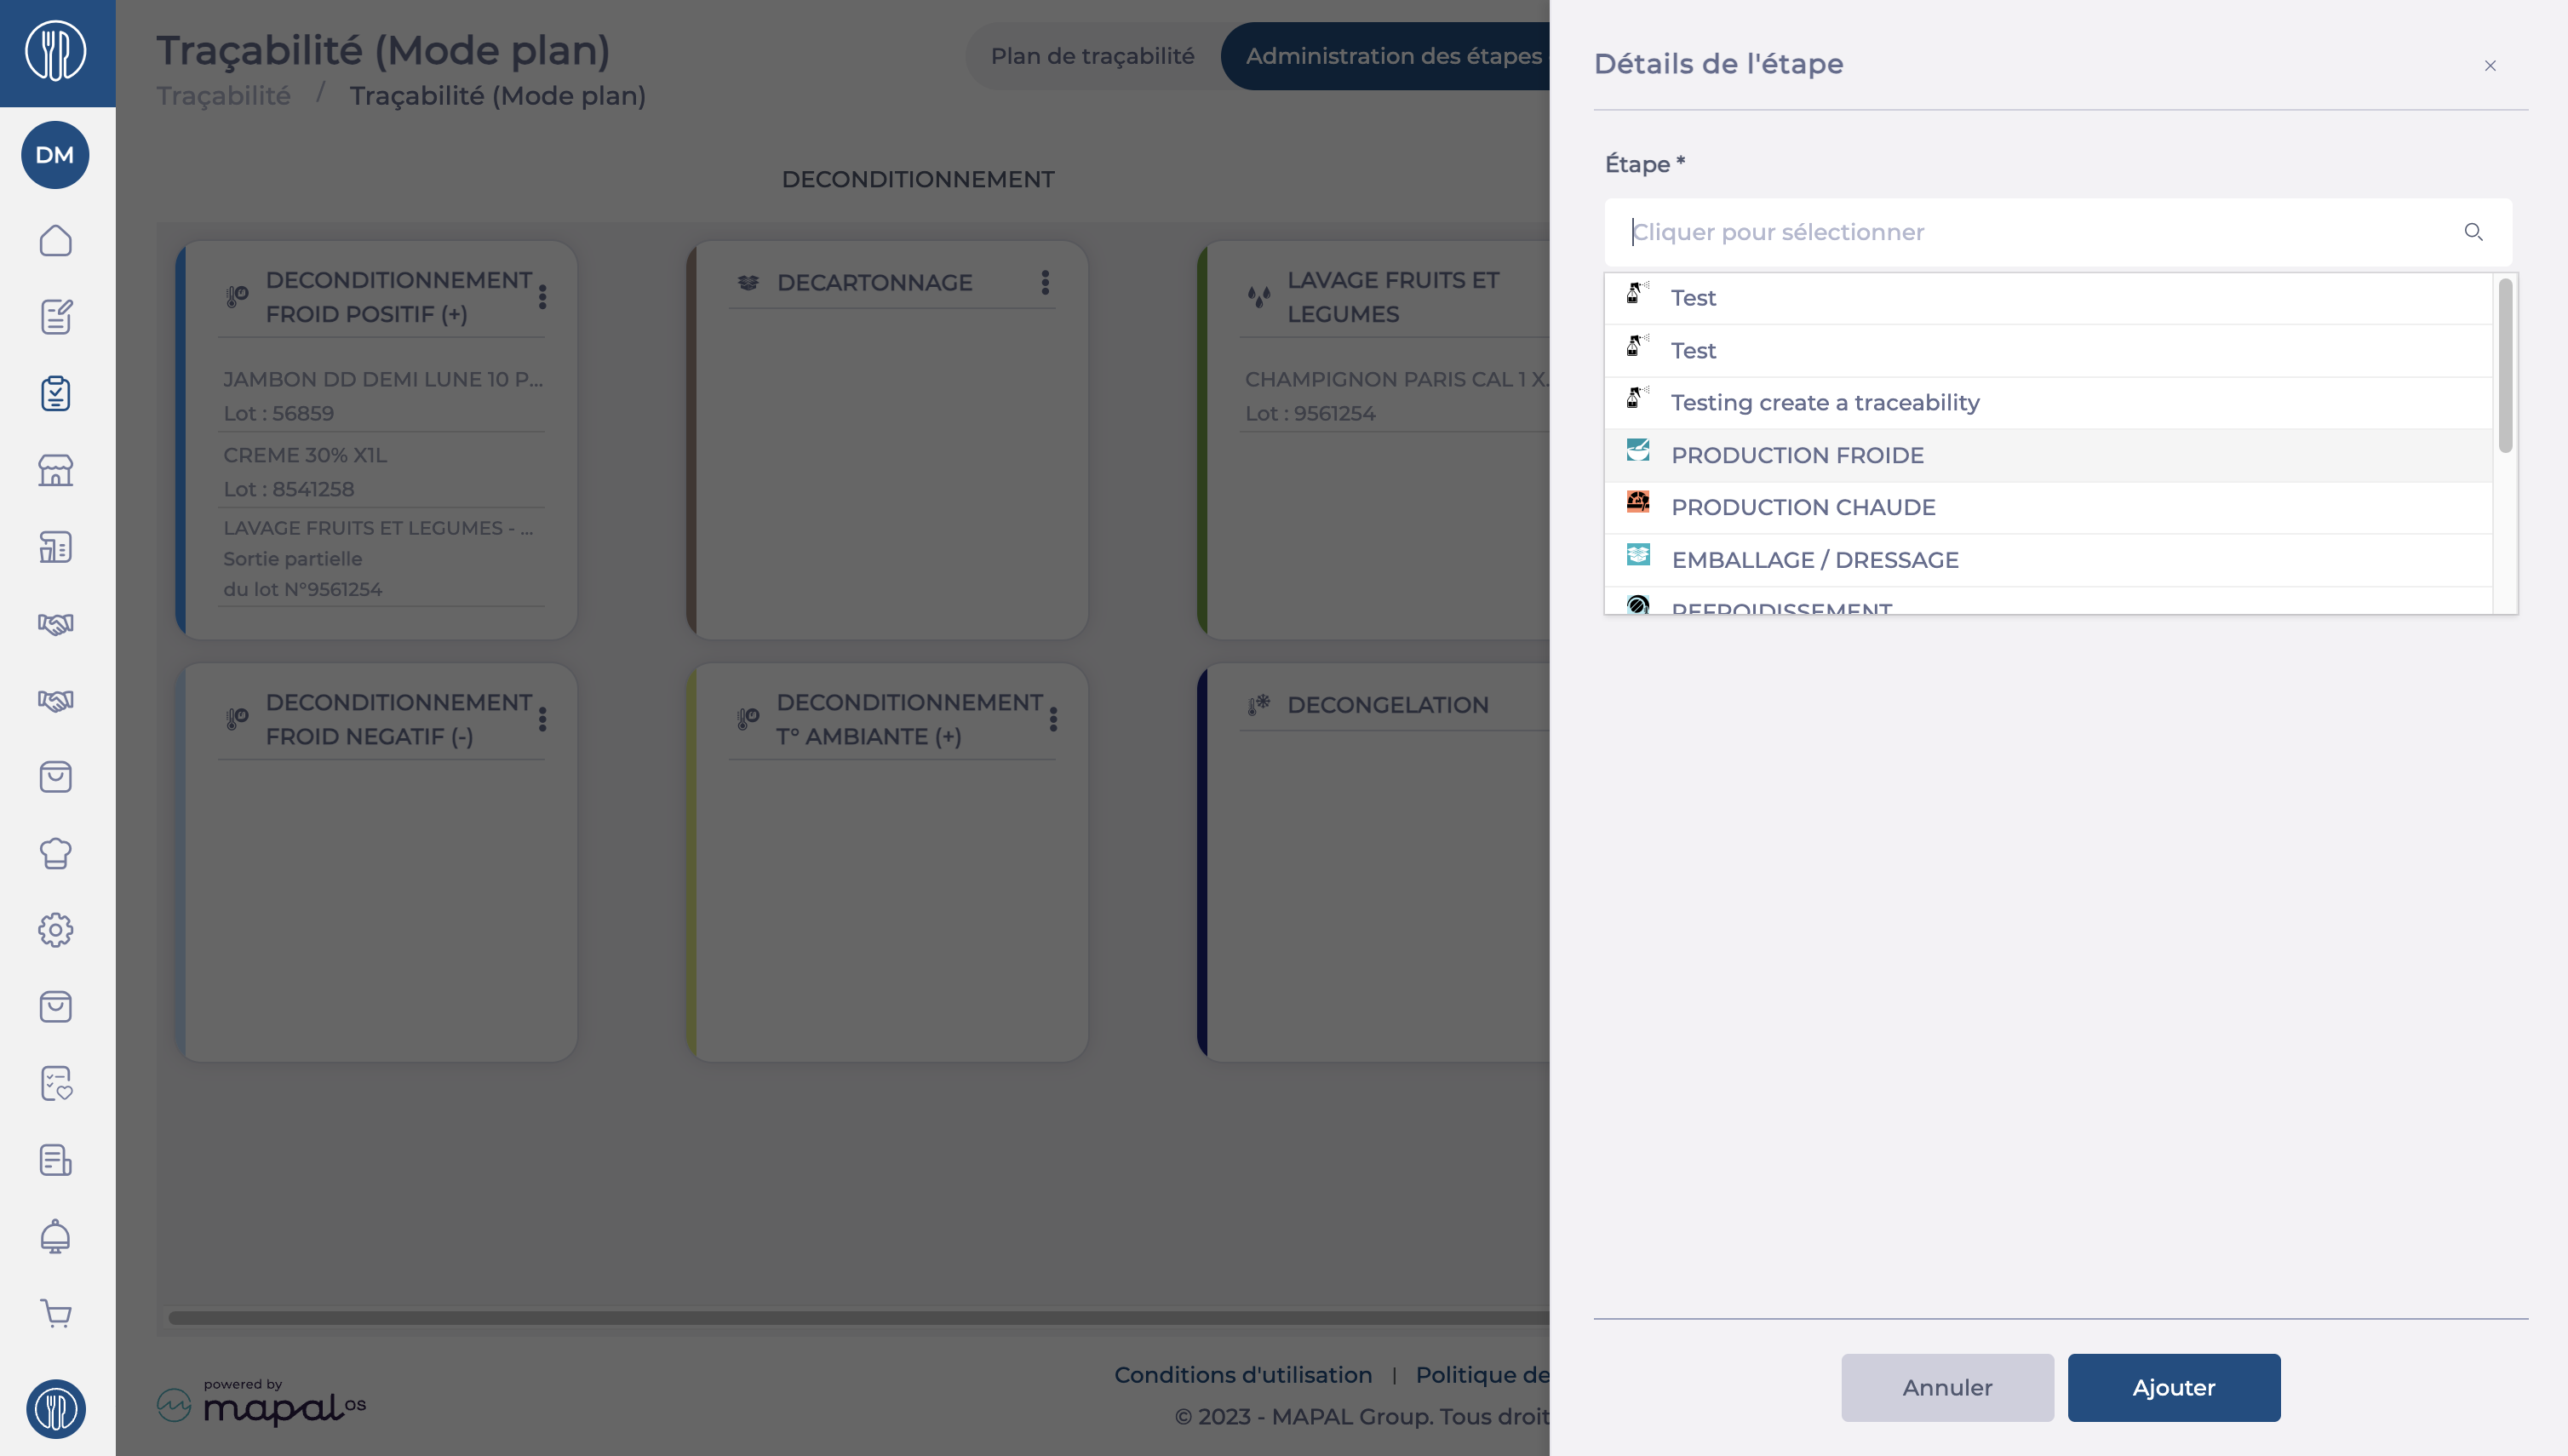
Navigate to Traceability > Administration of Traceability Steps.
Name*: Provide a clear, descriptive name for the step (e.g., "Unpacking", "Cooling", "Delivery").
Sort*: Define the sequence of the step in your traceability plan to ensure logical progression.
Is accumulated?*: Choose whether ingredients combined in this step should remain distinct or be merged into a new batch (e.g., blending multiple ingredients into a single batch for a recipe).
Step Type:
None: A general processing step.
Recipe Production: Used for steps where multiple ingredients are combined to create a recipe.
Colour*: Select a colour to identify your new step.
Icon*: Select an Icon to identify your new step.
Once details are entered, select Save to finalize the step configuration.
The new step is now available in your traceability workflow and can be assigned to relevant processes.
Select the Action menu (three dots) in the row of the step you wish to edit.
Select Modify.
Make changes in the fields as needed.
Click Save to apply the changes.
Notes: Some attributes, such as cumulative status, may not be editable after initial setup. If a fundamental change is required, you may need to create a new step and remove the old one.
Delete traceability steps
Select the Action menu (three dots) in the row of the step you wish to edit.
Select Delete.
In the confirmation window, select Yes to confirm the deletion of the step.
Create a Traceability Plan
Note: Actions on the Easilys platform depend on your user access permissions. If you are not able to perform the actions below, this may be due to restrictions on your user profile. Please contact the support team or your administrator for assistance.
Start from: The Easilys menu
Prerequisite: Define the key traceability steps as described in the article Manage traceability steps.
Step 1: Create a new traceability plan
You can create a single traceability plan that includes all the steps you wish to trace, or you can define specific plans with only some of the steps to simplify usage for your teams. For example, you might create one plan for unpacking and production steps, and another for production and delivery; or one for cold preparation and another for hot preparation.
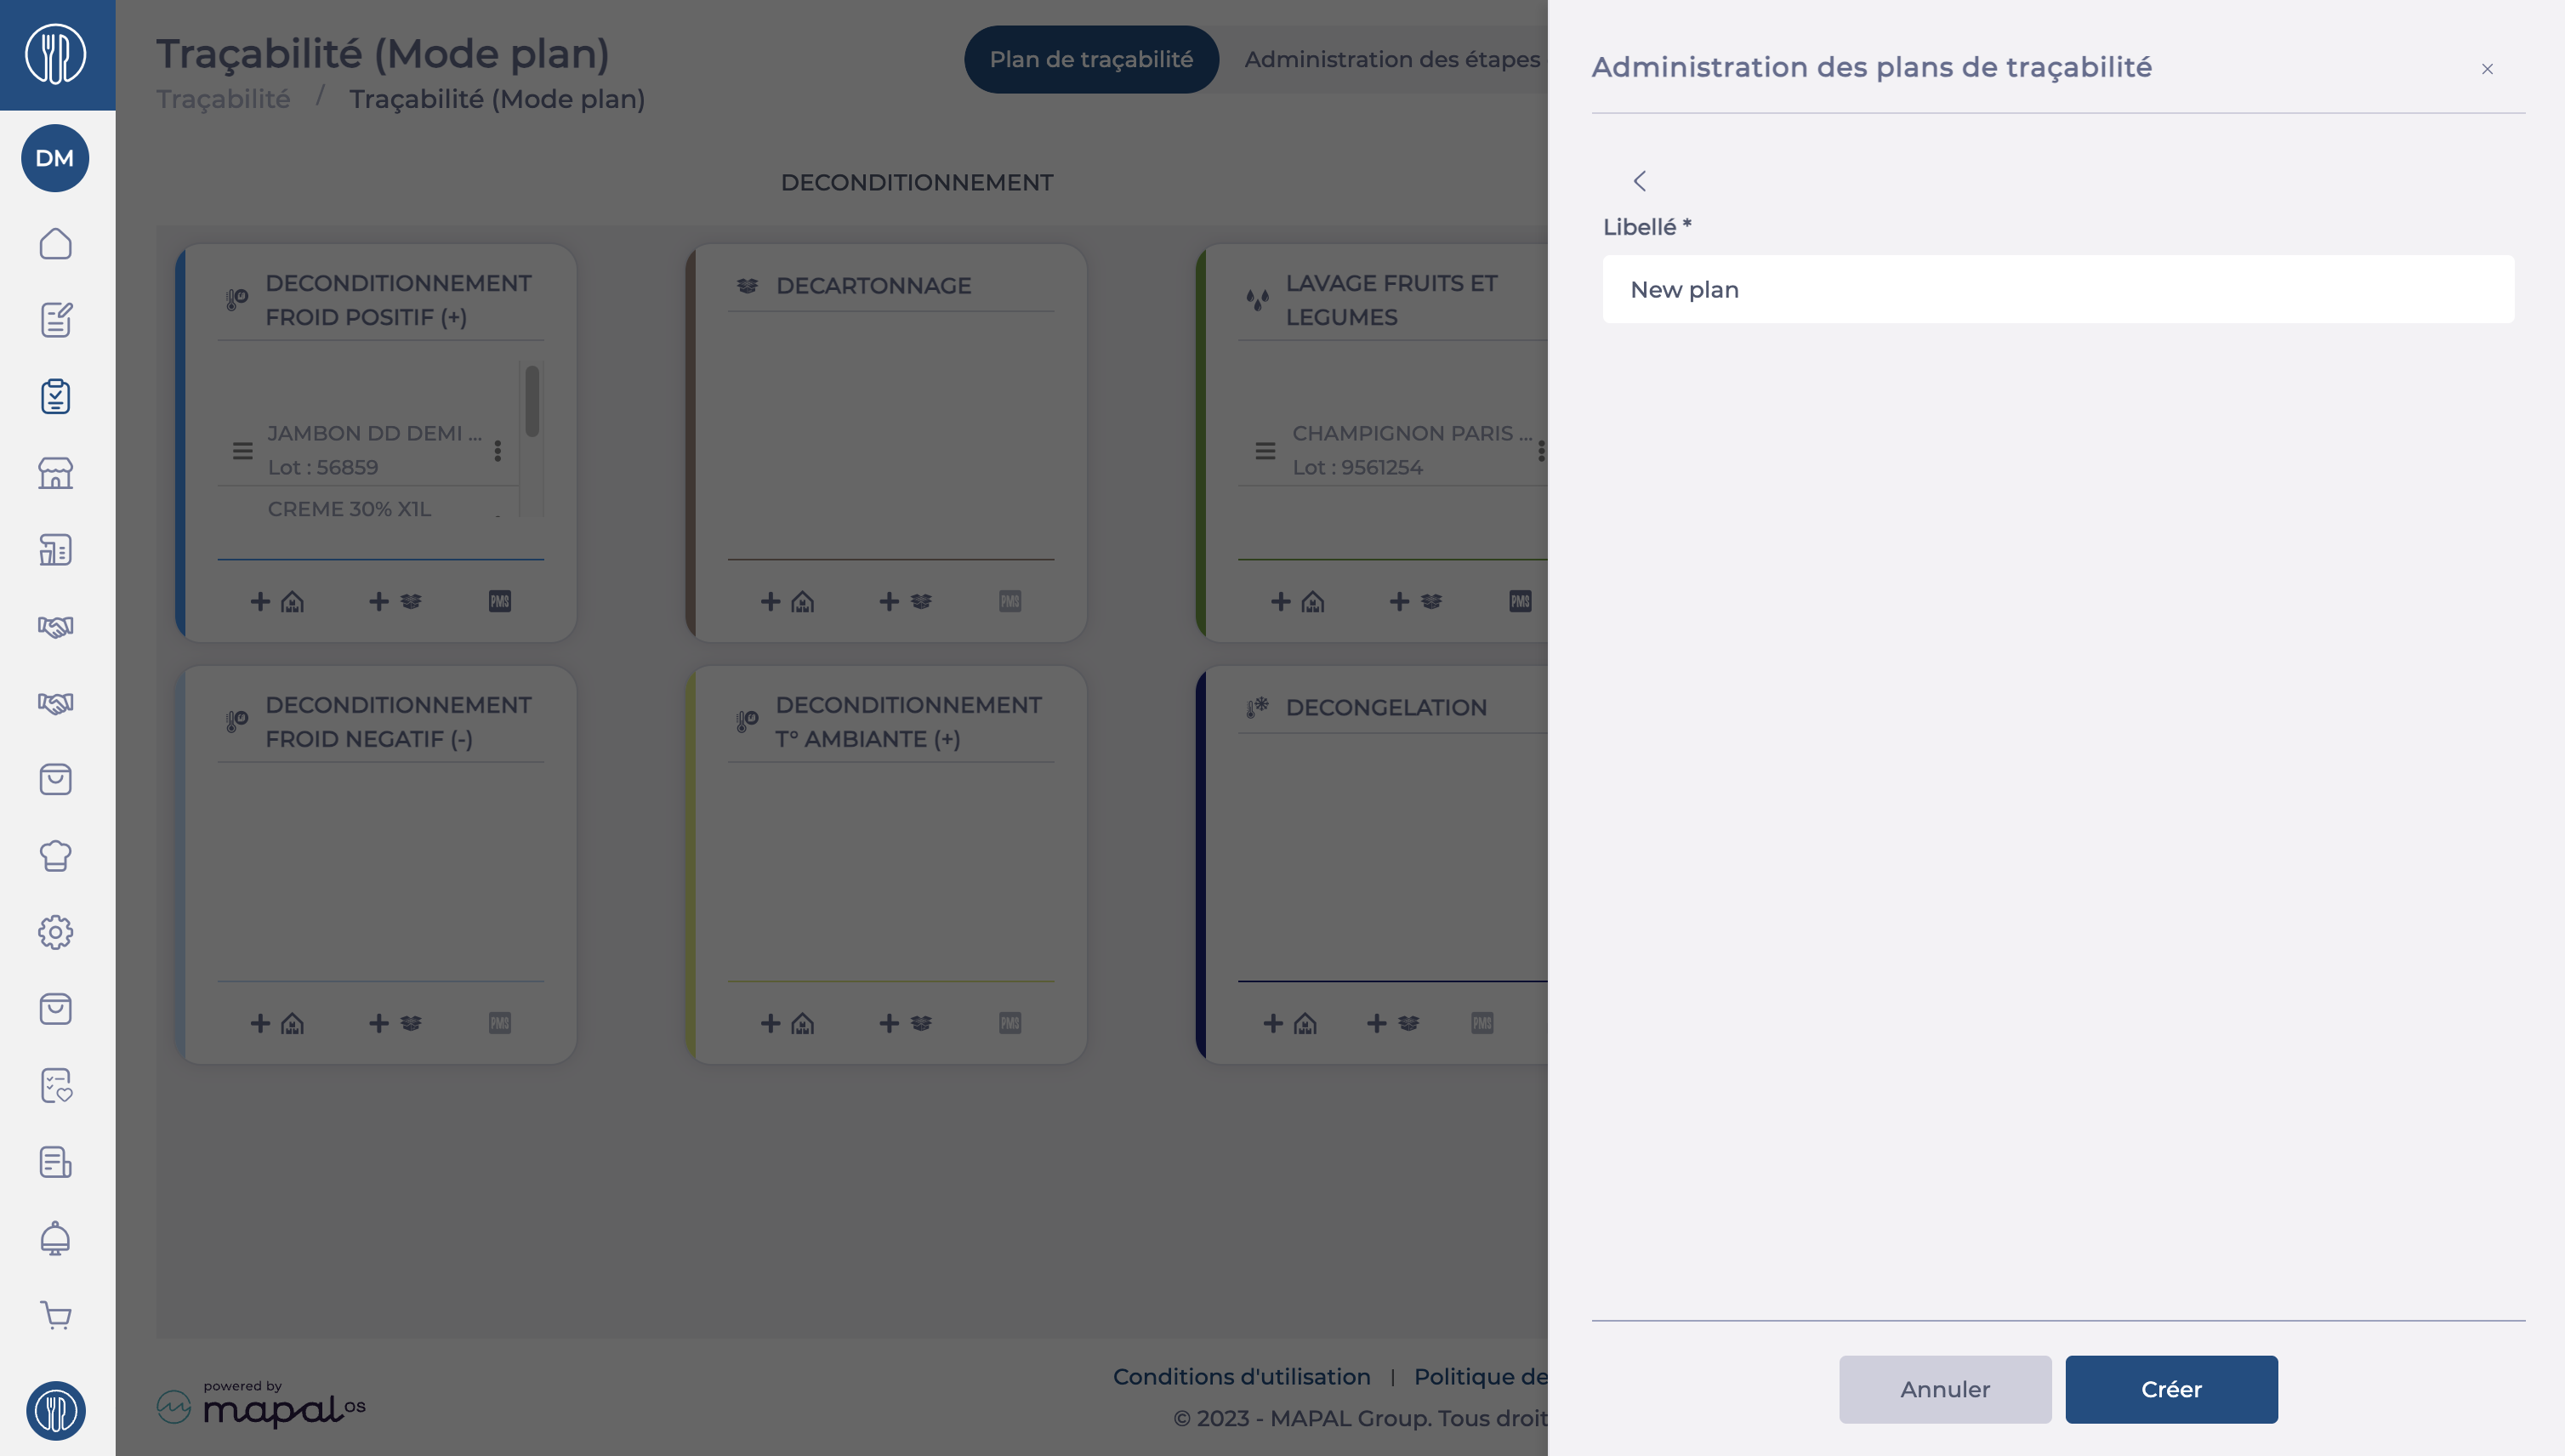
Go to Traceability > Traceability (plan mode).
Select the Traceability Plan view.
Click the Administration button.
Select + Add to create a new traceability plan.
In the Name field*, enter a clear and descriptive name (e.g., cold preparation).
Click Create to save your new plan.
Step 2: Add traceability steps to the plan
You must now specify which steps should appear in the new plan.
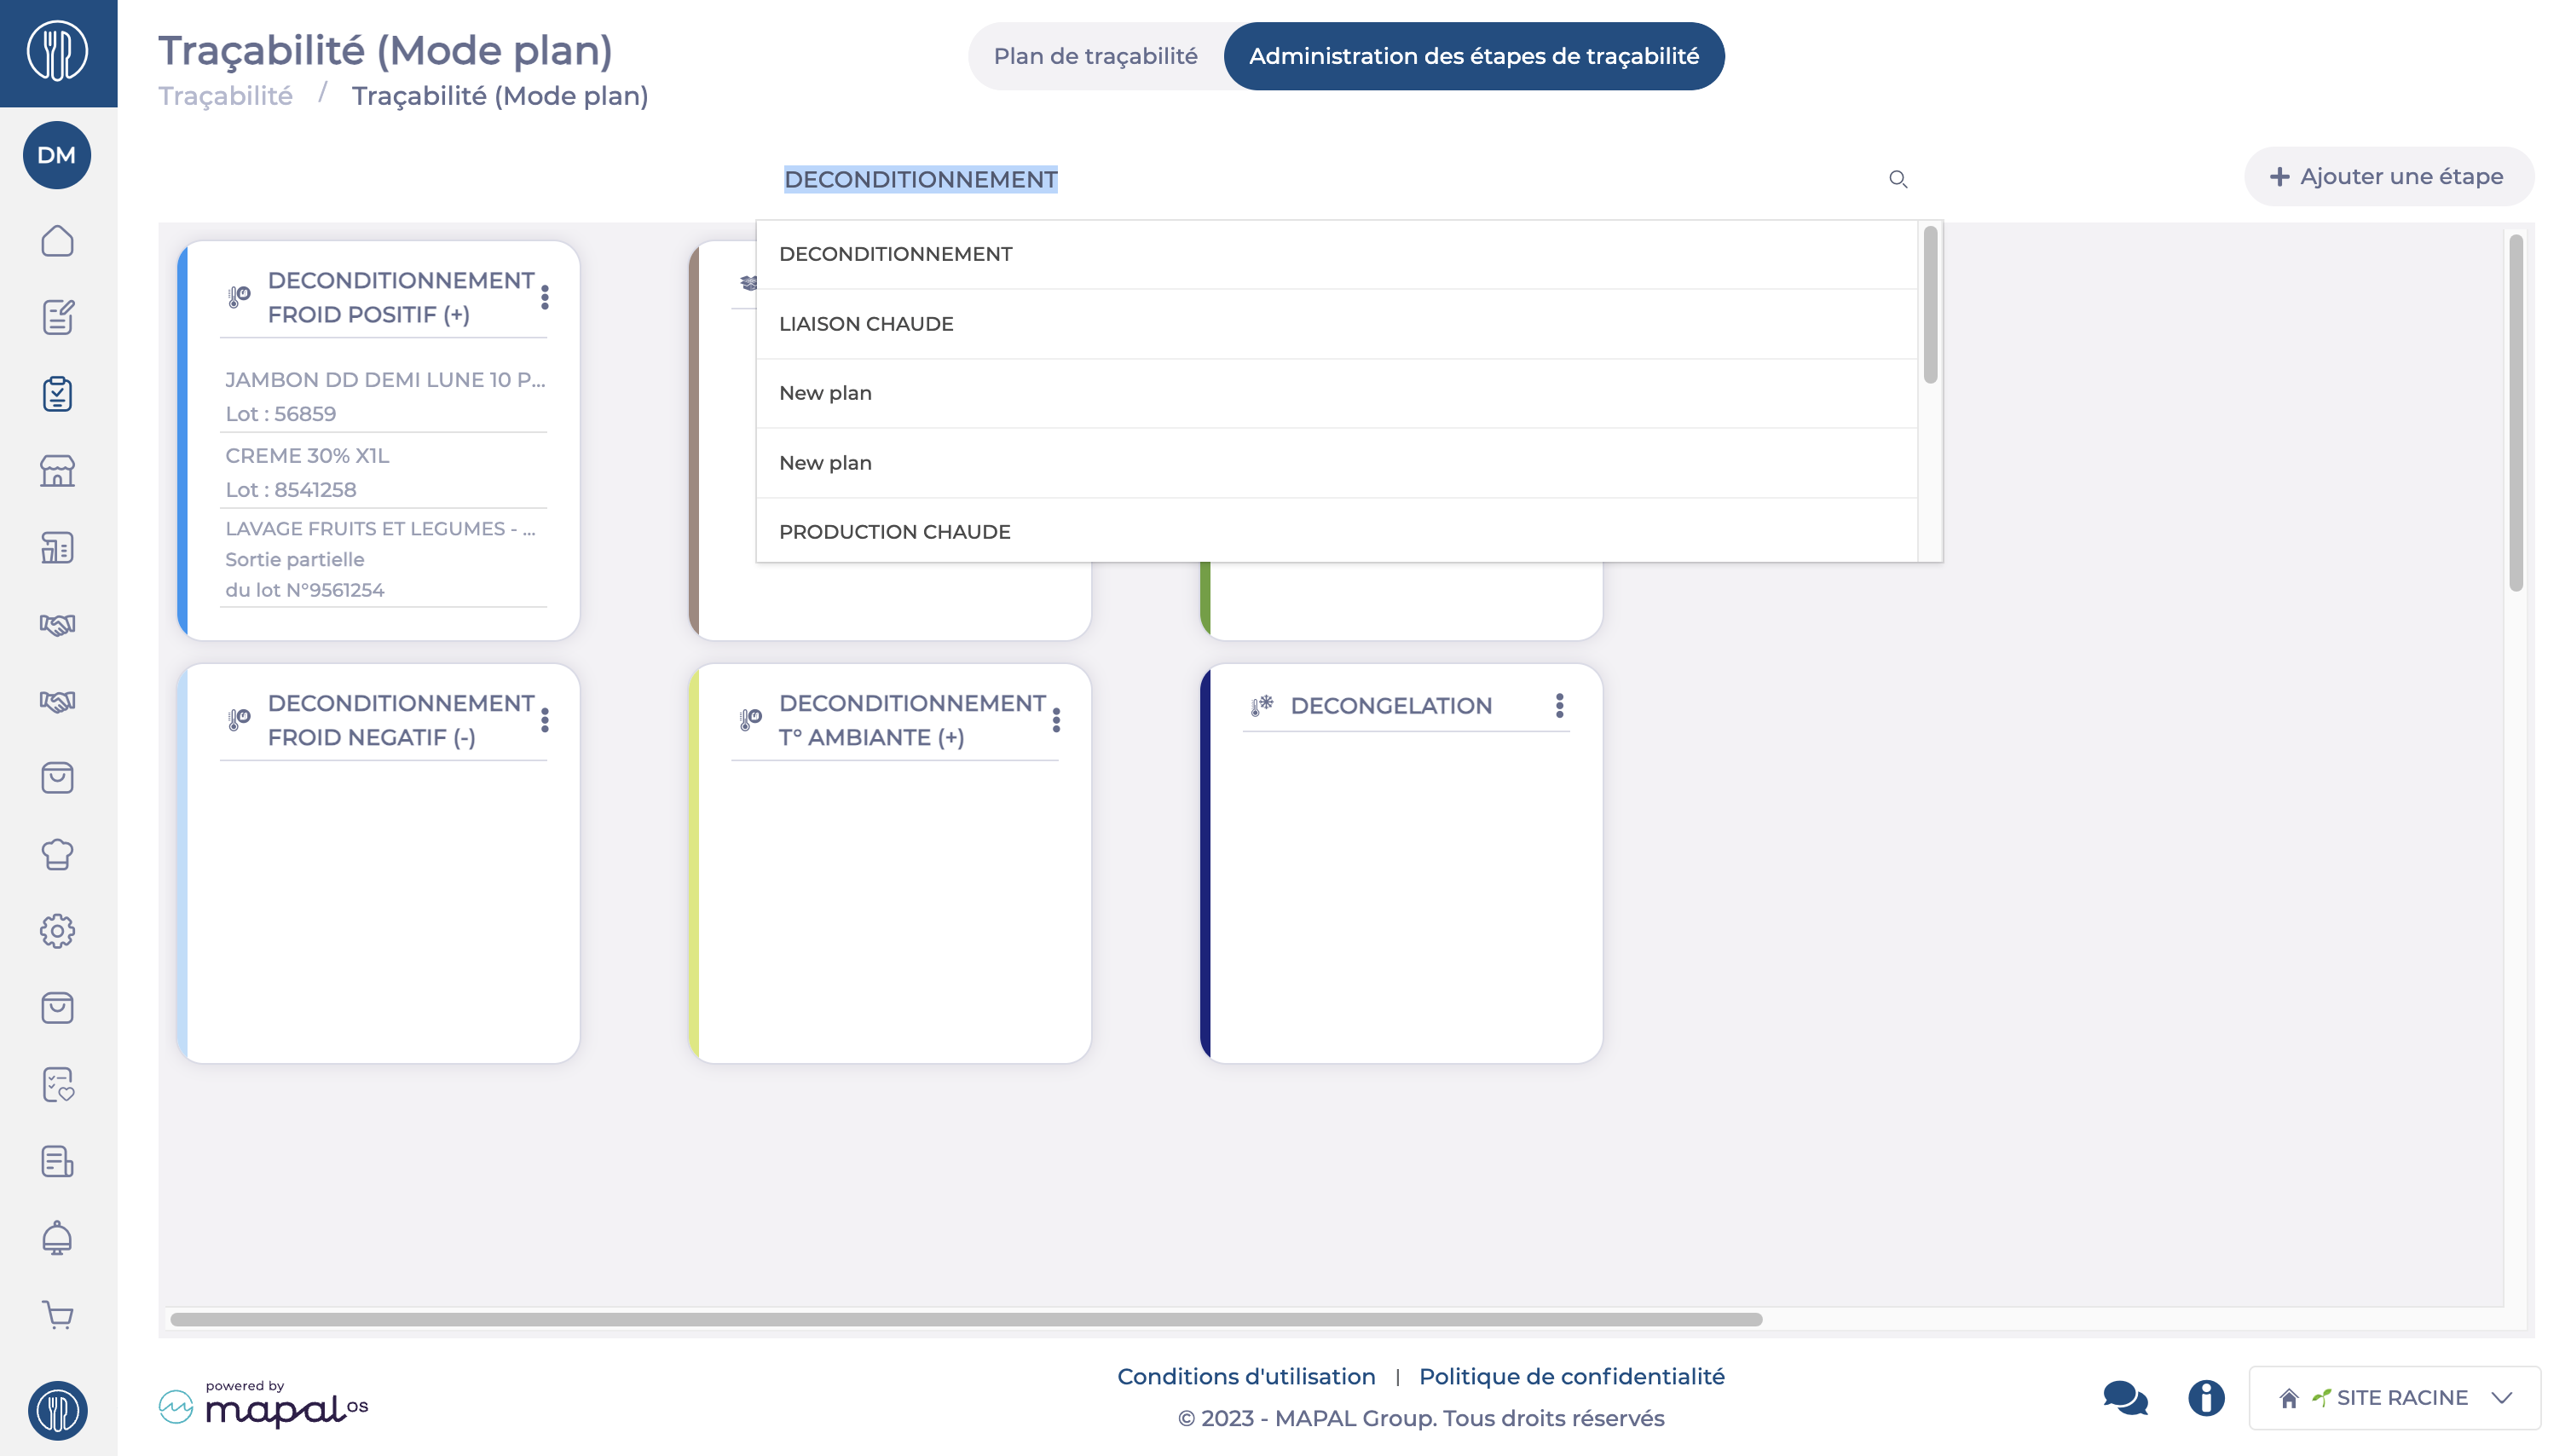
Select the Administration of traceability steps view.
Navigate to the traceability plan in which you want to add a step.
Click Add a Step.
Choose from the available traceability steps.
Note: Traceability steps must be created beforehand. See Manage traceability steps for setup and customisation.
Select the display size of the step (large or small card).
Arrange the traceability steps using drag-and-drop so that the plan is practical and easy to use.
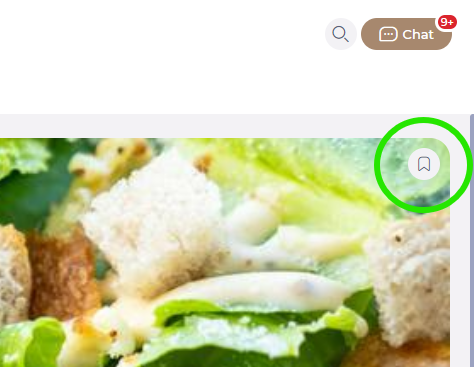
Find recipes in the Recipe Book
Use the bookmark icon on the top right of the main image.
You should see the alert Item added to favourites.
Check Learning > Your favourites to find favourited recipes alongside other favourited items.
Bet on recipe component tags to optimize production
Note: Each action performed on the application is subject to a fee. If you are unable to carry out the recommended actions in the articles you are viewing, this may mean that the necessary rights have not been enabled for your user profile. Contact the Support team, or your Admin, to find out more.
Start from: The Easilys menu.
Create “Recipe components” tags
Note: Tag creation is reserved for admins. Once created, they are available to all sites in the Easilys environment.
Select Sites in the main menu > Administration of tags.
In the Recipe components section :
Select + Add a tag.
Name the tag.
Select Create.
Note: Saving is immediate.
Apply tags to recipe components
Select Recipes in the main menu > Recipe management.
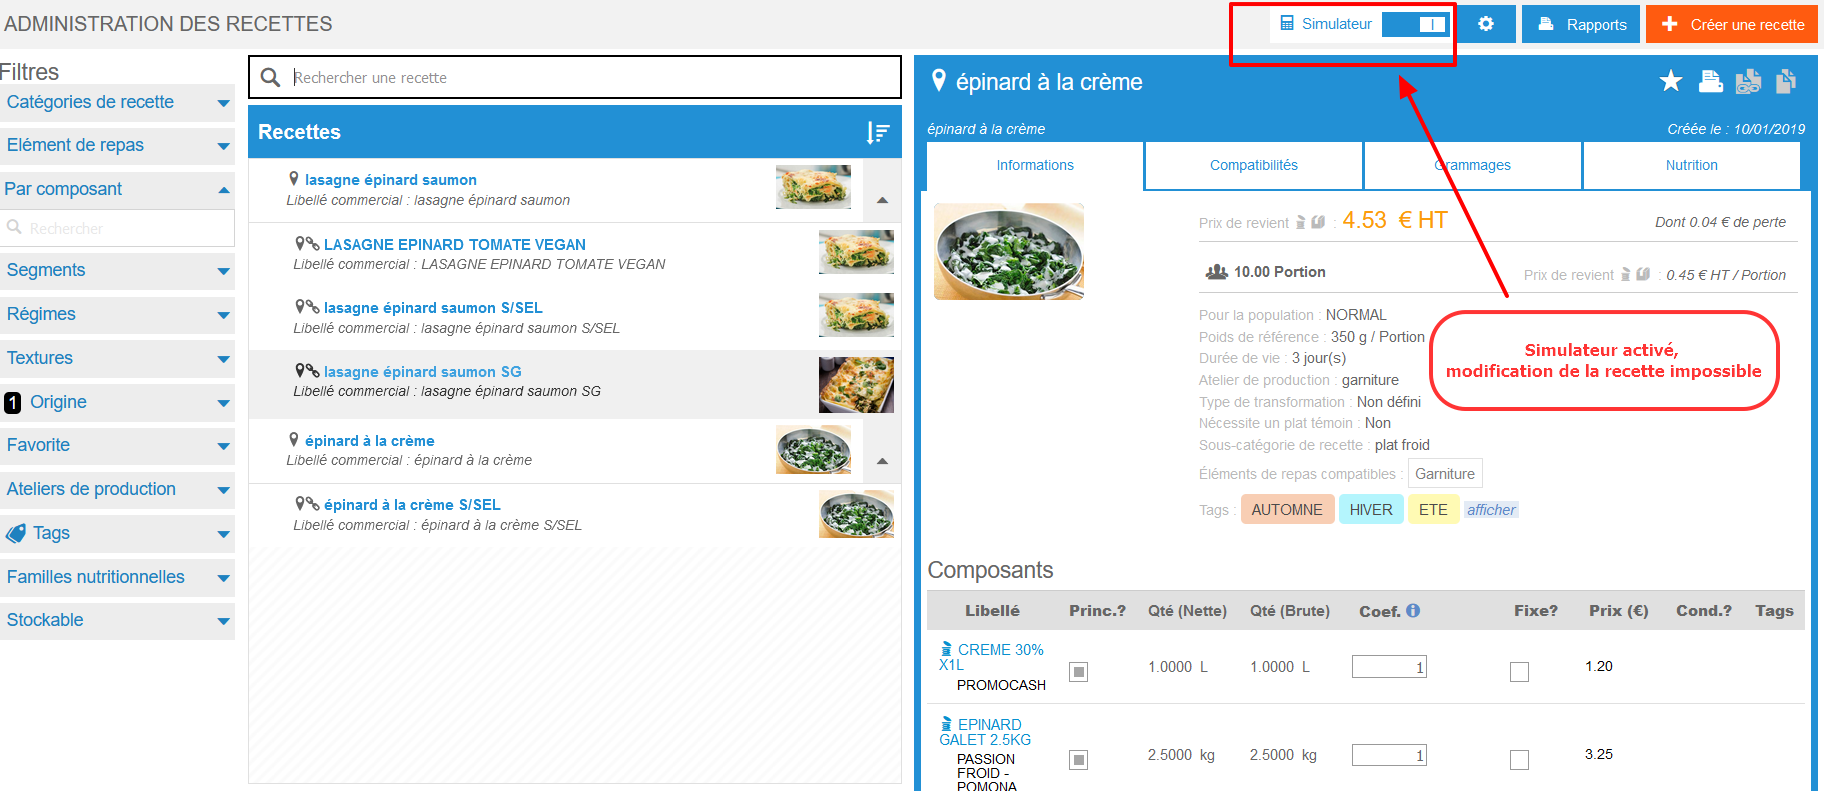
Select a recipe card in which you wish to add recipe component tags.
Note: Make sure the simulator is deactivated. (If this is activated, it is not possible to modify the recipe).
In the component table:
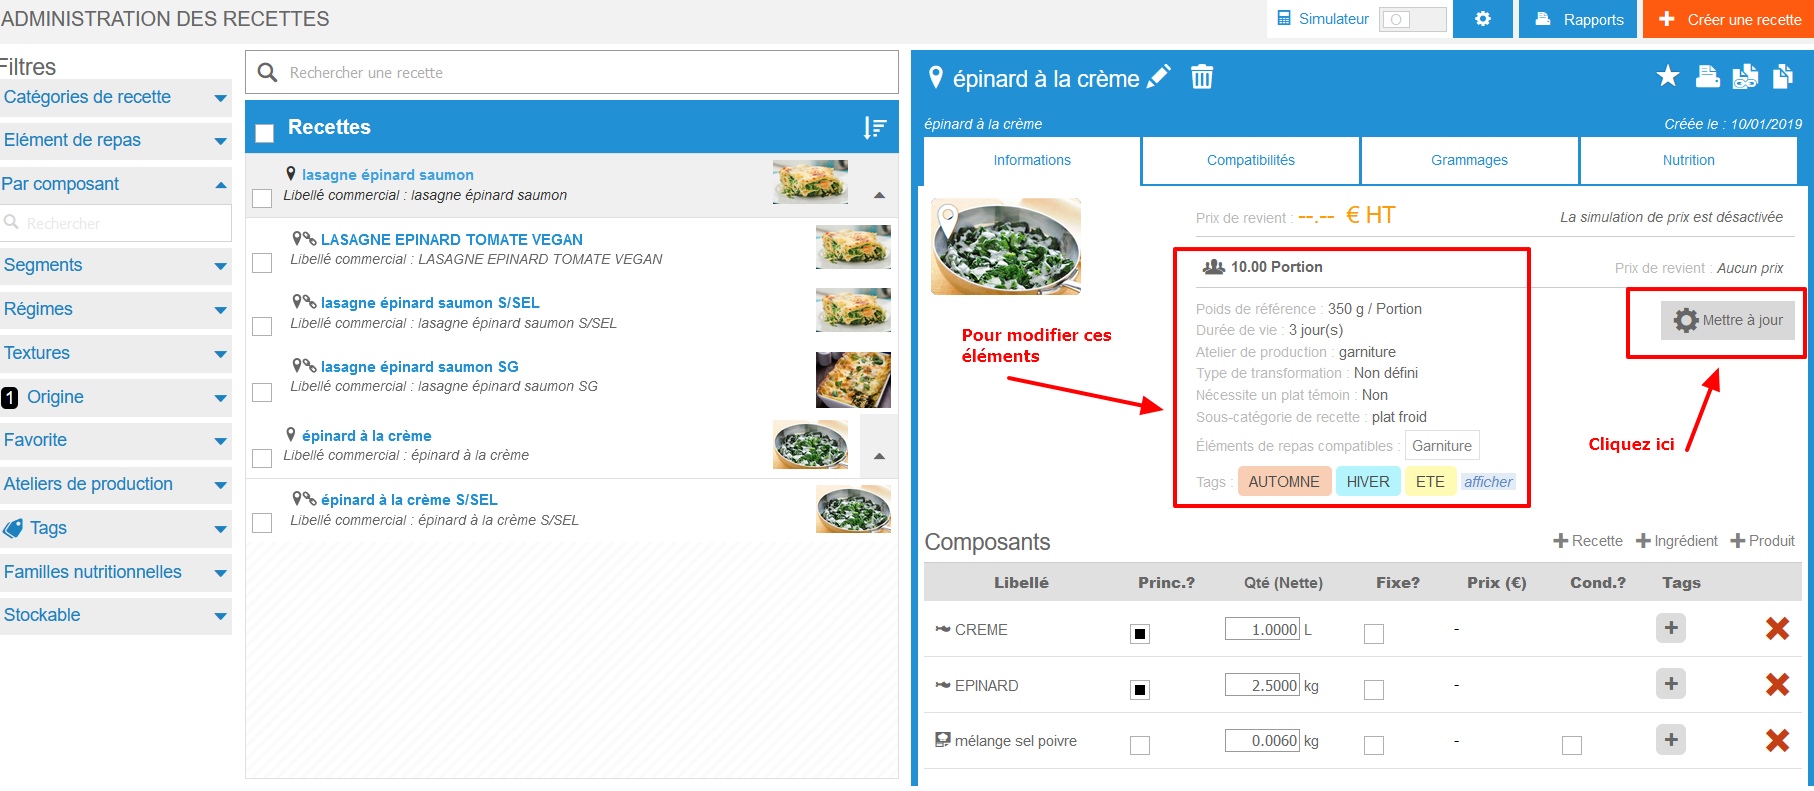
Select the + icon, visible in the Tags column, to add a tag to an item.
Note: Saving is immediate.
Example: You can add the Do not order tag to salt and pepper. So you can ask Easilys not to worry about these ingredients when preparing your order.
Example: You can add the tag Do not produce to vinaigrette. In this way, you can ask Easilys not to worry about this sub-recipe when editing your production reports.
Note: You can only add one recipe component tag per component (ingredient, sub-recipe or product).
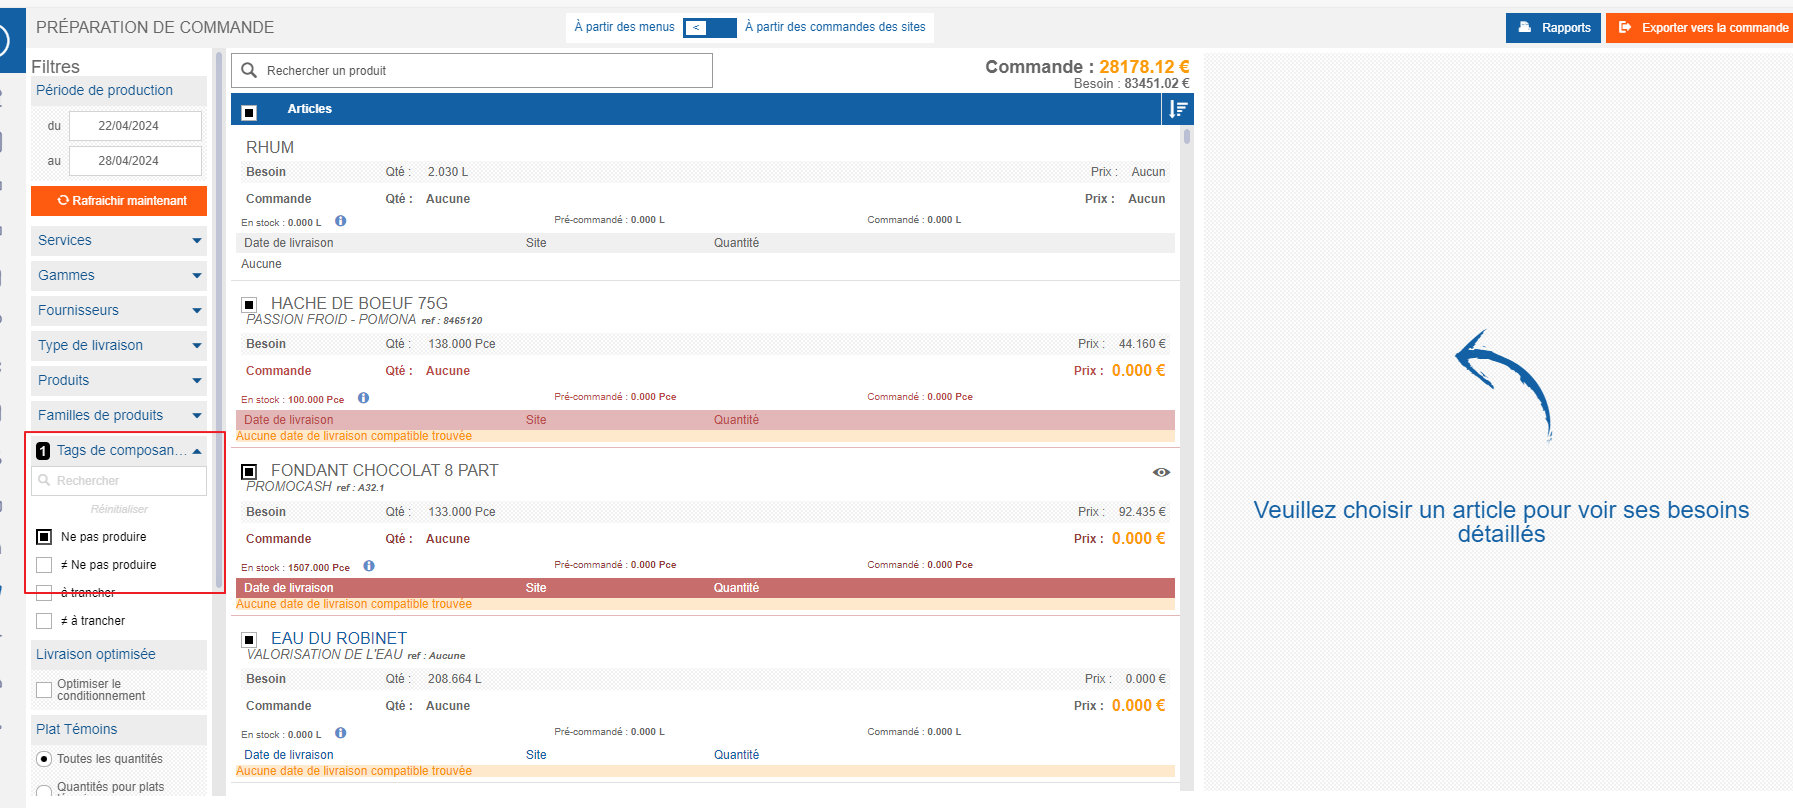
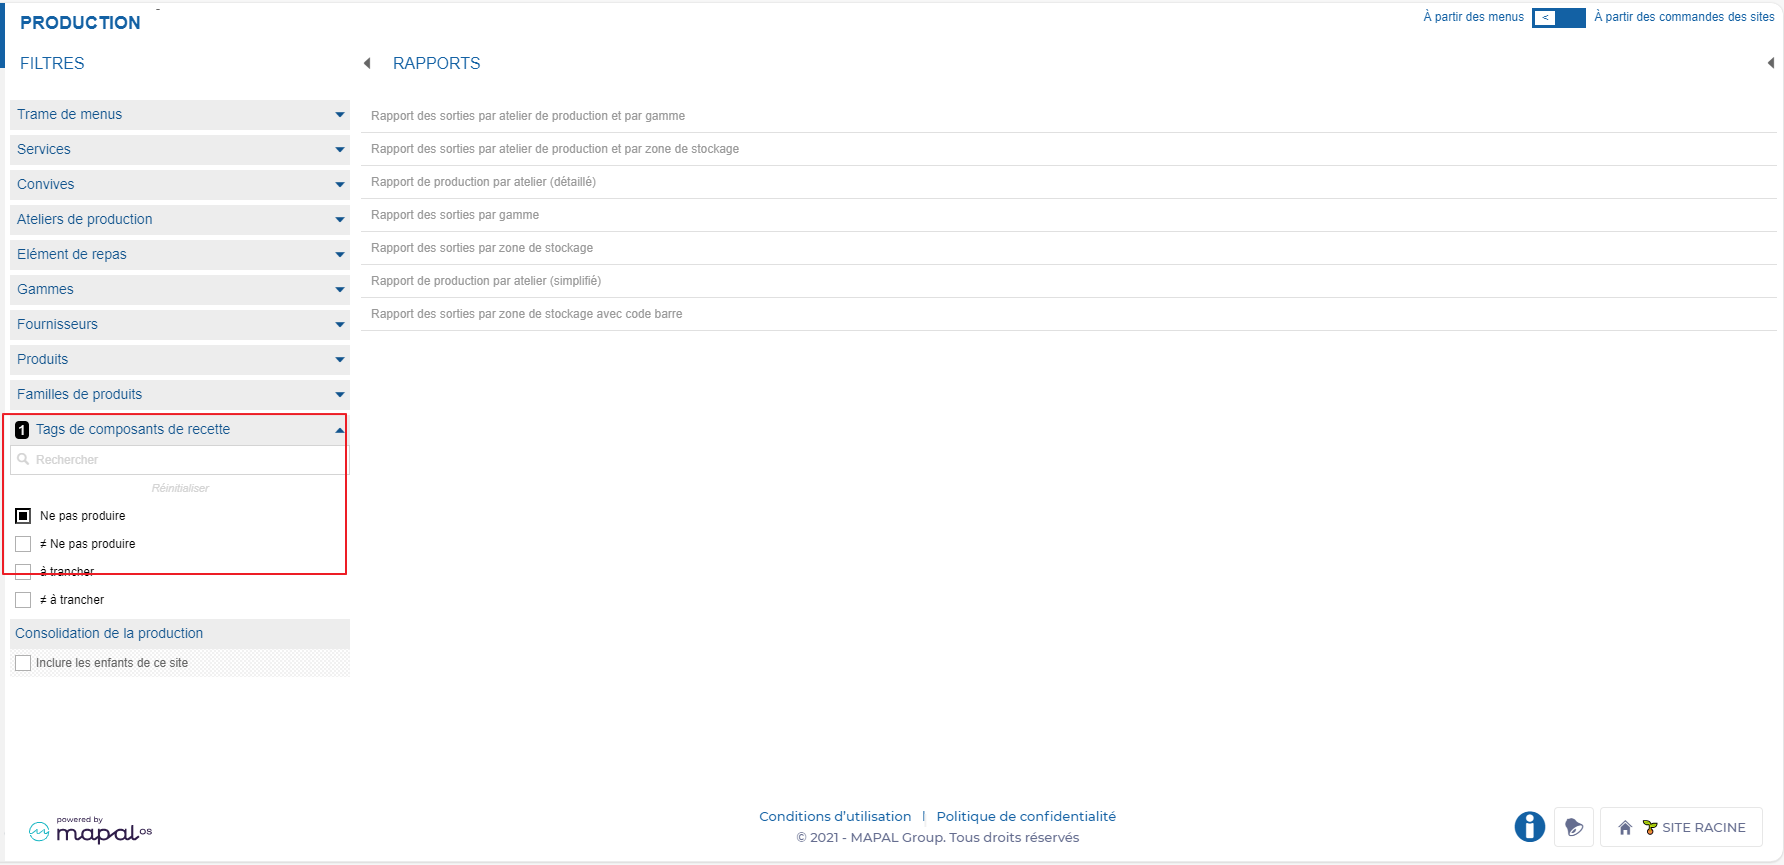
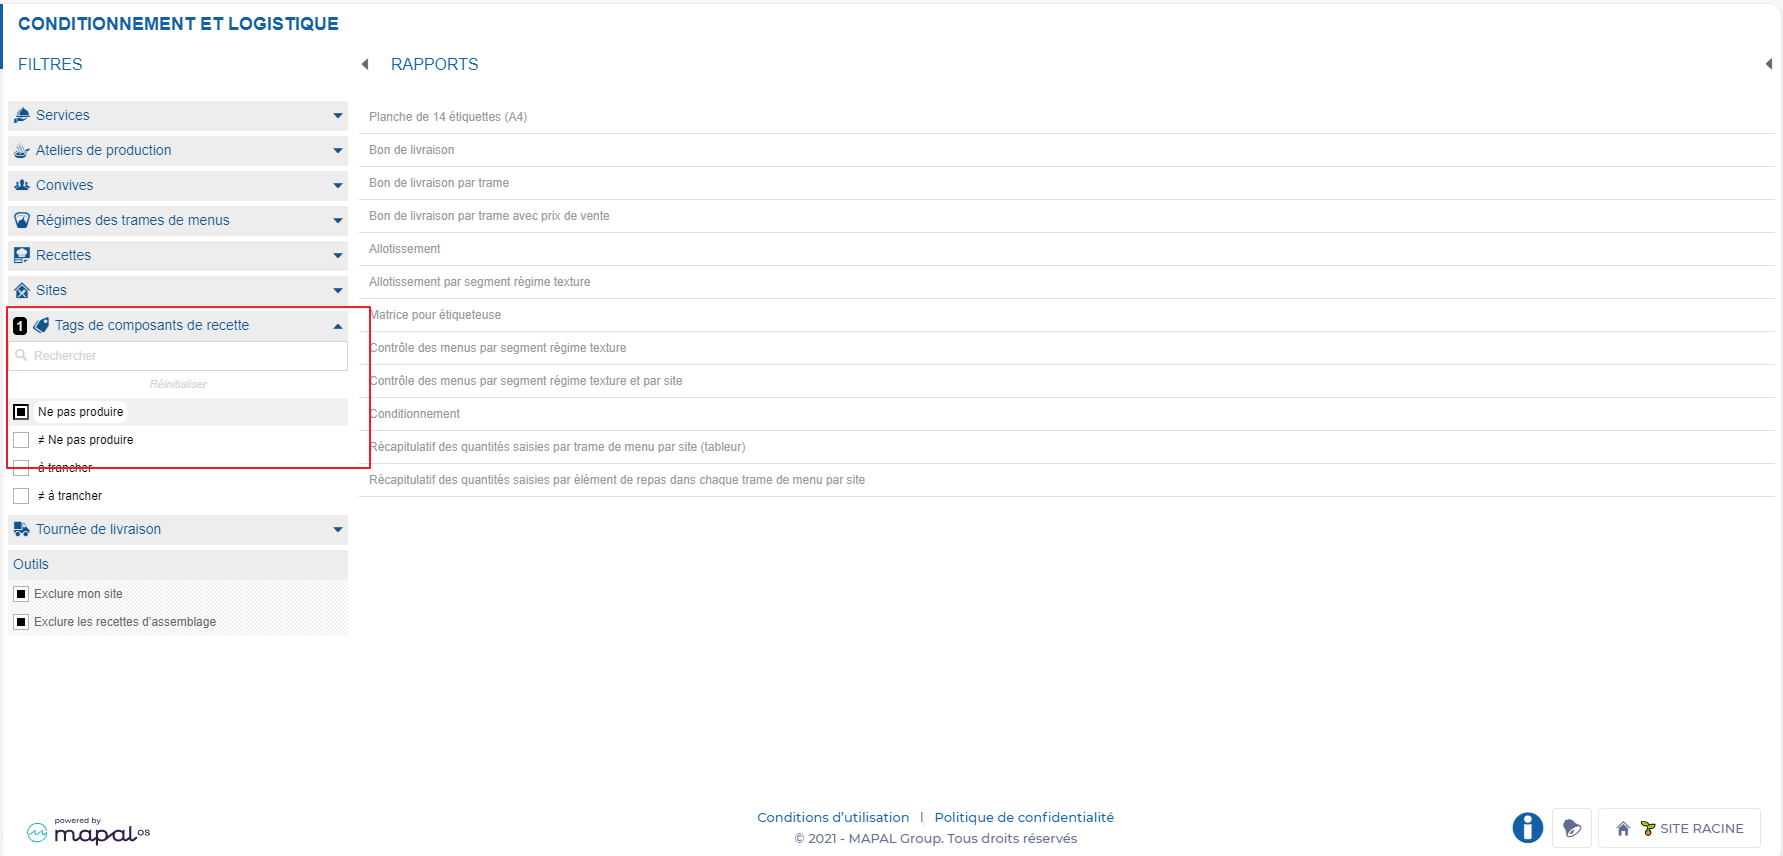
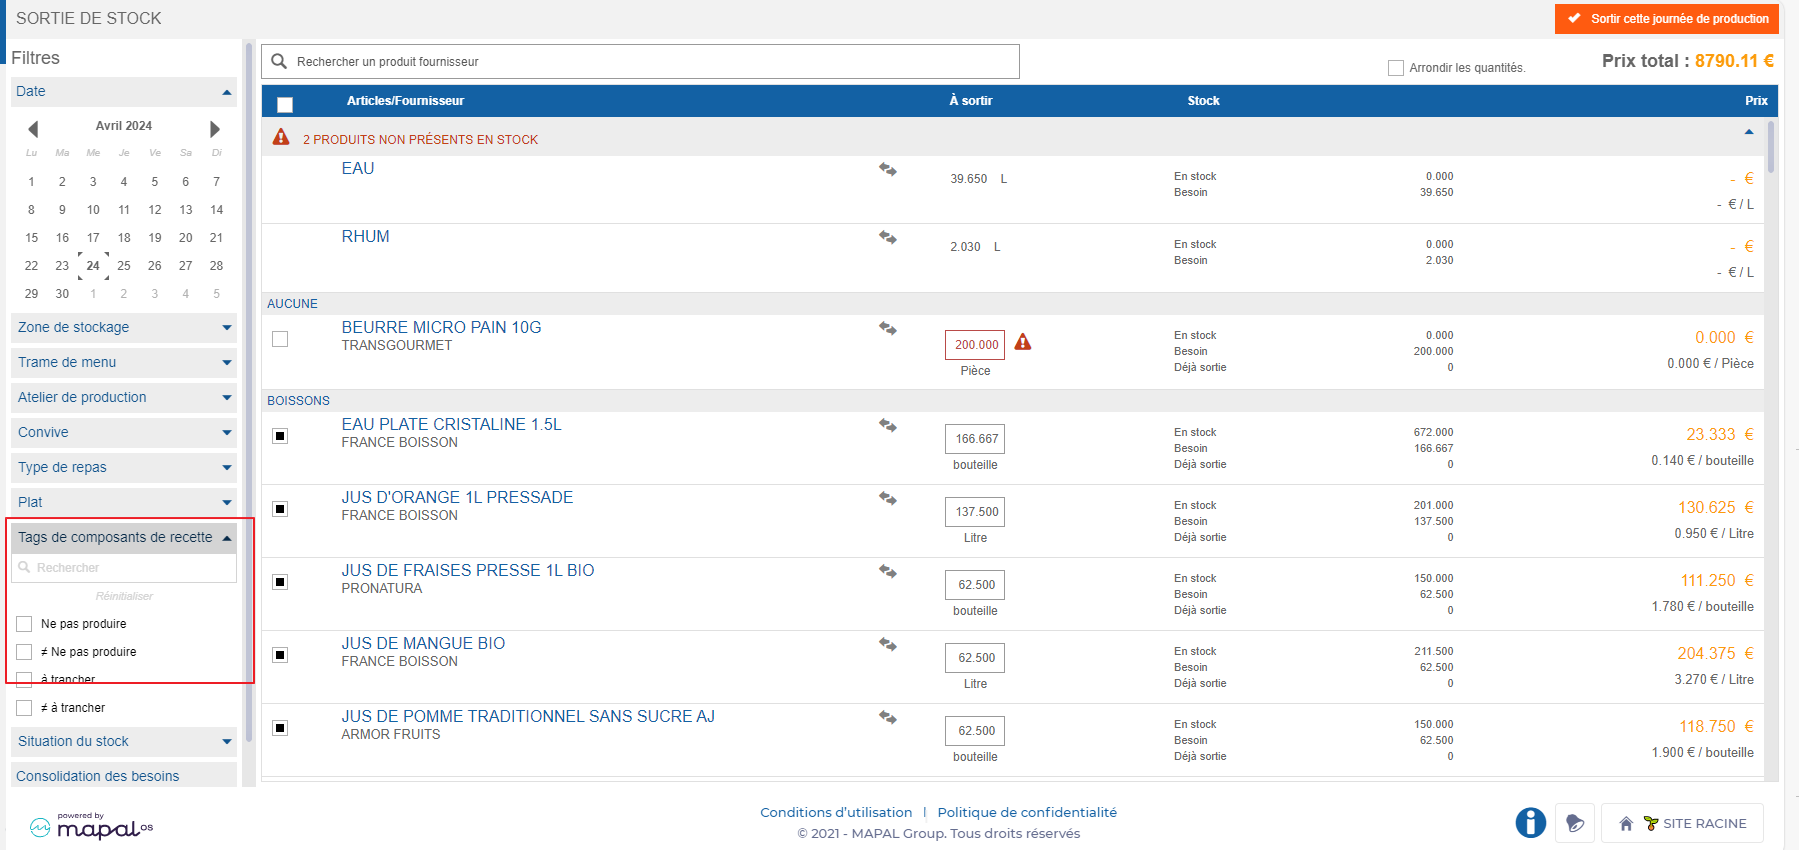
Using recipe component tag filters
If you have positioned component tags in your recipes, then you can use this criterion in the filters so that reports or calculations take them into account. The screens where this filter is available are :
Supplier Orders > Order preparation.
Production > Production.
Shipment > Packaging and logistics.
Stock > Stock removal.
Modify a recipe
If your environment is configured for multiple languages, the multilingual icon appears for some fields. For more information on how to use it, see the article Use Easilys in multilingual mode .
Note: Each action performed on the application is subject to access permissions. If you are unable to carry out the recommended actions in the articles you are viewing, this may mean that the necessary rights have not been activated for your user profile. Contact the Support team, or your administrator, to find out more.
Start from: The Easilys menu.
Select Recipes in the main menu > Recipe management.
Select the recipe you wish to modify.
The recipe card is displayed on the right of the screen.
Note: The simulator must be deactivated to edit a recipe card.
Modifying a local recipe
Modify recipe information
To modify recipe information :
Select Update.
Note: This button is only visible on a local recipe and when the simulator is deactivated.
Modify recipe composition
To modify a component already present, act directly on the information to be modified:
Check or uncheck the Main? or Fixed? boxes.
Correct the quantity directly in the relevant box.
Add or remove tags.
To delete a component :
Select the red cross icon.
To add a component :
Select the +Recipe, +Ingredient and +Product component buttons.
Change recipe progress
Select the orange pencil icon to the right of the Progress title.
Modify recipe labels
Select the pencil icon visible to the right of the current recipe label.
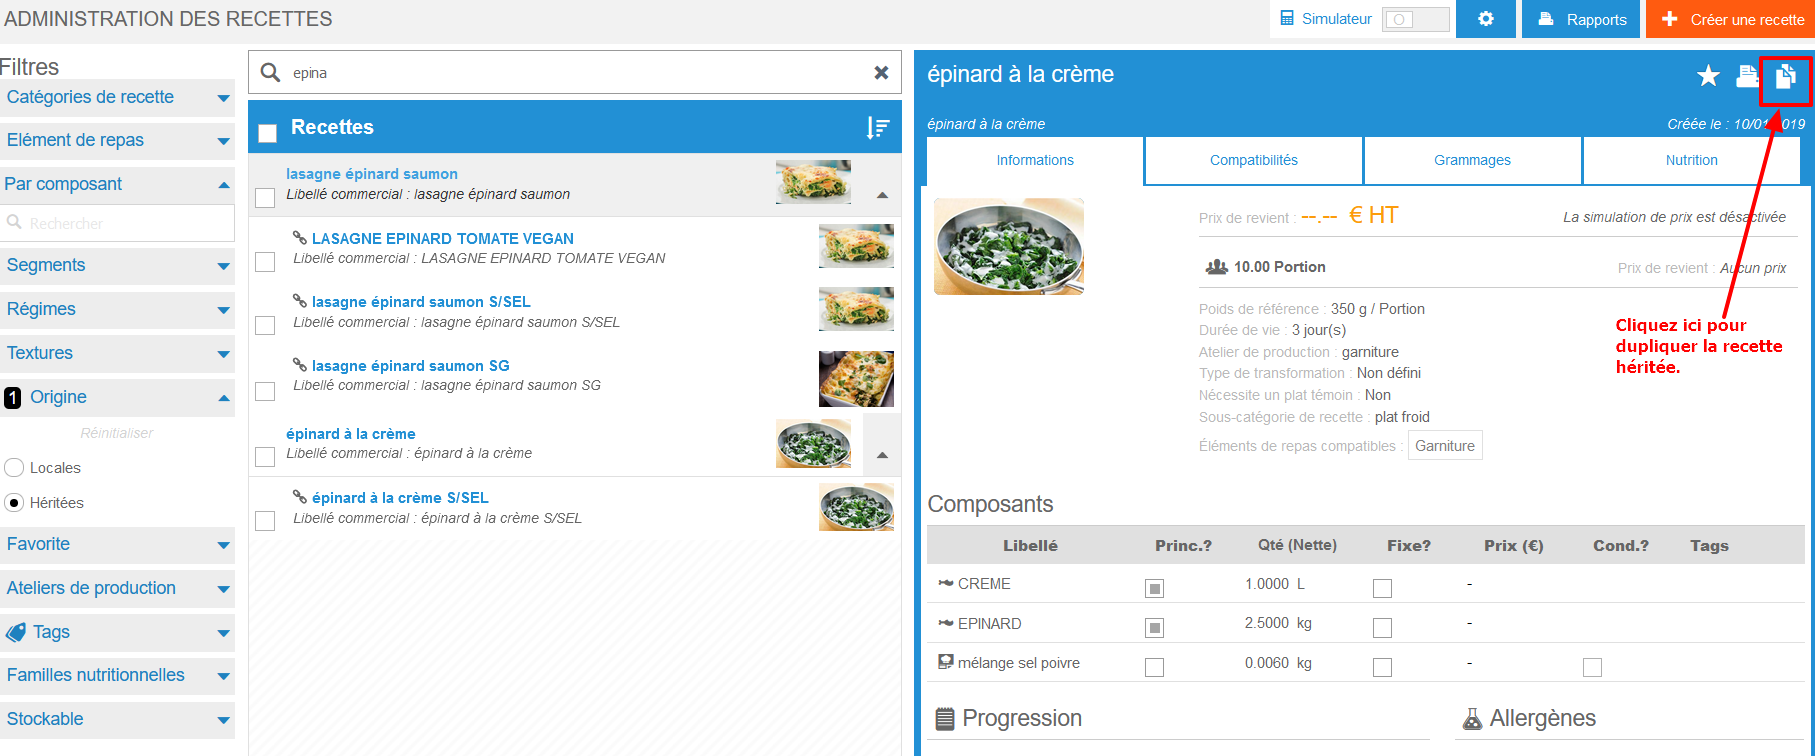
Modifying an inherited recipe
On a inherited recipe, most information cannot be modified. However, you can add or remove the net weigh from the Net weigh tab, and certain mass modifications are possible. To find out more about this procedure, see the article Mass configure recipe files, add elements and/or replace an ingredient.
If you wish to make any changes, you need to duplicate the inherited recipe: this way, you'll have a local copy that you can modify as you see fit.
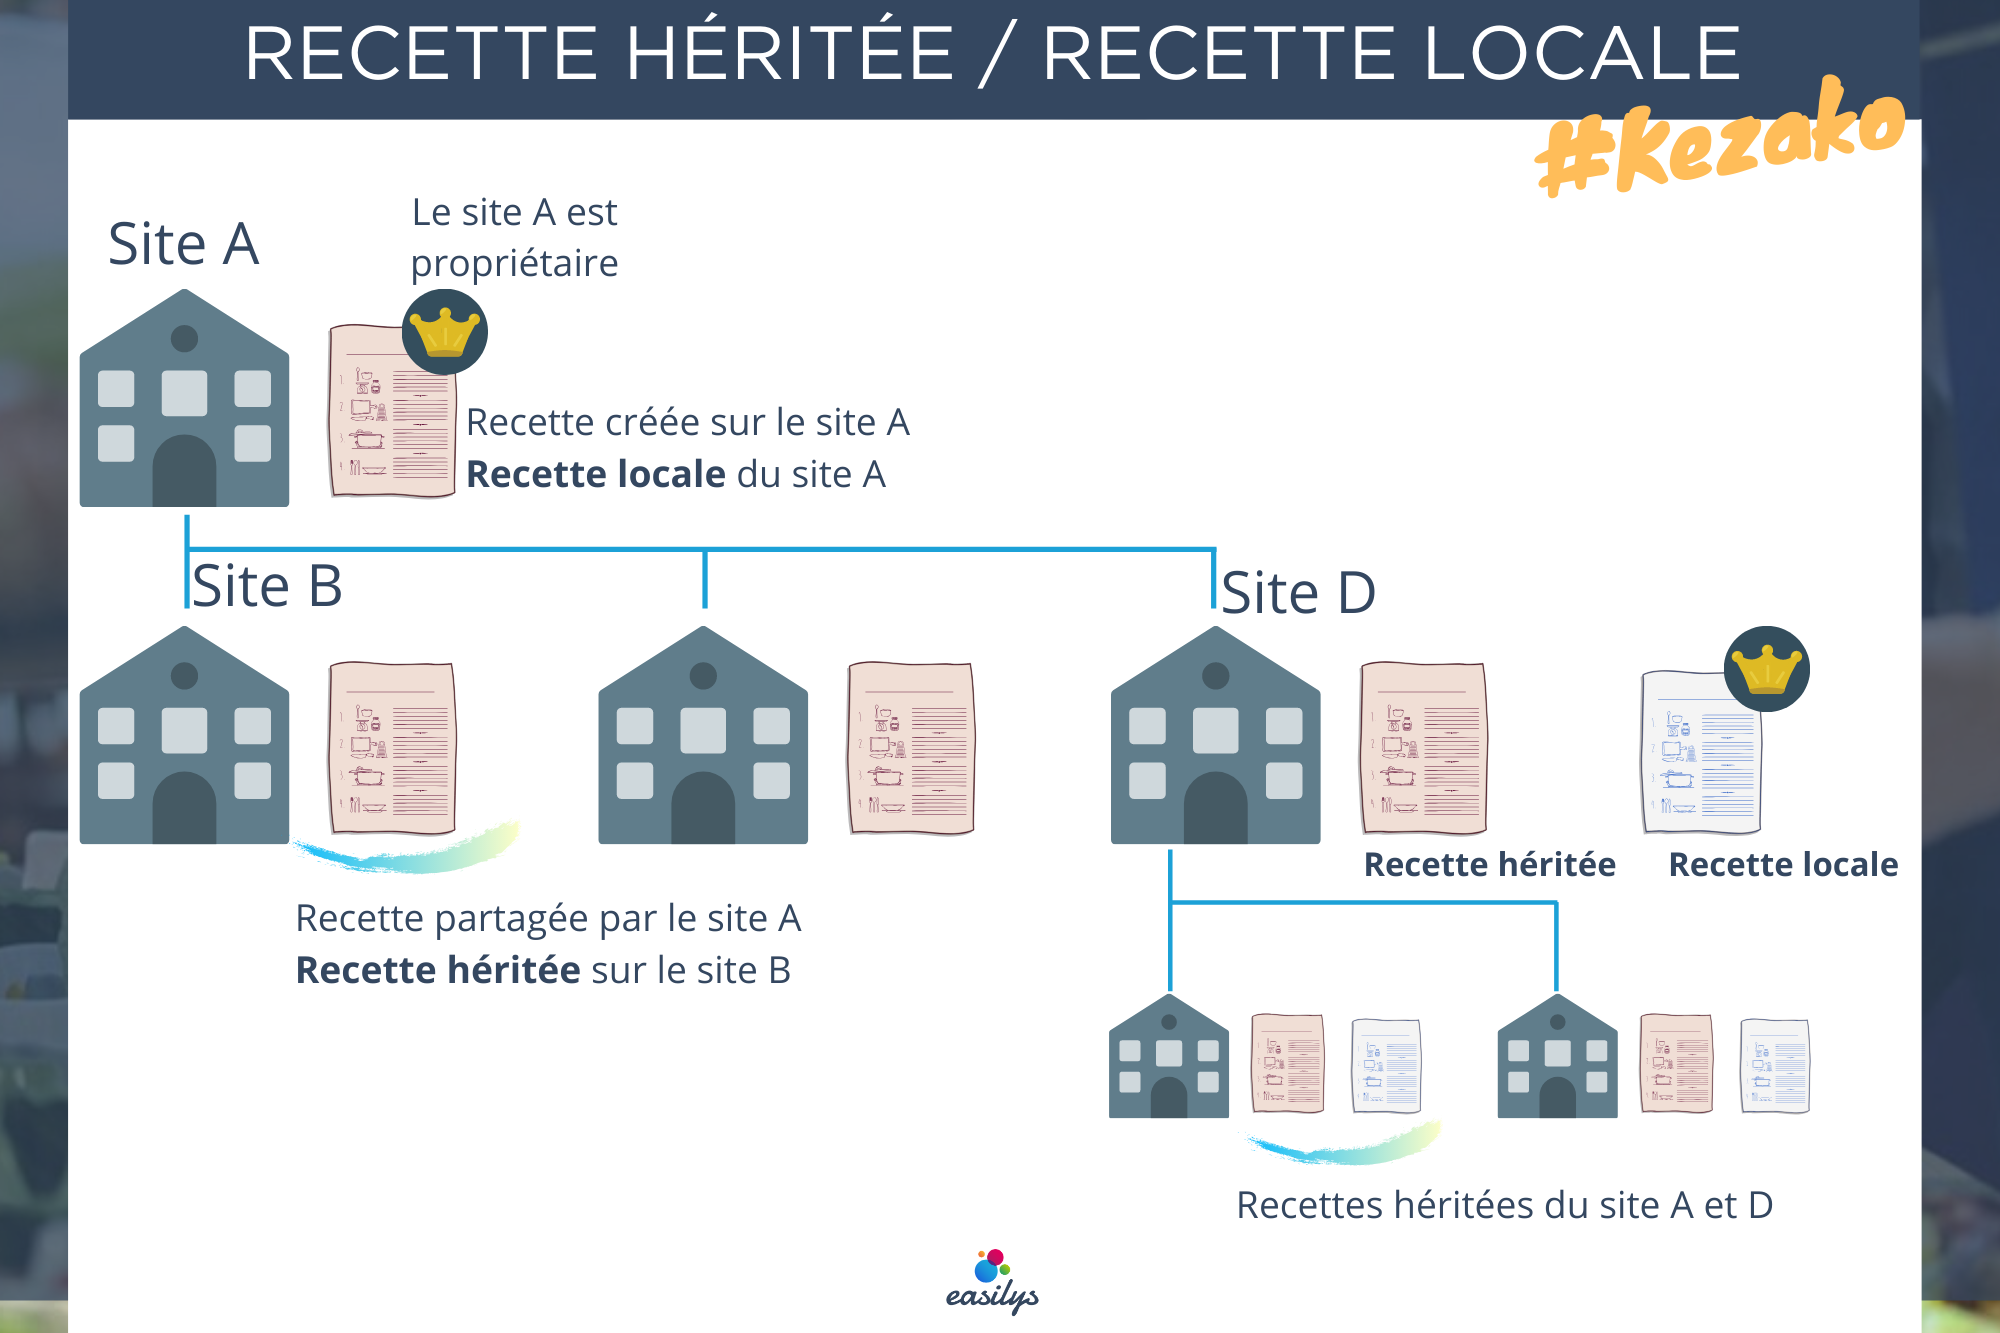
Reminder of the notion of local and inherited recipe
Mass configure recipe files, add elements and/or replace an ingredient
Note: Each action performed on the application is subject to a fee. If you are unable to carry out the recommended actions in the articles you are viewing, this may mean that the necessary rights have not been activated for your user profile. Contact the Support team, or your administrator, to find out more. Start from: The Easilys menu.
Select Recipes in the main menu > Recipe management.
Select the recipes for which you wish to add an element or replace an ingredient en masse.
Check the box in front of each recipe OR check the box at the top of the list.
Note: To make it easier to identify the recipes concerned, remember to use the filters to tell Easilys which recipes to display in the list.
Select Actions.
Select the desired action in the section that appears.
Note: The action is automatically saved. For example, as soon as you select a nutritional family to apply to recipes, it is applied and saved directly to the selected recipes. It is not, however, possible to massively remove an element. If you wish to apply a shelf life or enter the weight of a batch in mass: 1. Enter the desired value. 2. Select Update. Note: If the multi-selection contains inherited recipes, some mass modifications are grayed out, as they are forbidden.
The concepts of ingredient, industrial product, and supplier product
Note: Each action performed on the application is subject to access permissions. If you are unable to carry out the recommended actions in the articles you are viewing, this may mean that the necessary rights have not been activated for your user profile. Contact the Support team, or your administrator, to find out more.
The industrial product is the product as it leaves the production plant.
The supplier product corresponds to the product marketed by the supplier.
The generic ingredient corresponds to the ingredient associated with the industrial product.
Note: The same industrial product may be marketed by several suppliers. There may therefore be several supplier products linked to the same industrial product.
Example: "In my tomato sauce recipe, I indicate that I need tomatoes. I therefore add the generic ingredient TOMATOES to my Easilys recipe.
In the price lists, we can see that supplier A sells the product "Tomato bunches Size 3 CARTON 5 Kg".
The above product must therefore be linked to the notion of the generic ingredient TOMATOES, otherwise Easilys will not be able to know that the product corresponds to the generic ingredient TOMATOES that has been added to a recipe.
Once the product has been linked to the generic ingredient, Easilys is able to offer "Tomato Bunches Size 3 BOX 5 Kg" from supplier A when you need to prepare tomato sauce.
Note: If supplier A no longer markets its product, or if the price increases, Easilys will be able to offer another product also linked to the TOMATOES ingredient that the other suppliers market.
This avoids having to update the recipe every time you change product.
Your recipe cards are made up of ingredients. These ingredients are linked to industrial products: Easilys can therefore offer you the supplier products corresponding to the ingredient in order to order those required for your recipes.