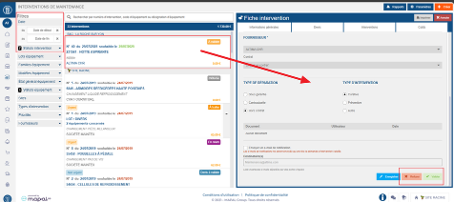
Validate or refuse maintenance intervention requests
Note: each action performed on the application is subject to access permissions. If you are unable to carry out the recommended actions in the articles you are viewing, this may mean that the necessary rights have not been enabled for your user profile. Contact the Support team, or your Admin, to find out more.
Start from: The Easilys menu.
You can become aware of a validation request in two ways:
Email notification: Follow the link provided in the email.
Directly in Easilys:
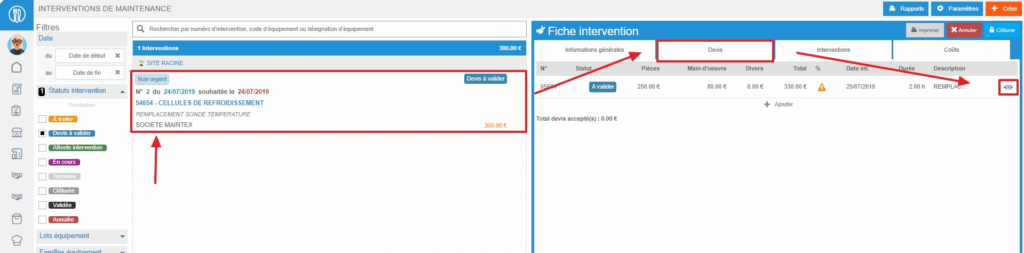
Select Equipment items > Interventions.
Use the filters if necessary to display interventions with the status TO VALIDATE (A VALIDER).
Click on the intervention you wish to review.
Take note of the intervention request
Click on “Validate” or on “Refuse” depending on your choice. If you decide to refuse, you must justify your decision by indicating a reason.
The intervention request then changes status. It is no longer modifiable.
Configure validation rules for maintenance requests
Note: Each action that can be performed on the application is subject to user permissions. If you cannot perform the actions recommended in the articles you consult, it may mean that the necessary rights are not activated for your user profile. Contact the Support team, or your administrator, for more information.
Start from: the Easilys menu.
Select your username or avatar from the left-hand menu, then Site parameters.
Select Workflows.
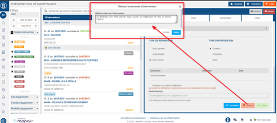
Select + Add a rule.
The window “Add a rule to this workflow” appears:
Select the Equipment feature.
Select the user profile that will be responsible for validation.
Note: By selecting a validator profile, you are telling the application which users will be notified of intervention requests. To ensure that only these users can validate intervention requests, you must configure profiles in the administration area so that only the chosen profiles have the permission “Validate intervention requests (validation workflow)” (See article Manage Easilys user account profiles)
Notification system settings
If you tick “Notify users associated with the validator profile by email”, all users with the validator profile will receive an email each time a non-validator user requests the creation of an intervention on equipment.
If you also want to notify one or more specific email addresses, enter them in the “Other emails to be notified” field and tick the box “Notify users associated with the validator profile by email”.
If you only want to notify one or more specific email addresses, enter them in the “Other emails to notify” field and leave the validator notification box unticked. Tip: Separate each email address with a semicolon.
If you are working across multiple sites and want the rule to apply only to certain site groups, add the desired “Sites” tag(s).
If all sites are concerned with validation by a manager, then no tag is required. All child sites of the site where you created the rule will be impacted by it.
Select Create.
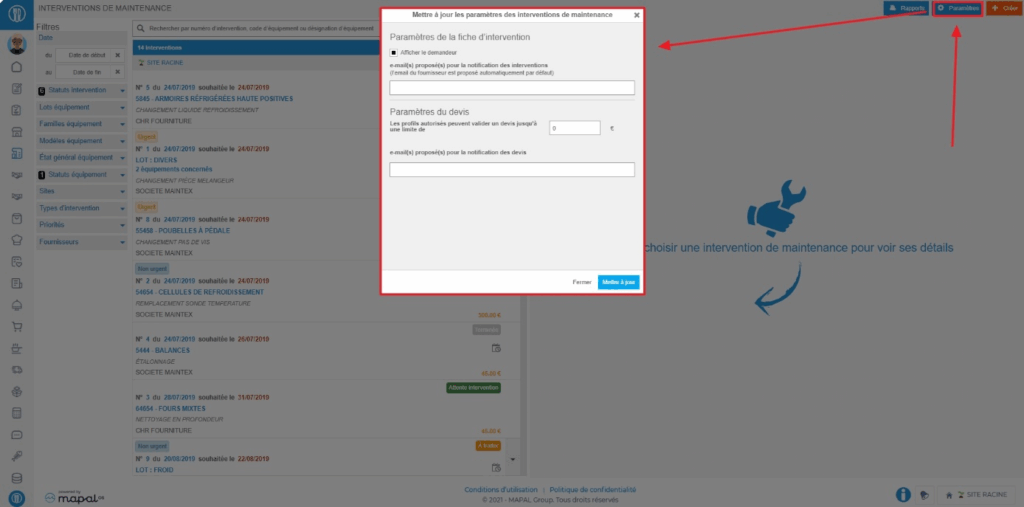
Configure notifications and the authorized validation limit for quote management
Starting from: The Easilys menu.
Select the tabs Equipment > Interventions.
Select Settings at the top right of the screen.
To configure email notifications, add the addresses (separated by a semicolon) to notify in the box under "proposed email(s) for intervention notification".
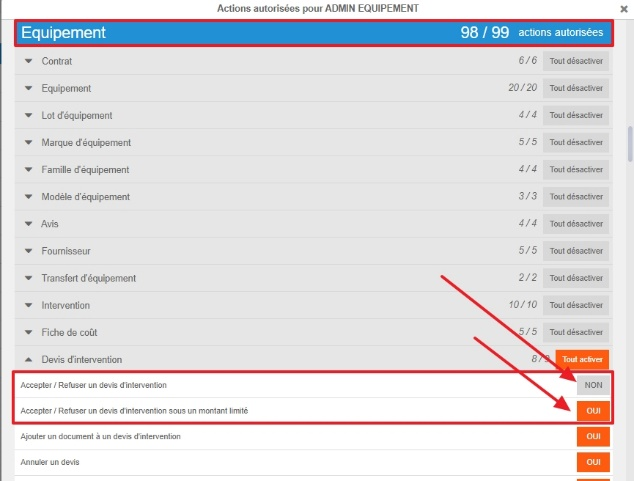
To set a quote limit beyond which it will be impossible for validator profiles, subject to the limit, to accept or reject quotes, enter the amount in the designated box.
A validator profile subject to the limit is a profile whose right "Accept / Reject an intervention quote under a limited amount" is activated and the right "Accept / Reject an intervention quote" is deactivated.
Reject or accept a quote submitted on a work order
Start from: The Easilys menu.
Select the Equipment > Interventions tabs.
Select the work order.
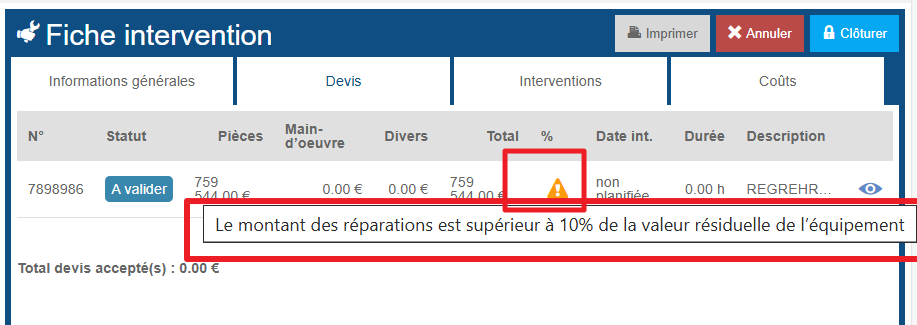
Select the small eye-shaped icon, on the right in the table at the top of the "Quotes" tab, to view the quote sheet.
Important to know: If an orange warning triangle is visible on the quote line, it means that the quote amount is higher than the threshold defined on the equipment record. When you hover over the triangle, a message will display the percentage set for this threshold.
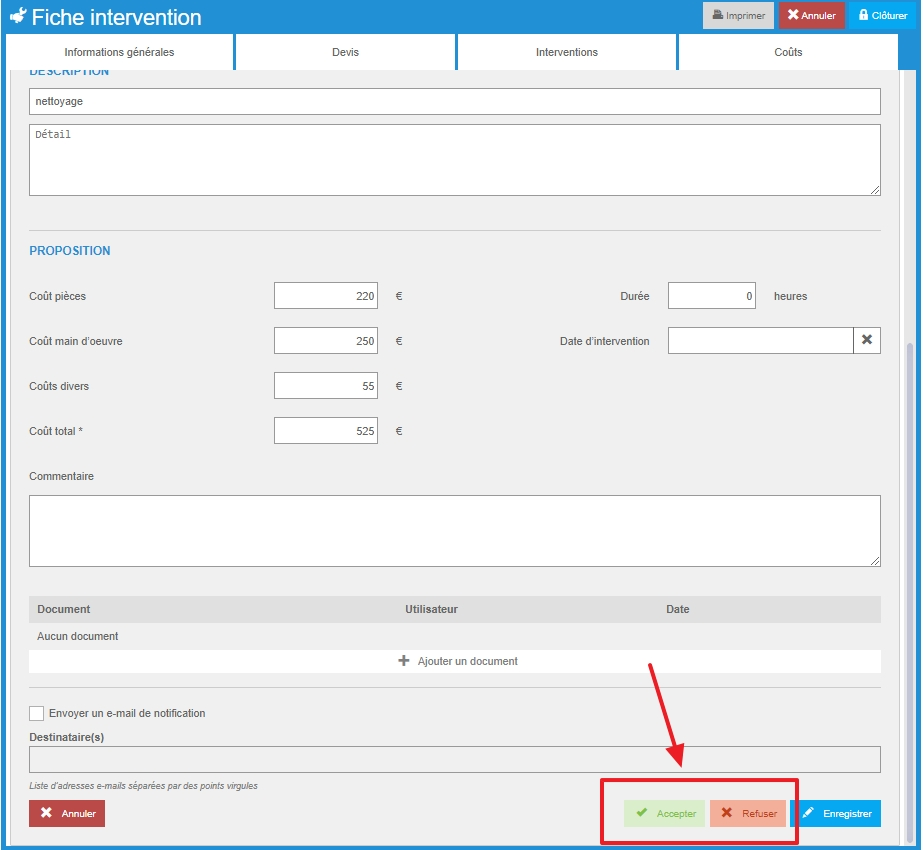
Select Reject or Accept at the bottom right of the quote sheet.
Note that you may not be able to "Accept" or "Reject" a quote if you do not have validation rights or if the amount of the quote exceeds the set limit.
If you reject a quote, you can add a comment to explain the reasons for the rejection. Your maintainer can then propose another quote.
The work order will change to status "Awaiting intervention" as soon as a quote is accepted.
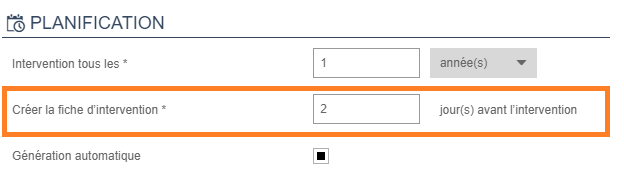
Create a preventive maintenance form
Start from: The Easilys menu.
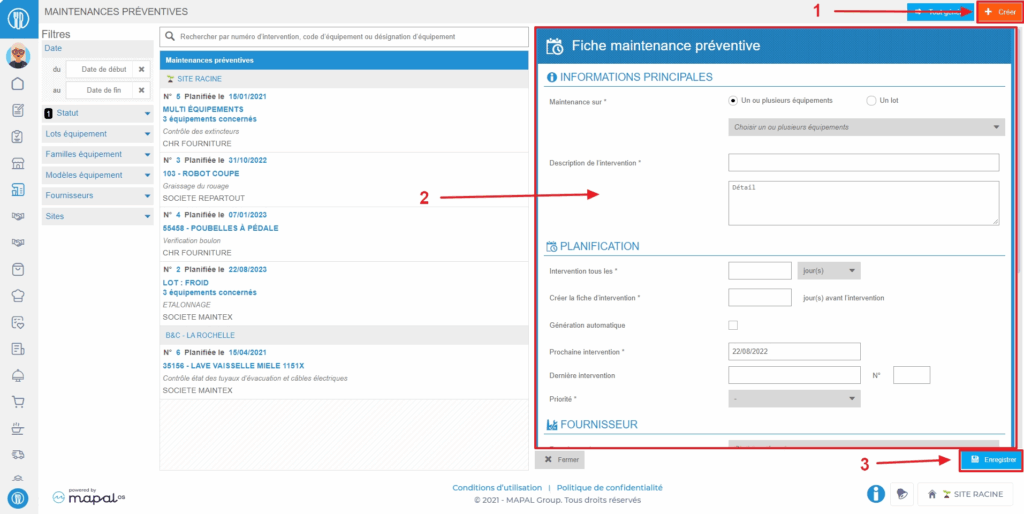
Select the tabs Equipment > Preventive.
Select Create visible at the top right of the screen.
A blank preventive maintenance form appears on the right side of the screen.
Complete the requested information. Those followed by a * are mandatory to create the form.
Select Save at the bottom of the form.
Note: Preventive maintenance forms automatically generate a service request on the date indicated in the form at the line "Create the service form". To generate requests in advance, you can manually generate the requests.
Status options for an intervention sheet
Start from: Equipment items > Interventions
Statuses of curative intervention or maintenance
Action
Performed by
Status after action
Creation of an intervention sheet
site
Entry of a quote (addition of attachments possible afterwards, as long as the quote is not ""accepted"")
maintainer/site
Quote refusal
site
Quote acceptance
site
Entry of an intervention report
maintainer/site
Indication ""intervention completed"" on the report
maintainer/site
Entry of intervention costs
site
status unchanged
Closure of the intervention sheet
site
Validation of the intervention (necessary for the intervention cost to be visible in the 'renewal plan export' report in the maintenance cost per equipment field)
site / supervision
Cancellation of the intervention sheet
site / supervision
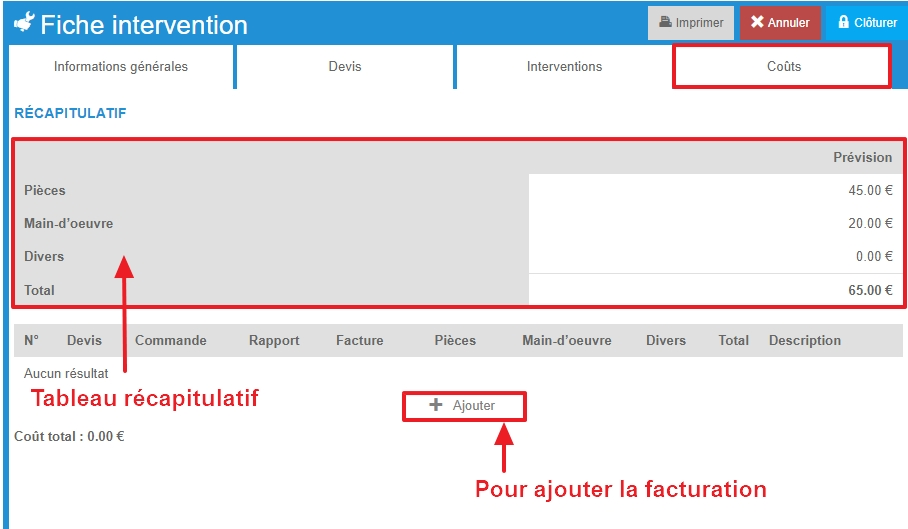
View projected and actual intervention costs and add final billing
Start from: The Easilys menu.
Select Equipment > Interventions.
Select the intervention record.
Go to the "Costs" tab of the intervention record.
The table summarizes the projected and actual costs according to the elements that have been entered throughout the management of the intervention.
Select + Add to add a billing record.
The blank "Costs" record is displayed on the screen.
Complete the requested information. Those followed by an asterisk are mandatory.
Select Save to validate the addition of the costs record.
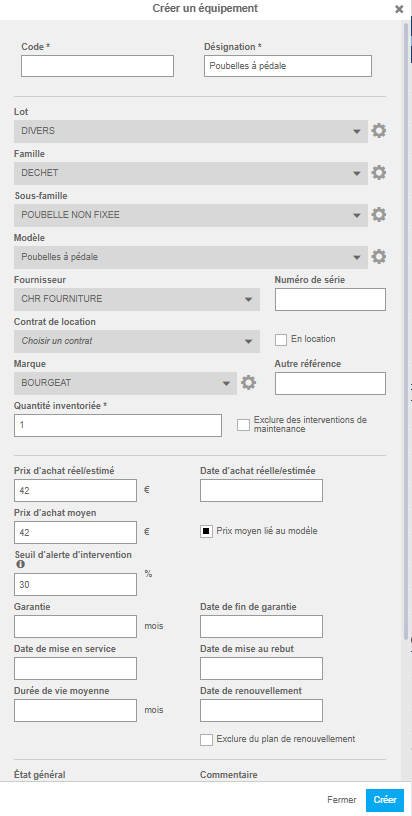
Create an equipment record
Start from: The Easilys menu.
Select the Equipment > Equipment tabs.
Select Create available at the top right of the screen.
The "Create equipment" window then appears on the screen.
Complete the requested information. Those followed by a * are mandatory to be able to create the equipment record.
Optional: Create a batch, family, sub-family and model by selecting the gear wheel as needed.
Select Create at the bottom right of the window.
The equipment record is now available in the left part of the "Equipment" screen. By selecting it, the details are displayed on the right.
Additional information can then be added such as the equipment photograph.
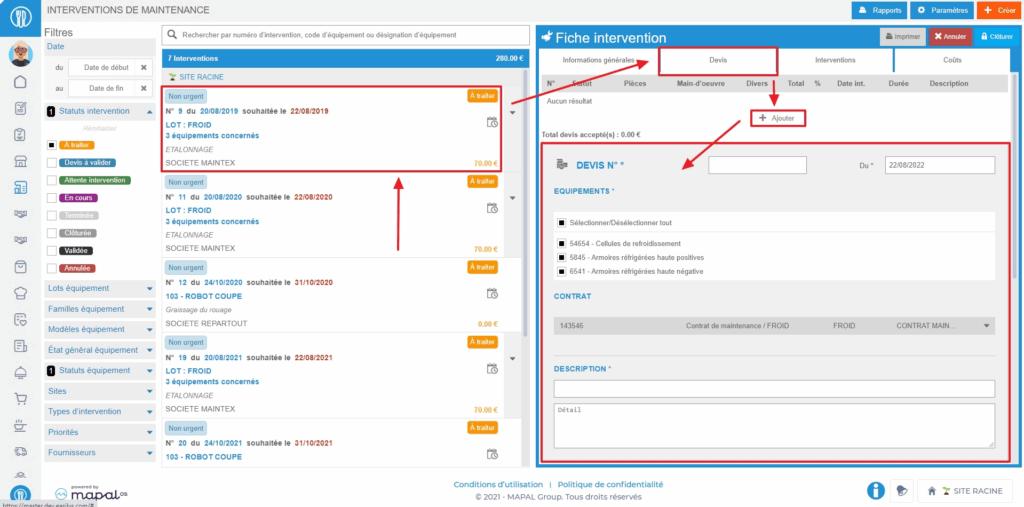
Select the intervention record on which to place a quote.
The details of the intervention record are displayed on the right side of the screen.
Go to the "Quotes" tab.
Select + Add. A blank quote form is displayed on the screen.
Complete the requested information. Those followed by an asterisk are mandatory.
Select Save at the bottom right of the quote form to add it to the intervention record.The quote is added to the table visible at the top of the "Quotes" tab.
Important to know: If an orange warning triangle is visible on the quote line, it means that the quote amount is higher than the threshold defined on the equipment record. When you hover over the triangle, a message will display the percentage set for this threshold.
These steps can be performed directly by the maintainer if you have given access to Easilys to them.
For this, you must have created a user account for your maintainer that you will have linked to a user profile specifically designed for MAINTENANCE so that they cannot view all your information available in Easilys and only have access to the screens and actions they need.
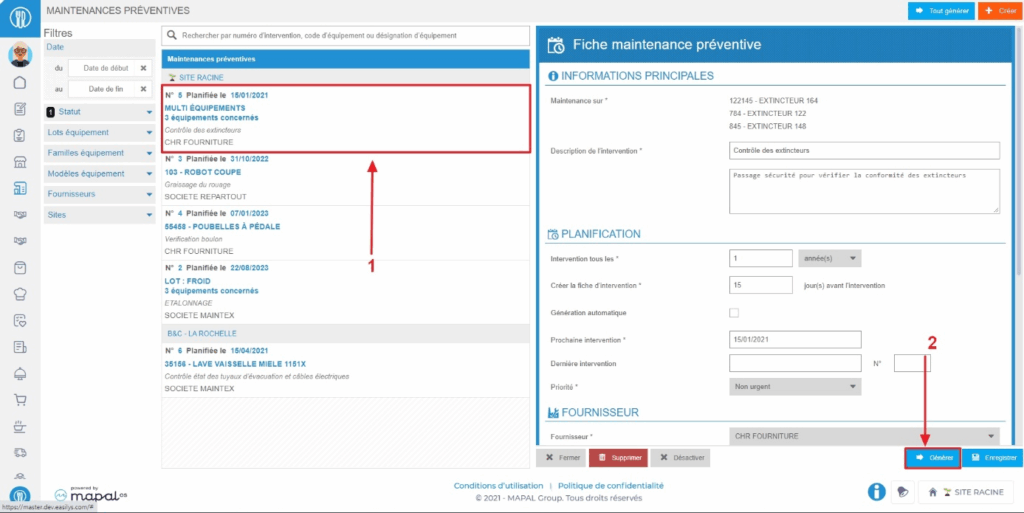
Generate a maintenance request from a preventive maintenance sheet
Start from: The Easilys menu.
Select the tabs Equipment items > Preventive.
Select the preventive maintenance sheet from which you want to generate a maintenance request.The details of the sheet appear on the right side of the screen.
Select Generate visible at the bottom of the sheet.
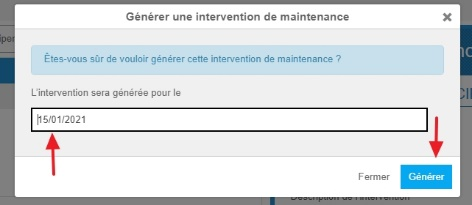
The "Generate a maintenance intervention" window appears on the screen.
Optional: You can change the date for which the maintenance request will be generated.
Select Generate.
Note: The maintenance request will be manageable from the Available Interventions screen in the "Equipment" section.