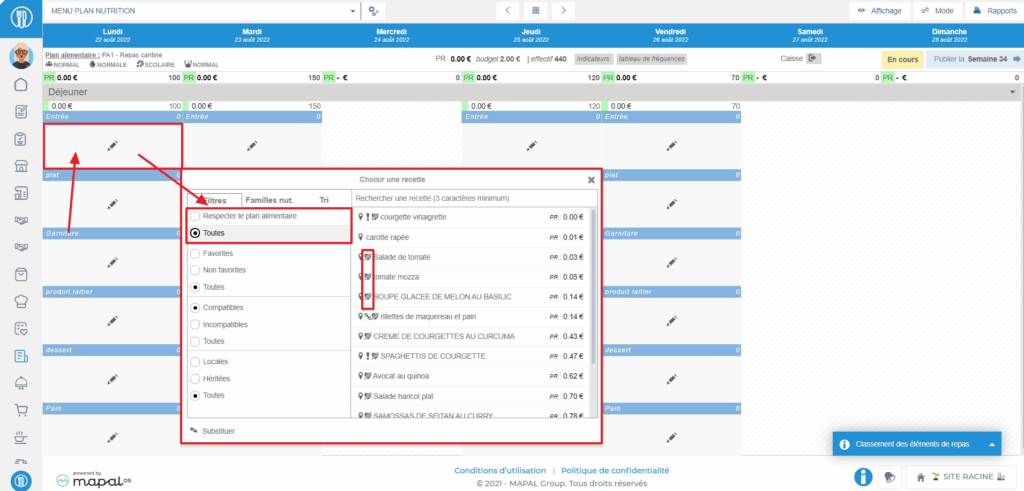
If the Ability to add dishes that do not comply with the meal plan permission is enabled on the user's profile, then they have access to the "Comply with meal plan" or "All" filter in the recipe selection window to be placed in the menu. When the filter is set to "All" and not "Comply with meal plan", recipes that do not comply with the meal plan have a crossed-out heart icon (the symbol of the MEAL PLAN screen crossed out).
Note: If you do not have the necessary permission, contact your administrator or our Support team to check if it is possible to enable the permission on your profile.
Administer the list of meal items and services
If your environment is configured for multiple languages, the multilingual icon
appears for some fields. For more information on how to use it, see the article
Use Easilys in multilingual mode
.
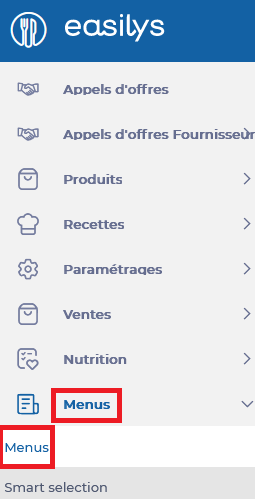
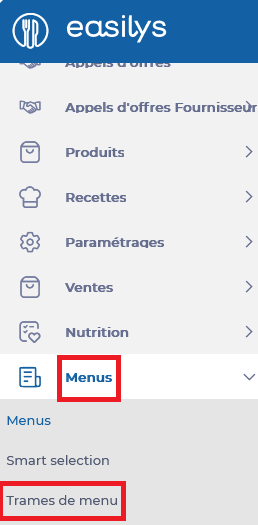
Start from: The Easilys menu.
Administration of the list of meal items and services is done via the "Manage services" function, which is accessible from Menus > Menus as well as from Nutrition > Meal plan.
Access the "Manage services" function, 1st method: from Menus > Menus.
Select the Menus > Menus tabs.
Select the cogwheels leading to the "Menu frame options".
Note: if you do not have any menu frames on your root site, Easilys will then prompt you to create one. Accept this creation to access the administration of services and meal items. (You will not be required to finalize the creation of the menu frame if you do not wish to.)
Select Edit the selected menu frame.
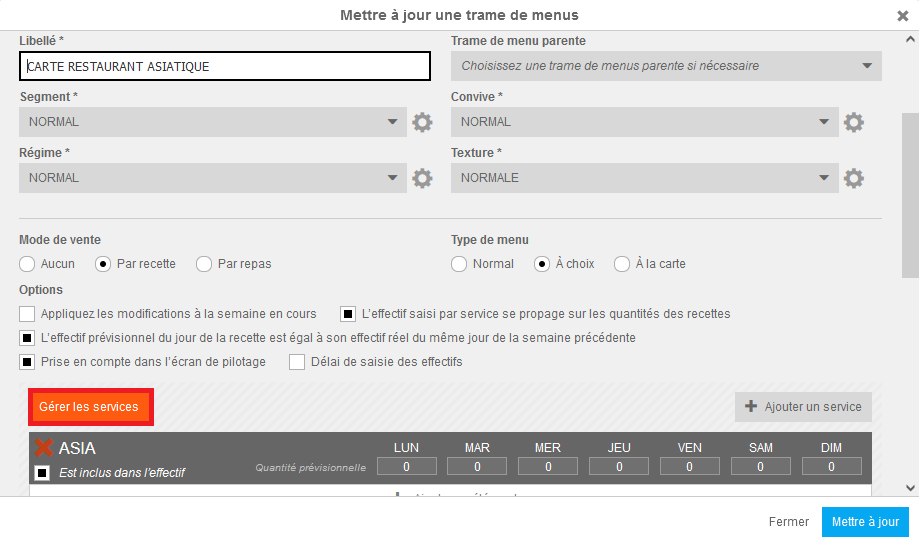
The Update a menu frame window appears on the screen.
Select Manage services.
Note: this button is only visible if you are on the root site and have administration rights for these items.
Access the "Manage services" function, 2nd method: from Nutrition > Meal plan.
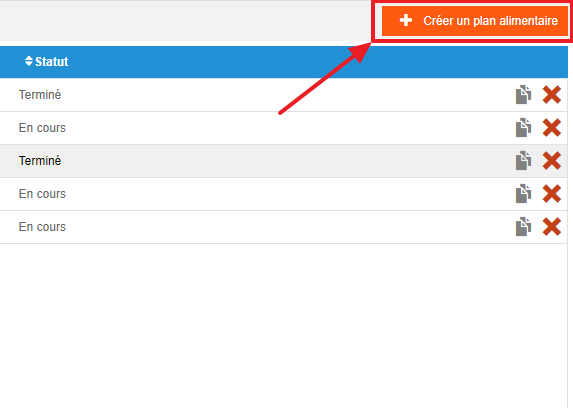
Select the Nutrition > Meal plans tabs.
Select Create a meal plan.
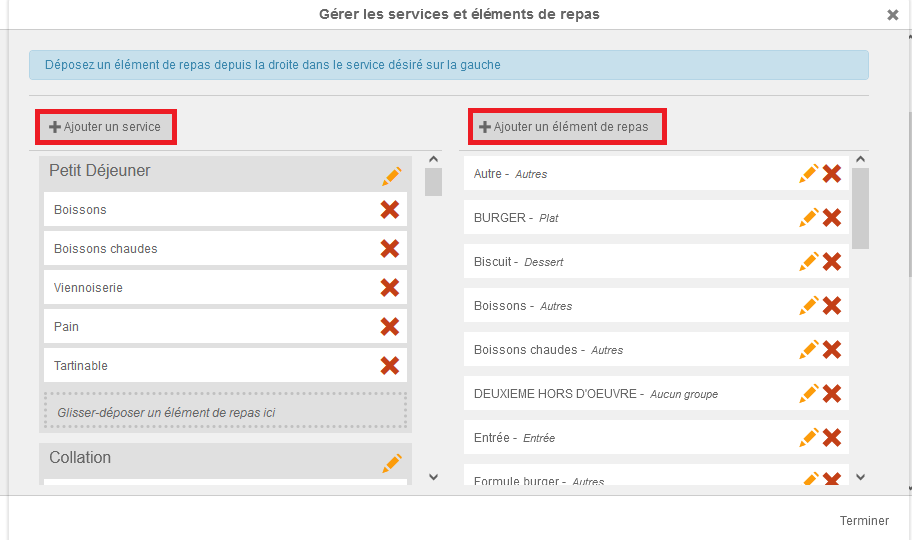
Use the "Manage services" function
The Manage services and meal items window appears on the screen. Service management is on the left side of the window, meal item management is on the right side.
Select "Add a service" or "Add a meal item" to create a new one. You can create a meal item by adding it to a meal item group.
Note: it is not possible to delete a service, you can only rename it.
Drag and drop meal items into a service to configure the service and determine which meal items can be offered for use when the user chooses to add the service to their menu frame.
Note: be careful not to delete a meal item by mistake when you only want to remove it from a service composition!
Select the orange pencil to edit the name or meal item group of a meal item.
Select the red cross to permanently delete a meal item.
Note: if it was part of a service composition, you will need to update the menu frames to remove it. Deleting a meal item does not remove its use in the menu frames.
Manage nutritional families
Start from: The Easilys menu.
Nutritional families are used to build meal plans. Once completed, these meal plans can be attached to menu templates during their creation. To develop the menus of these templates, you will be prompted by Easilys to adhere to the meal plans.
Indeed, Easilys will specifically suggest recipes compatible with the nutritional families defined for each meal item in the meal plans. It is therefore important to attach your recipes to nutritional families for it to work.
Select Nutrition > Nutritional Families.
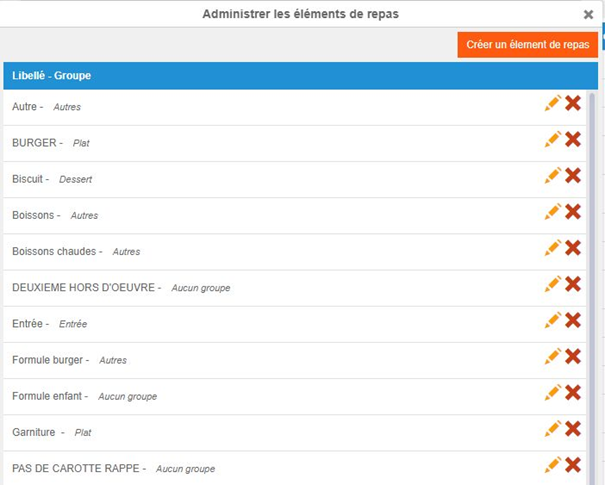
The table of nutritional families is displayed. This is the table in which you can view all existing and usable nutritional families in meal plans and recipes.
The most important information in the table is that of the Recommended meal items. This indicates the meal items in which this nutritional family can be positioned when creating a meal plan.
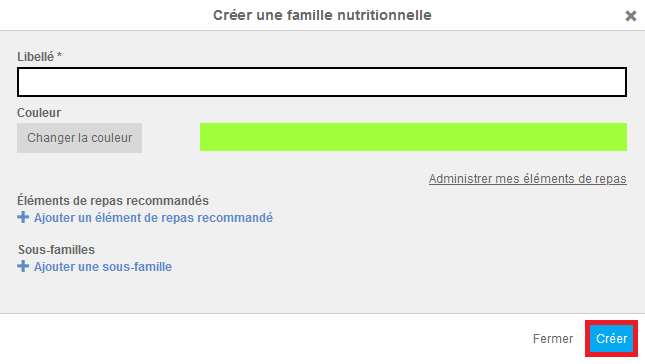
Select + Create a nutritional family.
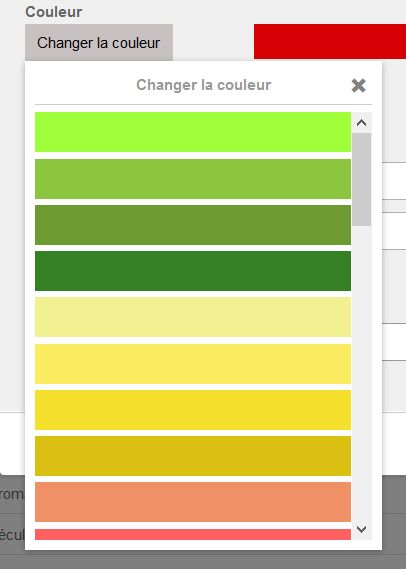
Label: enter the name of the nutritional family here.
Change color: indicate the color of the nutritional family here. The color facilitates the reading of the meal plan and allows displaying the nutritional families of each meal item in your menus using the nutritional display mode.
Recommended meal items: indicate here the recommended meal items to use the nutritional family. For reminder, meal items compose meal plans and menu templates and are attached to recipes.
Sub-families: indicate here the sub-family(ies) of the nutritional family. This is optional.
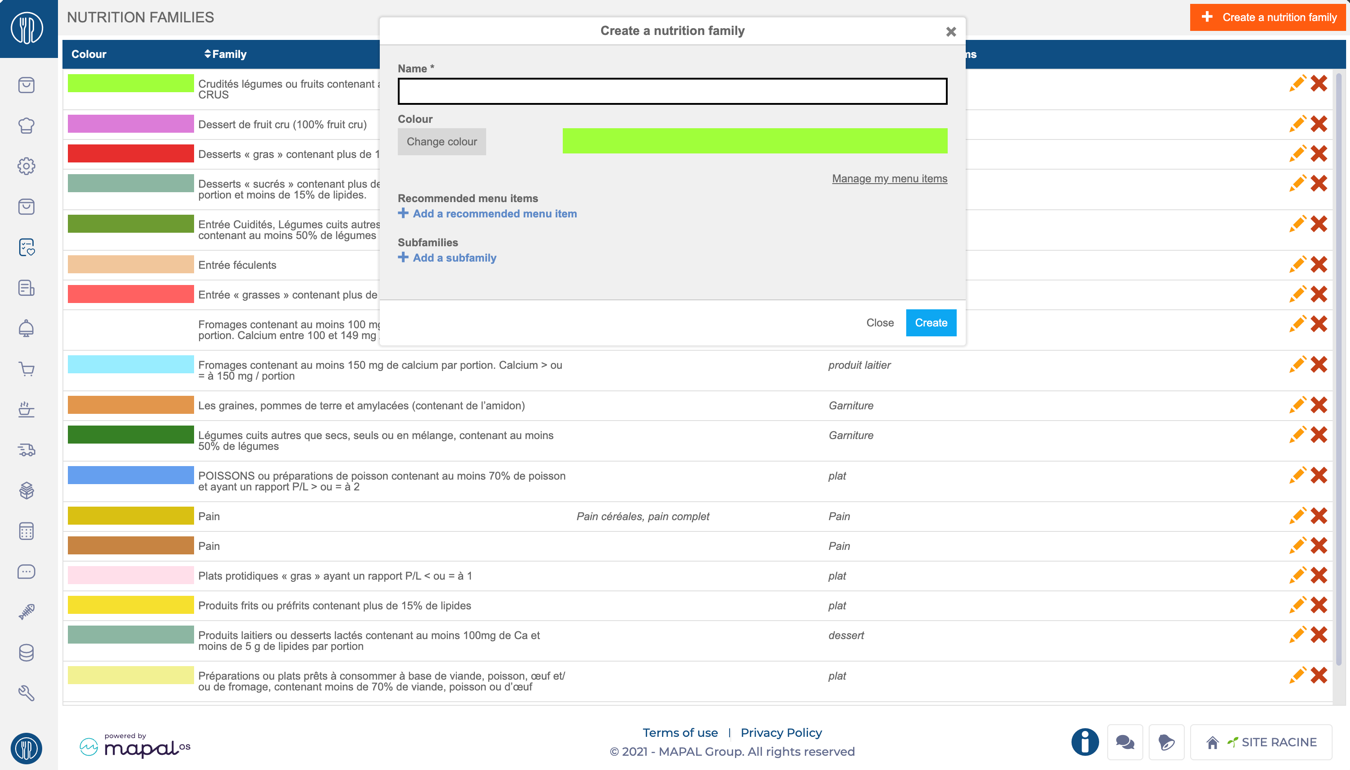
Manage my meal items: You can create, modify, or delete meal items through this window. Meal items are used in meal plans, recipes, and menus.
Select Create to validate the creation of the new nutritional family.
You will then find the new nutritional family in the table. You can then use this new nutritional family in meal plans and recipes.
To modify a nutritional family, select the orange pencil.
To delete one, select the red cross.
Note: to build a meal plan, you may need to adhere to specific nutritional recommendations such as those from GEMRCN. You can then provide the frequency constraints to be respected for a nutritional family from the Nutritional family constraints screen available from the Nutrition tab.
Create a meal plan
If your environment is configured for multiple languages, the multilingual icon
appears for some fields. For more information on how to use it, see the article
Use Easilys in multilingual mode
.
Start from: The Easilys menu.
Meal plans allow you to create menus based on them. When a menu is based on a meal plan, users, depending on their profile, are encouraged or required to select recipes that meet the nutrition families required by the meal plan.
Note: Meal plans created on a site are inherited by a child site unless the child site creates its own meal plan. In this case, the inherited meal plans disappear and are replaced only by the meal plan created by the child site.
Select the Nutrition > Meal plans tabs.
Select Create a meal plan.
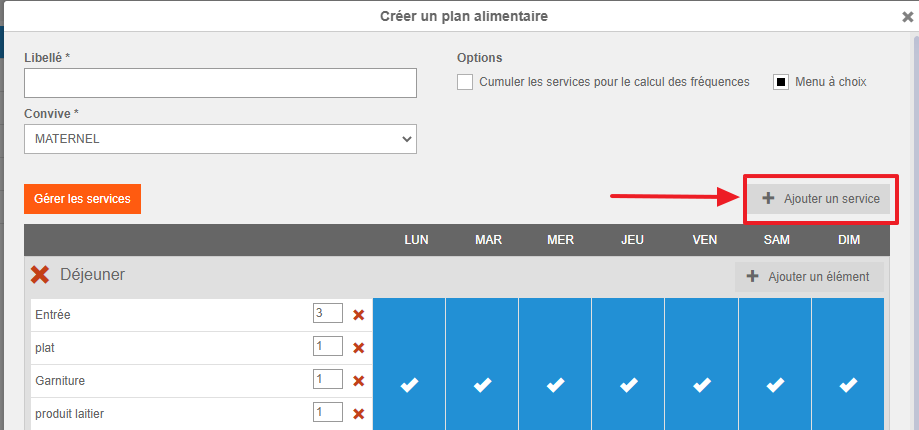
Complete the information in the "Create a meal plan" window that appears.
Label: This is the name you want to give your meal plan.
Guest: This allows you to select for which type of guest you are creating the meal plan. Example: A meal plan for children in kindergarten.
Options: "Combine services for frequency calculation": If you check this box, the displayed frequencies will take into account the sum of frequencies across different services instead of being service by service. "Choice menu": If you check this box, the frequency calculation is adjusted.
Example: If a "choice" meal plan includes 3 starters, each starter will count for 0.333 (=1/3) and not 1 as for meal plans not marked as "choice".
Select Add a service to add services. Note: Only services with recommended frequencies can be added to a meal plan. If the service you want to add is not in the list, check (in Nutrition > Constraints on nutrition families) that it has recommended frequencies.
Select Add an item to add a meal item to the added service.
Note: If you want to add a service or item that is not in the list, you can (from the root site only) create it from this screen using the "Manage services" function. Refer to the article Manage the list of meal items and services for more information on this feature.
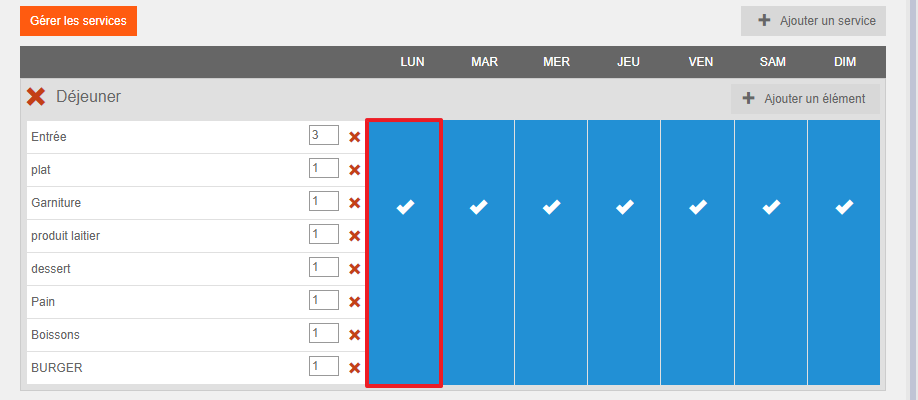
You can select the boxes for the days of the week to enable or disable the service for the selected day.
You can delete unwanted services or meal items by selecting the red cross.
You can indicate the number of proposals for the meal item in the box next to the meal item.
Example: Enter 3 if you offer a choice of three different starters.
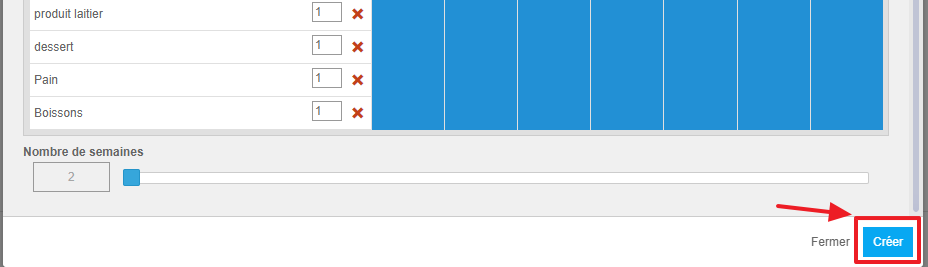
Indicate under the table of services and meal items the number of weeks the meal plan should cover. Simply drag the slider on the line.
Select Create at the bottom of the creation form.
The meal plan is created, you can now complete it as indicated in the article Complete a meal plan.
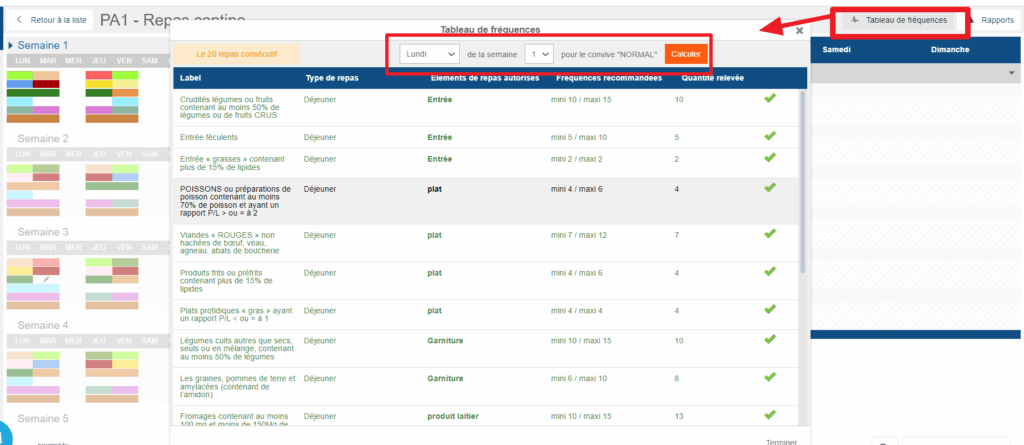
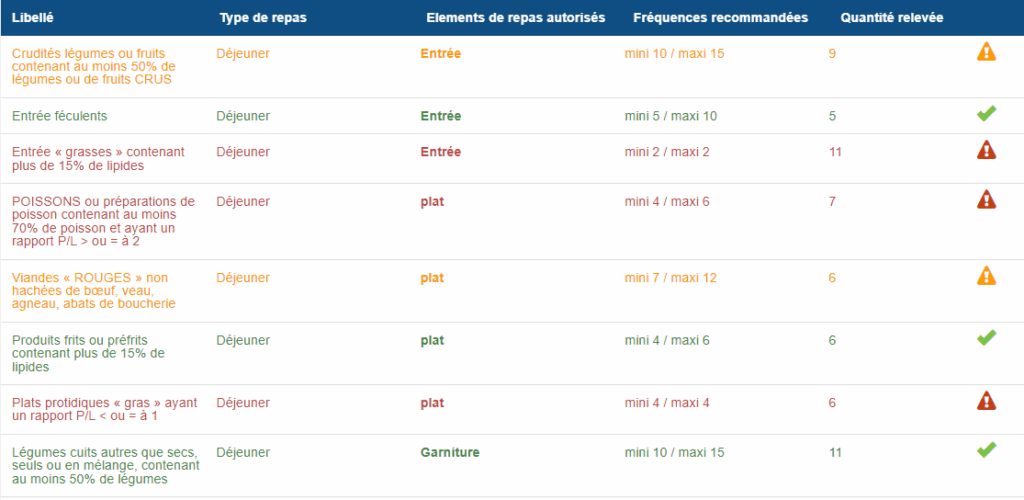
Understanding and using the meal plan frequency table
Note: Every action that can be performed in the application is subject to access permissions. If you are unable to perform the recommended actions in the articles you consult, it may mean that the necessary permissions are not enabled for your user profile. Contact the Support team or your administrator to learn more.
Start from: The Easilys menu.
The meal plan frequency table allows you to check if the plan complies with the frequencies recommended by the GEMRCN.
The GEMRCN “Groupement d’Étude des Marchés en Restauration Collective et de Nutrition” has, since its first version in 1999, been a practical guide concerning the nutritional quality of meals served in social collective catering.
Edit if necessary the day on which the frequency analysis should be focused.
Example: In a meal plan with 7-day weeks, 2 meals over 6 weeks, and an analysis period of 20 meals, if you select "Monday week 1", then the analysis will take into account the nutrition families positioned from Wednesday of week six to Friday of week 1. This means that the plan may be correct on Monday of the first week of your plan, but incorrect on Saturday of the second week since the calculation is different. It is therefore important to check on different days of the meal plan to cover it entirely.
The frequency analysis table alerts you to discrepancies between the frequencies you have indicated as recommended and the displayed meal plan, indicating for each nutrition family whether the observed frequency is correct, insufficient, or excessive:
Note: Some nutrition families are not subject to specific frequency recommendations. This means they can be included in the meal plan as desired, as long as this does not prevent compliance with the recommended minimums and maximums for other families.
Changing the Number of Meals Considered for Frequency Analysis:
By default, the number of meals considered for frequency analysis is set to 20. If, in your operation, you want the analysis to be carried out on a different number of meals, note that it is possible to modify this for a given guest. This setting is made from the guest administration. You can access it, for example, as follows:
Select the Nutrition > Constraints on nutrition families tabs.
Select Create to open the constraint creation window.
Select the gear icon on the guest's line to open guest administration.
Select the guest's pencil icon to edit.
Edit the number of meals to be considered for frequency analysis.
Select Save.
Manage dietary and nutritional constraints
If your environment is configured for multiple languages, the multilingual icon
appears for some fields. For more information on how to use it, see the article
Use Easilys in multilingual mode
.
Note: Actions on the Easilys platform depend on your user access permissions. If you cannot perform the actions below, it may be due to restrictions on your user profile. Contact the Support team or your administrator for assistance.
Start from: The Easilys menu.
Dietary and nutritional constraints
Easilys incorporates the guidelines of the GEMRCN (Groupement d’Etude des Marchés en Restauration Collective et de Nutrition), which establishes standards for collective catering. These include dietary recommendations and frequency rules to ensure balanced and healthy eating. Defining nutritional constraints in Easilys makes it easier to build meal plans and menus that comply with these recommendations.
Creating Nutrition Families
Nutritional families must be created before setting up nutritional constraints. These families group similar food types, simplifying meal planning and ensuring alignment with dietary requirements.
Navigate to Nutrition > Nutrition Families.
Click + Create a nutrition family in the top-right corner.
Fill in the required details:
Name: Assign a clear, descriptive name to the family (e.g., "Whole Grains" or "Raw Vegetables").
Colour: Choose a distinct color for visual identification.
Recommended menu items: Link the family to relevant meal elements (e.g., appetizers, main courses).
Subfamilies: For examples, "Bread" can include subfamilies like "Whole Wheat Bread" or "Multigrain Bread."
Click Save to finalize.
Notes: Associating families with meal components ensures alignment during meal planning. For instance, "Raw Vegetables" can be tied to appetizers rather than desserts.
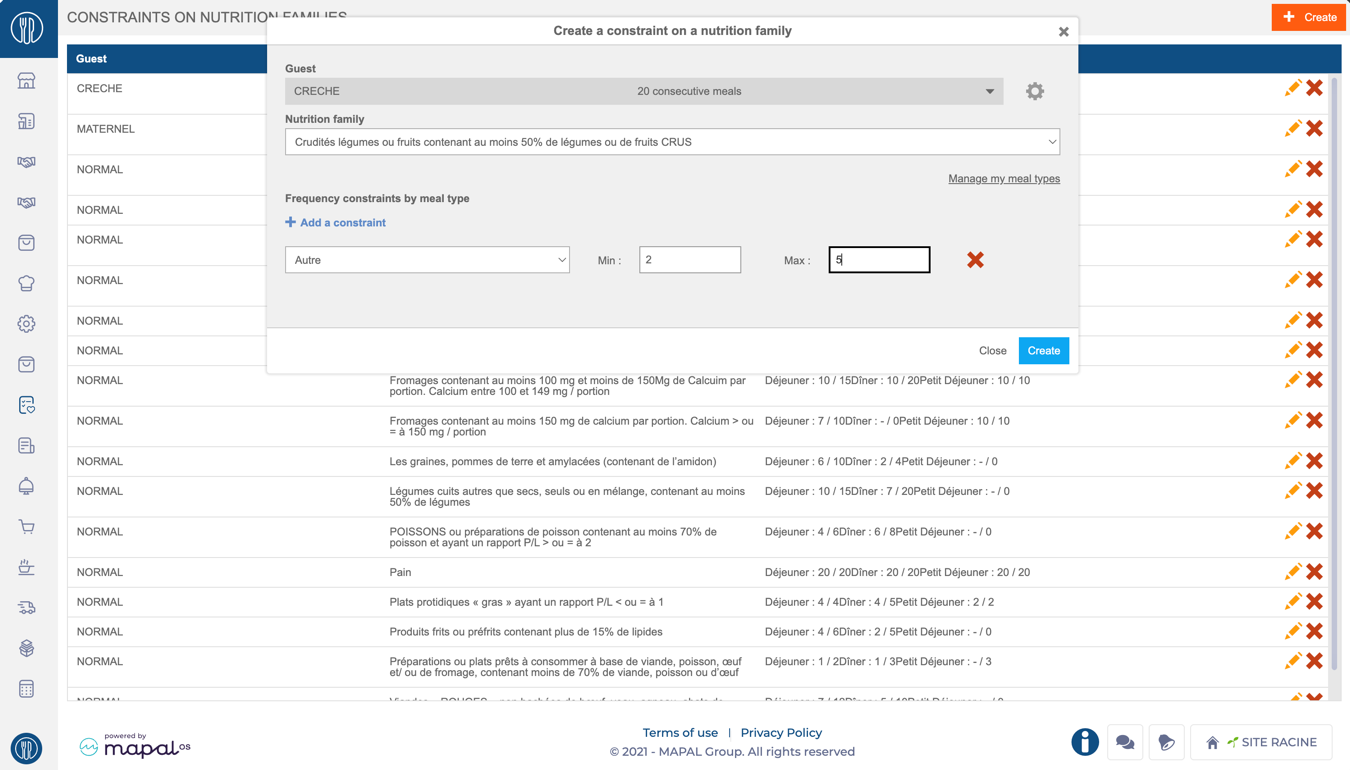
Setting constraints for Nutrition Families
The principle is to indicate for each nutrition family the minimum and maximum recommended frequency over the analysis period for a given guest and each meal. By default, the analysis period is 20 consecutive meals, but it can be modified in the guest settings.
Navigate to Nutrition > Constraints on nutrition families.
Select + Create to define a new constraint.
Complete the following fields:
Guest Type: Select the group (e.g., "Children," "Seniors"). New guests can be added or edited via the gear icon.
Nutrition Family: Choose the nutrition family to apply the constraint (e.g., "Red Meat").
Frequency constraints by meal type: Set a minimum and maximum frequency (e.g., "2-5 times") over a 20-meal cycle. Example: "Raw Vegetables" appear 2-5 times at lunch but only 1-3 times at dinner.
Select Create to confirm. The constraint will now appear on the list.
Notes: Constraints are customizable for each guest type and meal service. Alerts notify planners if meal plans fall outside defined frequency ranges.
Consideration of nutritional constraints
The nutritional constraints entered are taken into account:
When creating meal plans, to help you position the expected nutrition families in each meal component. For more details, see Complete a meal plan.
When creating menus: the frequency analysis table allows you to check whether the recipes placed in the menu comply with the recommended frequencies.Once nutrition families and constraints are created, they can be integrated into meal plans for seamless compliance with dietary requirements.
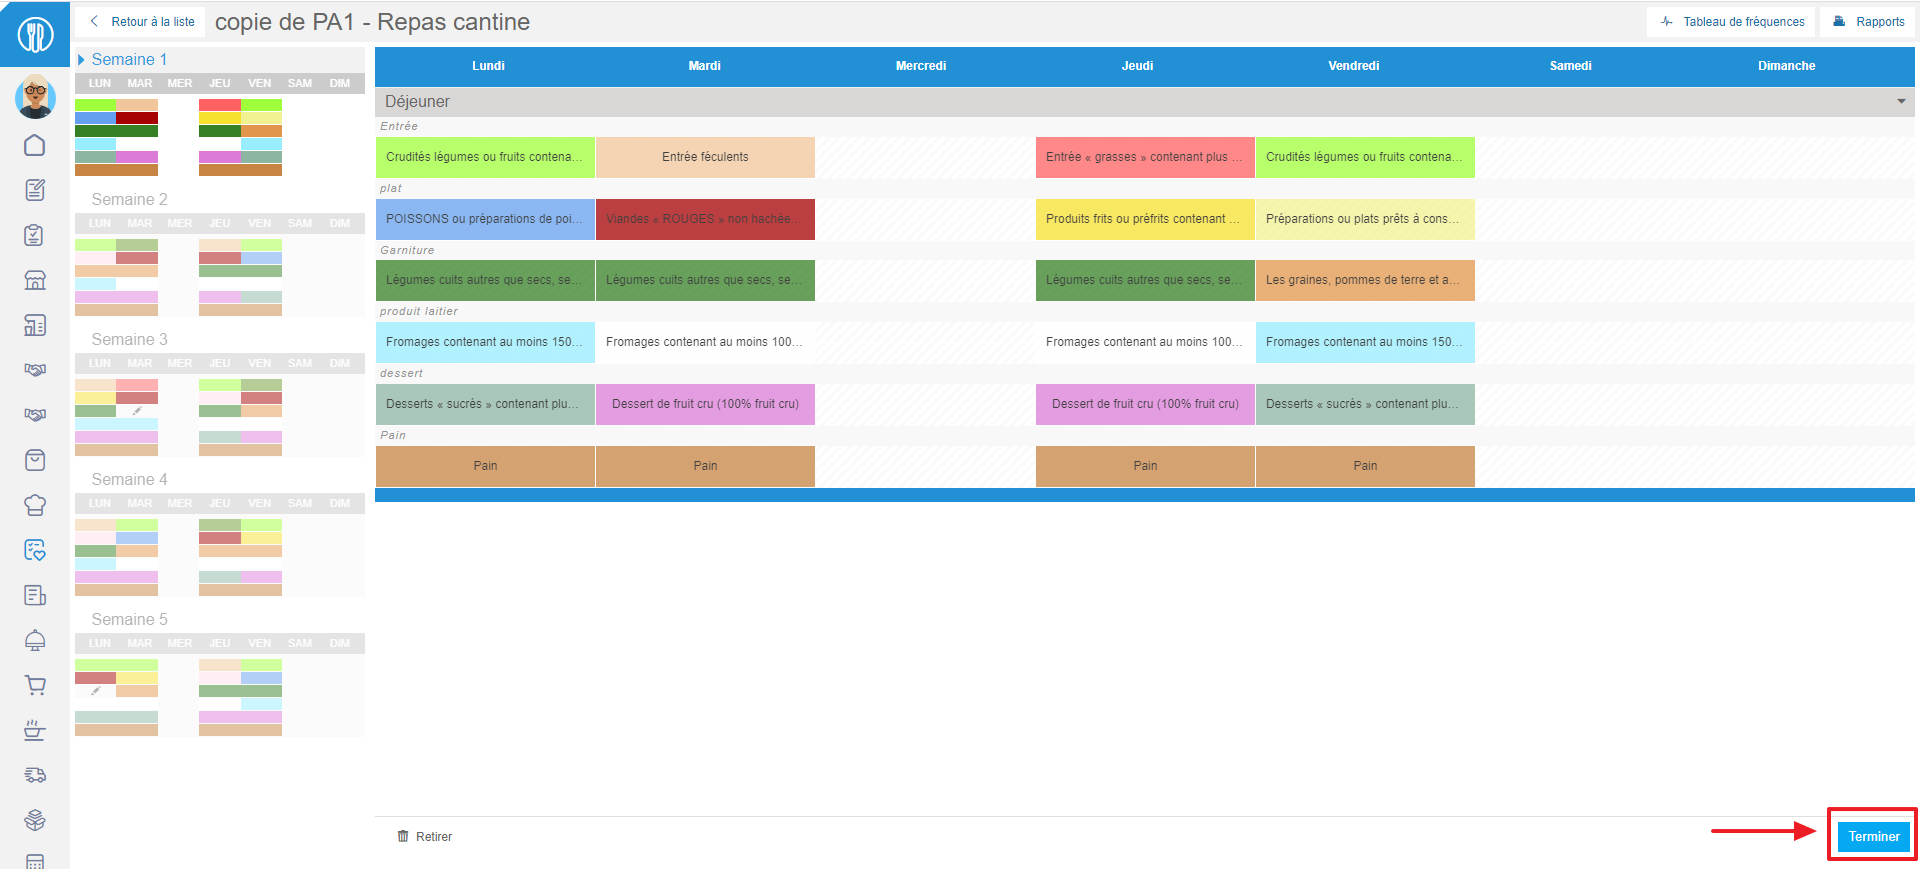
Complete a meal plan
Note: actions performed on the Easilys platform are subject to user access permissions. If you are unable to carry out the actions described in the articles, it may be because you do not have the necessary permissions activated on your user profile. Contact the Support team, or your administrator, for help.
Start from: the Easilys menu.
Select Nutrition > Meal plans from the main menu.
Select a food plan showing In progress status (or create one if you haven't already).
Select the pencil icon in an empty cell.
You can also select a completed cell.
The Nutritional families drop-down menu will appear on the screen, suggesting the nutritional families that are compatible with the meal item.
You can see the details of the nutritional family.
Remainder: this indicates the number of times the nutritional family must still appear in your plan for it to meet the standards imposed by the constraints on nutritional families (which are often those of the GEMRCN- Groupement d'Etude des Marchés en Restauration Collective et de Nutrition).
Mini: indicates the minimum number of times the nutritional family must appear in your plan to comply with the constraints imposed on nutritional families (which are often those of the GEMRCN).
Max: Indicates the maximum number of times the nutritional family must appear in your plan to comply with the constraints imposed on nutritional families (which are often those of the GEMRCN).
Currently: indicates the current number of times the nutritional family is found in the plan.
Note: to return to the food plans list, select Back to the list. Bear in mind that food plans are rolling. This means the application checks that your meal plan complies with the GEMRCN, always analysing the ten days before and the ten days after.
Select Frequency table to check that the meal plan is correct.
Select Finish once the meal plan has been completed.
Please note that once a meal plan has been set to Completed status, it cannot be subsequently modified.
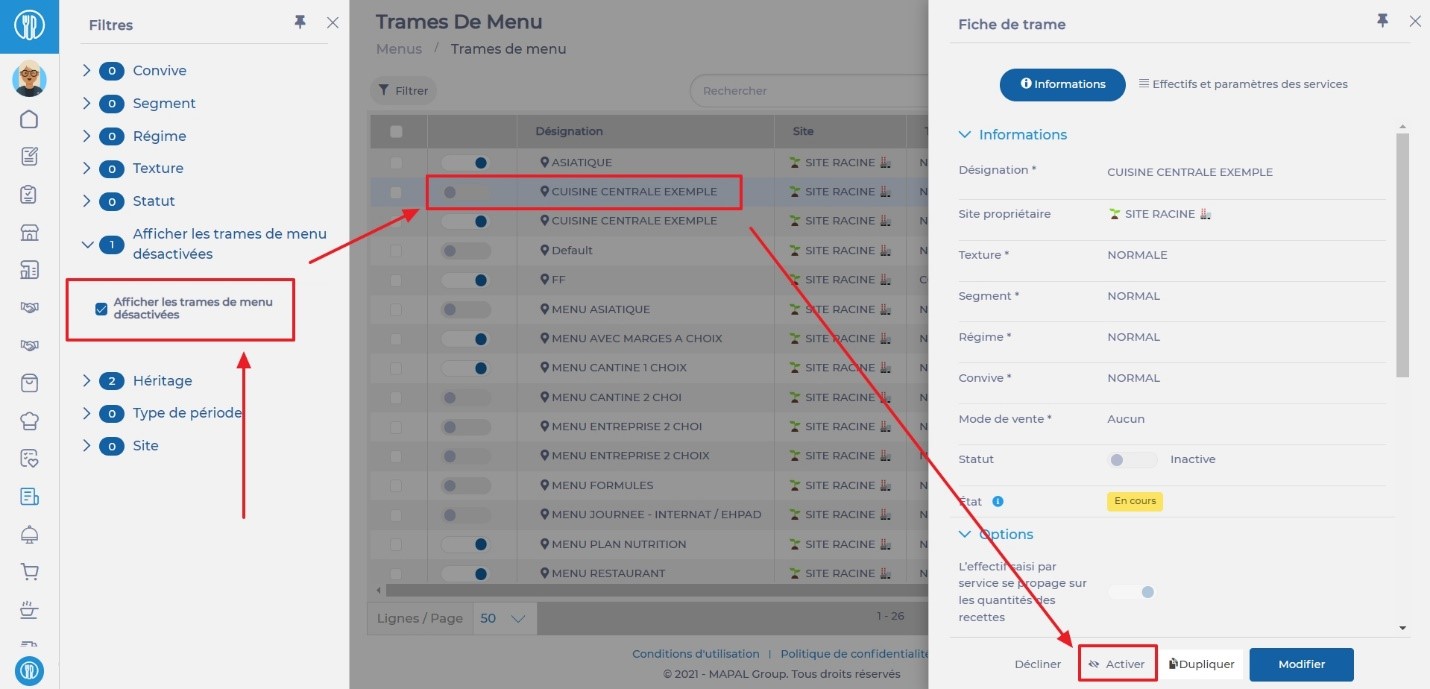
Reactivate a deactivated menu template
Note: actions performed on the Easilys platform are subject to user access permissions. If you are unable to carry out the actions described in the articles, it may be because you do not have the necessary permissions activated on your user profile. Contact the Support team, or your administrator, for help.
Start from: The Easilys menu.
Select the Menus > Menu templates tabs.
Select the "Display the disabled menu templates" filter.
Check the "Display the disabled menu templates" option for this filter.
Select the inactive menu template you wish to reactivate.
Select Activate in the "Template sheet".
Alternatively, you can select the toggle button next to the name of the menu template you wish to reactivate.