By validating a delivery receipt, you enter into stock all the products it contained, in the quantities specified.
A delivery receipt is automatically generated when you send an order from the "Supplier orders" screen, regardless of the sending method chosen. It contains all the products present on the purchase order. To learn more, see the article Validate a delivery receipt.
It is also possible to generate a delivery receipt without an order directly from the "Receptions" screen.
This delivery receipt will not be linked to an order and you will need to manually indicate the products that should be found there.
Finished products planned in the menu or ordered by child sites can be added to stock from the production management screen, as indicated in the article Manage finished product stock entries with Easilys assistance. If you want to add to stock a finished product that is not planned in the menus or that is ordered by a child site, then you can do so from the Stock screen, as indicated below.
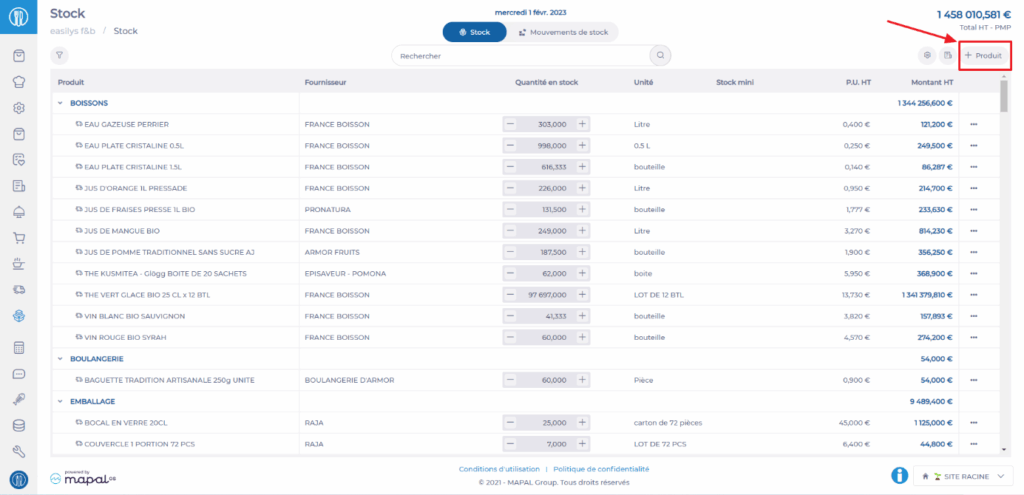
Select the tabs Stock > Stock V2.
Select +Product.
Select Finished product.
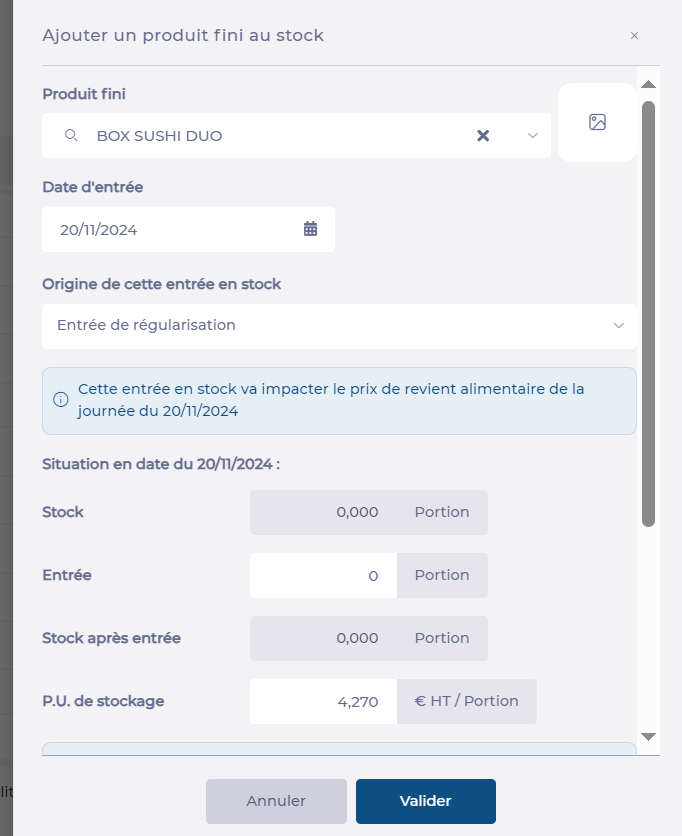
The "Add a finished product" screen appears.
Search for and select the product you want to add to stock.
Enter the stock entry date.
Enter the movement type.
You can optionally modify the unit price (note that this modification will only have an effect for this stock movement, if you want to permanently modify the unit price, go to the price list where the product is located to modify it).
Indicate the quantity to enter.
You can if necessary modify the unit price manually.
You can also ask Easilys to recalculate the price based on other calculation options. In this case:
Click on Calculation options
Select the template and the desired service for the valuation calculation
Click on Calculate. A message indicates that the price has been updated
You can add a comment if needed.
Select Validate.
The product quantity is added to stock on the selected date.
An overview of Easilys F&B
Working in institutional catering? Easilys Collective is the management software specifically designed to meet your needs. Efficiently manage your budget, menus, procurement, production, and raw material traceability while staying compliant with regulations. Whether producing on-site or in a central kitchen, using hot or cold links, Easilys adapts to your setup to help you forecast and monitor production costs, and offer optimal control of your foodservice operations.
Key features
Stock Management
Accurate tracking: Control your stock with automatic updates based on receipts, production, sales, and inventory control.
Cost control: Analyse inventory variances, manage losses and markdowns, and ensure budget compliance.
Cost Management
Profitability analysis: Identify and promote your most profitable menu items.
Recipe costing: Get accurate, real-time cost prices.
Forecast management:
In commercial catering: Use historical data to define and optimise your sales forecasts.
In institutional catering: Easily create menus that meet your budgets, legal requirements, and consumer needs.
Centralised control: View and analyse all your sites through dashboards.
Waste Management
Tracking: Precisely measure food waste.
Integrated BI tool: Analyse and highlight waste trends. Identify cost-saving opportunities.
Production Management (Adapted to Your Operations)
On-site production: Plan, streamline, and manage all your locations.
Centralised production (Commissary Kitchen or Lab): Efficiently manage centralised production for multiple distribution sites. Optimise packaging and delivery based on orders from your outlets or satellite restaurants.
Next steps
Easilys f&b by Mapal OS is an essential tool for hospitality businesses aiming to optimise their food and beverage operations. Its comprehensive features and user-friendly interface ensure efficient, sustainable, and profitable management.
Modify product information: units, labels, origins, VAT, etc.
If your environment is configured for multiple languages, the multilingual icon
appears for some fields. For more information on how to use it, see the article
Use Easilys in multilingual mode
.
Note: actions performed on the Easilys platform are subject to user access permissions. If you are unable to carry out the actions described in the articles, it may be because you do not have the necessary permissions activated on your user profile. Contact the Support team, or your administrator, for help.
Start from: The Easilys menu.
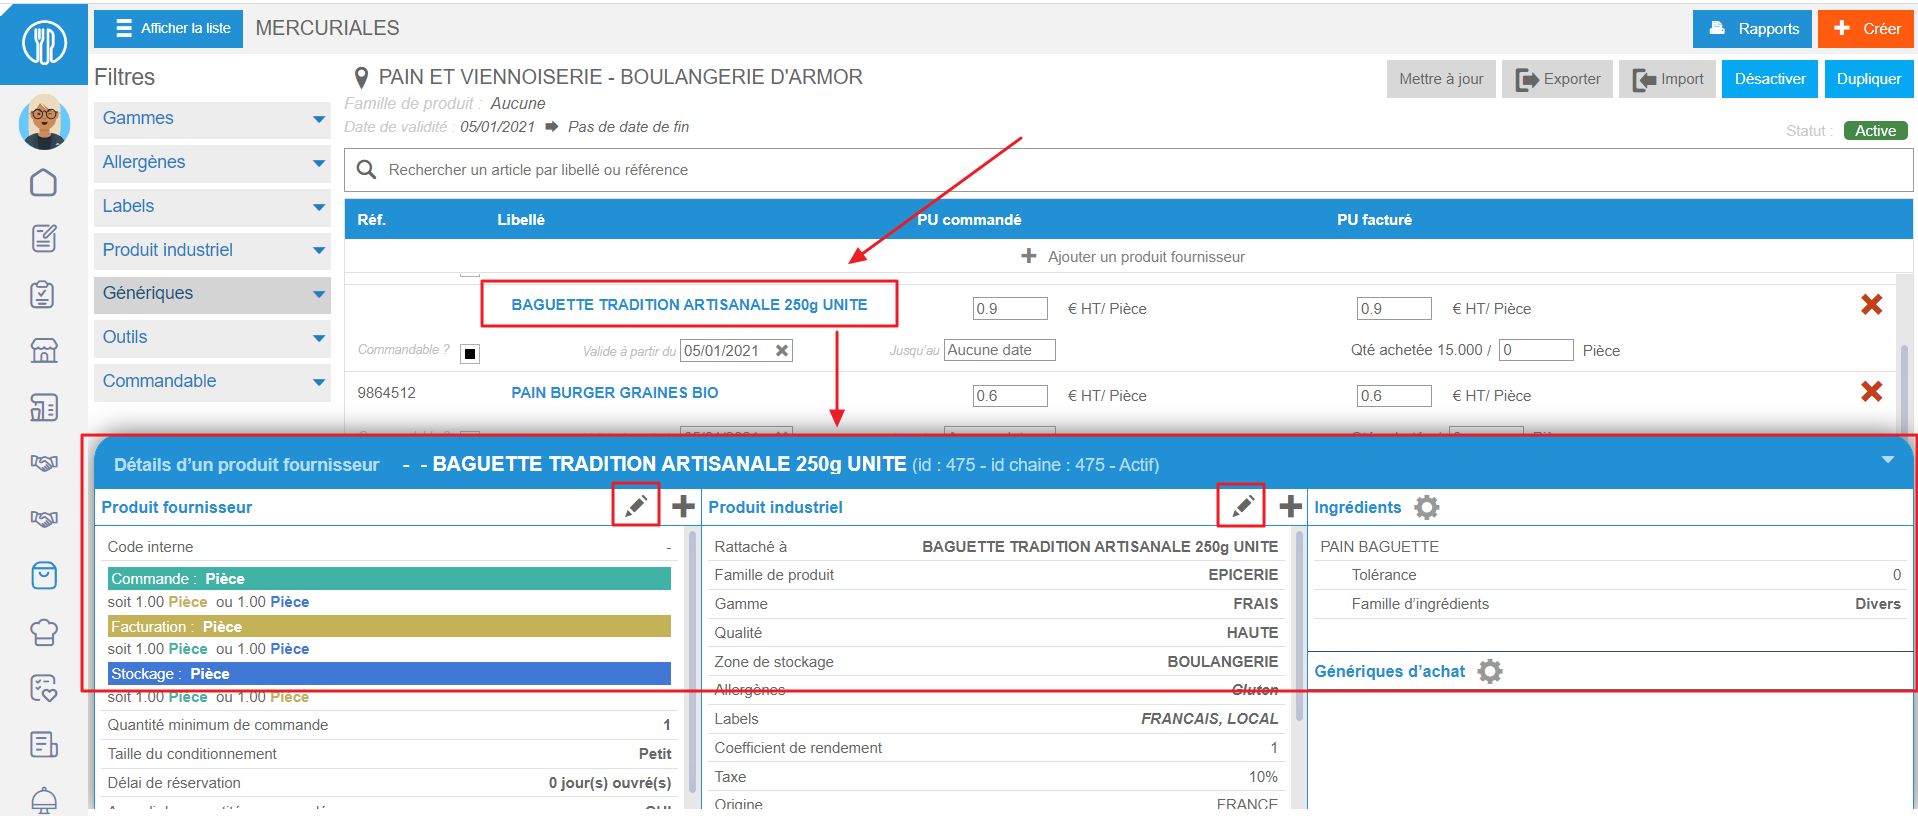
Modify product information via the "Price lists" screen
Select the Products > Price lists tabs.
Select the price list in which the product to be modified is located.
Price list details are displayed on screen.
Select the product name.
The Supplier product details panel appears at the bottom of the screen.
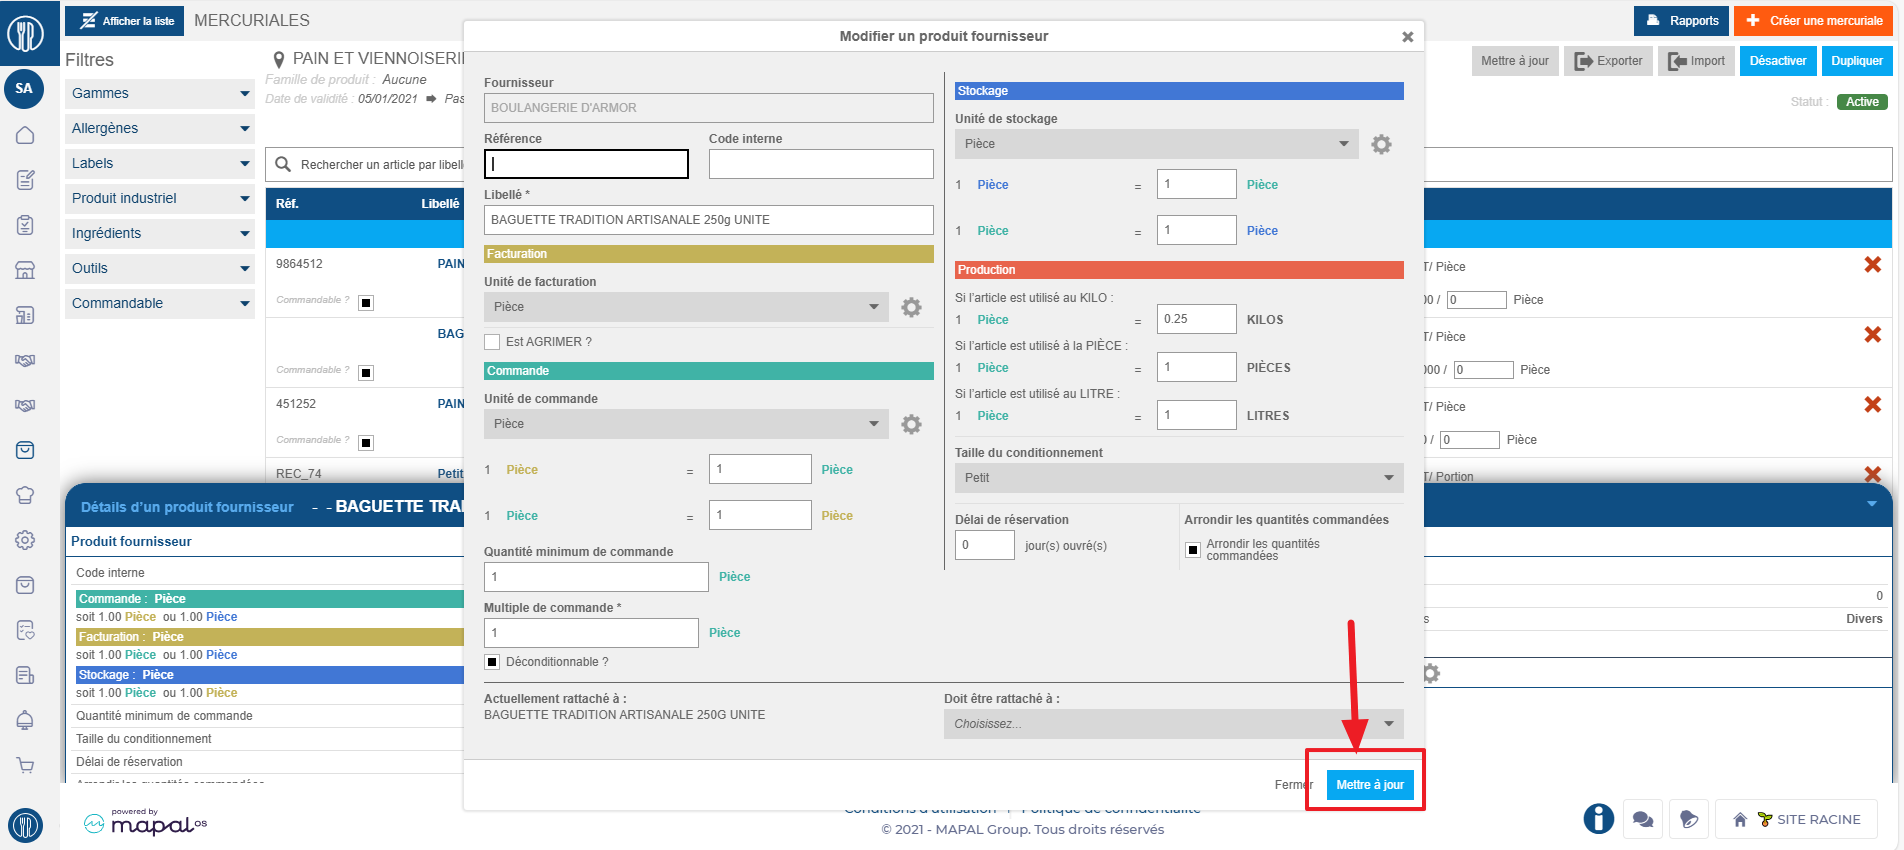
Select the pencil in the "Supplier product" column or in the "Industrial product" column to make changes.
The "Update a supplier product" or "Update an industrial product" window appears on the screen, allowing you to modify the items.
Make any necessary changes, then select Update to save your changes.
Modify product information via the "Products administration - V2" screen
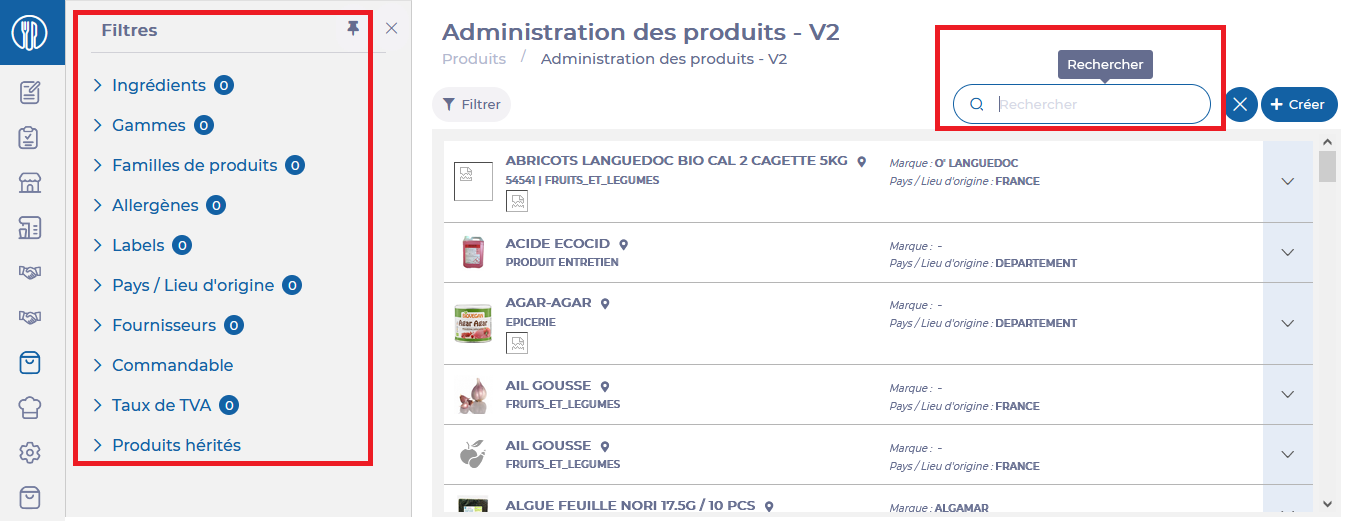
Select the Products > Products administration - V2 tabs.
Use the filters on the left and/or the search by name box to find the product you wish to modify.
Depending on the type of information you wish to modify, select:
the industrial product, to modify product characteristics that do not depend on the supplier, such as brand, allergens, origin, VAT, etc.
the supplier's product, to modify product characteristics not dependent on the supplier, such as order units, invoicing, or the supplier's reference.
Note: Every action possible in the application is subject to specific user rights. If you cannot perform the recommended actions described in the articles you read, it may mean that the necessary rights are not enabled for your user profile. Contact the Support team or your administrator for more information.
Start from: The Easilys menu.
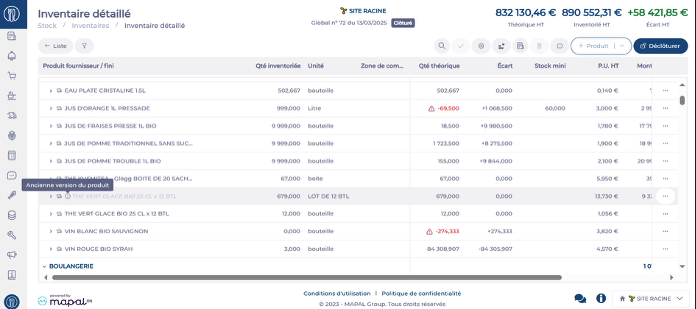
CASE 1: From the Stock screen
Navigate to Stock > Stock.
Some product lines appear in grey and italics.
Hover over the (i) icon — a message appears.
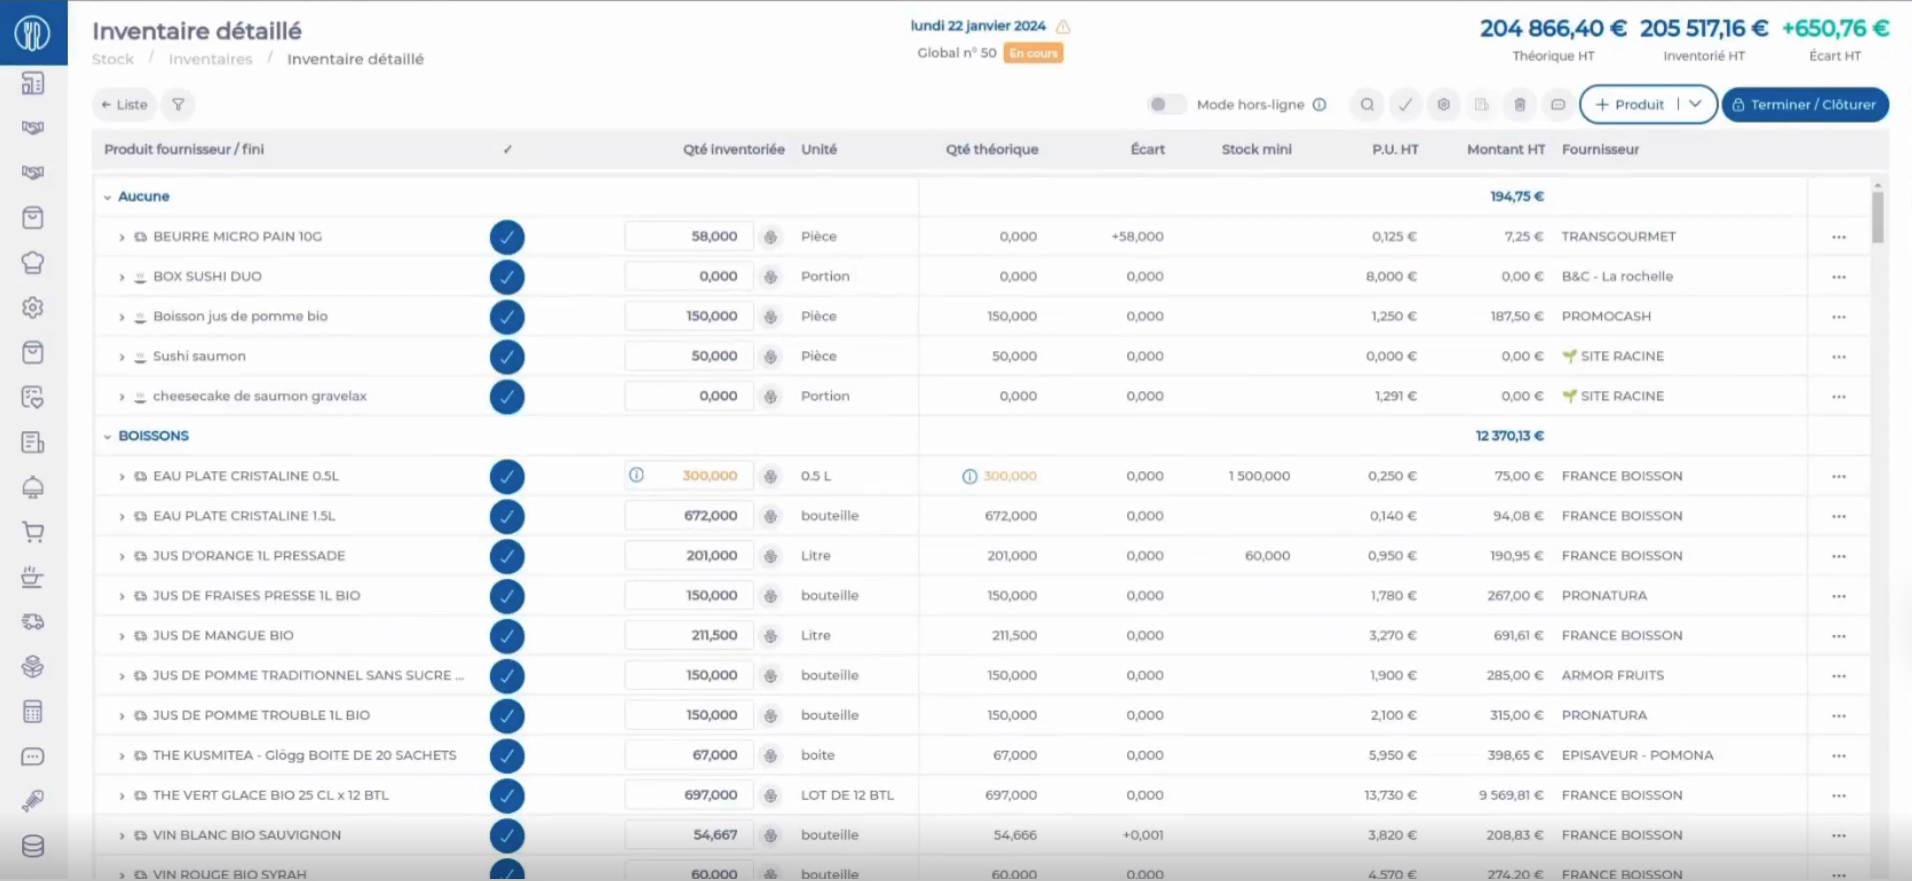
CASE 2: From the Inventory screen
Navigate to Stock > Inventories.
Select an inventory.
Some product lines appear in grey and italics.
Hover over the (i) icon — a message appears.
Explanation:
Sometimes it is necessary to change the configuration of a supplier product. For example, if you want to manage the stock of a given product by the box rather than by a lot of 12 boxes.
When you make this type of change, the quantity currently in stock will still appear in the old storage unit (this is the old version of the product), while new stock entries will be recorded in the new storage unit (the new version of the product, which appears in black).
Being able to distinguish, in stock and inventory, items in their old version (inactive items) from active items allows you to adjust your quantities on each line with full transparency. Usually, during an inventory, if there are inactive products, it is best to adjust their quantity to 0 and update the stock value on the active version of the product. This is because all future purchases will be added to this active version.
This way, you will have only one line for each product in stock, ensuring clear and efficient management.
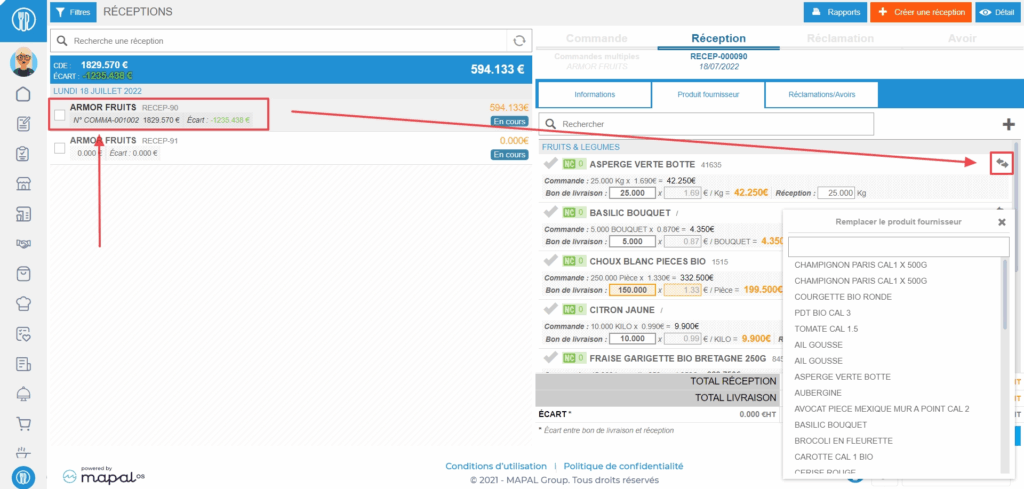
Replace a product with another in a reception
Note: Every action that can be performed in the application is subject to access permissions. If you cannot perform the recommended actions in the articles you consult, it may mean that the necessary permissions are not enabled for your user profile. Contact the Support team, or your administrator, to learn more.
Start from: The Easilys menu.
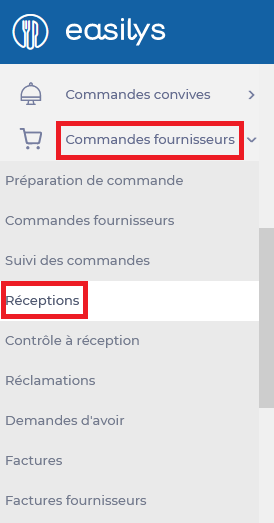
Select the Supplier Orders > Receptions tabs.
Select the reception in which you want to substitute one product for another.
If the reception is already validated, you can no longer modify it without reopening it first. Refer to the article REOPEN A COMPLETED RECEPTION for more information on reopening a completed reception.
Select the double arrow button to the right of the product name you want to replace with another.
The list of products available from the supplier is displayed.
Select the product that should replace the first one.
Fill in the delivered quantity, price, and received quantity.
Select Save now.
This method applies to products present in the original purchase order for the reception. If the product was not on the purchase order and was added manually, you can select the red cross to remove it and add another in its place.
Print inventory analysis reports (Inventories V2)
Start from: the Easilys menu.
Navigate to Stock > Inventories.
Select Reports.
Select the desired report:
Specify format and any options (different depending on the report chosen).
Select Generate.
You can obtain six different reports:
Latest inventory by site, broken down by analytical group: for each site, the amount of the last inventory for the selected period, broken down by analytical group. The layout of this report is designed for printing as a PDF, but it can also be run as a spreadsheet if required.
Latest inventory by site, broken down by analytical group (spreadsheet), which shows for each site the amount of the last inventory for the selected period, broken down by analytical group. The data is displayed in tables, allowing you to filter and sort.
Latest inventory by site, broken down by storage area, which gives the amount of the last inventory for each site in the selected period, broken down by storage area. The layout of this report is designed for printing as a PDF, but it can also be run as a spreadsheet if required.
Latest inventory by site, broken down by storage area (spreadsheet), which gives the amount of the last inventory for each site in the selected period, broken down by storage area. The data is displayed in tables, allowing you to filter and sort.
Inventory change by analytical group, which gives the accounting change for each analytical group between two inventories of the site on which you are positioned.
Inventory variance, which, for each product, gives a detailed analysis of the discrepancies between two inventories of the site on which you are positioned.
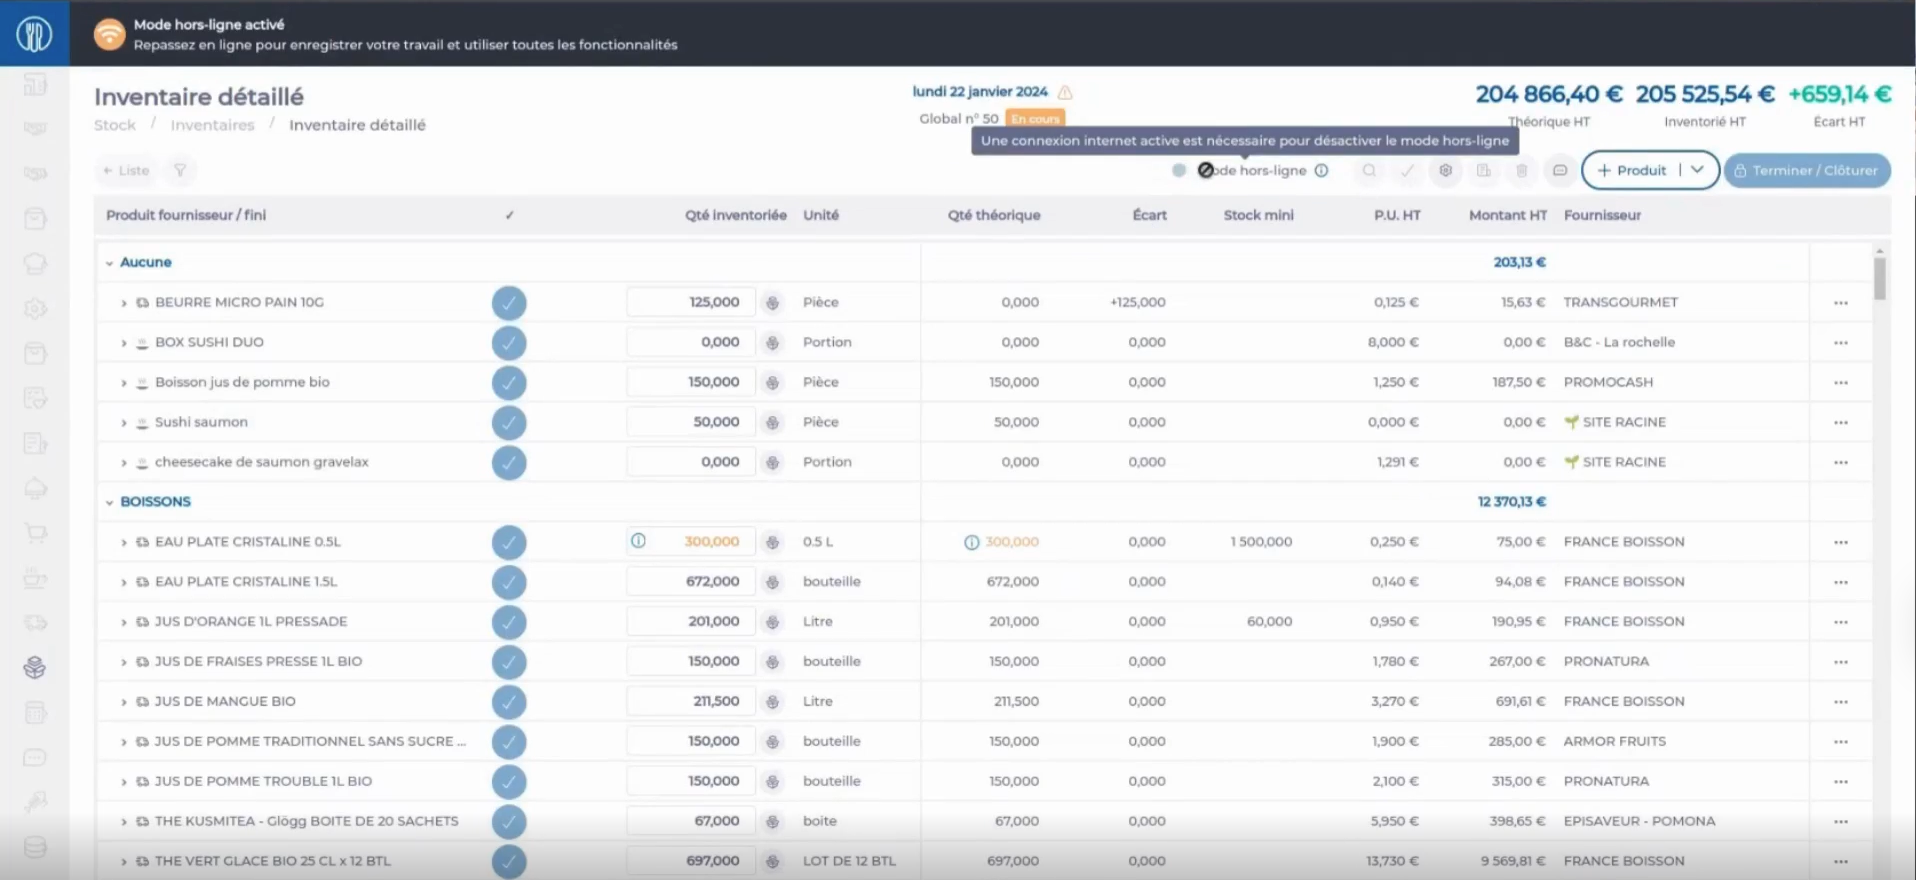
Enter inventory items while offline
Start from: The Easilys menu.
Navigate to Stock > Inventories.
In the inventory screen, you will find a feature that allows you to switch to offline mode.
Note: If this option is not available, you may not have the required permissions. Please contact your administrator or the Easilys Support team for assistance.
When online mode is enabled, the data is loaded onto the device, allowing you to move with your tablet into an area with no coverage.
While you are in a disconnected zone, the reactivation button is unavailable. A message will display indicating that an internet connection is required to deactivate offline mode.
Notes: In offline mode, navigation is restricted. The only accessible screen is the inventory screen, which will always open the detailed inventory that was previously loaded. All other parts of the platform are inaccessible.
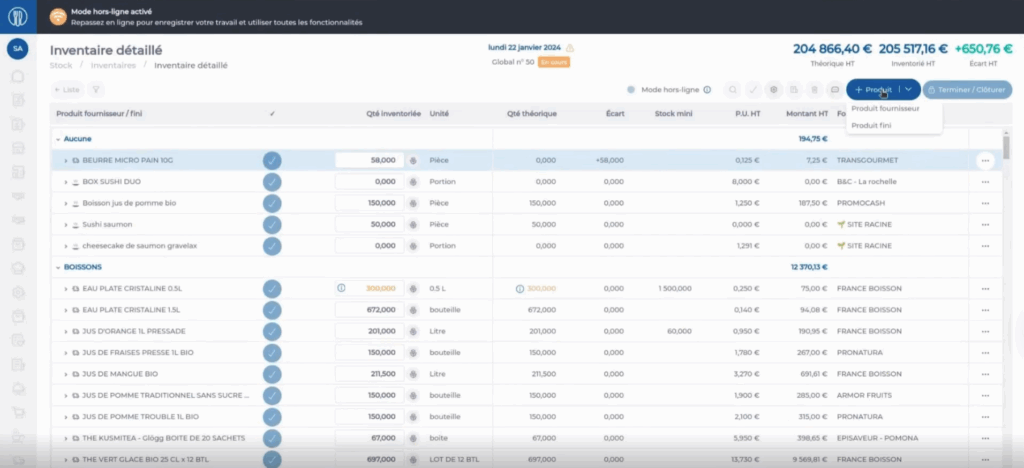
Available Inventory actions in offline mode
Modify the total recorded quantities for products
Use the New Count panel, with the available packaging options or counting zone options when enabled
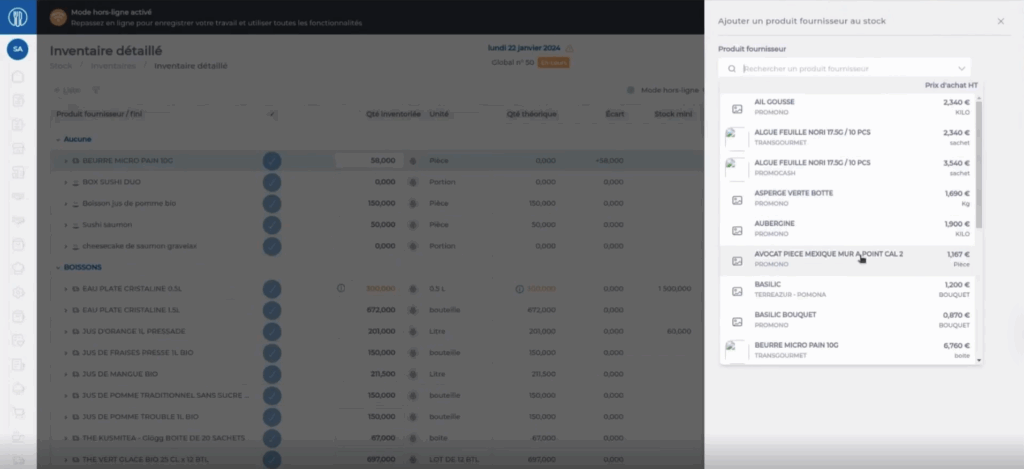
Add a product not currently in stock to the inventory using the Add a Product button. The full product list is available, and you can use the search function.
Once the internet connection is restored, the reactivation button becomes available again. By clicking it, your changes will be synchronised with the online inventory screen.
Notes: If you close Easilys while in offline mode, do not worry. Reopening the application will bring up the inventory screen again. For convenience, you can also install Easilys directly on your tablet for quicker access.
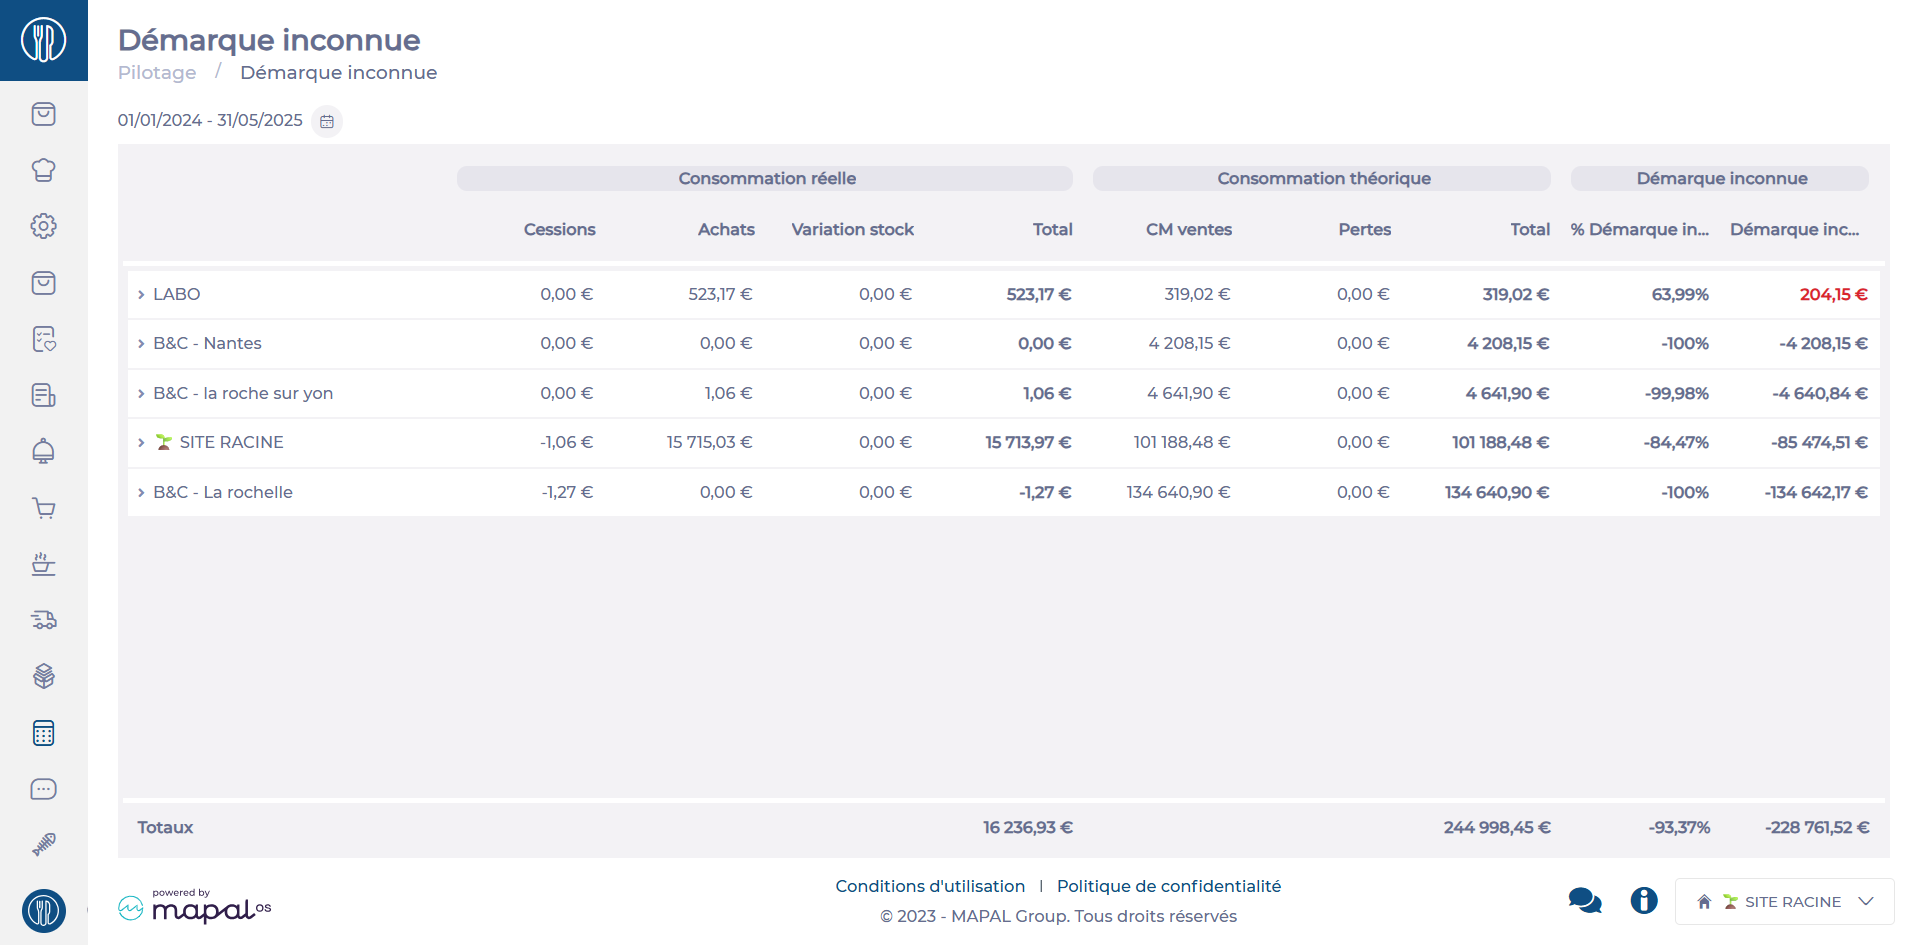
Manage shrinkage in the inventory
Start from: The Easilys menu.
Navigate to Management > Shrinkage.
This feature is particularly useful for:
Identifying high-loss points: Detect sales points with significant losses that may indicate theft, management errors, or inefficiencies.
Comparing performance: Compare inventory shrinkage between centers to identify trends or areas for improvement.
Prioritizing corrective actions: Focus efforts on problem areas and implement tailored solutions, such as strengthening controls or training teams.
Interpreting Shrinkage Rates
Very high rate
A very high shrinkage rate signals a serious issue, which could be caused by:
Inventory errors or unreported spoilage/losses.
Internal or external theft.
System management problems (e.g., software misconfiguration or supplier delivery discrepancies).
High rate
A shrinkage rate that is still significant but less critical. It may indicate:
Small but frequent thefts.
Minor management errors.
Undeclared breakage or losses.
Negative rate
Negative shrinkage is rare but possible, indicating that physical stock exceeds theoretical stock. This may be caused by:
Errors during receipt or inventory counts.
Poorly documented returns from suppliers or customers.
Low rate
A low shrinkage rate is acceptable and reflects good management practices, such as:
Rigorous stock control.
A well-defined loss management process.
A trained and vigilant team.
Product details per site
The detailed breakdown of shrinkage per center provides a list of products contributing to inventory losses. This helps:
Identify causes: Detect thefts, breakage, or other issues.
Prioritize corrective actions: Focus on addressing losses for sensitive items.
Optimize purchases and stock: Avoid overstocking or unsold products.
Monitor trends and anomalies: Respond quickly to unusual patterns or events.
Manage products within Product Administration
If your environment is configured for multiple languages, the multilingual icon
appears for some fields. For more information on how to use it, see the article
Use Easilys in multilingual mode
.
Note: Actions on the Easilys platform depend on your user access permissions. If you cannot perform the actions below, it may be due to restrictions on your user profile. Contact the Support team or your administrator for assistance.
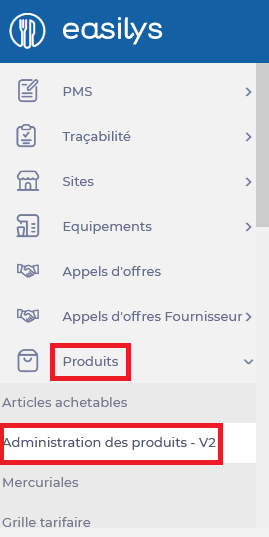
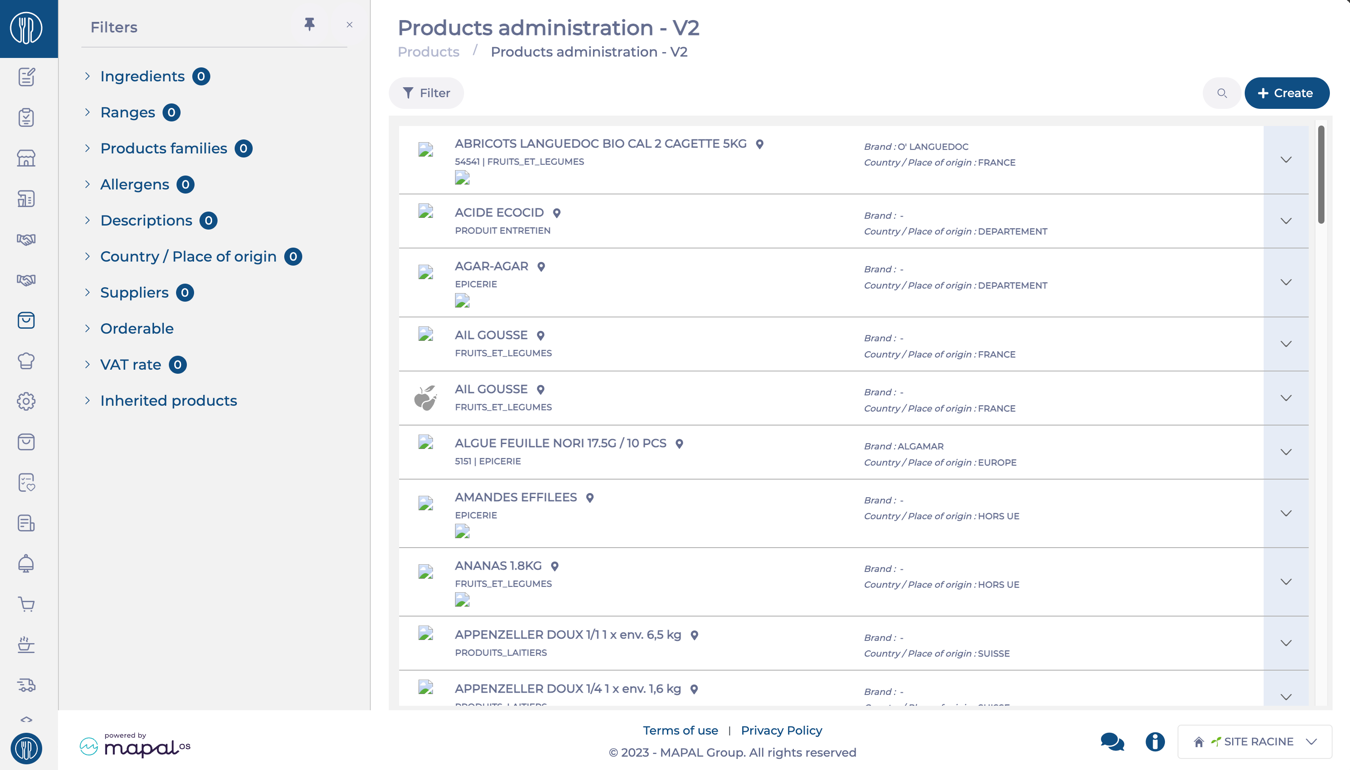
Start from: The Easilys menu.
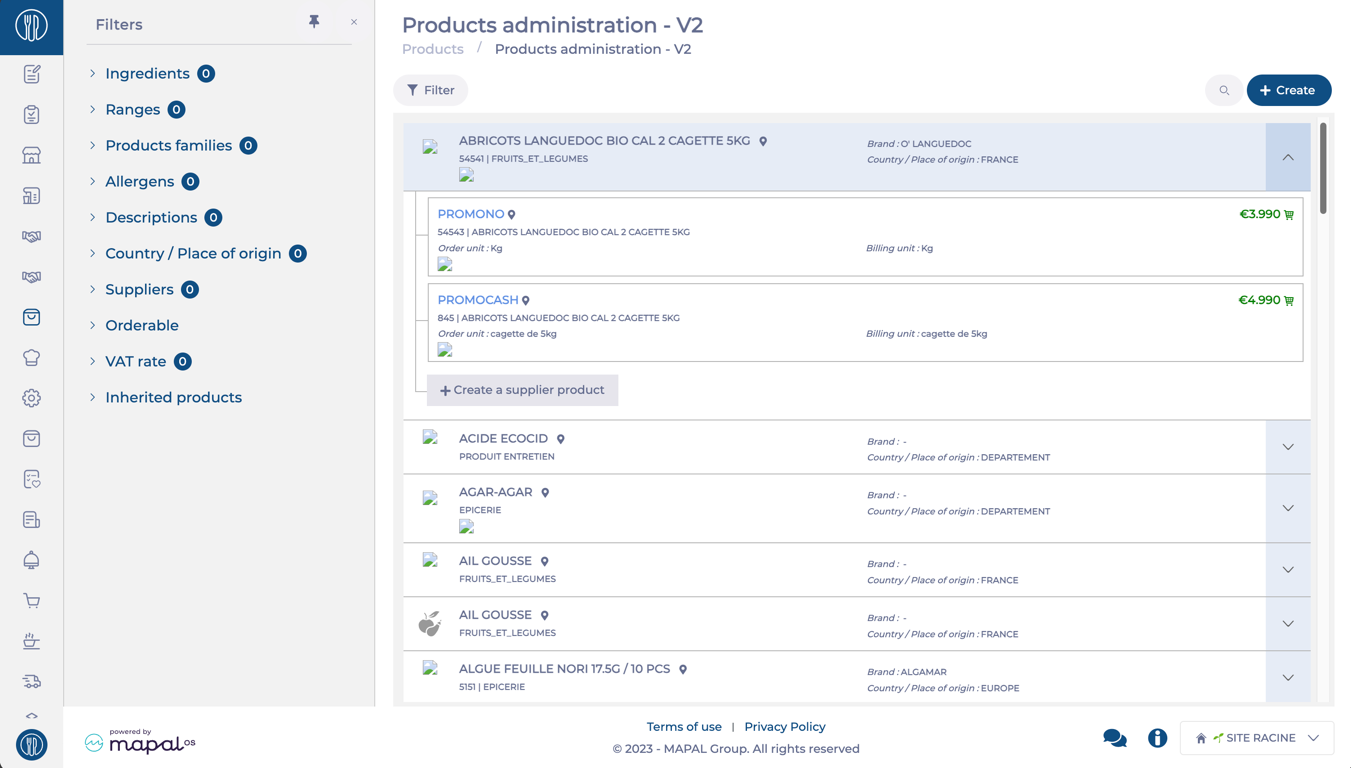
Navigate to Products > Products administration – V2.
The V2 Product Administration Screen offers enhanced functionality for managing industrial and supplier products.
The main grid shows you a list with all the available industrial products.
Create Industrial Products
Select the + Create button.
Enter the required product details.
Note: Industrial products can be created without linking them to supplier products or price lists.
Select Save to complete the creation process.
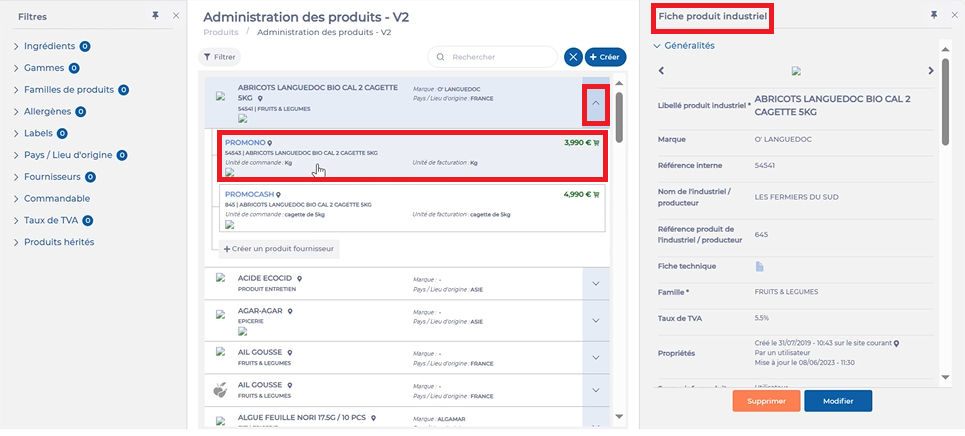
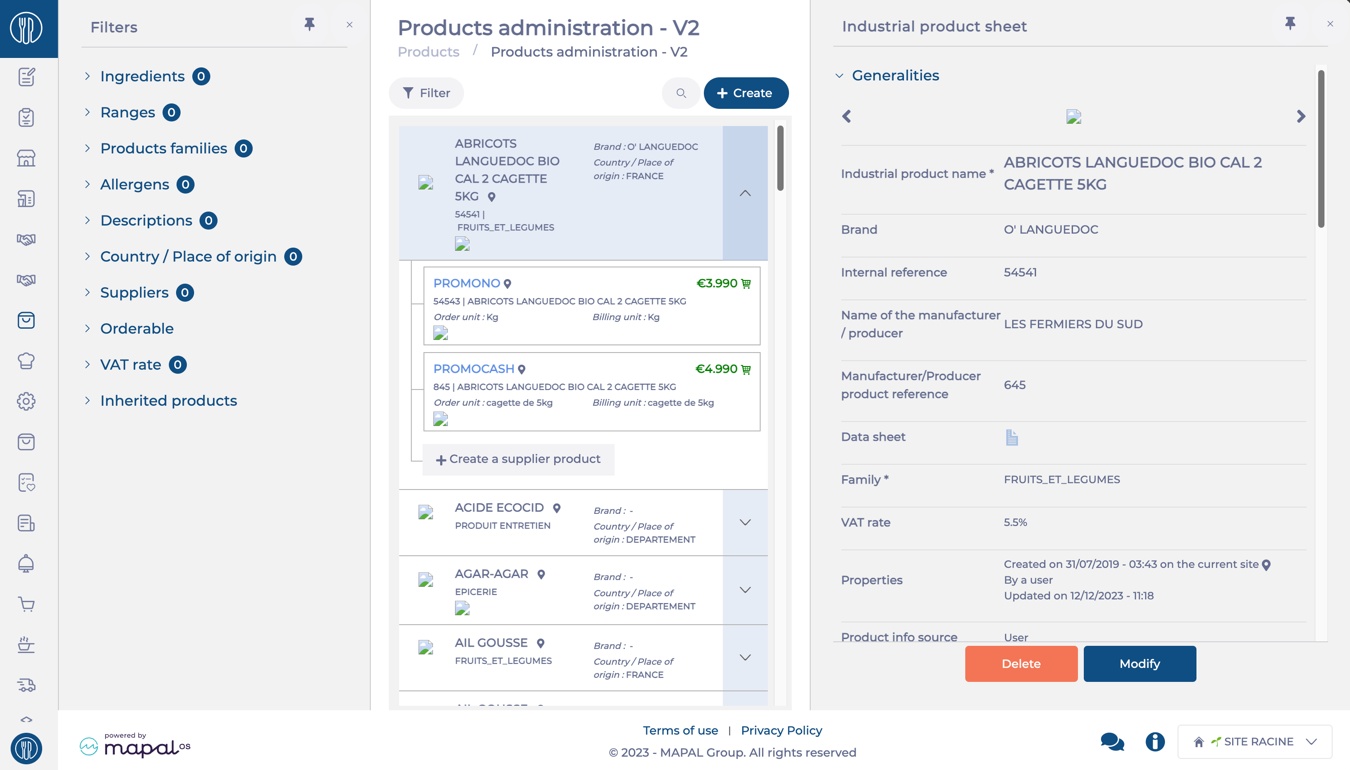
View Industrial Product Details
Select an industrial product from the list.
Here, you can view details like:
Product information: Name, description, and characteristics.
Traceability information: Creation date, user, last update details, and location.
Consumption: Efficiency ratio, weight per piece, etc.
Logistics and storage information: appropriate storage areas, packing types and codes, etc.
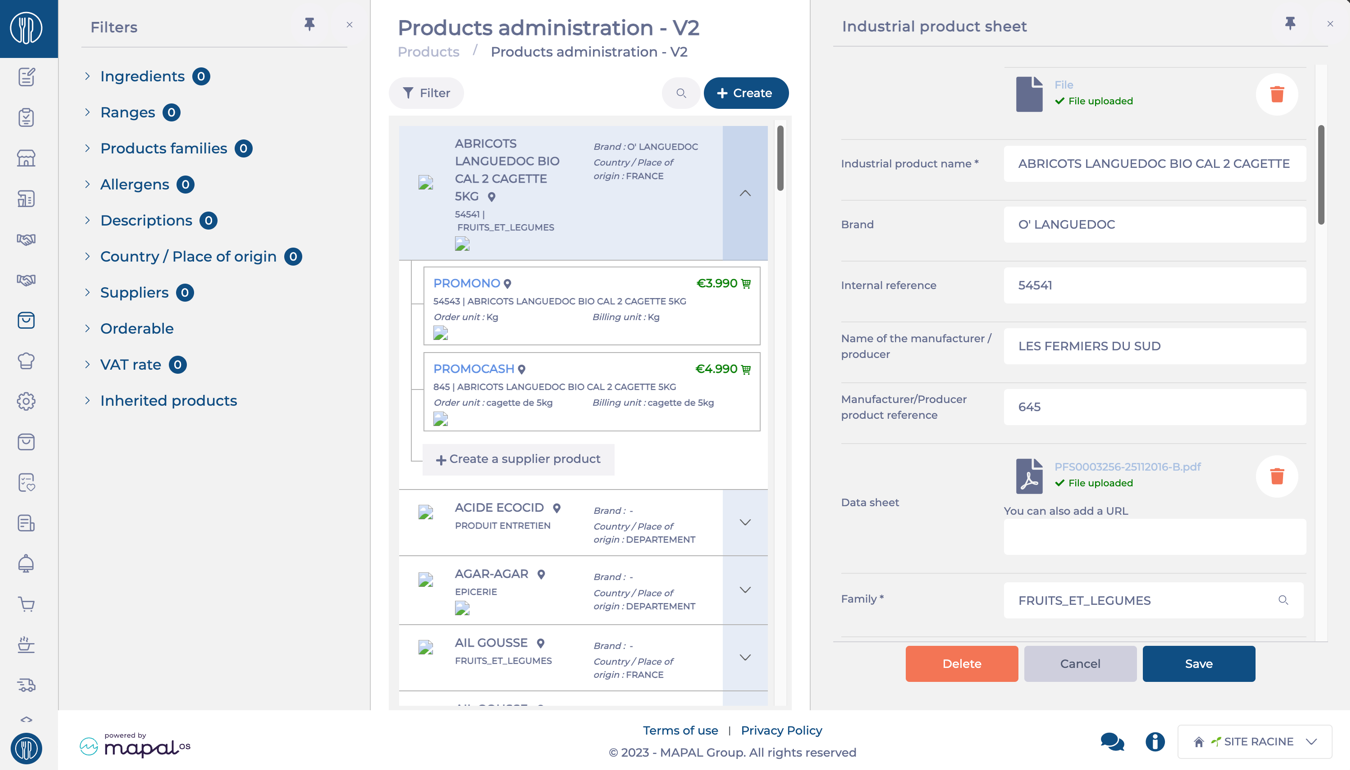
Edit an Industrial product
Select an industrial product.
Click Modify.
Edit the required fields.
Select Save to apply changes.
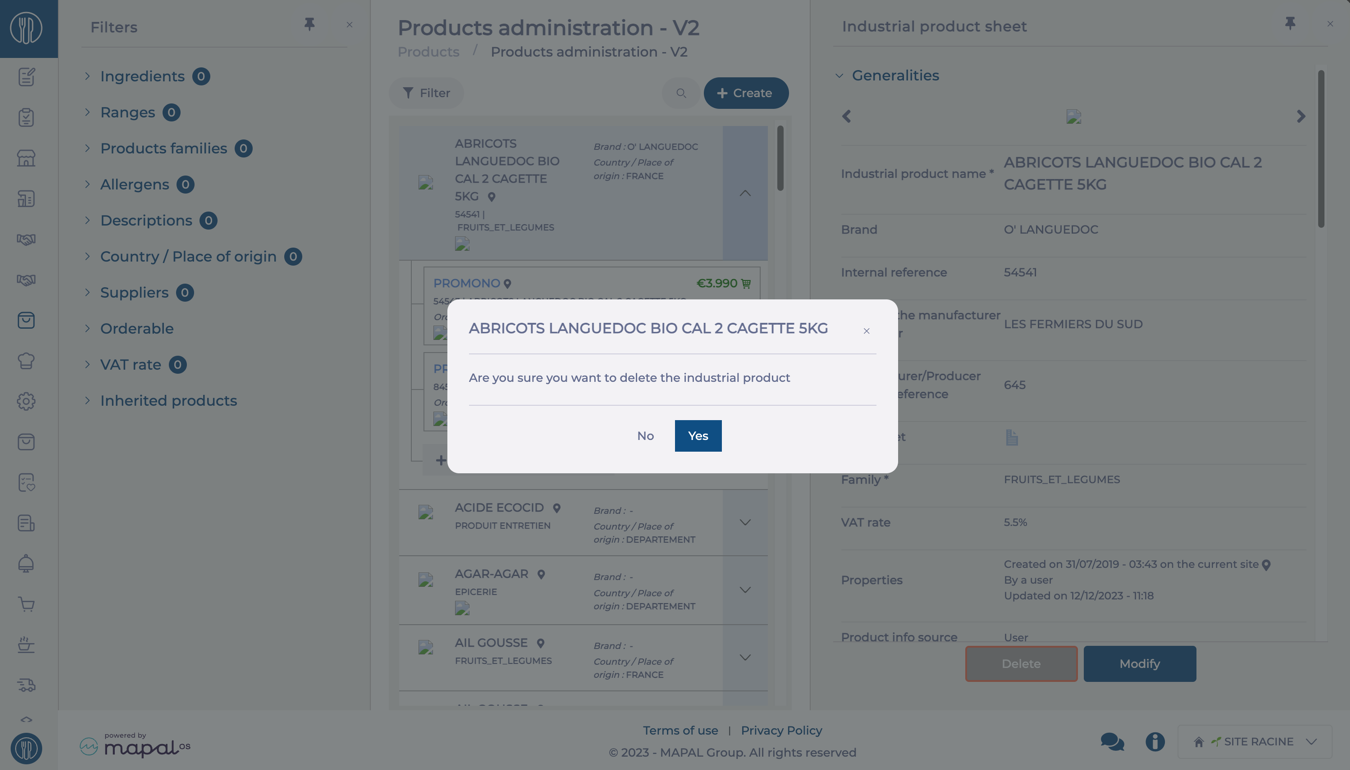
Delete Industrial product
Select an industrial product.
Click Delete.
Confirm the action by selecting Yes on the pop-up.
Supplier products
To view supplier products, first select an industrial product. Supplier details will be displayed below.
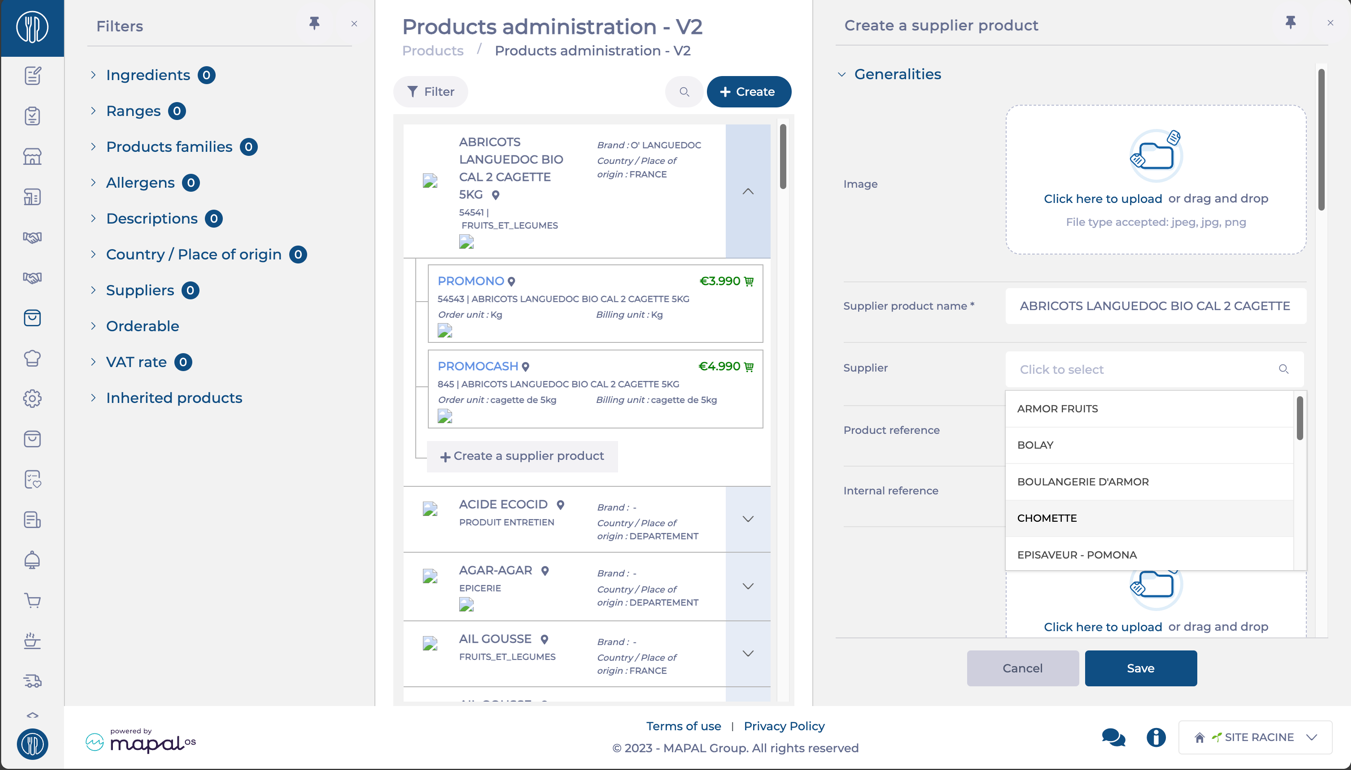
Create supplier products / Link industrial products to suppliers
Select an industrial product to view details such as potential suppliers, pricing, order, and billing units.
To create a new supplier product or link this product to a new supplier, select + Create a supplier product.
Select a Supplier from the list.
Add supplier-specific details, including price and attributes.
Select Save to finish the creation of your supplier product.
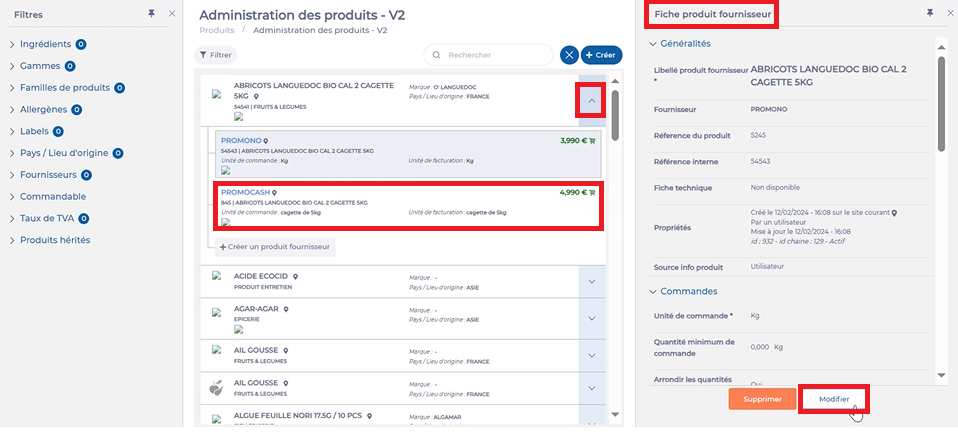
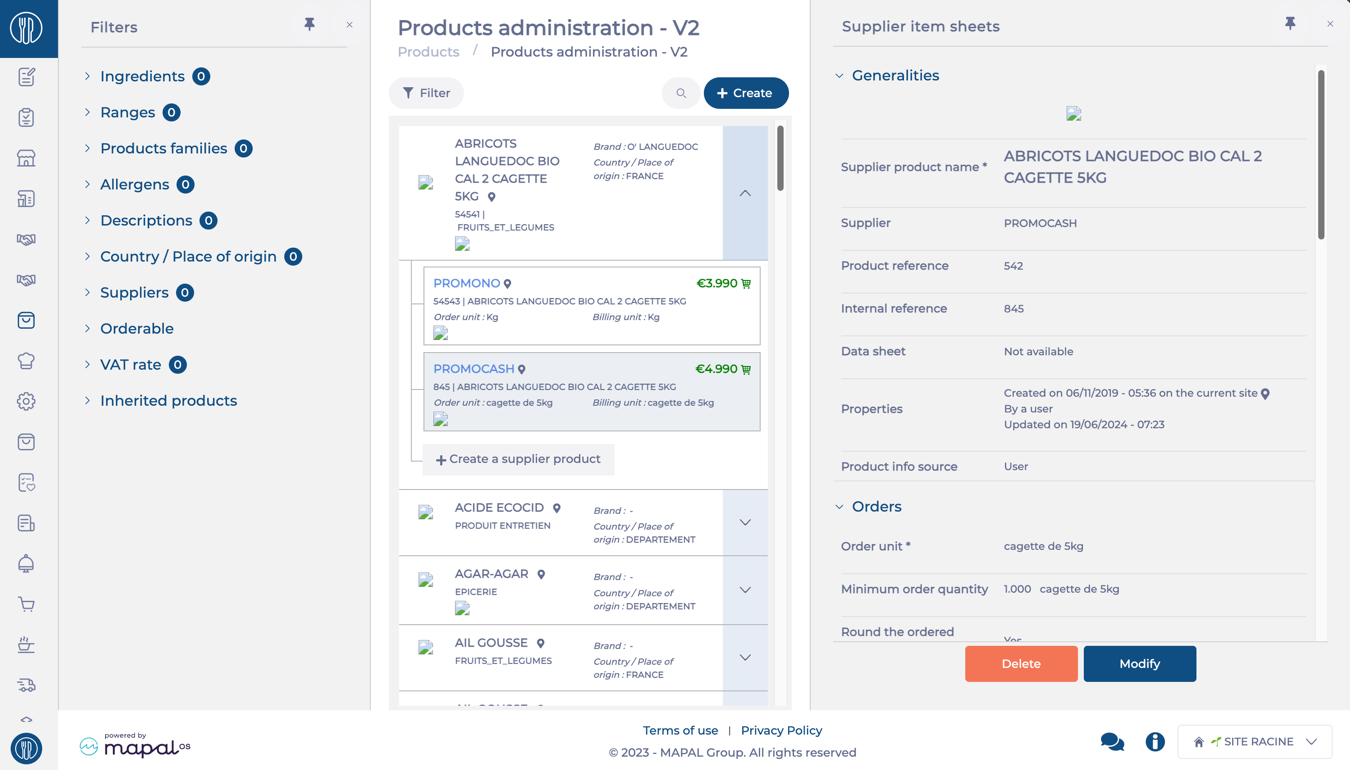
View Supplier Product Details
Select an industrial product from the list.
Click the specific supplier's name.
View details such as:
Product information: Name, description, and attributes.
Traceability information: Creation date, user, last update details, and location.
Ordering and invoicing information: order units, minimum order quantity, reservation periods, billing units, etc.
Stock information: Storage units.
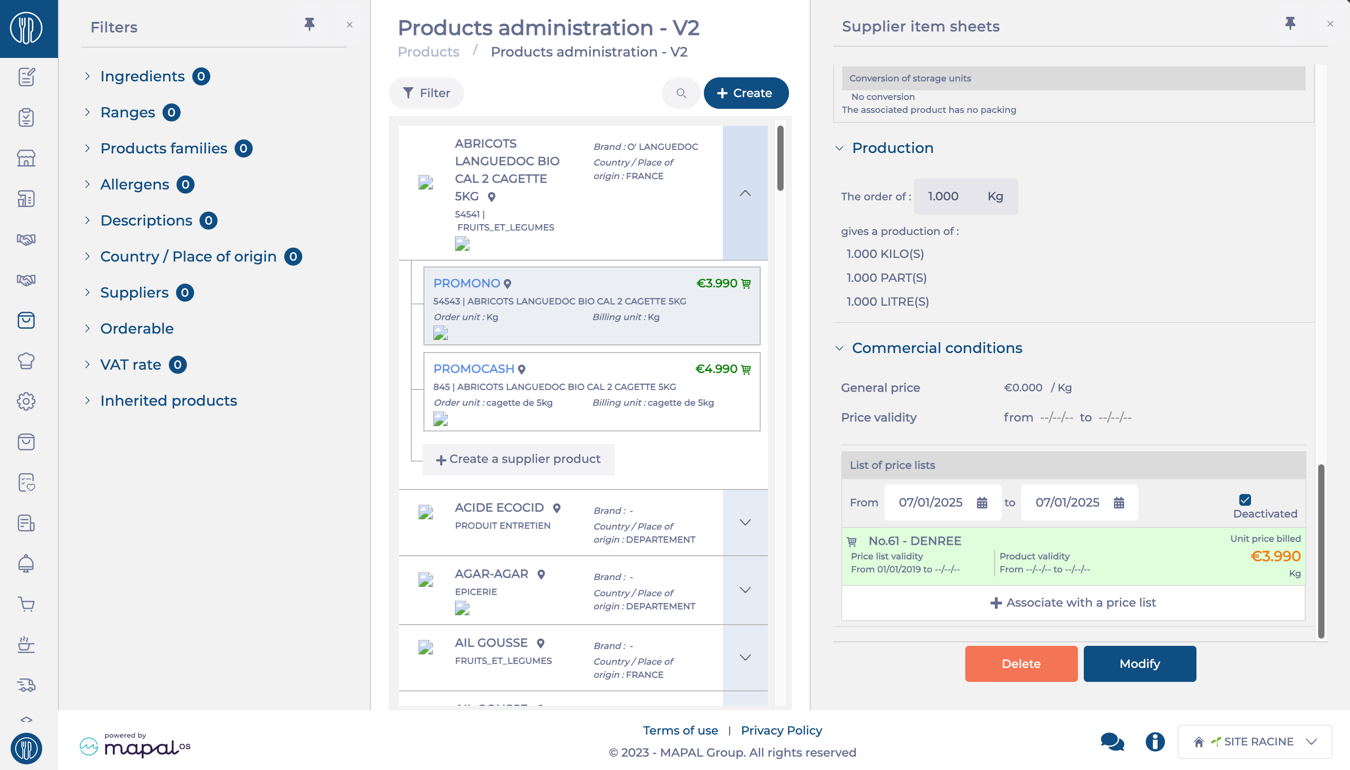
Commercial conditions: Pricing and Price lists associated with this product.
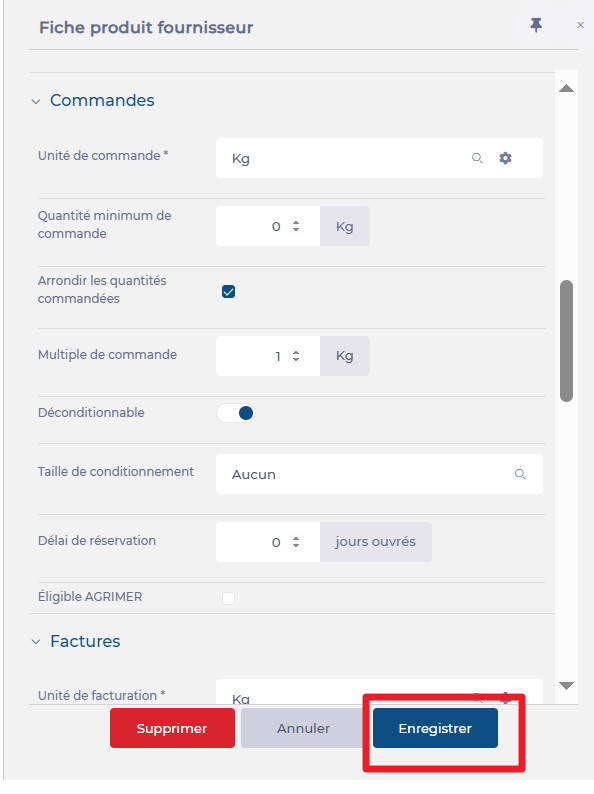
Edit a Supplier product
Select an industrial product from the list.
Select the specific supplier's name.
Select Modify.
Edit the required fields as needed.
Here, you can also modify the pricing in the List of price lists field (e.g., associate the product with a price list, modify current price lists, or disassociate from them).
Select Save to confirm changes.
Delete a supplier product
Select an industrial product from the list.
Select the specific supplier's name.
Select Delete.
Confirm the action by selecting Yes on the pop-up.