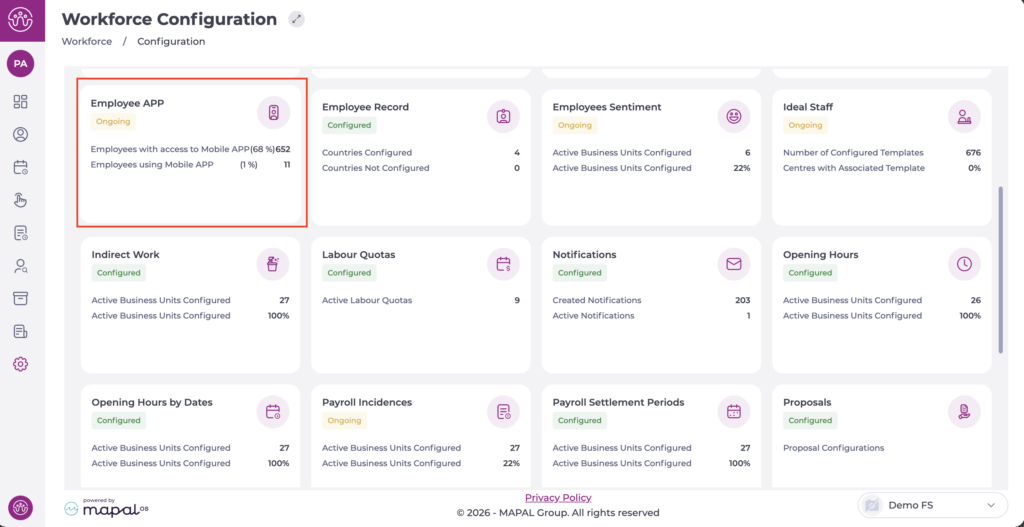
Select Configuration > Employee App from the main menu.
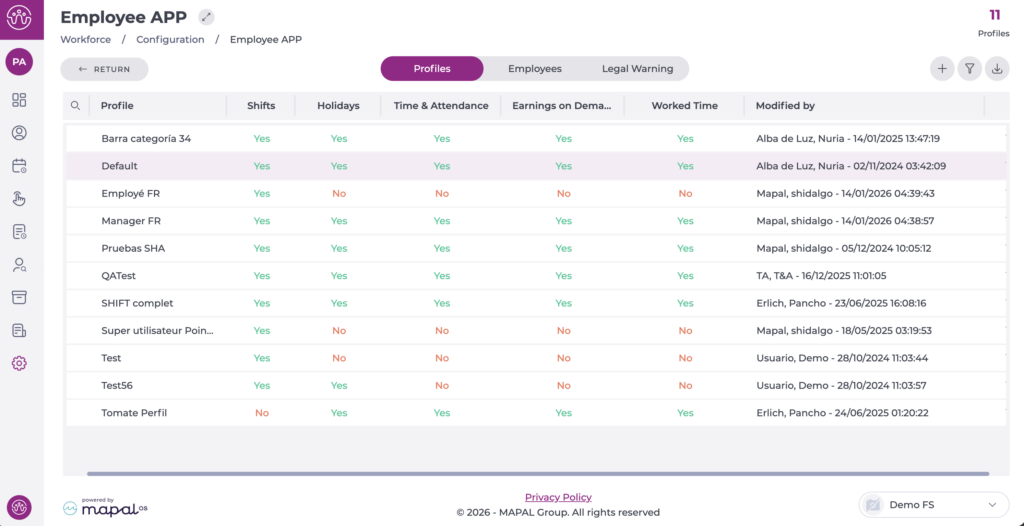
On the Profiles tab, you can see the list of profiles already created.
Select the profile you want to edit.
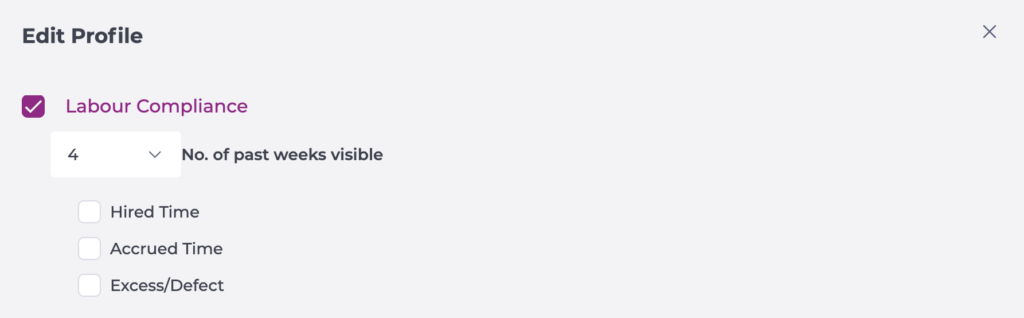
In the pop-up window, begin editing the Labour compliance section by enabling the corresponding checkbox.
Set the number of past weeks visible.
Select the options Hired time, Accrued time and/or Excess/Defect, so that the hours in each case are visible according to the indicated reference period.
Select Accept to save the configuration you have defined OR Cancel to discard the changes.
Manage employee details
Start from: The Workforce module.
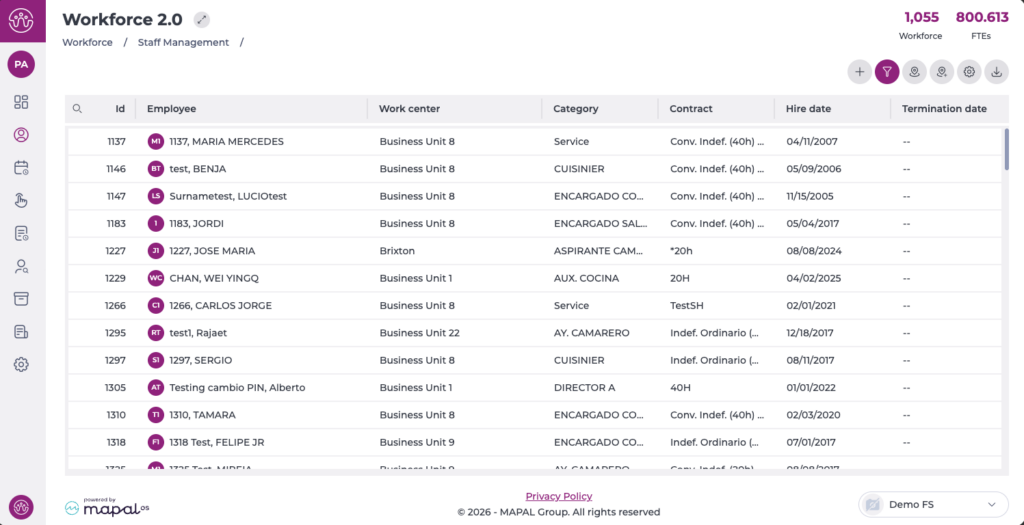
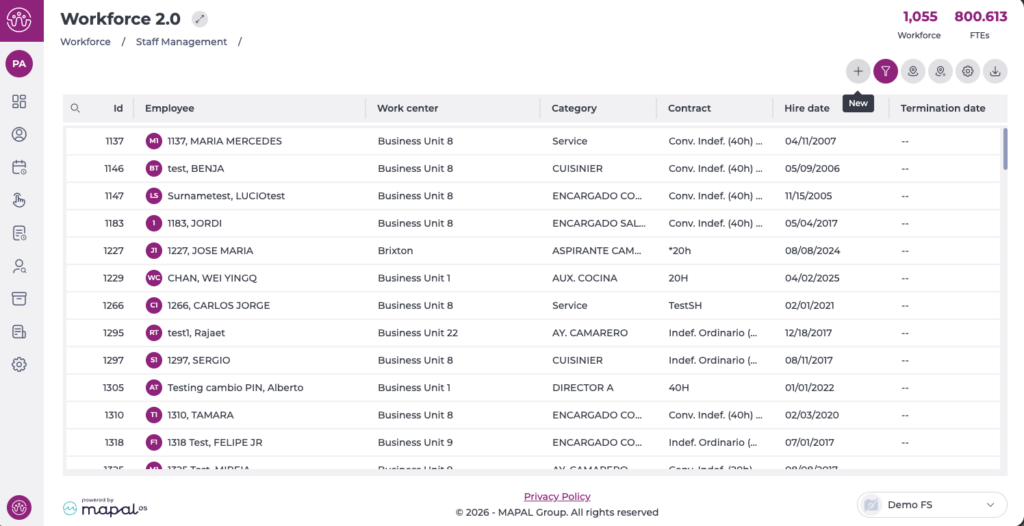
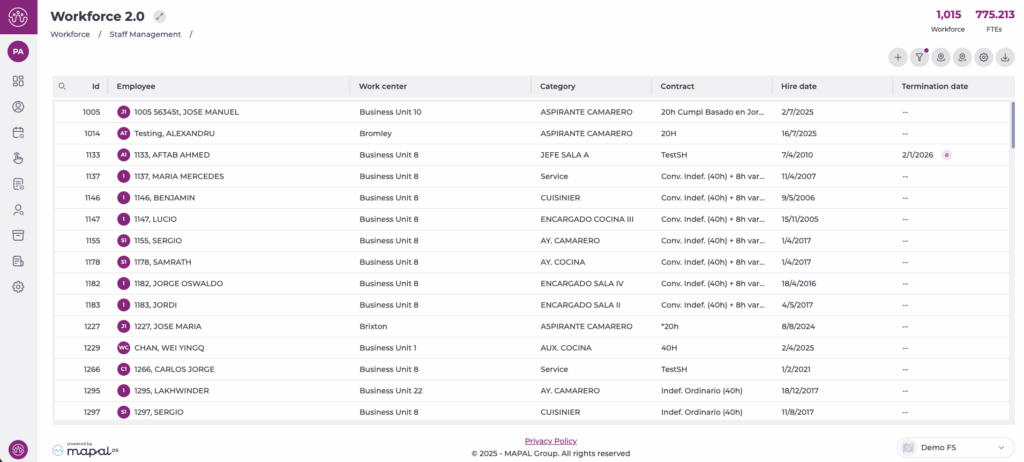
Select Workforce Management > Workforce 2.0.
On the Workforce 2.0 screen, select the employee whose information you want to manage from the list.
The screen will open on the Employee Record tab. This tab has four sections:
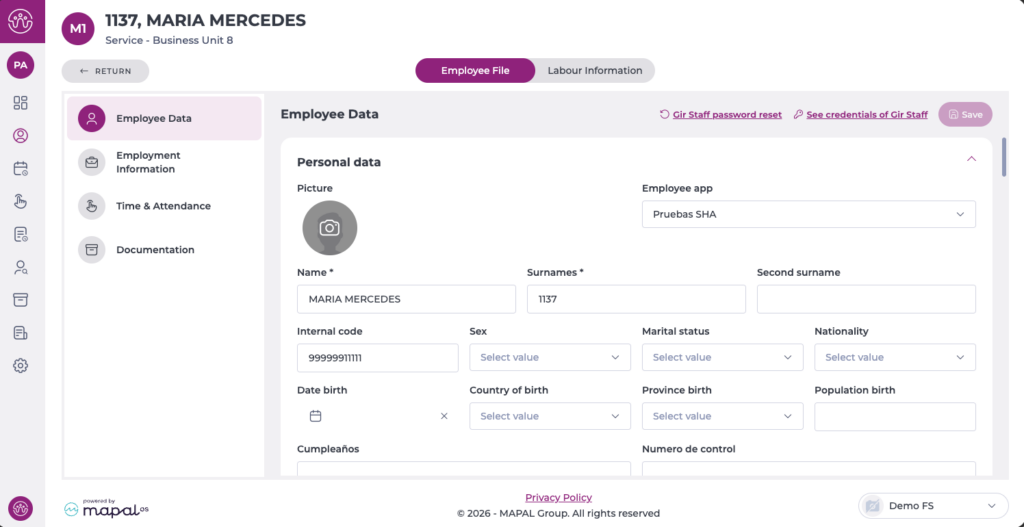
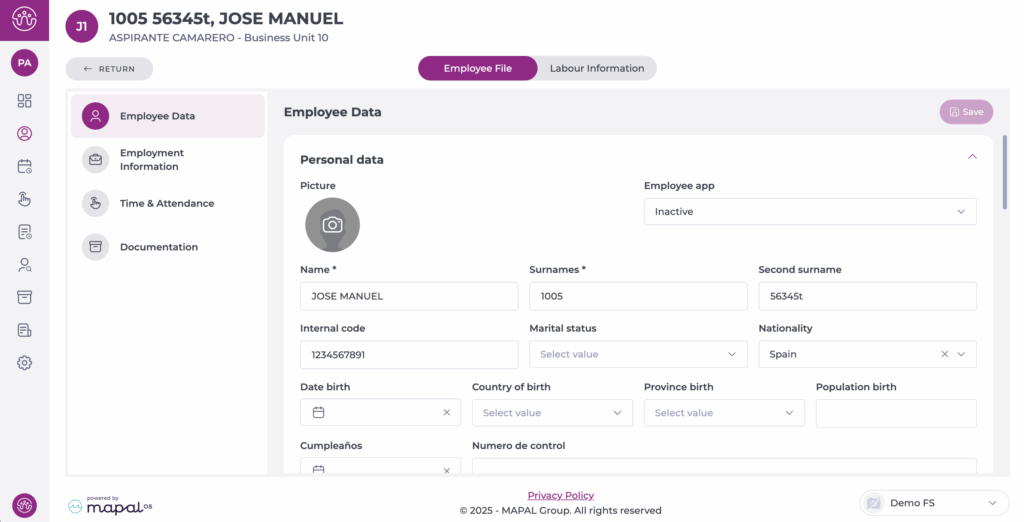
Employee data
In this section, you can change any data related to the employee's record, such as personal details, add a photo, add emergency contacts, medical reviews, among others.
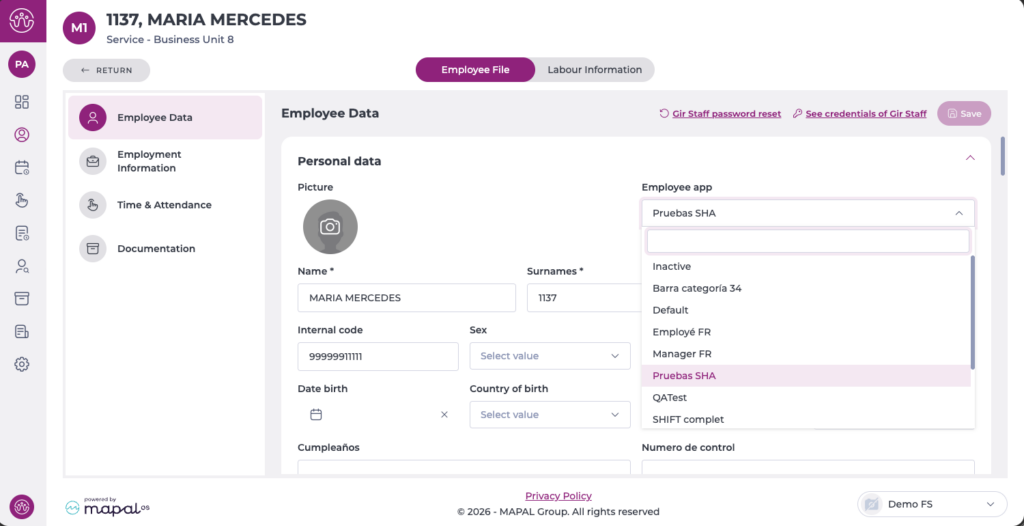
Here you can also activate, deactivate or change the profile related to the Employee App.
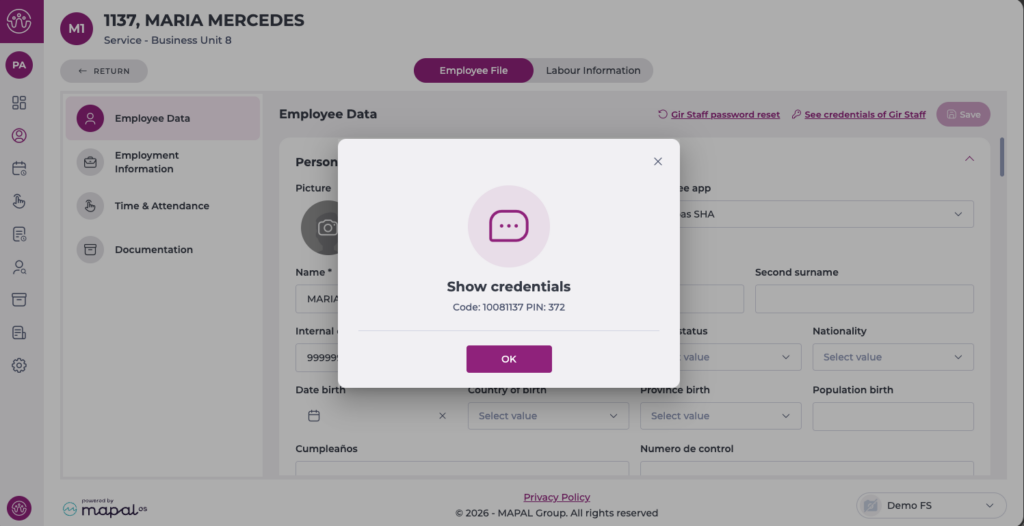
Note: For those using the GIR Staff app, it is possible to view their credentials, change their profile and reset the password.
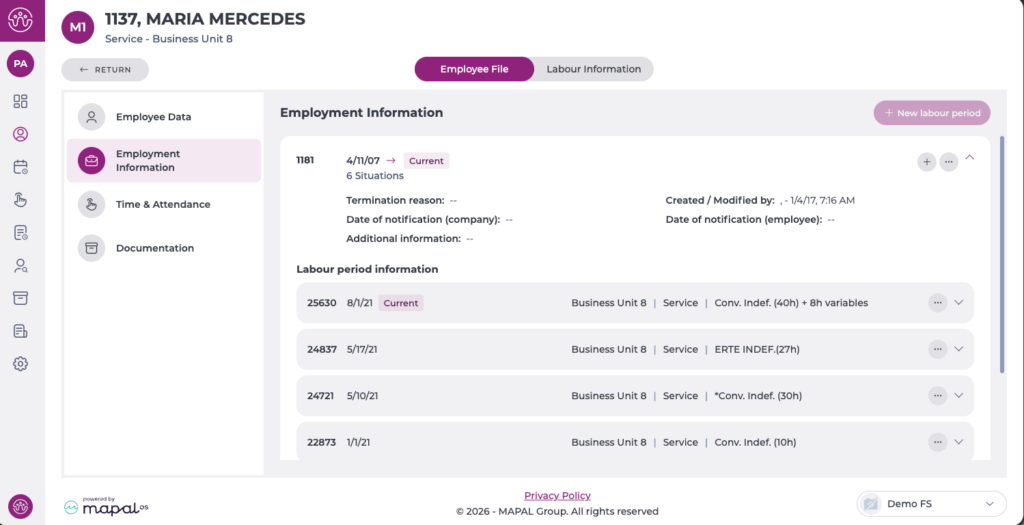
Employment information
In this section, you can manage the employee's different work periods and, within them, the employment situations. These correspond to changes in contract type, different shift restrictions or transfers to other work centres.
In the documentation section, you can only view the documents assigned to the employee you are viewing, provided you have the necessary permissions to see them.
If you want to add more documentation and send it, you must do so from the Documentation section of Workforce.
To learn more about managing documentation in Workforce, see the articles in the Documentation category.
Create an employee
Start from: The Workforce module.
Select Workforce Management > Workforce 2.0.
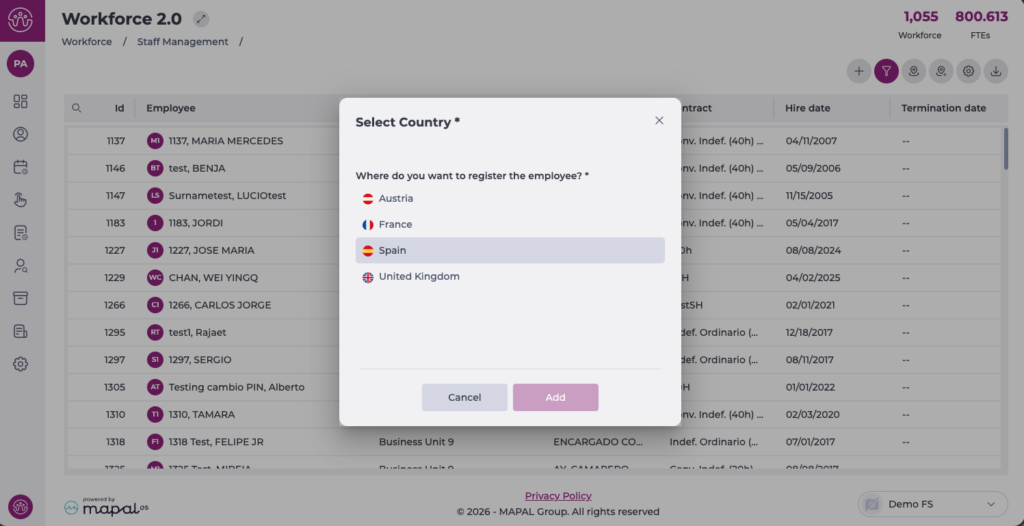
On the Workforce 2.0 screen, select New +.
If you have more than one country configured, you will need to select the country for which you want to create the employee first.
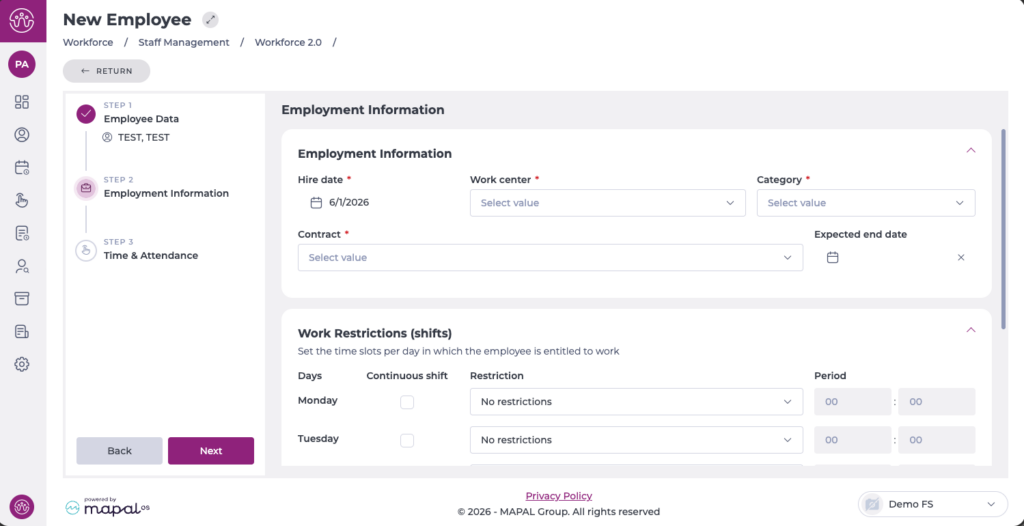
In the New Employee panel, you can add information in 3 steps:
Note: Fields marked with an asterisk (*) are mandatory.
Employee data
In this section, you will complete all the personal details of the new employee, taking into account the configuration applied in Workforce > Configuration > Employee record, regarding field requirements and visibility.
You can also activate and assign a specific profile related to the Employee App.
Once the information in this step is complete, select Next to move to the next step.
Employment information
In this step, you will complete the details related to the employee's contract, hire date, business unit, and category.
Additionally, you can configure shift restrictions by day of the week, also taking into account bank holidays and holiday eves.
You can also configure split shifts or shifts with different start times.
Once the information in this step is complete, select Next to move to the next step.
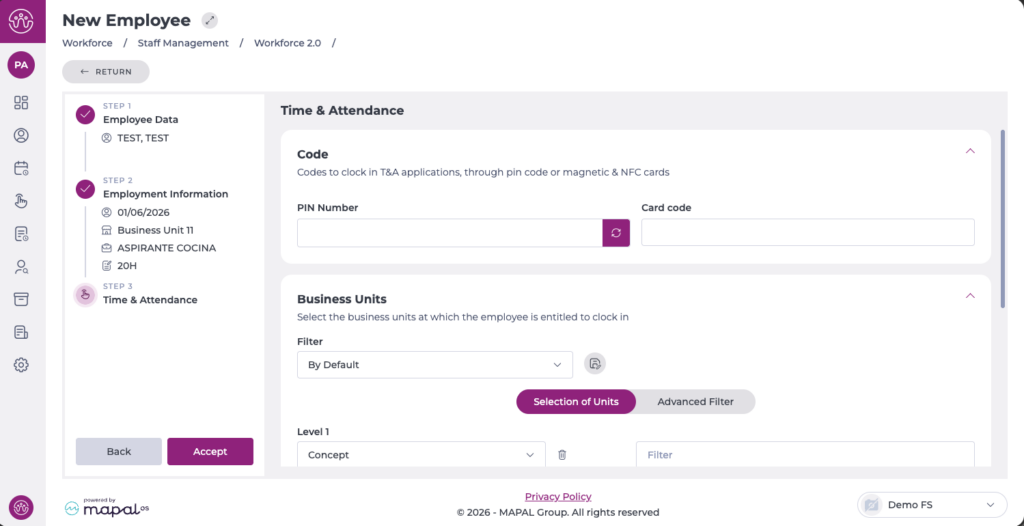
Time & attendance
In this section, you can configure the codes for clocking in on the T&A applications, either via PIN code or magnetic and NFC cards. You can also select the centres where the employee is entitled to clock in.
Once the information in this step is complete, select Accept to save the new employee's configuration.
The created employee will appear immediately in the employee grid. Depending on whether the hire date is current or in the future, you will need to adjust the corresponding filter.
Change an employee's email address
Start from: The Workforce dashboard.
Select Workforce Management > Workforce 2.0 from the main menu to open the Employees List.
Use the list to locate the employee record with the email address to be changed.
Note: Use the filter to narrow down your search when needed. For more information about how to use the filter, see Filter the employee grid.
Once in the employee file, select the Employee Data tab.
Scroll down to Contact data.
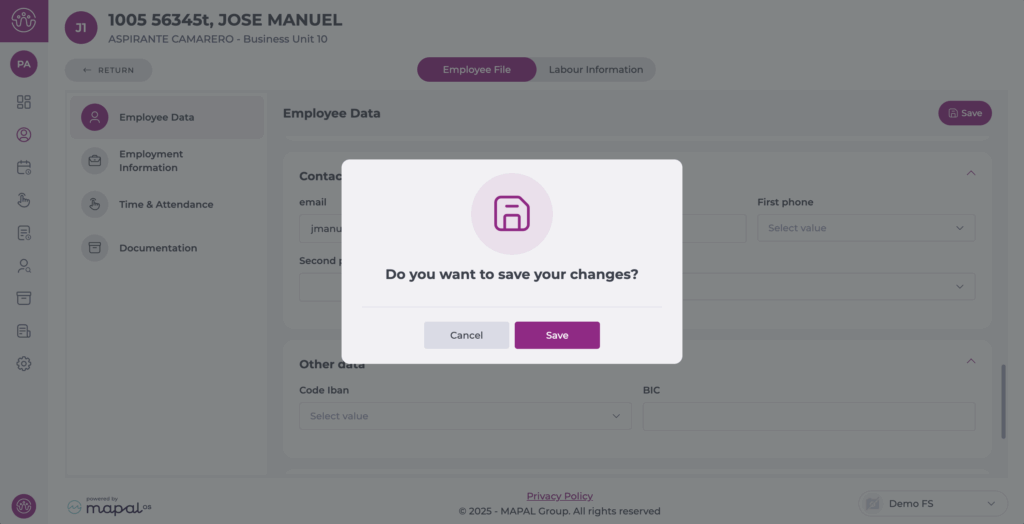
Enter the new email address in the E-mail field.
Select Save and confirm the action to complete the process.
The employee’s email address will be updated immediately when the record is saved.
Note: Saving the employee record will save all of the fields in the record. You will be prompted to enter a valid value for any incorrect fields before the changes are saved.
Assign or change punch-in code
Start from: The Workforce module.
Select Workforce Management > Workforce2.0 from the main menu.
Use the filters at the top of the screen to refine the employee list. For full filtering guidance, see Filter the employee grid.
Select the specific employee from the grid.
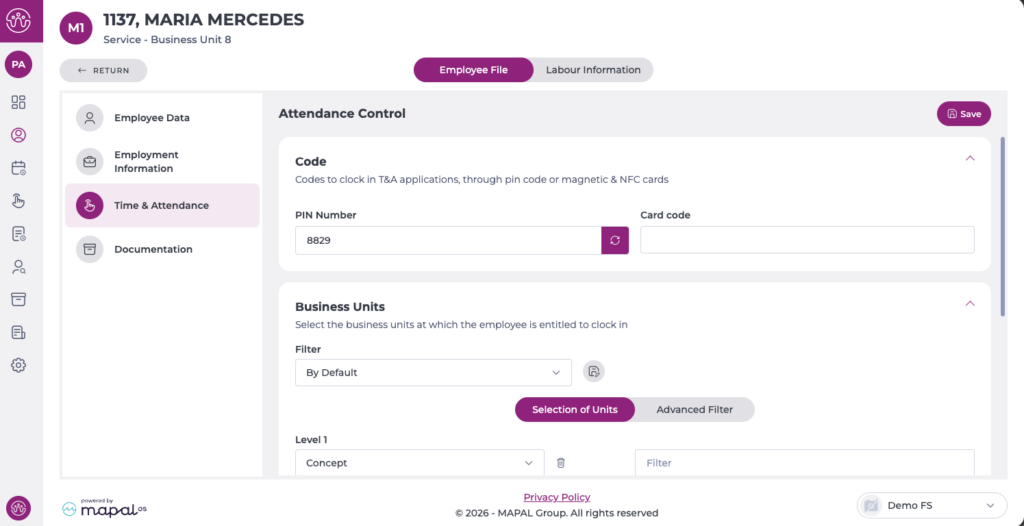
Choose Time & Attendance from the left-hand menu.
Configure an employee’s clock-in codes
In the Code panel, you can configure all identification methods used in T&A applications:
PIN Number: enter a four-digit code of your choice or select the arrow button to automatically generate a random code.
Card code: enter or scan the magnetic or NFC card identifier assigned to the employee.
These codes allow the employee to clock in even when their fingerprint cannot be used.
Select the business units where the employee may clock in
The Business Units panel allows you to define exactly where the employee is authorised to record attendance.
Use the Selection of Units tab to choose business units manually, or use Advanced Filter to filter by country, concept, or other hierarchy levels.
Tick the business units where the employee is allowed to clock in.
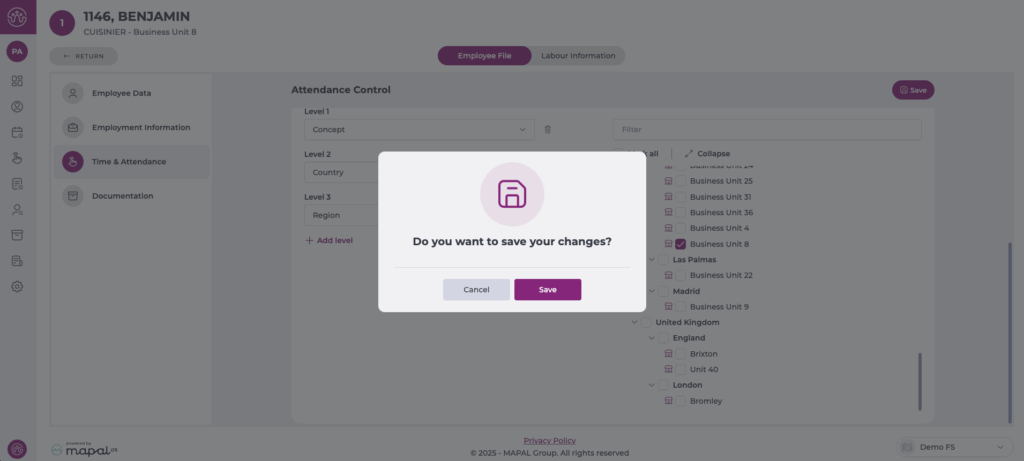
Save changes
Once all codes and eligible business units have been configured, select Save at the top right of the screen.
A confirmation window will appear; select Save again to apply the changes.
To learn how to punch in using the assigned code, see Punch in by code.
Create and manage a labour conditions proposal
Start from: The Workforce module.
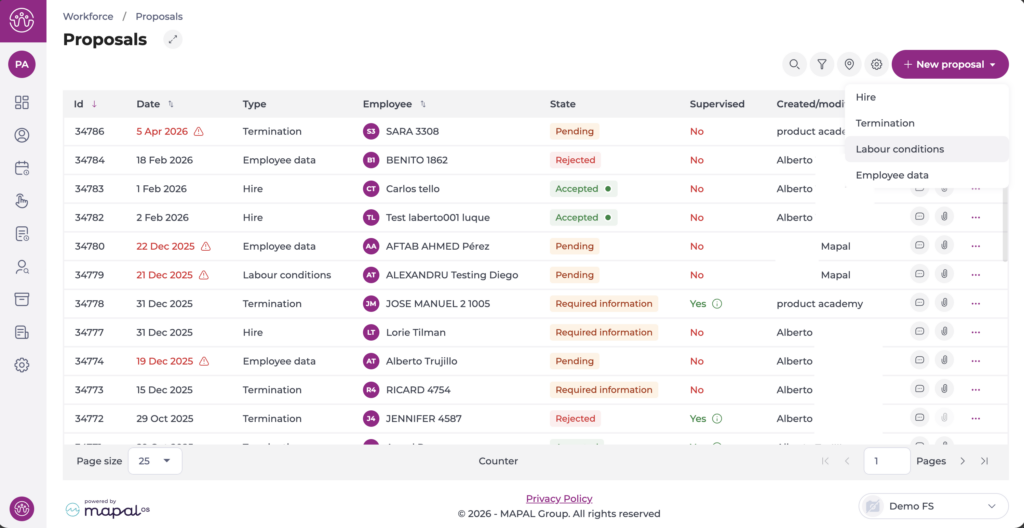
Navigate to Workforce management > Proposals 2.0.
Create a labour conditions proposal
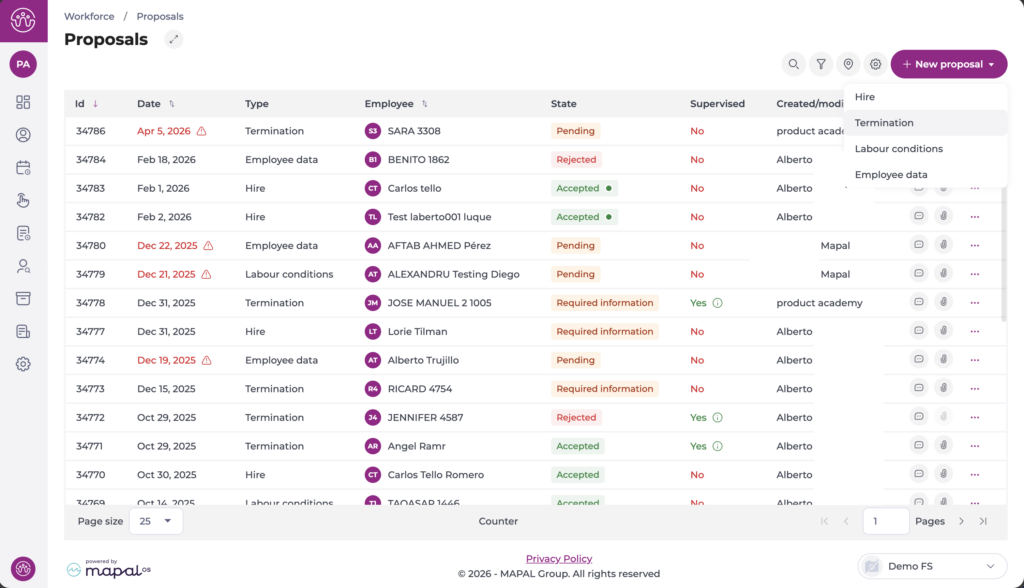
Select + New proposal.
Select Labour conditions from the dropdown.
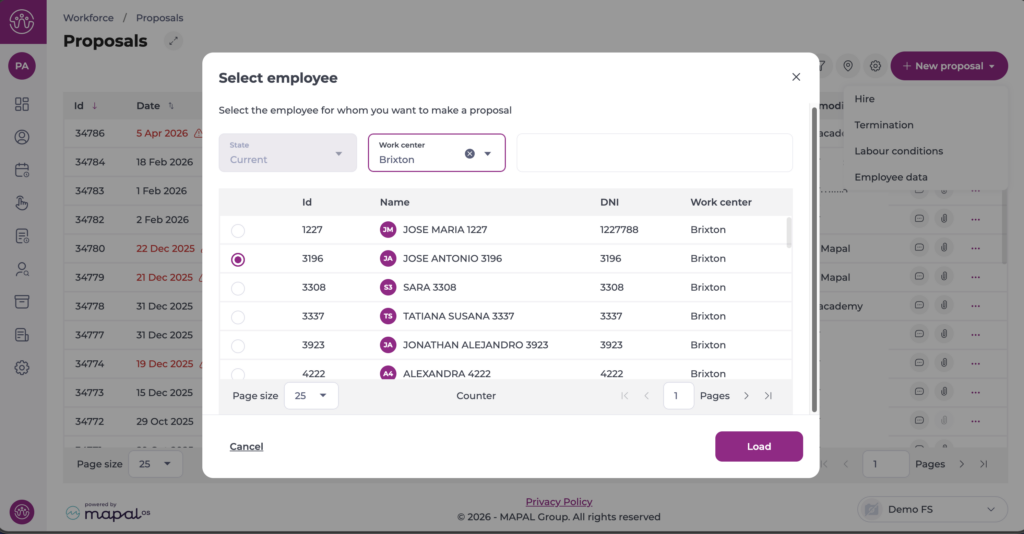
A Select employee dialogue appears. This displays a list of current employees. You can filter the list by State and Work centre to narrow down the results. Select the employee you want to create the proposal for, then select Load.
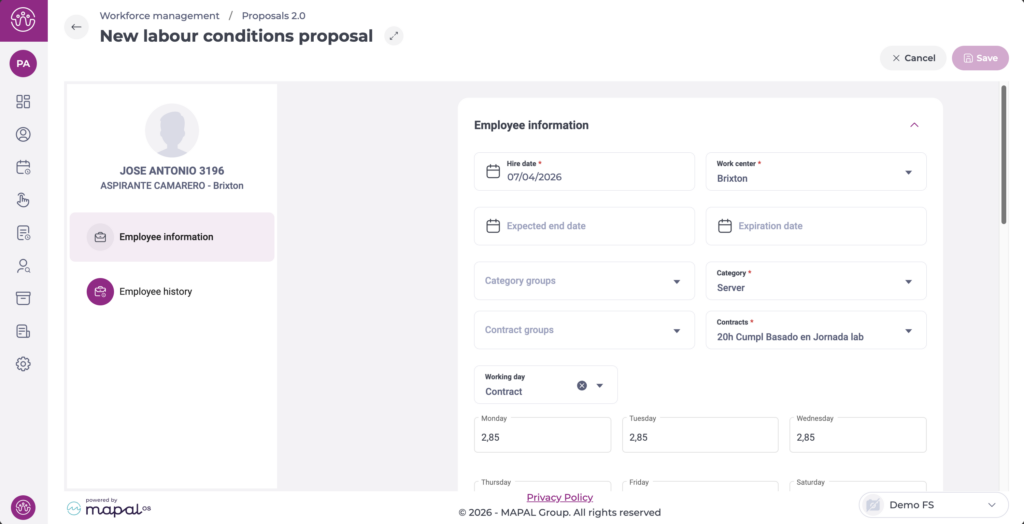
The system opens the New labour conditions proposal form. The left-hand panel displays the employee's name, role, and business unit, along with two navigation sections: Employee information and Employee history.
Employee information
Select Employee information in the left-hand panel to update the employee's contractual details. Required fields are marked with an asterisk (*). The form pre-fills with the employee's current values.
Select the Hire date *. This reflects the start date for the new conditions.
Select the Work centre * from the dropdown.
Select the Expected end date and Expiration date if applicable.
Select the Category groups and Category * from the dropdowns.
Select the Contract groups and Contracts * from the dropdowns.
Select the Working day type from the dropdown.
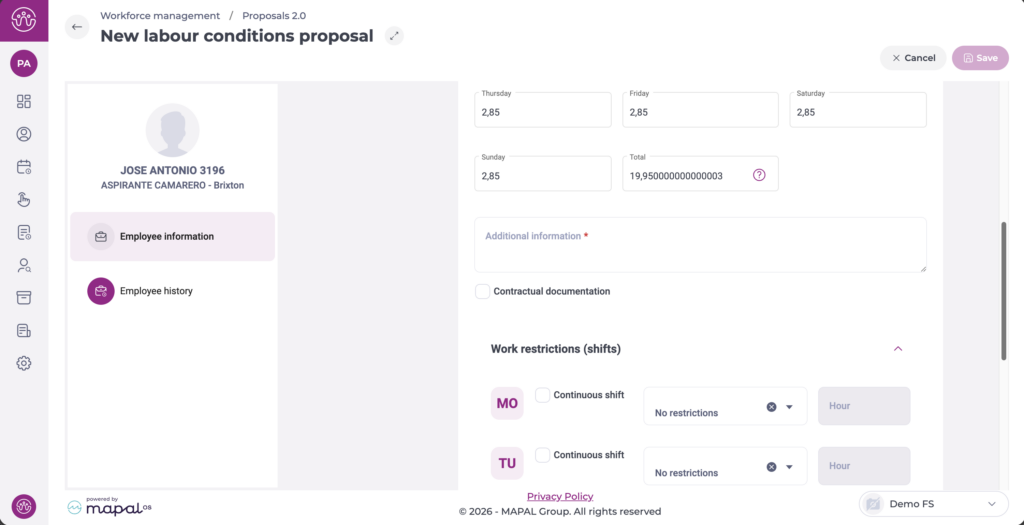
Enter the number of contracted hours for each day of the week (Monday through Sunday). The Total field updates automatically.
Enter any relevant details in the Additional information * field.
Select the Contractual documentation checkbox if contractual documents need to be generated for this change.
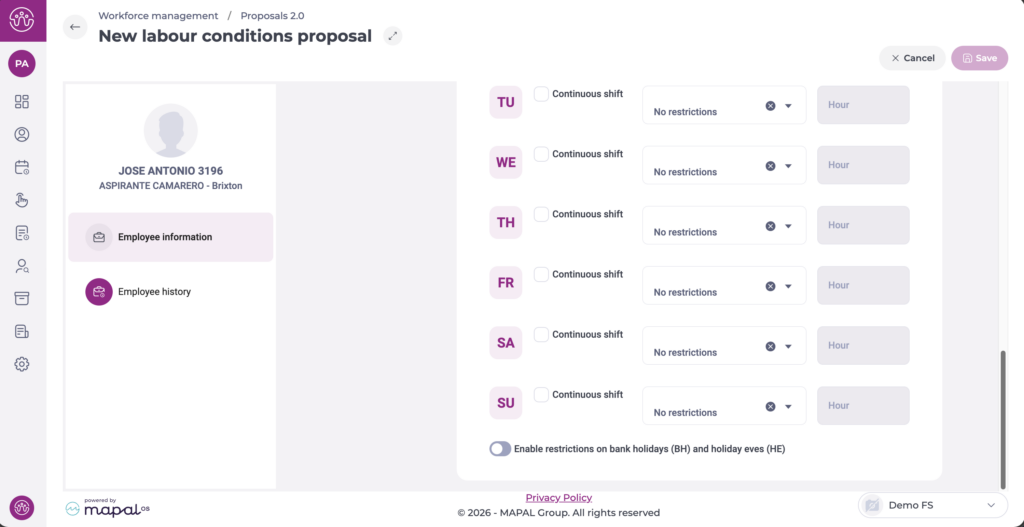
Set Work restrictions (shifts) for each day of the week (MO, TU, WE, TH, FR, SA, SU):
Select the Continuous shift checkbox if the employee works a continuous (non-split) shift on that day.
Select a restriction from the dropdown. The default value is No restrictions.
Enter a value in the Hour field if a specific start time applies.
To apply restrictions on non-working days, enable the Enable restrictions on bank holidays (BH) and holiday eves (HE) toggle.
Employee history
Select Employee history in the left-hand panel to review the employee's current and historical employment records. Each record shows the employee ID, start date, business unit, role, contract type, and contracted hours. Select the expand arrow on any record to view further details such as the termination reason and created/modified information.
This section is read-only and is provided for reference when processing the change.
Once you have completed the employee information, select Save to submit the proposal. Select Cancel to discard the proposal without saving.
Manage a labour conditions proposal
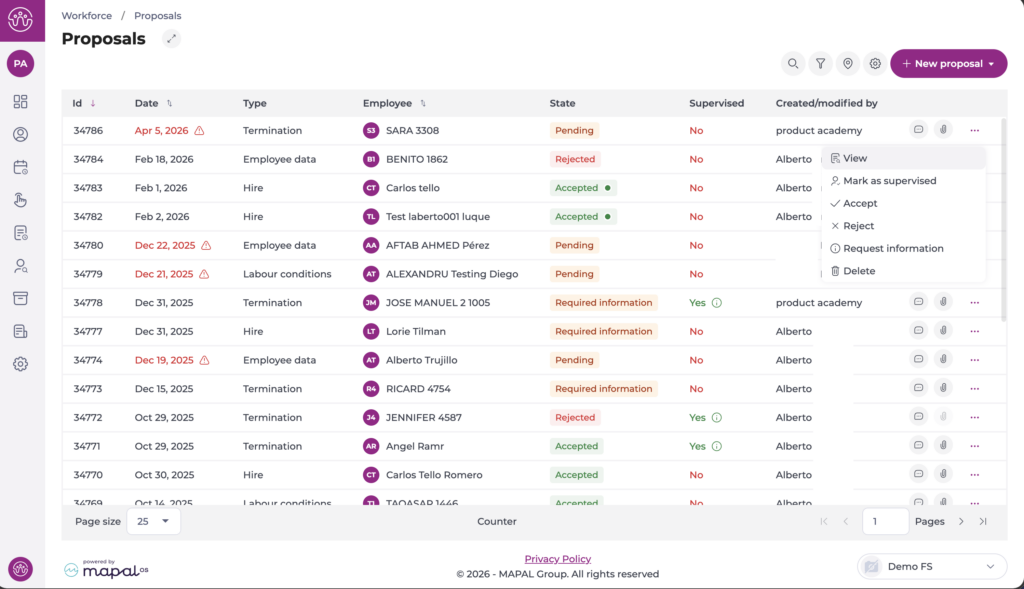
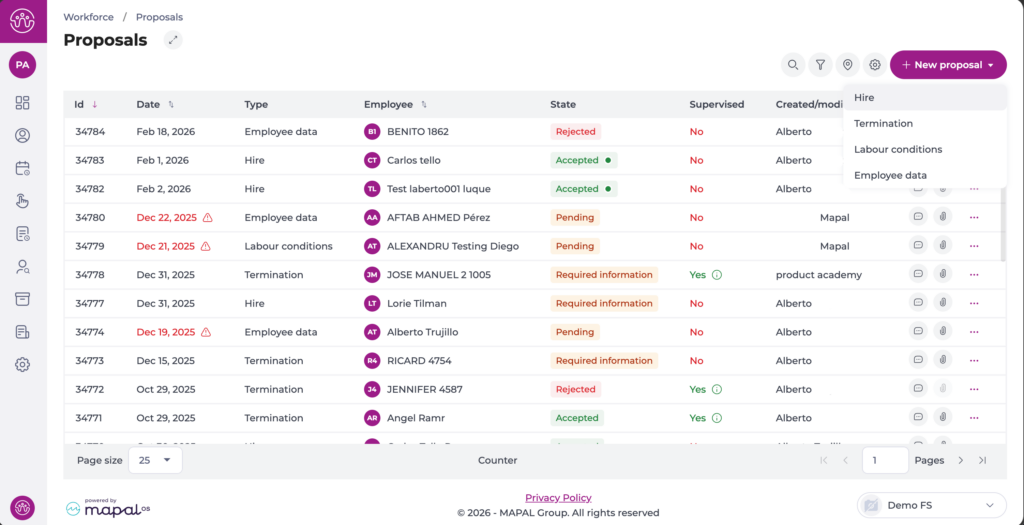
Once submitted, the proposal appears in the Proposals list with the type Labour conditions and the status Pending.
Actions menu
Select the three-dot icon (...) on the proposal row to open the actions menu. The options available depend on the proposal's current status and your permissions:
View: Opens the proposal in read-only mode.
Mark/Unmark as supervised: Flags the proposal as reviewed.
Accept: Approves the change. A confirmation dialogue warns that this action is final and cannot be reversed. Select Accept to confirm.
Reject: Declines the change. A confirmation dialogue warns that this action is final and cannot be reversed. Select Reject to confirm.
Request information: Returns the proposal to the creator for additional data or corrections. The status changes to Required information.
Delete: Permanently removes the proposal from the system.
Note: Accepting or rejecting a proposal is irreversible. Review the proposal details carefully before confirming either action.
Note: The actions available depend on your role and permissions. If you cannot see a specific action, contact your administrator to review your role configuration under Workforce > Configuration > Roles. For more information on role management, see Configure permissions for workforce management.
Create and manage a termination proposal
Start from: The Workforce module.
Navigate to Workforce management > Proposals 2.0.
Create a termination proposal
Select + New proposal.
Select Termination from the dropdown.
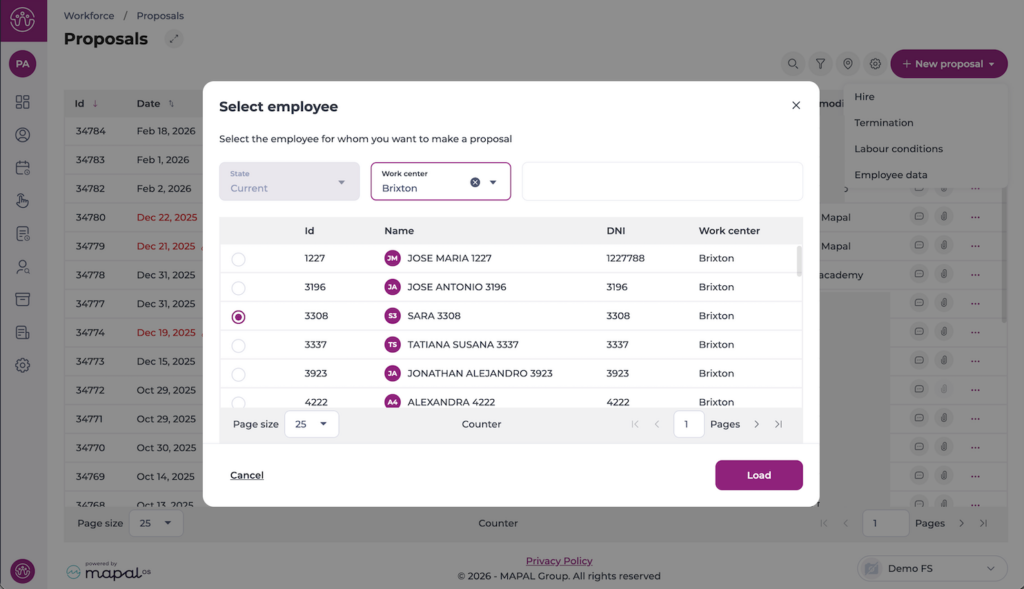
A Select employee dialogue appears. This displays a list of current employees. You can filter the list by State and Work centre to narrow down the results. Select the employee you want to create the termination proposal for, then select Load.
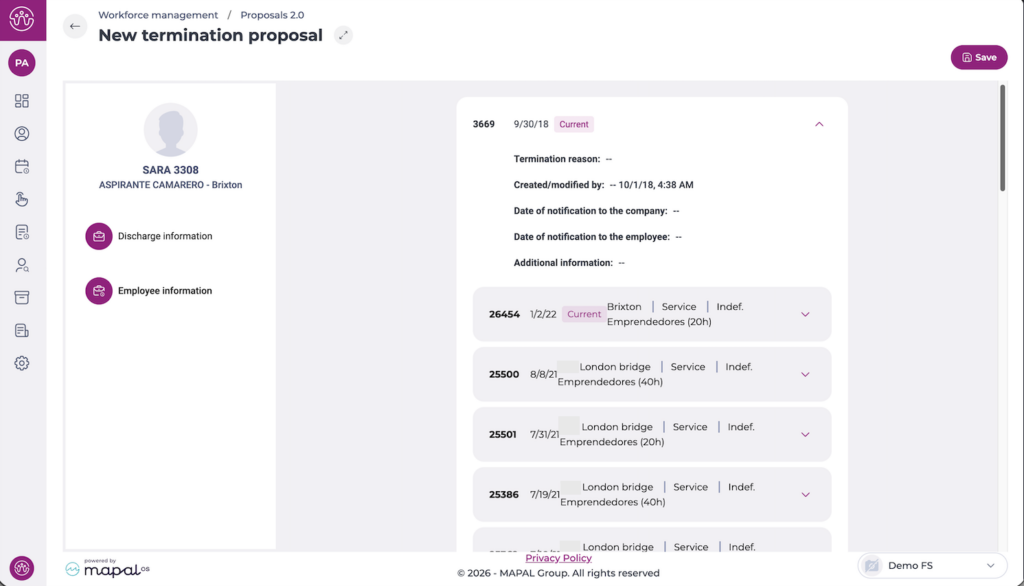
The system opens the New termination proposal form. The left-hand panel displays the employee's name, role, and business unit, along with two navigation sections: Discharge information and Employee information.
Discharge information
Select Discharge information in the left-hand panel to complete the termination details. Required fields are marked with an asterisk (*).
Select the Termination date *. This is the date the employee's contract ends.
Select the Termination reason * from the dropdown (for example, "End of the contract by the company").
Select the Date of notification to the employee if applicable.
Select the Date of notification to the company if applicable.
Enter any relevant details in the Additional information * field.
Employee information
Select Employee information in the left-hand panel to review the employee's current and historical employment records. Each record shows the employee ID, start date, business unit, department, contract type, and contracted hours. Select the expand arrow on any record to view further details such as the termination reason and created/modified information.
This section is read-only and is provided for reference when processing the termination.
Once you have completed the discharge information, select Save to submit the proposal.
Manage a termination proposal
Once submitted, the proposal appears in the Proposals list with the type Termination and the status Pending.
Actions menu
Select the three-dot icon (?) on the proposal row to open the actions menu. The options available depend on the proposal's current status and your permissions:
View: Opens the proposal in read-only mode.
Mark/Unmark as supervised: Flags the proposal as reviewed.
Accept: Approves the termination. A confirmation dialogue warns that this action is final and cannot be reversed. Select Accept to confirm.
Reject: Declines the termination. A confirmation dialogue warns that this action is final and cannot be reversed. Select Reject to confirm.
Request information: Returns the proposal to the creator for additional data or corrections. The status changes to Required information.
Delete: Permanently removes the proposal from the system.
Note: Accepting or rejecting a proposal is irreversible. Review the proposal details carefully before confirming either action.
Termination validation
When a termination proposal is accepted, the system checks whether the employee already has a termination date registered. If a prior termination exists, the system blocks the action and displays a message indicating the proposal cannot be approved.
Select Accept to close the message. The proposal remains in its current status, and you can reject it from the proposals list if it was created in error.
Note: The actions available depend on your role and permissions. If you cannot see a specific action, contact your administrator to review your role configuration under Workforce > Configuration > Roles. For more information on role management, see Configure permissions for workforce management.
Create and manage a hire proposal
Start from: The Workforce dashboard.
Navigate to Workforce management > Proposals2.0.
Create a hire proposal
Select + New proposal.
Select Hire as the proposal type.
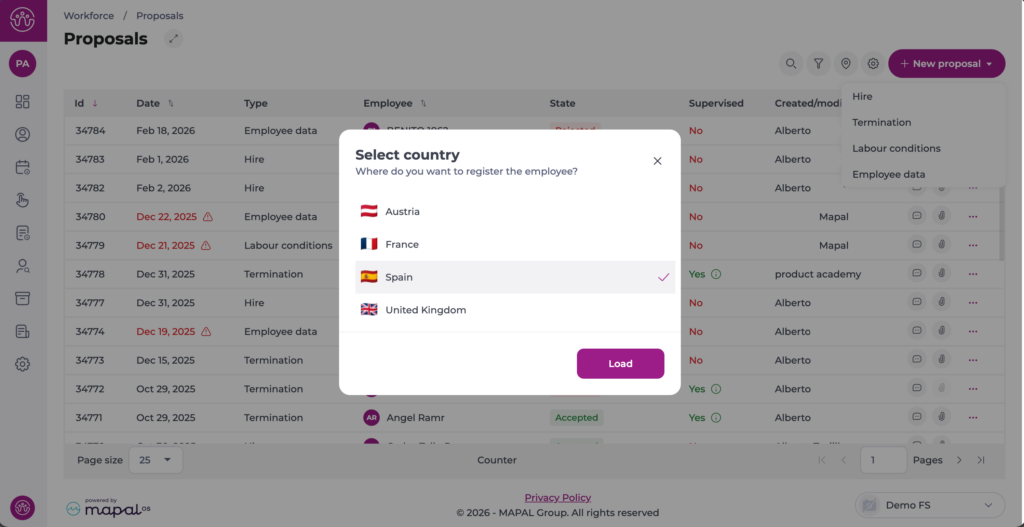
If you manage multiple Business Units in different locations, rhe system opens a pop-up window to select the country of the new hire. Select the specific country and tap Load.
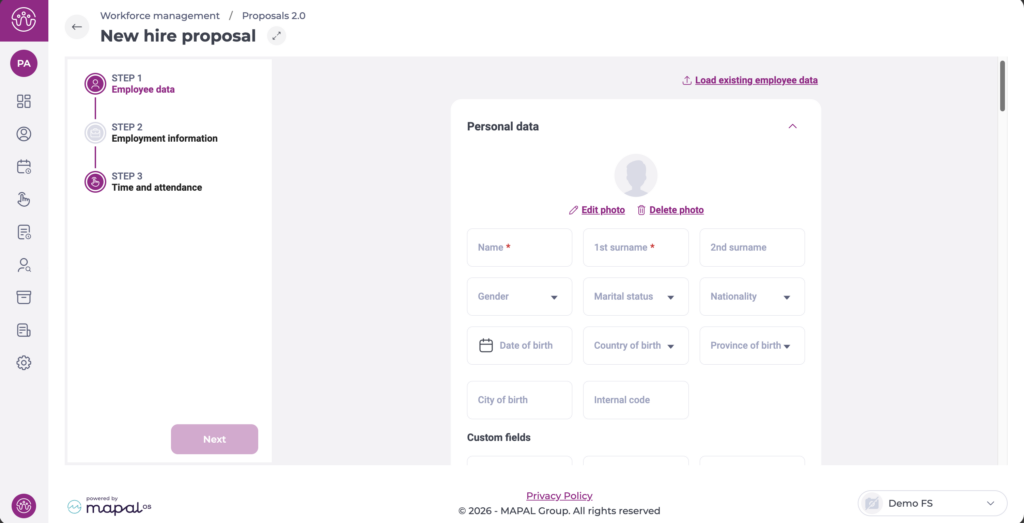
The New hire proposal form opens, divided into three steps: Step 1: Employee data, Step 2: Employment information, and Step 3: Time and attendance. Complete each step and select Next to advance. Required fields are marked with an asterisk (*).
Step 1: Employee data
This step collects the employee's personal and administrative information. The form is organised into collapsible sections.
Personal data: Enter the employee's basic personal data, such as name, surnames, gender, marital status, nationality, date of birth, etc.
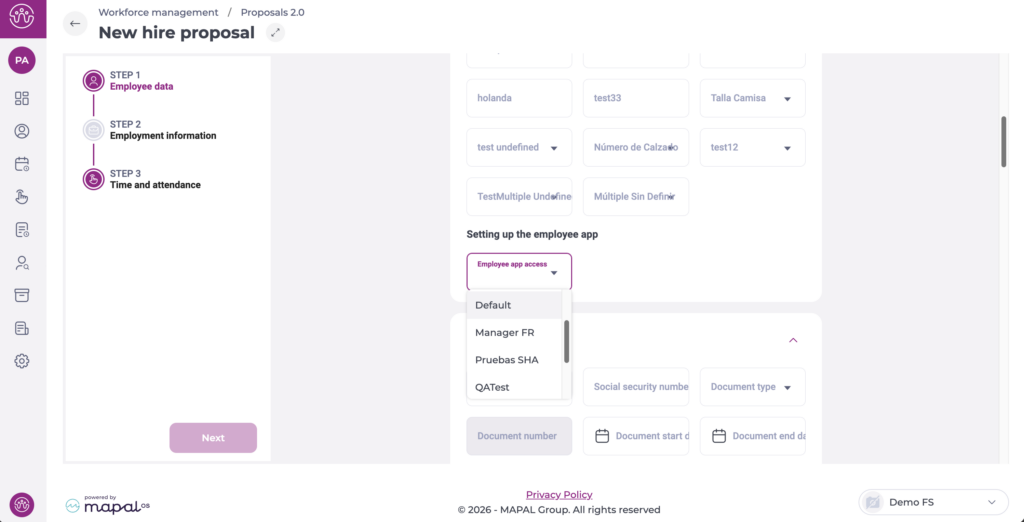
Setting up the employee app: In the Employee app access field, define whether the new employee will have access to the employee app.
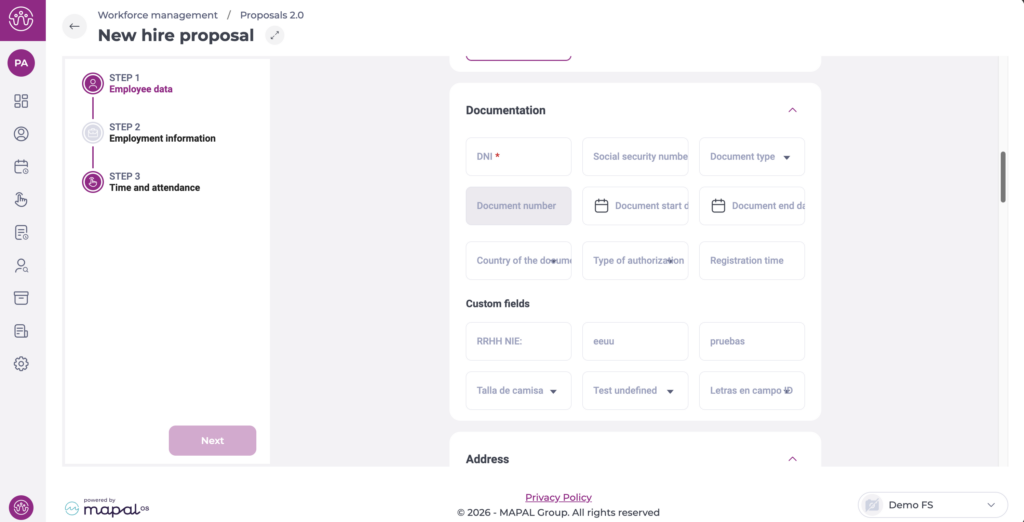
Documentation: Enter the employee's identity and work-authorisation details:
Enter the DNI *. This field is required.
Enter the Social security number if available.
Select the Document type from the dropdown.
Enter the Document number, Document start date, and Document end date as applicable.
Select the Country of the document and the Type of authorisation if required.
Enter the Registration time if applicable.
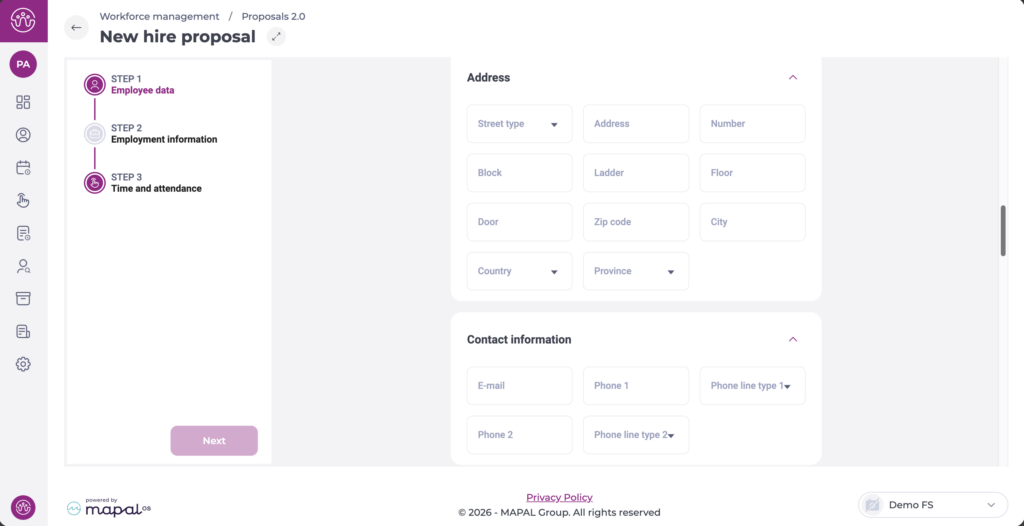
Address: Enter the employee's residential address, including Street type, Address, Number, Block, Ladder, Floor, Door, Zip code, City, Country, and Province.
Contact information: Enter the employee's E-mail, Phone 1 with its Phone line type 1, and optionally Phone 2 with Phone line type 2.
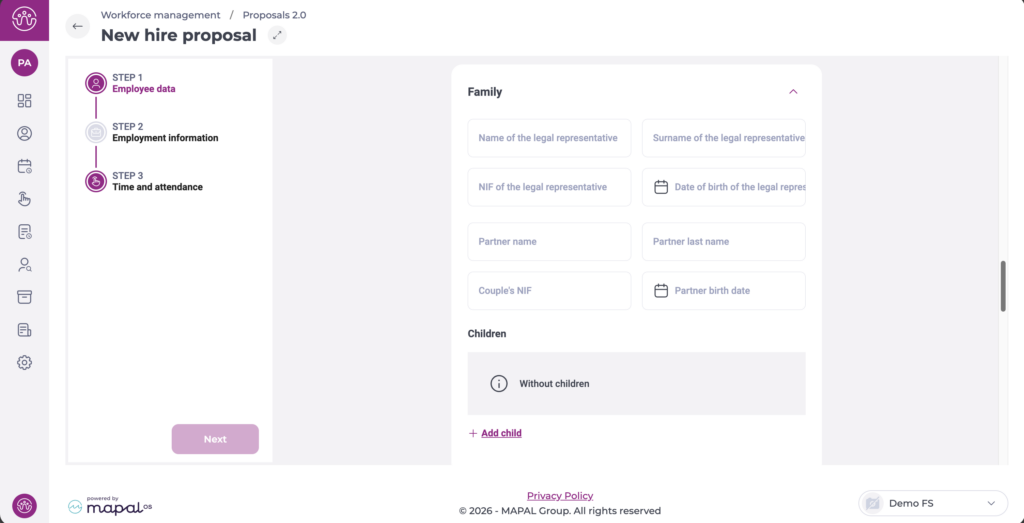
Family: Enter details of the employee's legal representative (name, surname, NIF, date of birth) and partner information if applicable. The Children section displays Without children by default. To add dependants, select + Add child.
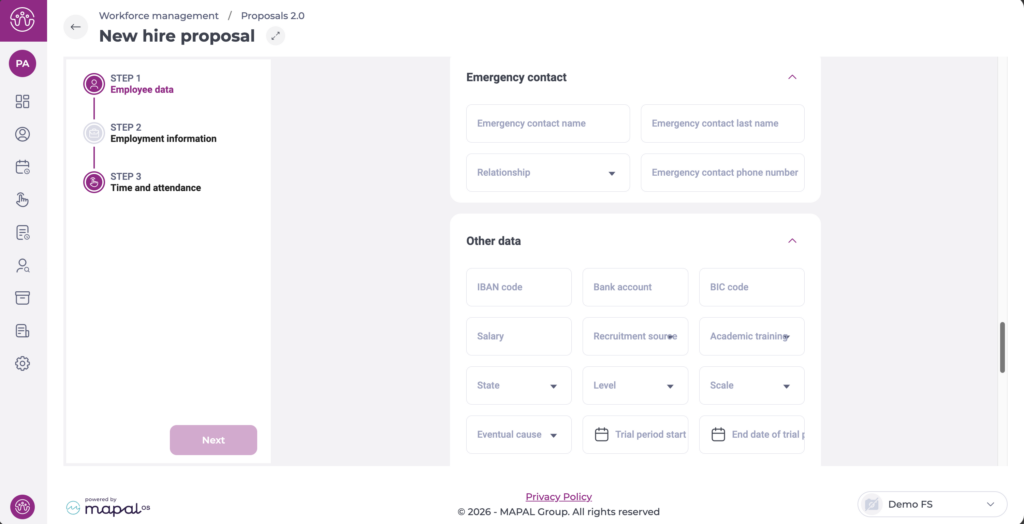
Emergency contact: Enter the Emergency contact name, Emergency contact last name, Relationship, and Emergency contact phone number.
Other data: Enter banking details (IBAN code, Bank account, BIC code), Salary, Recruitment source, and Academic training. Select the State, Level, Scale, Eventual cause, and Disability level from the dropdowns. Enter the Trial period start and End date of trial period if applicable.
Custom fields: If your organisation has configured custom fields, they appear in each section as configured. Fill in any relevant values.
Select Next to move to Step 2.
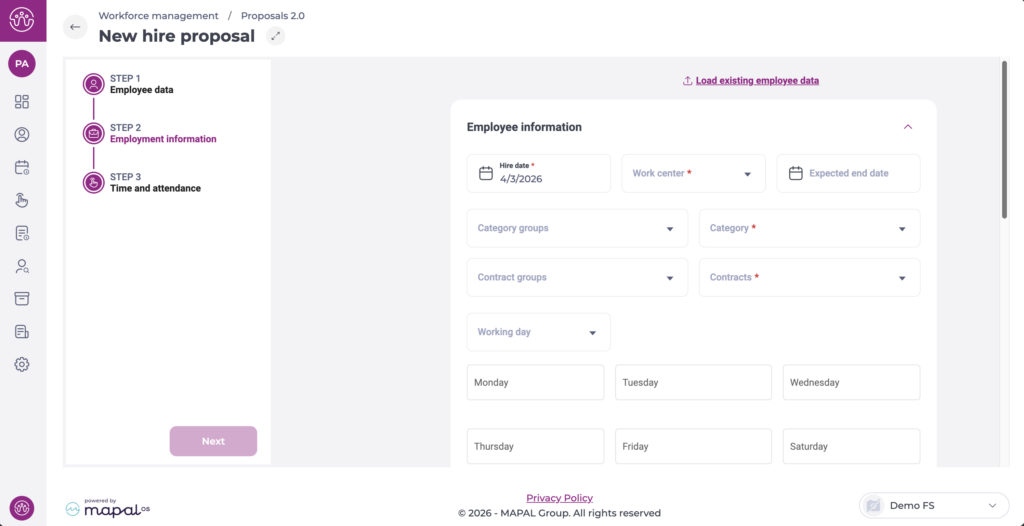
Step 2: Employment information
This step defines the employee's contractual and scheduling details.
Note: If the employee has previously worked for your organisation, select Load existing employee data to pre-fill certain fields from their existing record.
Select the Hire date *. This is the date the employee's contract begins.
Select the Work centre * from the dropdown.
Select the Expected end date if the contract is temporary.
Select the Category groups and Category * from the dropdowns.
Select the Contract groups and Contracts * from the dropdowns.
Select the Working day type from the dropdown.
Enter the number of contracted hours for each day of the week (Monday through Sunday). The Total field updates automatically.
Note: If a contract has working hours set per default, once you select it in the dropdown, the contracted hours fields disappear. However, some contracts may have the flexibility to adjust those hours. In those specific cases, the fields still appear and you can edit hours as needed.
Note: The daily hours fields are highlighted in red until they are completed. Ensure the total matches the expected weekly hours for the selected contract type.
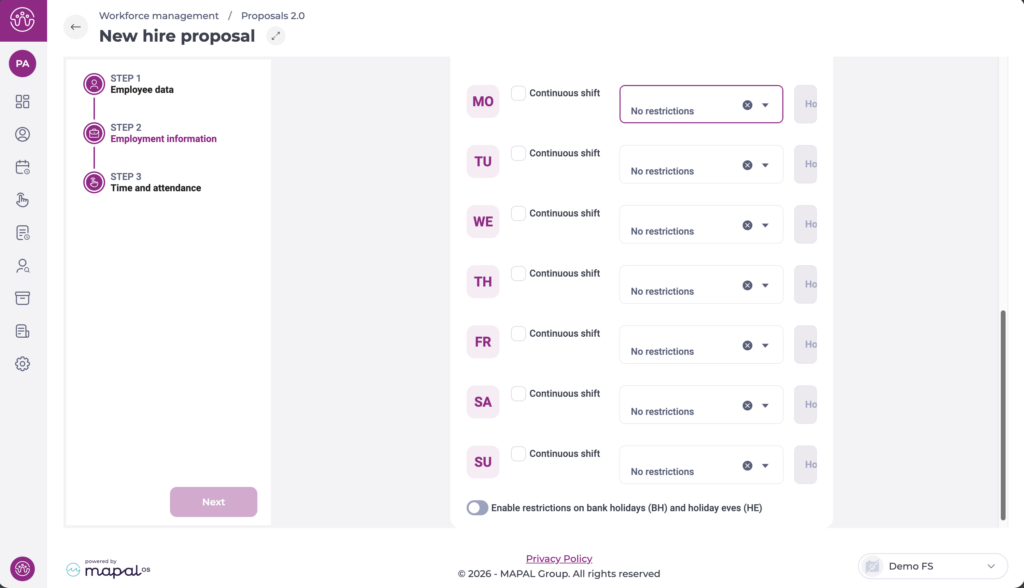
Configure the Work restrictions for the employee in each day of the week (MO, TU, WE, TH, FR, SA, SU):
Select the Continuous shift checkbox if the employee works a continuous (non-split) shift on that day.
Select a restriction from the dropdown. The default value is No restrictions.
To apply restrictions on non-working days, enable the Enable restrictions on bank holidays (BH) and holiday eves (HE) toggle.
Select Next to move to Step 3.
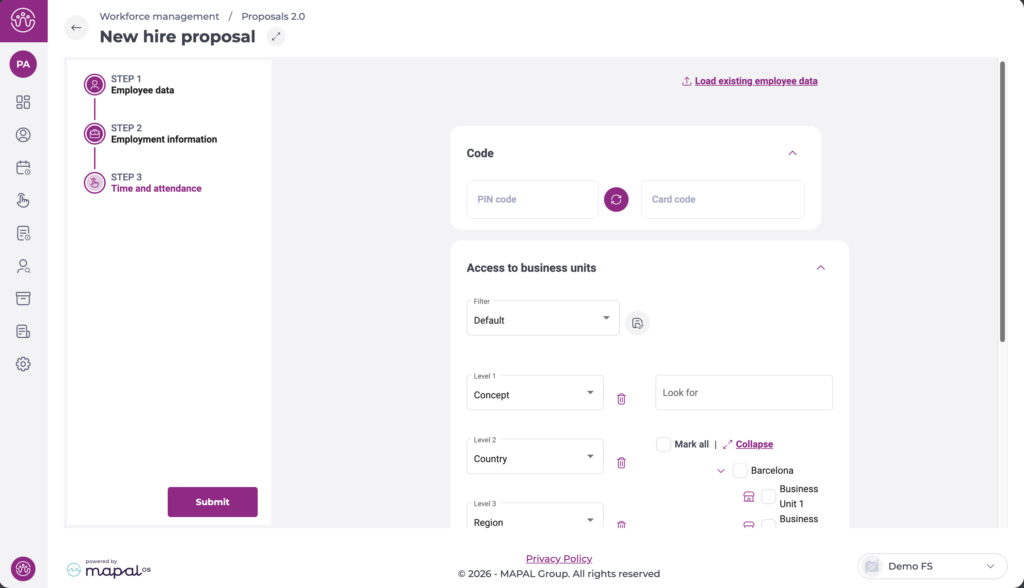
Step 3: Time and attendance
This step allows you to define specific configurations for employee clock-in.
Define a PIN code for the employee. You can use the circular arrows button to generate a random PIN code.
Type the Card code for the employee.
Select the specific business unit(s) the employee will have access to. You can use the business unit tree filter or the search bar to find the units easily.
Select Next to submit the proposal.
Manage a hire proposal
Once submitted, the proposal appears in the Proposals list with the status Pending.
Actions menu
Select the three-dot icon (?) on the right-hand side of the proposal row to open the actions menu. The options available depend on the proposal's current status and your permissions:
View: Opens the proposal in read-only mode.
Mark/Unmark as supervised: Flags the proposal as Supervised (Yes/No), useful when an additional validation step is required before acceptance.
Accept: Approves the proposal. A confirmation dialogue warns that this action is final and cannot be reversed. Select Accept to confirm.
Reject: Declines the proposal. A confirmation dialogue warns that this action is final and cannot be reversed. Select Reject to confirm.
Request information: Returns the proposal to the creator for additional data or corrections. The status changes to Required information.
Delete: Permanently removes the proposal from the system.
Note: Accepting or rejecting a proposal is irreversible. Review the proposal details carefully before confirming either action.
Duplicate check on acceptance
When a hire proposal is accepted, the system checks the employee's DNI and Social security number against existing records. If a match is found, a dialogue presents three options:
Load existing employee: Reuses the existing record and creates a new employment period. This is recommended for rehires.
Continue: Creates a new employee record despite the match. Use this only if you are certain the records belong to different people.
Cancel proposal: Cancels the proposal without making changes.
Note: The actions available depend on your role and permissions. If you cannot see a specific action, contact your administrator to review your role configuration under Workforce > Configuration > Roles. For more information on role management, see Configure permissions for workforce management.