


Start from: The Engagement Dashboard
Creation Options
When creating a new survey, you have three tiles to choose from:
- Manual creation: Build your survey step by step (described below).
- AI-assisted creation: Enter a prompt (e.g., “Feedback from new hires”), and the AI will generate a draft survey you can edit. See Generate push surveys using AI for details.
- NPS Survey: Quickly create a Net Promoter Score survey with a pre-filled format.
- Includes an auto-generated Title, Description, and the mandatory 0–10 scale question (“How likely are you to recommend us?”).
- You can edit scheduling, audiences, and general details (title, description, image).
- You cannot change the question type or add new sections/questions.
Step 1: Create a New Survey
- Select Push Survey from the main menu.
- Select + New push survey to create a new survey.

- Complete the Survey Information fields:
- Name (required): Enter a descriptive name to identify the survey.
- Description (optional, 300-character limit): Add a short summary or key context for the survey. This text appears in the survey email notification sent to participants.
- Cover Image (optional): Upload a JPG, JPEG, or PNG image to serve as the survey’s cover.

Step 2: Define Timing and Notifications
- Set the Survey Availability:
- Start Date & Time (required): Define when the survey will be available to employees.
- End Date & Time (required): Set the closing time for responses.
- Survey Frequency:
- Weekly: Send the survey once a week.
- Monthy: Send the survey once a month.
- Quarterly: Send the survey once every three months.
- Anually: Send the survey once every year.
- You can also select to send the survey based on the employee’s start or end date.
- Configure Notifications:
- Send Notification: Enable notifications via email and push notifications.
- Reminder Notifications: Set follow-up reminders a specific number of days before the end date to increase response rates.
- Mapal One Visibility: Display the survey prominently in the Mapal One home carousel for better visibility.
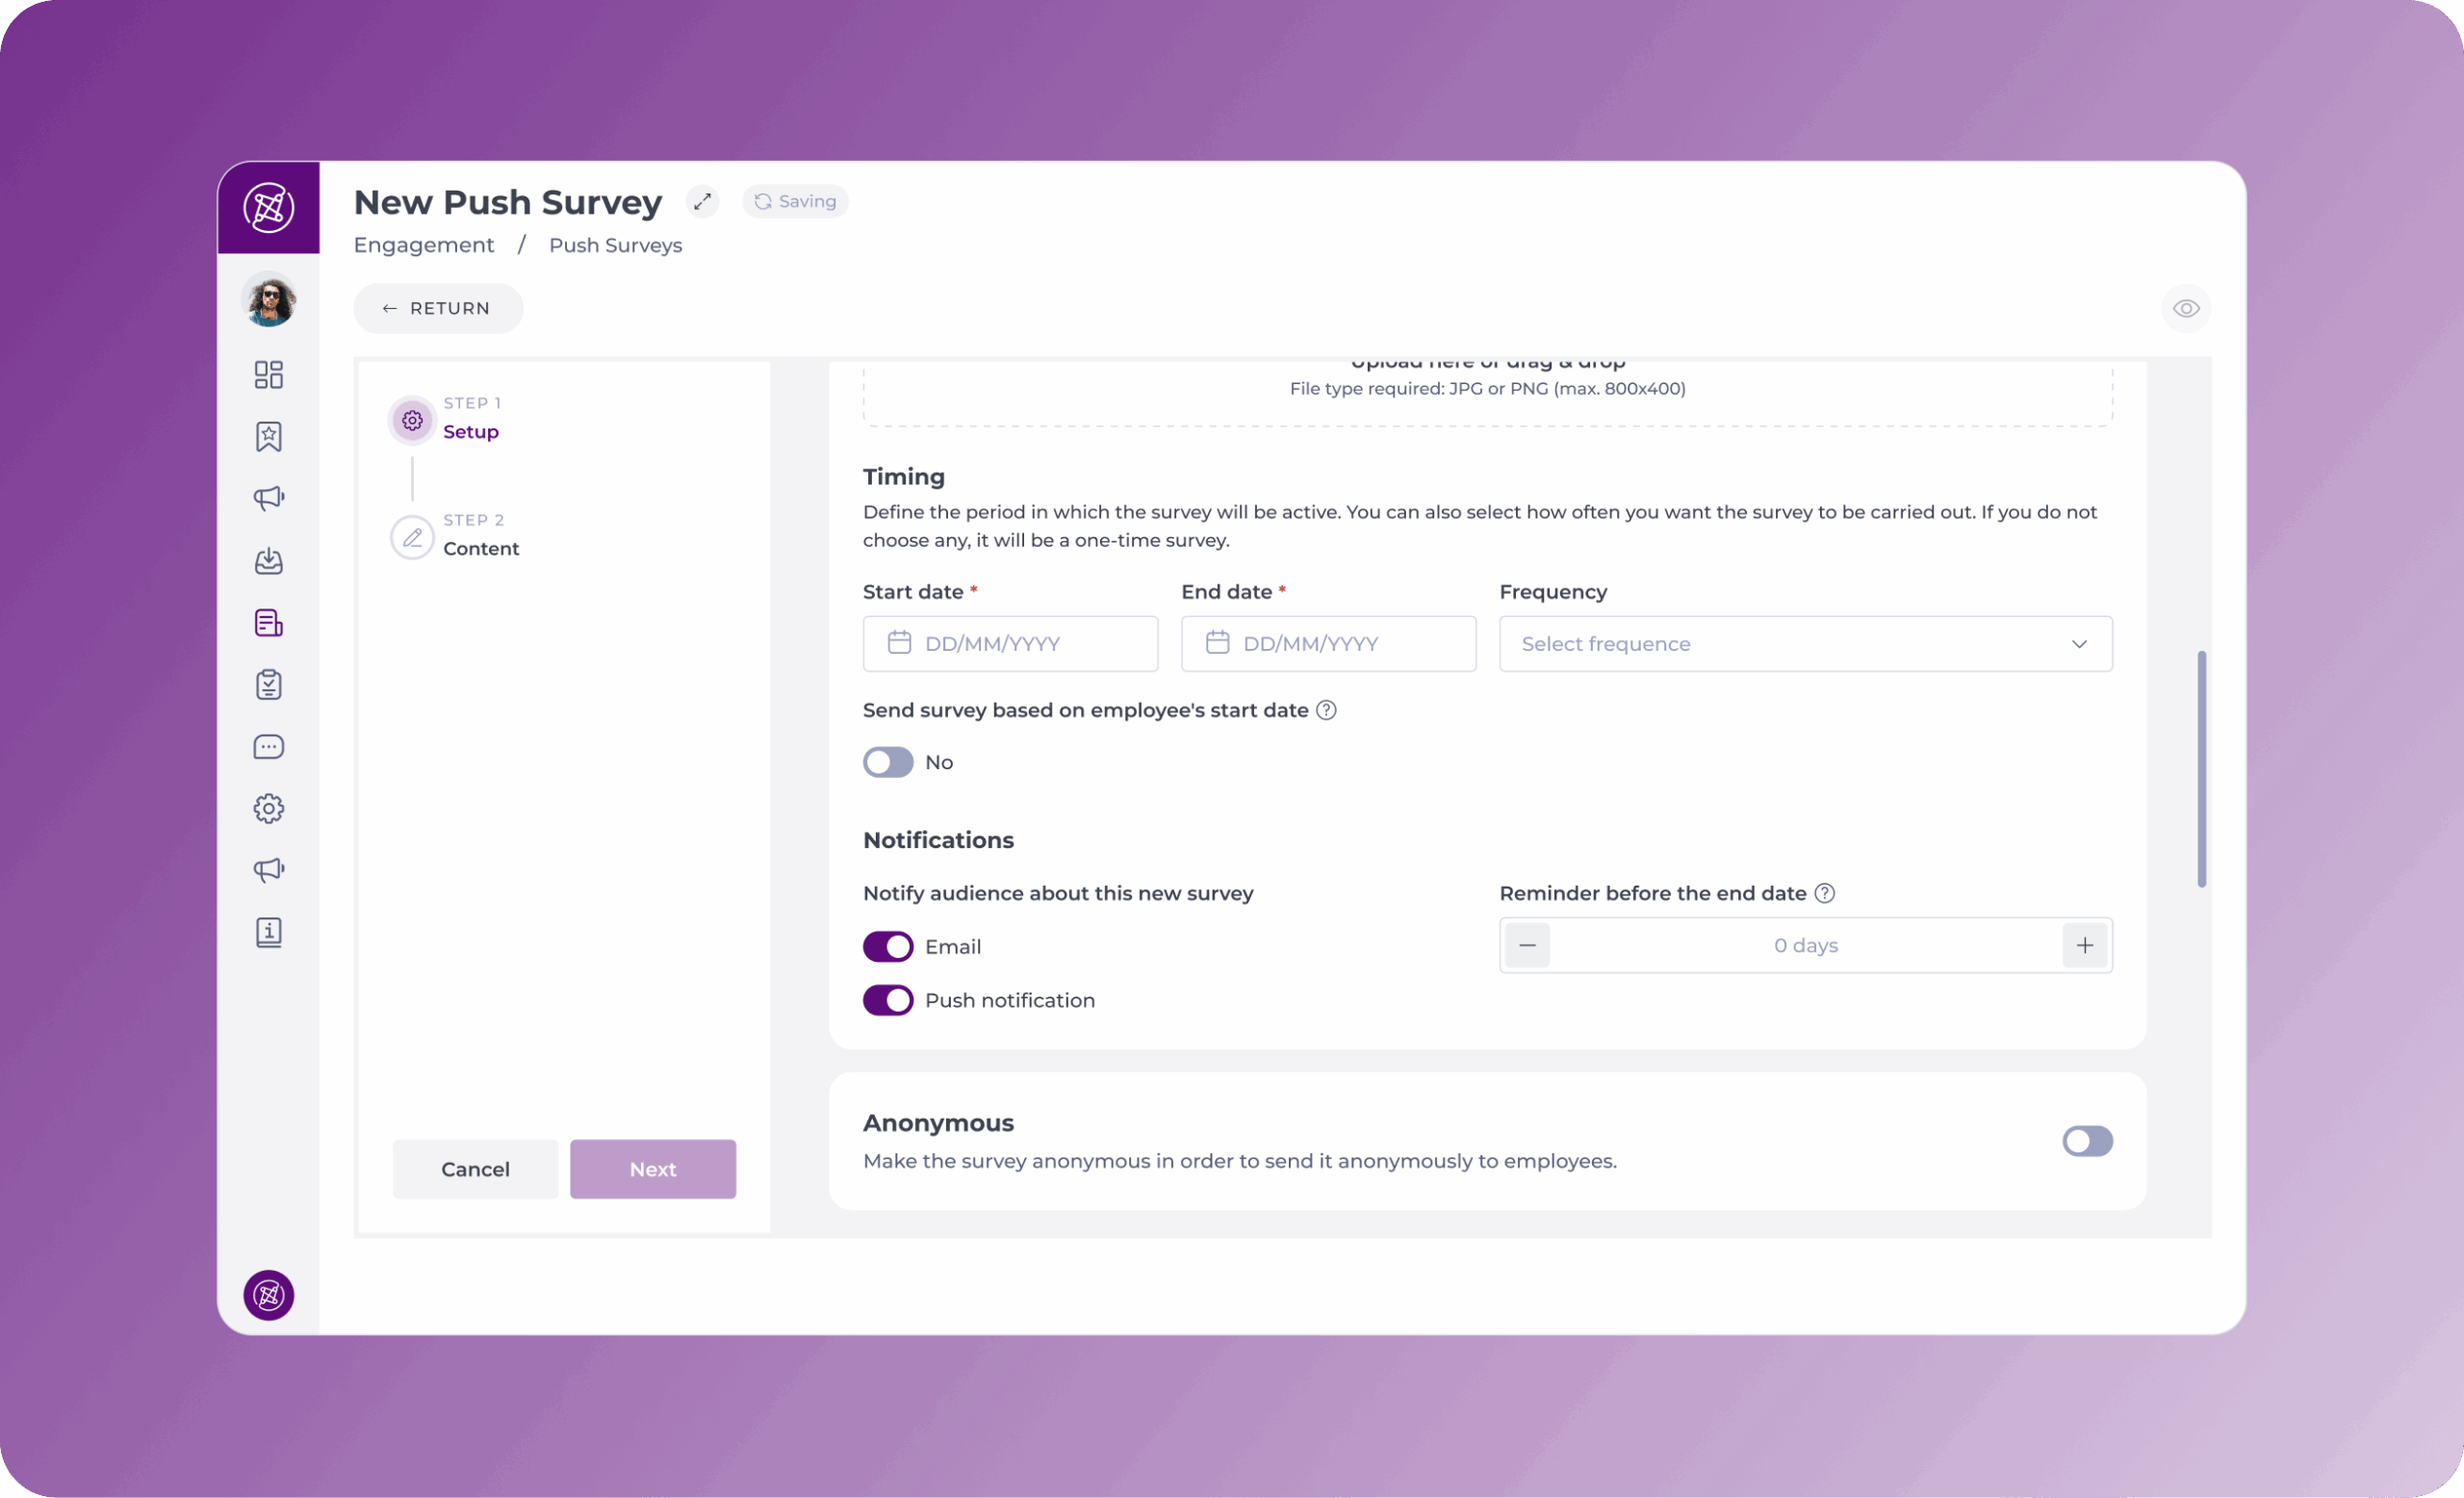
Step 3: Set Anonimity Controls
When the Anonymous toggle is enabled, you will see additional options for controlling which fields are visible in the results.
Use the Expose fields in anonymous survey results section to select which non-identifiable user data should be visible. These fields provide context without compromising anonymity.
Available options include:
- Job
- Department
- Level 3
- Level 2
- Level 1
You may enable any combination of these fields based on your reporting needs.
Note: Exposed fields are also used by Smart Analysis to produce segmented insights (e.g., showing patterns by job role or department). The AI respects your anonymity settings, only the chosen fields will be included. For more on this functionality, see Smart Analysis in Engagement.

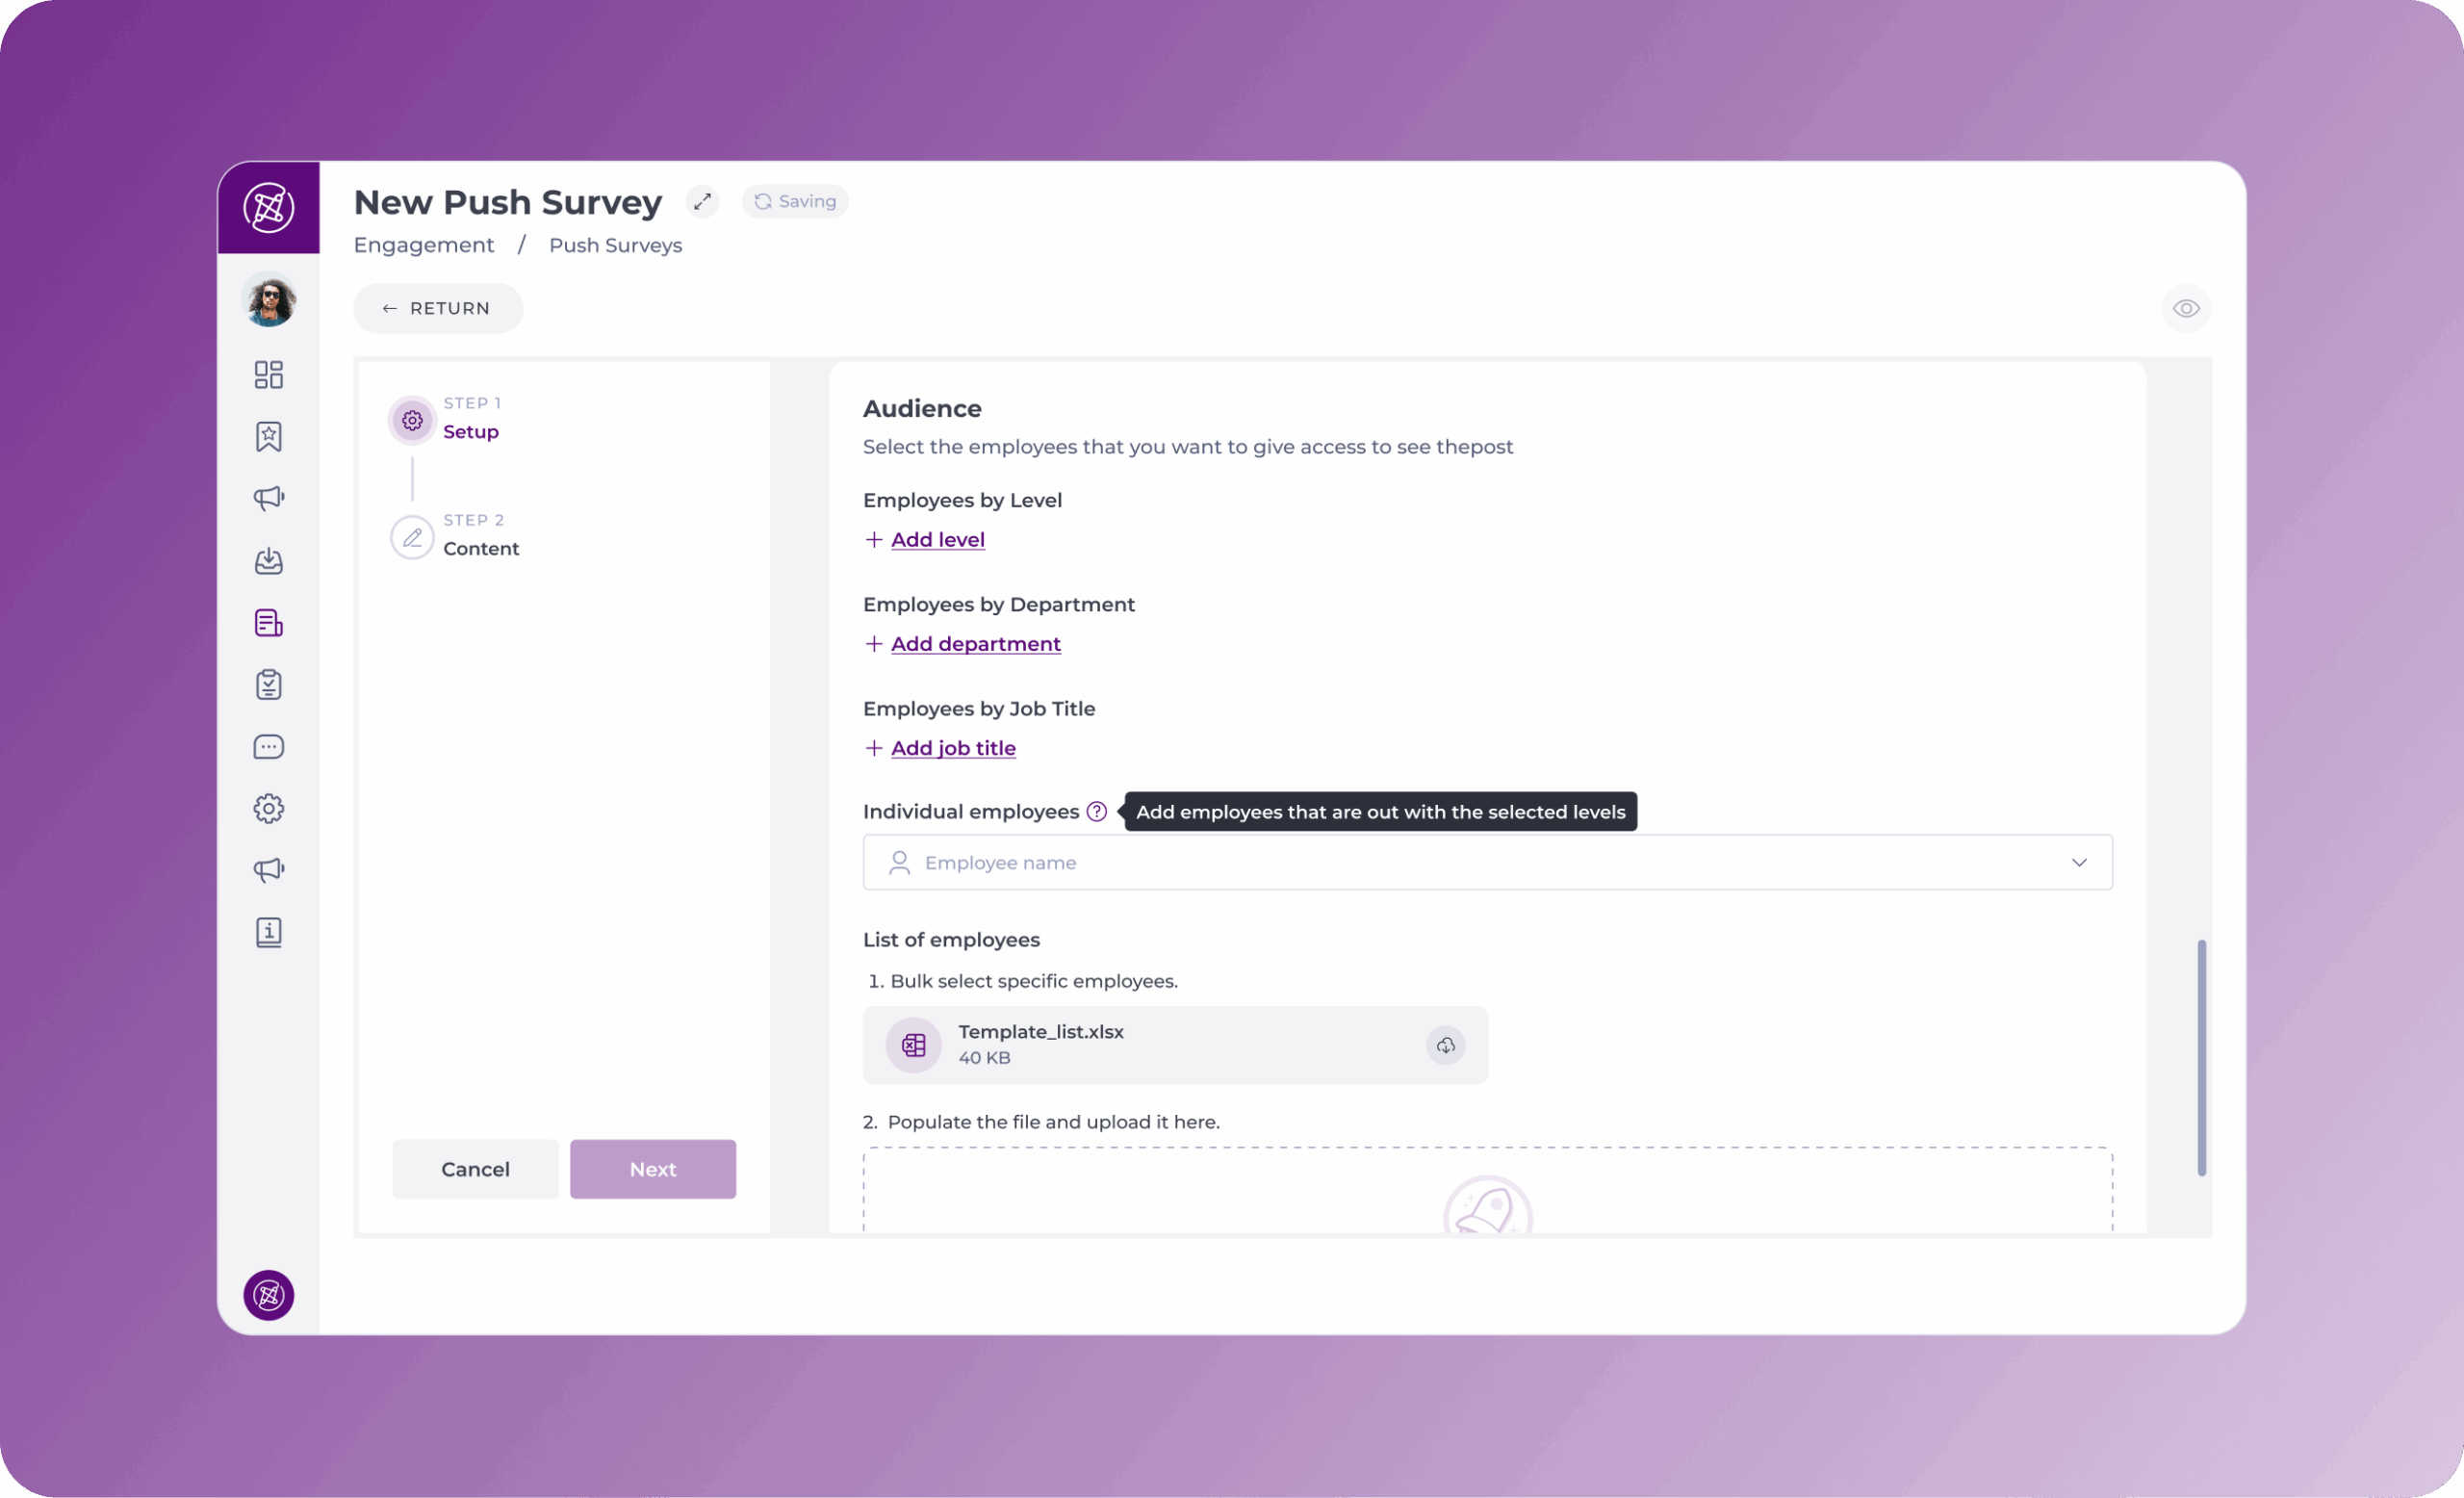
Step 4: Select the Audience
- Choose how to target employees:
- By Level (Regions)
- By Job Role (e.g., kitchen staff, waiters, cashiers).
- By Department (e.g., HR, Operations, Sales).
- Only specific employees by typing their name in the Additional employees field and selecting them from the pre-populated dropdown list.
- In Bulk:
- Click Download Template to export the user list.
- Fill in the required fields in the Excel file.
- Upload the file to bulk-add employees.
- Select Next to proceed to content creation.
Step 5: Build the Survey
You can build a push survey manually or using AI. For more information about how to use the AI-assisted creation, see Generate push surveys using AI.
Build survey manually
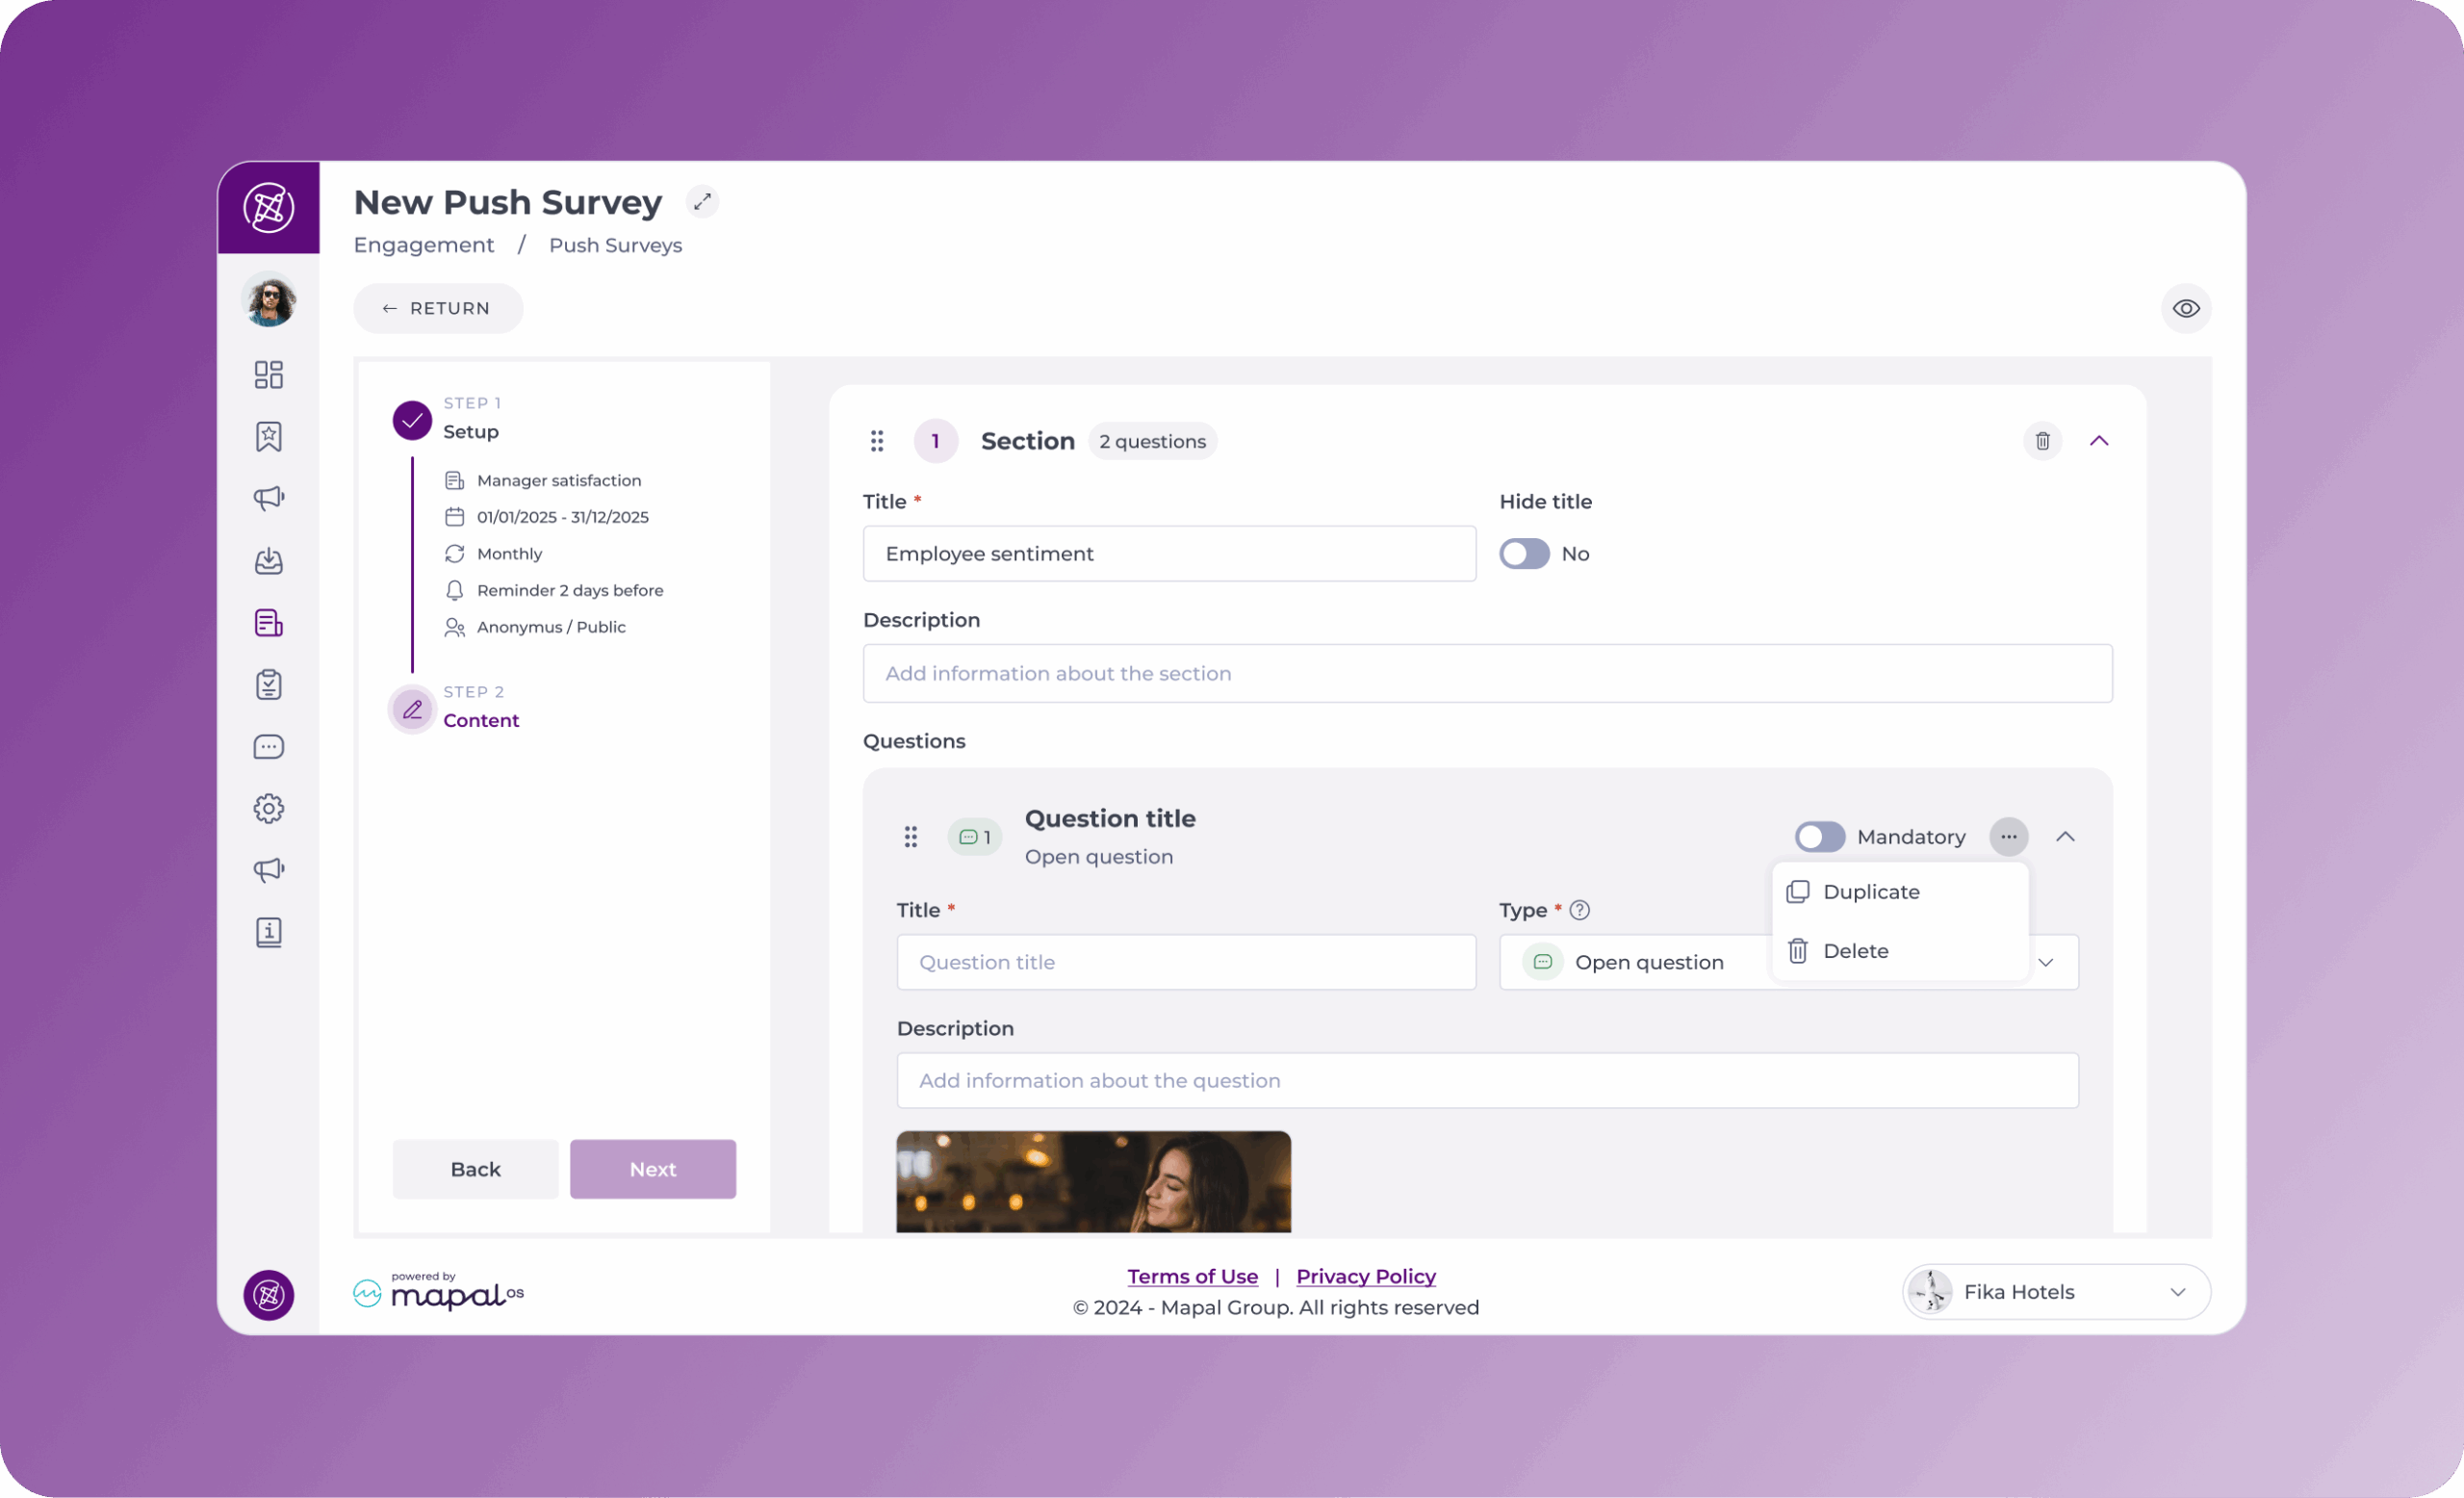
- Add Sections:
- Click New Section.
- Enter a Title (e.g., "Workplace Satisfaction").
- Add an optional Description to provide context.
- Toggle Hide Title if you prefer not to display it.
- Add Questions:
- Click New Question within a section.
- Fill in the following fields:
- Question Title (required): The main text of the question.
- Description (optional): Additional details or instructions.
- Question Type (required):
- Open question
- Satisfaction rating
- Single/multiple choice
- Net promoter score
- Attach Media (optional): Upload an image for context.
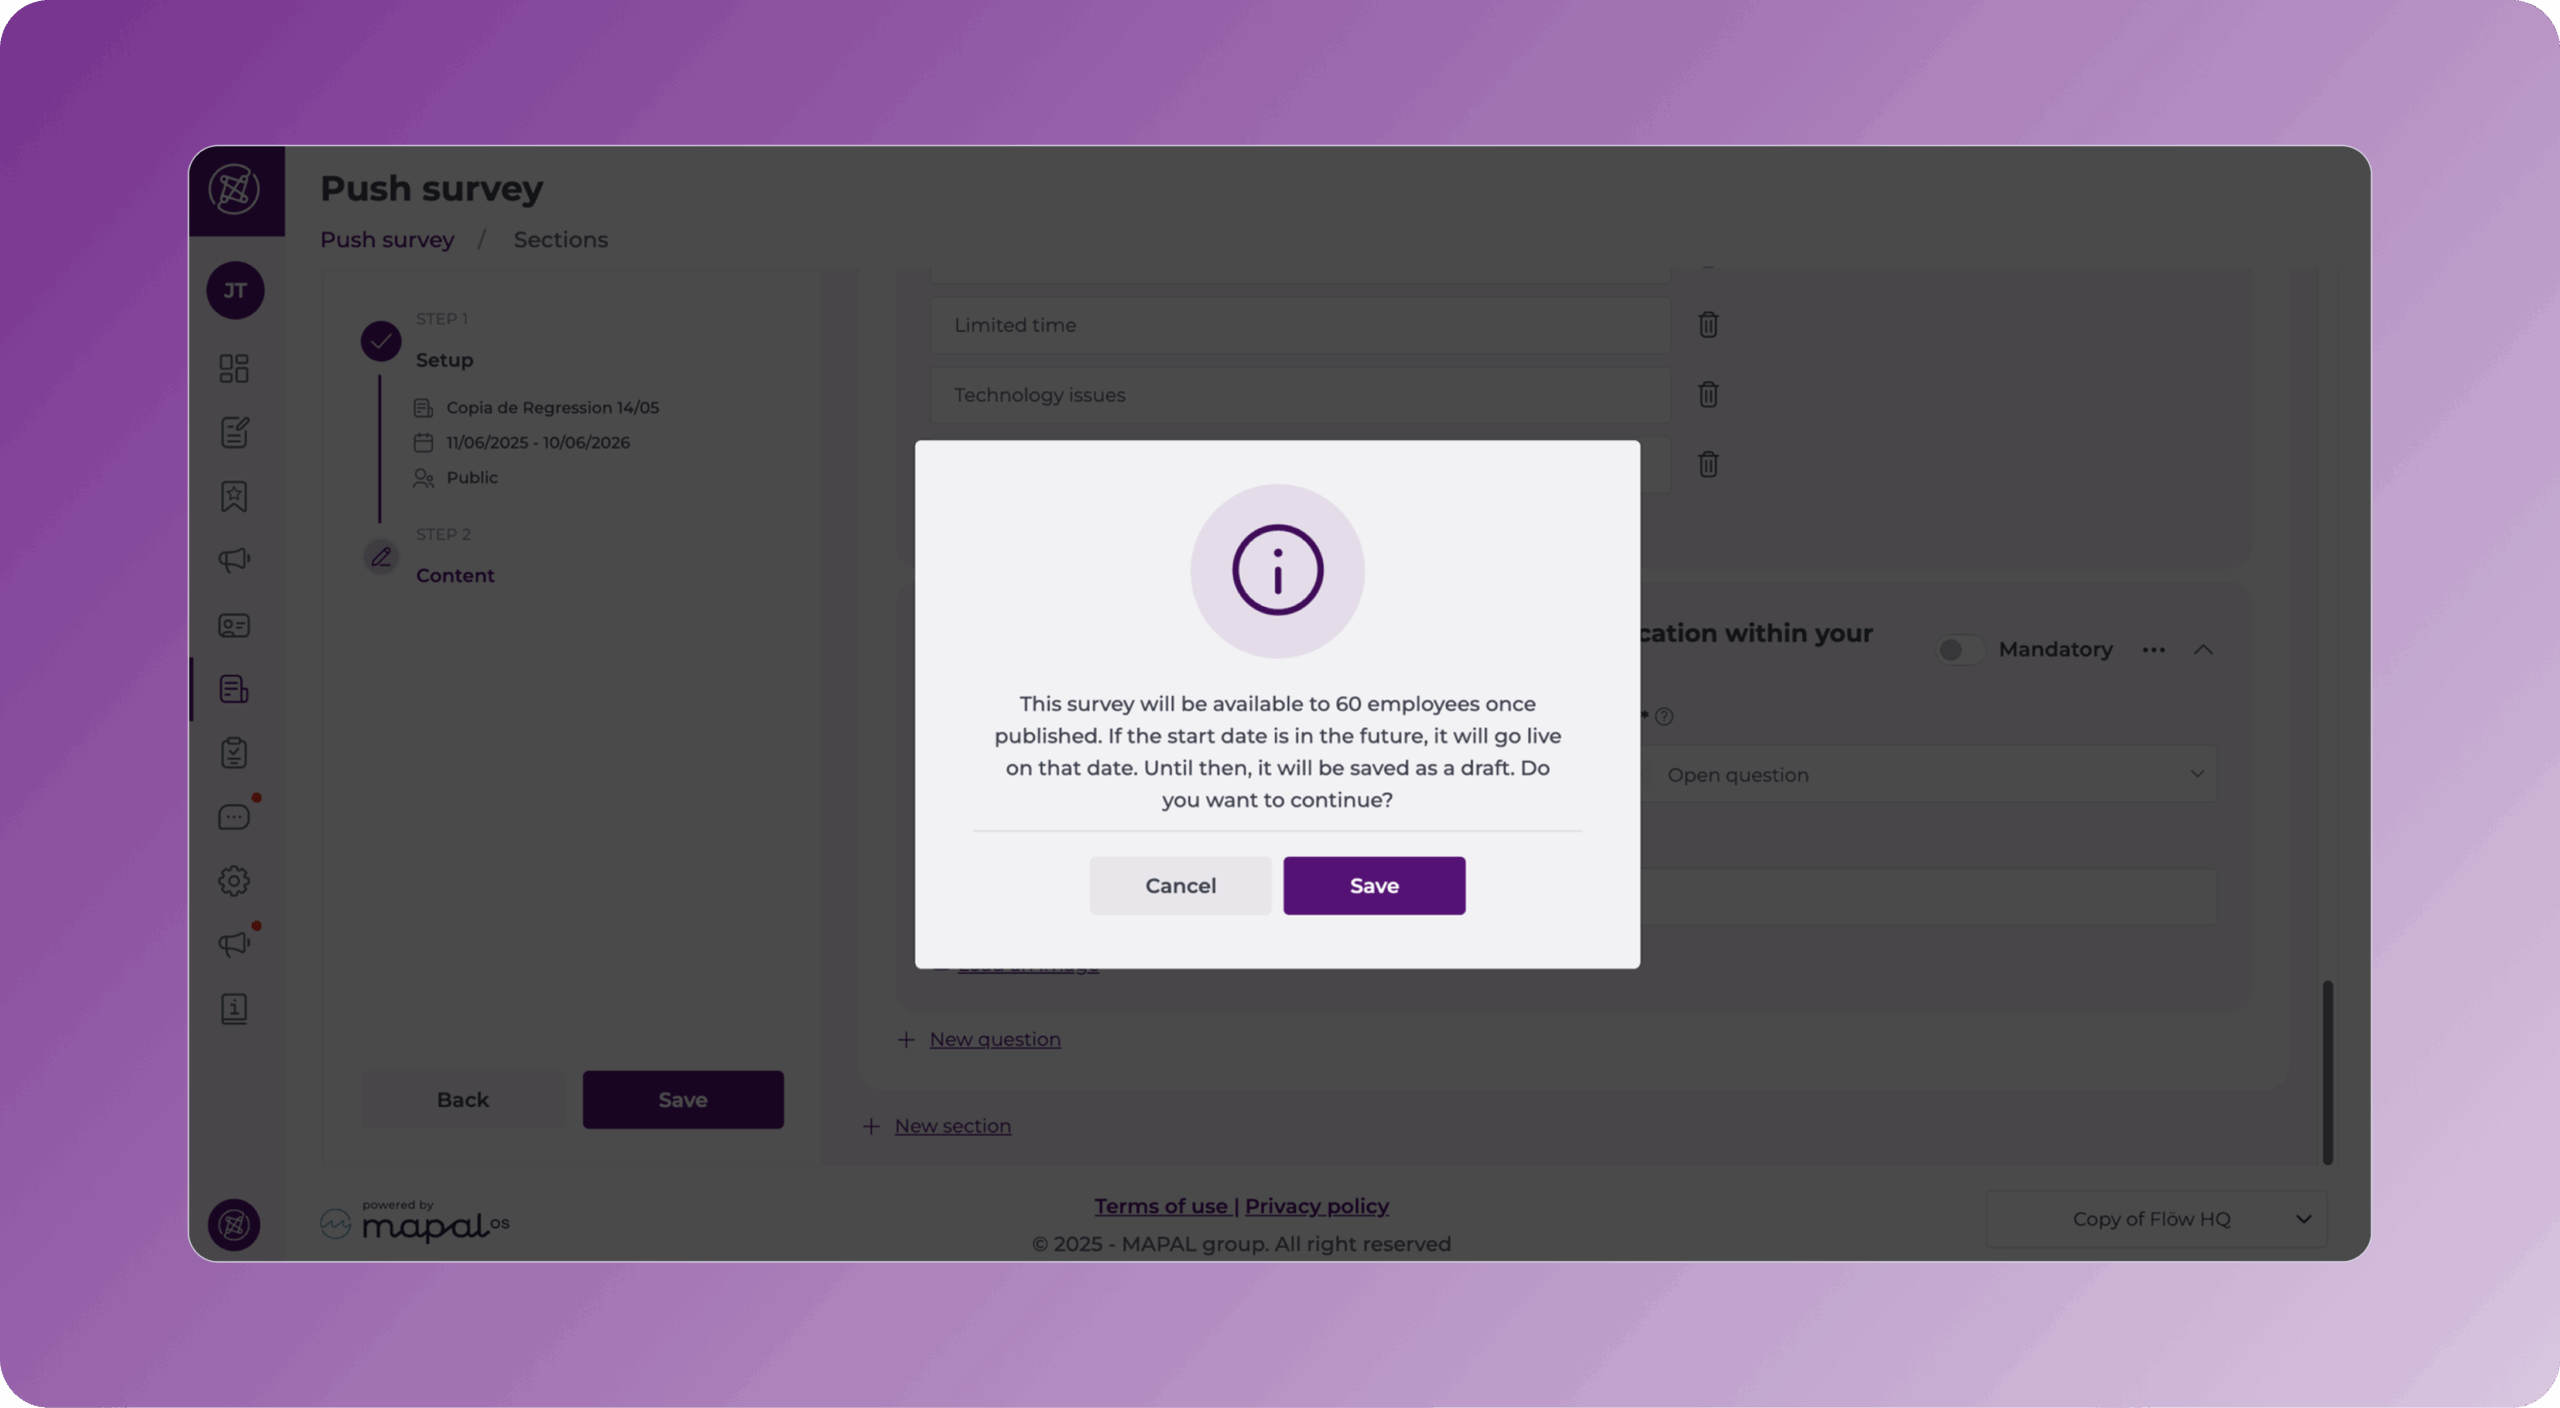
- Click Save after adding all necessary sections and questions.
- A confirmation window appears before the survey is published. This popup window shows:
- The number of targeted employees (e.g. “This survey will be available to 60 employees once published”).
- Clarification that if the start date is in the future, the survey will be saved as a draft until it goes live on the defined date.
- Select Save to confirm or Cancel to return and make changes.
Managing an Existing Survey
- Edit: this option allows you to edit any part of the survey before receiving any answers. See Edit or view a push survey for more details.
- See answers: this option allows you to have a quick view of the answers. See Edit or view a push survey for more details.
- Notify pending: this option allows you to resend notifications to users who haven’t replied. Even if the survey is anonymous, the system can identify if a user has replied or not.
- Duplicate: this option allows you to copy and paste a survey to reuse some or all of its structure or content.
- Remove: delete a survey.