


Start from: The Workforce module.
- Select Workforce Management > Absences from the main menu.
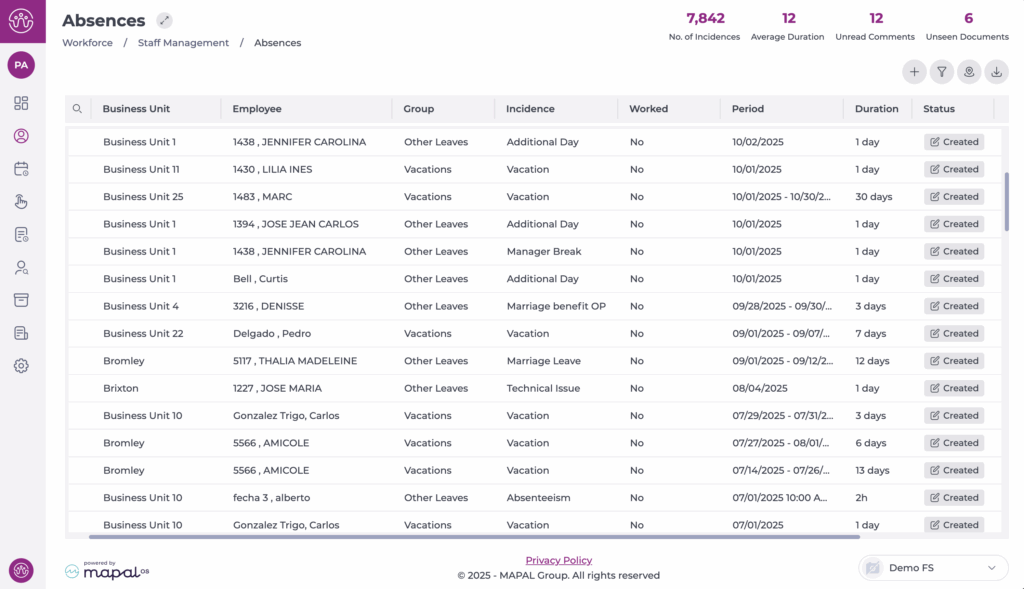
- Select the New + icon to create a new leave or absenteeism incident. A popup window with four tabs will appear: General Data, Documentation, Comments, and History.
Rules for absenteeism incidents
Some companies may have rules in place that restrict or block incident creation in certain cases. These rules are configured by administrators and may vary by site, employee seniority, or job role. When a rule prevents an action, the system will display a message (e.g., blocked days, unsupported duration, missing documentation).
Common examples of rules include:
- Document requirements: e.g., Sick Leave or Work Accident requires a medical note before the absence can be registered.
- Duration limits: e.g., Marriage Leave maximum of 15 days; Vacation minimum of 1 day.
- Blocked days: e.g., Training or Internal Meetings cannot be registered on public holidays in the site calendar.
- Seniority restrictions: e.g., Paid Leave available only to employees with at least 90 days of service.
- Incompatible consecutive incidents: e.g., Personal Leave cannot be scheduled immediately before Vacation.
- Job category restrictions: e.g., Union Days only available to representatives.
- Request limits: e.g., Justified Absence limited to three per month.
Note: Rules are inactive by default and must be enabled per client either during setup or by operational request.
General Data tab
- Select the Work Center in the dropdown menu.
- Select the specific Employee from all currently contracted workers in the selected Work Center.
- Select an Incident from all incident types in the selected Work Center.
- Select a Labour Period for the chosen Employee.

- Specify the Start and End date of the absenteeism incident. For partial absenteeism incidents when the start and end dates are the same, and partiality is marked "Yes", you’ll have to specify Start and End hours.

Note: There are additional Absenteeism Incident Characteristics switches that are only available for Its, such as Confirmed End Date, Hospitalization, Replacement, Long Duration, Renewal, and Relapse.
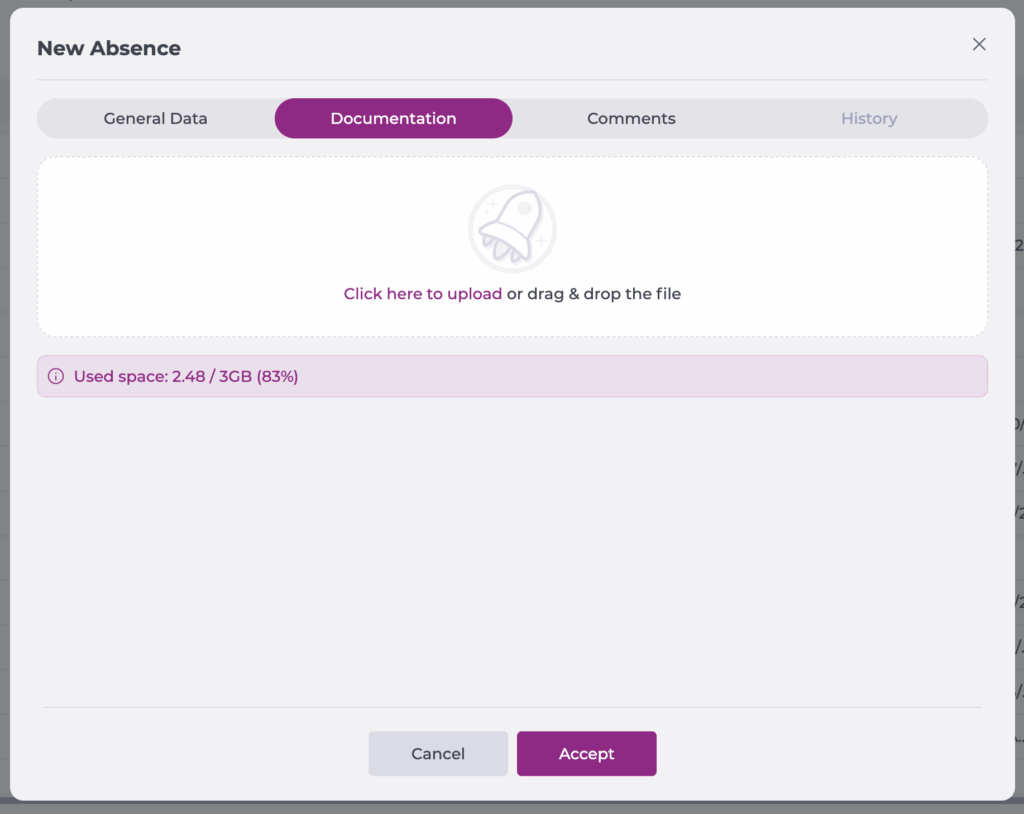
Documentation tab
Users can attach documents to absenteeism incidents by selecting a document from their computer or using the drag-and-drop functionality. Each time a document is attached to an absenteeism incident (in the creation or editing of the absenteeism incident), other users with permission to view such absences will see the document number highlighted in the grid.
Note that the uploaded document will not be saved until the user selects Accept, even if it appears to be loaded. The maximum number of documents that can be uploaded per absenteeism incident is 10.
Comments tab
When creating or editing an absenteeism incident, users can add comments. Each time a comment is added to an absenteeism incident (in creation or editing), other users accessing the absenteeism incidents screen (and having permission to view such incidents) will see the number of comments highlighted in the grid.

History tab
The History tab is for informational purposes only. In this tab, users will be able to see status changes in absenteeism incidences with the following information:
- Date & Time: the date and time when the status of the absenteeism incident was changed.
- User: the user who made the status change.
- Status: the status in which the incident is or has been.
