Note: Actions on the Easilys platform depend on your user access permissions. If you cannot perform the actions below, it may be due to restrictions on your user profile. Contact the Support team or your administrator for assistance.
Start from: The Easilys menu.
Overview
Once an interface has been set up, easilys regularly receives data from your point of sale (POS). The "POS Data History"History" view allows you to view key metrics from the received data: daily turnover, the number of receipts, and meals served. The Mapping view allows you to view the links between POS items and easilys recipes, and to modify them if necessary.
Access the POS datas screen
- Navigate to Sales > POS datas.

- The screen opens by default in the History tab.
- At the top, general counters display:
- Sales including VAT
- Turnover before tax
- Checks
- Cutlery
History Tab
This tab provides a daily breakdown of cash register data uploaded to Easilys.
- Select the History tab at the top of the page.
- Use the following features to analyze the data:
- Adjust the Date Range: Use the Calendar button to adjust date ranges. The default day is the previous day; however, you can focus on specific periods like the current week or last month.

- Filter by Sites: Use the Filter button to display data for selected sites.

- Customize Table Layout: Click Configure to organize columns.

- Manage services and their Time Slots: Add, edit, or delete time slots.

- Access Detailed Data: Click on a site’s row to view detailed cash register data for configured time slots or services.

- Export Reports: Select Reports to download the displayed data in your preferred format.
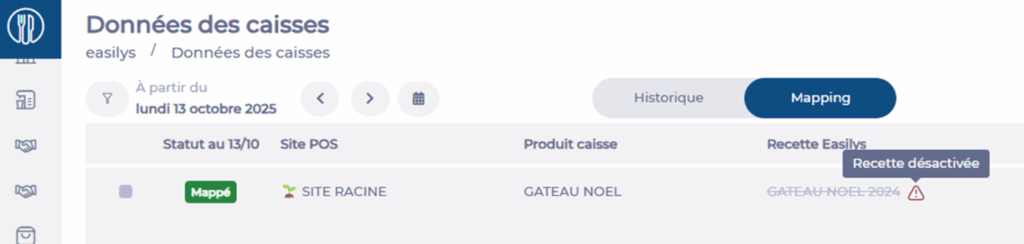
Mapping Tab
- Select the Mapping tab at the top of the page. You will see a grid with a list of products and recipes.

- Review and resolve alerts for:
- Unmapped Products: Products not linked to recipes, which prevents destocking.
- Click the action menu (three dots) next to the product and select Map.
- Choose the corresponding recipe.
- Define the mapping period or leave it indefinite by omitting the end date.
- The recipe will now appear in the product’s line.
- Unmapped Products: Products not linked to recipes, which prevents destocking.

- Empty Recipes: Products linked to incomplete recipes, which also block destocking.
- Click the action menu (three dots) next to the product and select Consult Recipe.
- Complete the recipe details and save it.
- The alert will disappear.

- You can also mark alerts as Ignored for products you choose not to map. Ignored products can be retrieved later using filters.

Notes: You can check mapping history for a product by selecting Mapping History from the action menu.
Note: If a POS product is mapped to a deactivated recipe, the recipe name will appear greyed out and crossed through, a /!\ icon will be displayed, and a tooltip will inform you when you hover over it.
Feel free to use the search filters on this screen: